3. Installation
Creating a USB flash startup disk
Windows
The creation of the ISO image will erase all existing information from the USB drive.
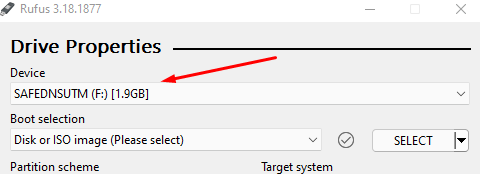
- Download Rufus software and open the downloaded file.
- Choose the designated USB flash drive in the Device:

- Select Disk or ISO image in Boot Selection.
- Click on Select and open the downloaded SafeUTM image.
- All other settings remain default.
- Click on Start.
- In the drop-down menu, select Write in DD image mode.
- A dialog window will pop up for you to confirm the USB flash drive write.
Further, follow the instructions of the installation wizard. SafeUTM installation steps are described in the Installation Process article.
Linux
In order to create a USB flash startup disk in Linux, all you need is to copy blocks of SafeUTM ISO image to your device. Below two ways to do it are described:
Using the command gnome-disks

Manually
1. Check image integrity:
$ md5sum /home/safedns/SafeUTM.iso
8c872cb6b720f6fd6683107681645156 /home/safedns/SafeUTM.iso
The size must be the same as in the account the image was downloaded from. If the number is different, the file is corrupted and needs to be downloaded again.
2. Find the USB flash disk in the system:
$ lsblk --nodeps  -o name,size,fstype,tran,model,mountpoint /dev/sd*
NAME  SIZE FSTYPE TRAN MODEL        MOUNTPOINT
sdx   7,5G        usb  USB_DISK_3.0
sdx1  7,5G vfat                     /run/media/safedns/D661-82E2
We can see there is /dev/sdx USB flash disk, as well as the file system mounted on it.
3. Unmount the file system:
sudo umount /run/media/safedns/D661-82E24. Write the image to the disk:
$ sudo dd if=/home/safedns/SafeUTM.iso of=/dev/sdx bs=1M oflag=direct status=progress5. Prepare the disk to be ejected:
$ sudo eject /dev/sdxSetting up Hypervisors
Necessary conditions for SafeUTM work:
1. UEFI support.
2. Legacy download mode must be turned off (it may also be called CSM - Compatibility Support Module).
3. Turn off Secure Boot in UEFI.
SafeUTM supports the following hypervisors:
- VMware (Workstation and ESXi) versions 6.5.0 and higher;
- Microsoft Hyper-V (2nd generation);
- VirtualBox;
- KVM;
- Citrix XenServer.
In order to work on virtual machines, there is no need to install additional drivers or utilities on SafeUTM. Guest add-ons are included in the distribution package.
General Recommendations
- OS type to create a virtual machine: Linux Fedora, 64-bit;
- Minimum hard drive capacity - 64 Gb;
- Hard drive dynamic expansion is not automated but possible upon contacting technical support;
- Minimum memory size - 8 Gb;
- An internal VM clock must be set up for keeping time in the UTC time zone.
If during the installation of SafeUTM an error "At least 8 GB of RAM is required" appears on the screen, and you specified the recommended amount of RAM, then reduce the size of the resources allocated for video memory to the minimum.
Microsoft Hyper-V
Only the 2nd generation VMs for Windows Server 2012 R2 or higher are supported. It is necessary to turn off Secure Boot.
Always use a regular virtual network adapter.
VMware ESXi
Before SafeUTM installation it is necessary to increase video memory for the virtual machine to 16 Mb (the default is 4 Mb).
Vmxnet3 virtual network adapters are recommended for use.
Citrix XenServer
In case XenServer cannot be downloaded from an ISO file, follow these steps:
- Run command
xe vm-list. This command will show the list of virtual machines on XenServer. - Select a virtual machine with UTM and memorize its UUID.
- Run command
xe vm-param-set uuid=<UUID> HVM-boot-policy=BIOS\ order HVM-boot-params:order=dc
These steps should start the installation from the installation medium.
KVM
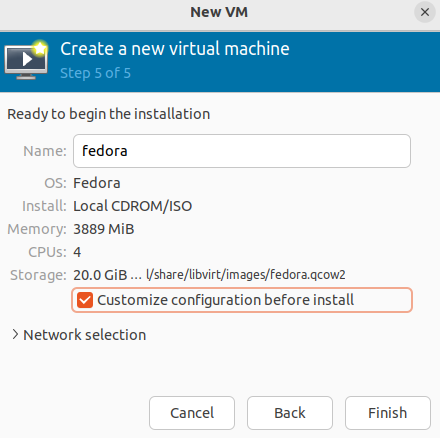
- When installing SafeUTM choose Fedora as the type of operating system.
- At Step 5 (virtm-manager) of installation make sure to tick Customize configuration before installation and click Finish.

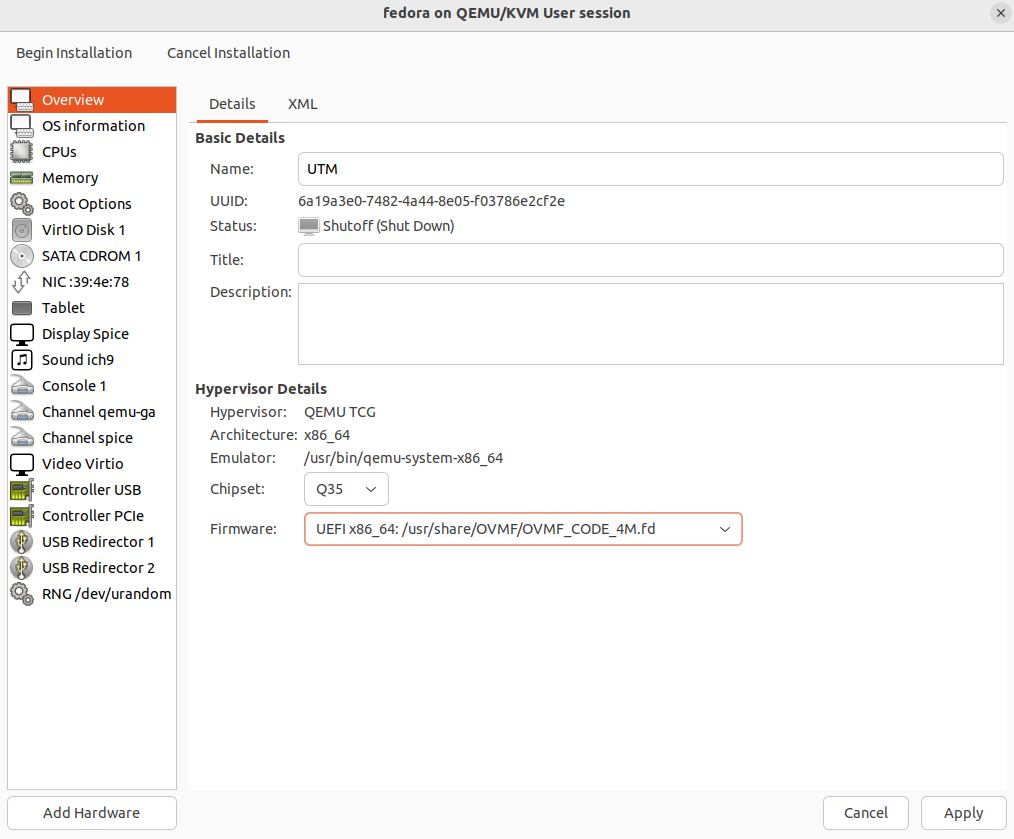
- For disks and NICs select/change the network interface to virtio.
- For disks use writeback cache mode if disks are stored in qcow2 or raw files. If it is not the case, please consult your storage admin or our technical support about the cache mode selection.
- In the window, select Overview in the Firmware field and select UEFI x86_64:/usr/share/OVMF/OVMF_CODE.fd. This selection will turn on UEFI and turn off Secure Boot.

If there is no UEFI x86_64:/usr/share/OVMF/OVMF_CODE.fd on the list, you need to install ovmf package. In Ubuntu, this package is installed with the command sudo apt install ovmf.
Installation Process
System Requirements
Mandatory conditions for work with SafeUTM:
1. UEFI support.
2. Turn off Legacy boot mode, it may be called CSM (Compatibility Support Module).
3. Turn off the Secure Boot option in UEFI.
|
Hardware |
Minimum system requirements |
Note |
|
Processor |
Intel Pentium G/i3/i5/Xeon E3/Xeon E5 with SSE 4.2 instructions support |
Requirements may differ depending on network load and services used, as well as content filtering, antiviruses, and intrusion prevention system. The system requires at least 2 cores; a 4-core processor is better. |
|
RAM |
8 Gb (16Gb if the number of users is over 75) |
Requirements may differ depending on network load and services used, as well as content filtering, antiviruses, and intrusion prevention system. |
|
Disk subsystem |
HDD or SSD, capacity 64 Gb or more, with SATA, SAS. Additional HDD or SSD when using a mail server is required. |
Software RAID controllers are not supported (those integrated into the chipset or motherboard). Using hardware RAID controllers is not recommended. |
|
Network adapters |
One network adapter |
Gigabit (or 10G) Intel network cards are recommended. |
|
Additional |
Display and keyboard |
No preinstalled OS or additional software is required to install and run SafeUTM. SafeUTM is installed to a dedicated server from an installation USB-flash, a file system is automatically created and all necessary components are installed. |
In order to choose the best hardware platform for you please follow the guidelines on equipment choice for SafeUTM. The approximate hard drive capacity to store the information of about 1000 users for 1 year is 10-15 Gb.
Browser support for server administration web interface
All up-to-date versions of Firefox, Chrome, and browsers based on Chromium are supported. Internet Explorer is not supported.
Hypervisor support
Microsoft Hyper-V (2nd generation, Windows 2012R2 or higher), VMware, VirtualBox, KVM, Citrix XenServer. More information can be found here.
Configuration examples
Examples of several types of configurations depending on the number of users can be seen in the table below.
|
Hardware |
25 |
50-200 |
200-500 |
1000 |
2000 |
|
Processor |
Intel Pentium Gold G5400 or compatible |
Intel i3 8100 or compatible |
Intel i5, i7, Xeon E3, 3 GHz and up, or compatible |
Intel Xeon E3, E5 or compatible |
Intel Xeon or compatible 8-core one |
|
RAM |
8 Gb |
8 Gb |
16 Gb |
16 Gb |
32 Gb |
|
Storage space |
64 Gb |
64 Gb |
250 Gb |
500 Gb |
500 Gb |
|
Network adapters |
2 pcs. |
2 pcs. |
2 pcs. |
2 pcs. |
2 pcs. |
Performance data:
Configuration example: Intel Xeon E-2234, 16 GB DDR4, 1 GB LAN.
- Mode L3: TCP up to 1 Gbps, UDP up to 1 Gbps, HTTP up to Gbps.
- *Mode L7: TCP up to 550 Mbps, UDP up to 900 Mbps, HTTP up to 500 Mbps.
* - Mode L7: IPS modules, content filtering, application control, and antivirus scan are on.
Installation Options
You can install SafeUTM on a dedicated server or a virtual machine. It depends on the expected load and equipment capacity.
SafeUTM installation from a USB flash drive
SafeUTM can be installed from a flash drive by using an installation ISO file. This process is described in the Creation of boot USB flash drive article.
Installation on a dedicated server
In order to install the SafeUTM security gateway you need to follow these steps:
- Prepare hardware in accordance with technical requirements.
- Prepare a USB-flash drive with a capacity of over 2 Gb.
- Receive the ISO file from your manager.
- For safety reasons check the downloaded file checksum, which you can find on the SafeUTM downloads page in your personal account.
- Create the bootable USB-flash drive using the ISO file.
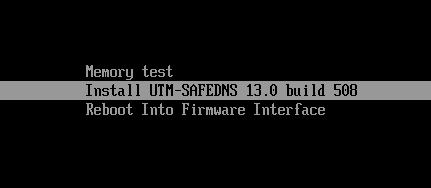
- In the computer’s BIOS settings choose "boot from USB-flash drive" and start the system installation from this USB drive. SafeUTM installer should appear on the screen as seen below.
Installation Process
Stage 1. Start of installation
Choose a disk for installation. To do this, enter the number of the disk you wish to use and press Enter.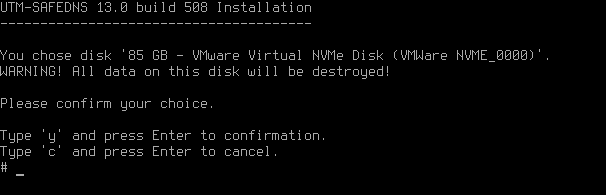
The system will warn about the loss of all data stored on the disk. We recommend that you make sure the disk does not contain any important information, as it will not be possible to recover it. The data loss alert can be seen in the screenshot below. To continue, type y and press Enter.
Now you need to select the time zone. Select the time zone you are in. To do this, type y and press Enter.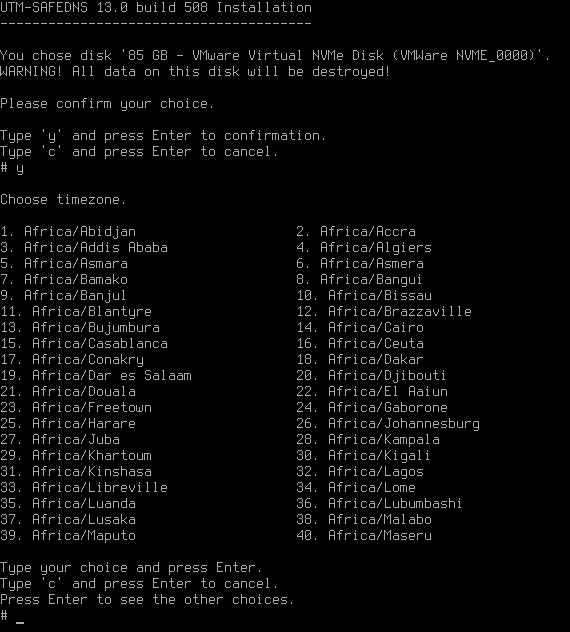
In the next dialog box, you need to set up a date and time. If the settings are correct, type y and press Enter.
If the current settings are incorrect, type n and put in the correct data, then press Enter.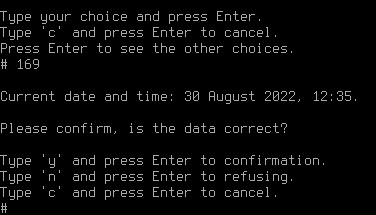
Then the system will perform disk subsystem tests necessary for installation:
- A partition table will be created and formatted.
- System files will be copied onto the disk.
- Basic system settings will be configured according to your computer configuration.
Don’t forget to eject the USB drive when restarting UTM so that the system doesn’t start booting from the installation drive.
After the server restarts, you will see a window with system info. An example of such a window can be seen below. To continue press any key.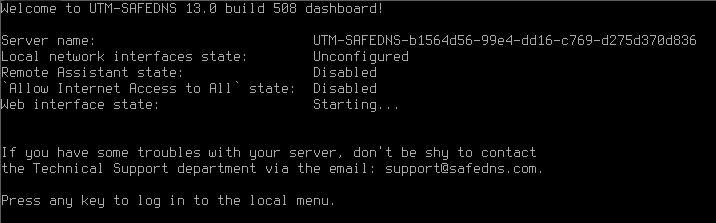
If you want to configure the server as the second node of the cluster, press y and then Enter. For more information about configuring clustering, see the High Availability article.
If the clustering setup is not required, press n and then Enter.
Stage 2. Creating admin’s account
Create an admin account. After typing in login press Enter and type in a new account password, then press Enter.
Admin password requirements:
- Minimum 10 symbols.
- Upper- and lower-case Latin letters.
- At least one digit
- Special characters (! # $ % & ' * + etc.)
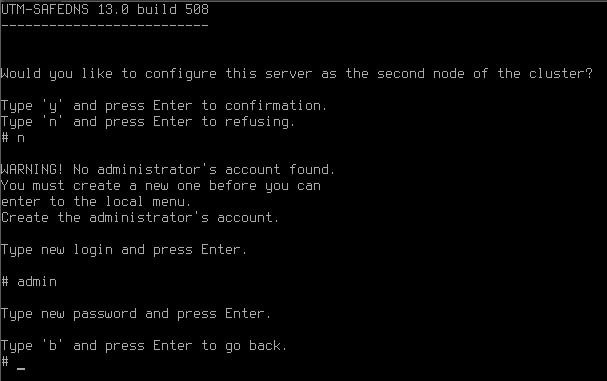
If the password does not pass the security policy requirements, a notification about password unreliability will appear. You need to type in another password taking into consideration password requirements and press Enter.
When the account has been created, press any key to switch to the local menu and type in data from the newly created admin’s account.
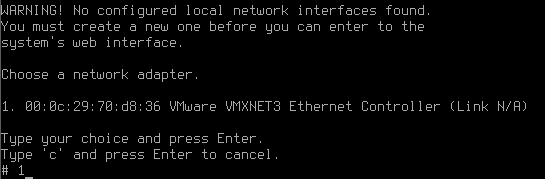
Stage 3. Network adapter setup
Now the system will suggest that you set up a local network interface. It is the interface to which all your enterprise network will be connected. Type in the network adapter number from the list and press Enter.
During local interface definition, you may encounter difficulties with NIC identification. Sometimes several adapters may have the same manufacturer. In such a case in order to avoid a mistake, you need to identify the device by its MAC address. Do not worry about making a mistake, you can change these settings later.
Type in the local IP address subnet mask as ip/mask and press Enter.
Next, if necessary, create a VLAN tag or leave the field empty and press Enter.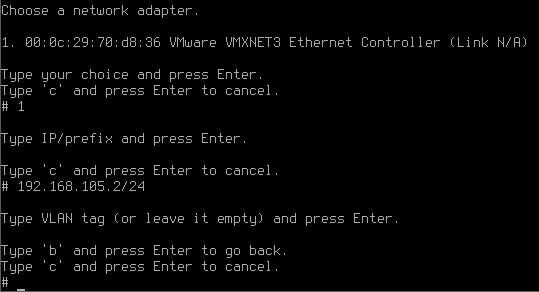
After creating a local interface, the server administration menu will open.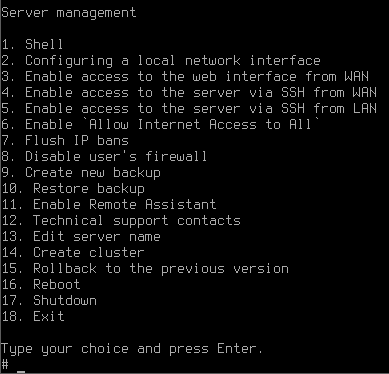
The next step is SafeUTM configuration. This process is described in the Initial configuration article.
Initial Configuration
Connection to SafeUTM Web Interface
If you haven’t installed SafeUTM yet, please see the Installation Process article.
After you have successfully installed SafeUTM you can start its initial configuration.
Start an internet browser on any local network computer, for example, Mozilla Firefox or Google Chrome (Internet Explorer is not supported). In the address bar type in the local IP address indicated in the settings during the local network interface installation and port 8443 used by the web interface in the format:
IP-address:port
Example: 192.168.100.2:8443
As encryption is used during connection to the web interface, the internet browser may display an error saying the security certificate was not issued by a trusted certificate authority. In such a case you need to continue to the website by clicking on the corresponding button at the bottom of the window.
Error example in Google Chrome: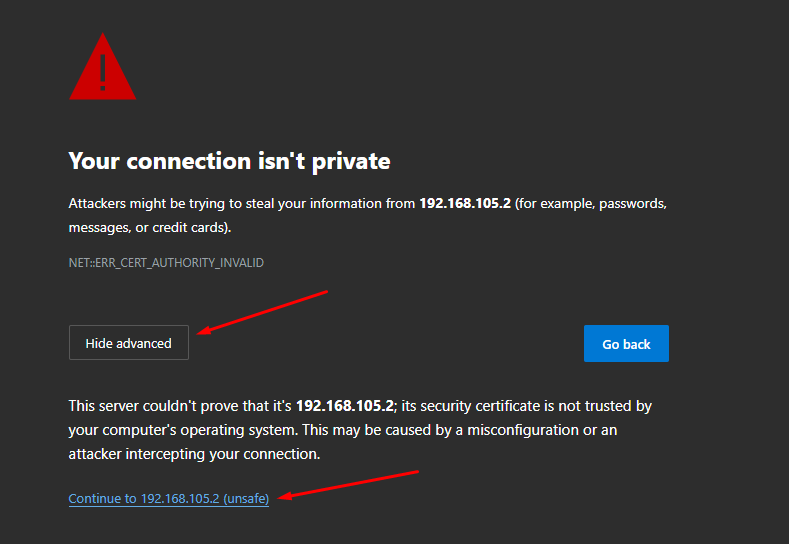
When you continued to the website using the IP address, a SafeUTM web interface authorization window will open. Type in the admin account login and password information you used during SafeUTM installation.
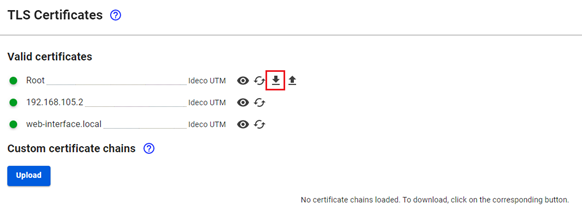
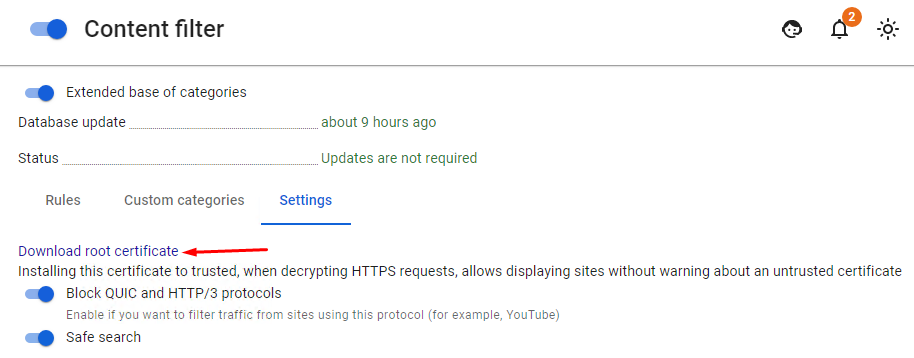
In order to avoid the error in the future, import the UTM root certificate into the browser.
There are two ways to download the certificate:
- Go to Services -> TLS Certificates, and click on the Download root certificate icon:

- Go to Traffic rules -> Content filter -> Settings:

After you first log in, you will see a few notifications that will advise you that in order to work correctly SafeUTM needs to set up a connection to the provider and register a server.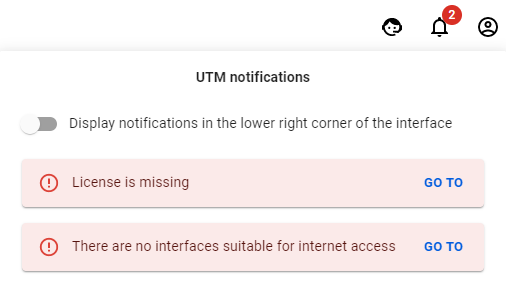
Setting up a Connection to the Internet Provider
In order to set up a connection to the provider go to Services -> Network Interfaces.
Ethernet connection setup
This type of connection requires setting up the parameters described in the table below.
|
Parameter |
Note |
|
Network card |
It is necessary to identify the network adaptor that will be used to connect to the internet provider. To identify the adaptor, you can use either the manufacturer’s name or MAC address. |
|
IP-address and mask |
The network credentials are assigned by the provider. Specify the IP address and netmask as CIDR or a four-octet number. |
|
Default gateway |
Specify the internet provider’s IP address that will be used to connect to the internet. |
If your provider supports auto-configuration of an external network interface using DHCP protocol, tick Automatic Configuration via DHCP.
In order to set up an Ethernet connection follow these steps:
1. Click on "+ Add" in the upper left corner and select External Ethernet.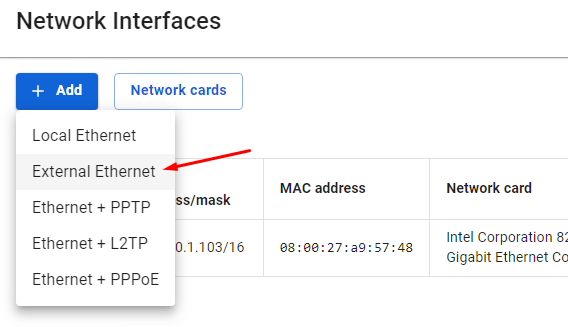
Attention!
If you select Local Ethernet and set it up as External Ethernet, internet access will not be possible.
2. Choose the applicable Network card.
3. Fill out the following mandatory fields:
- Title
- IP-address/mask
- Gateway (or tick the Automatic configuration via DHCP);

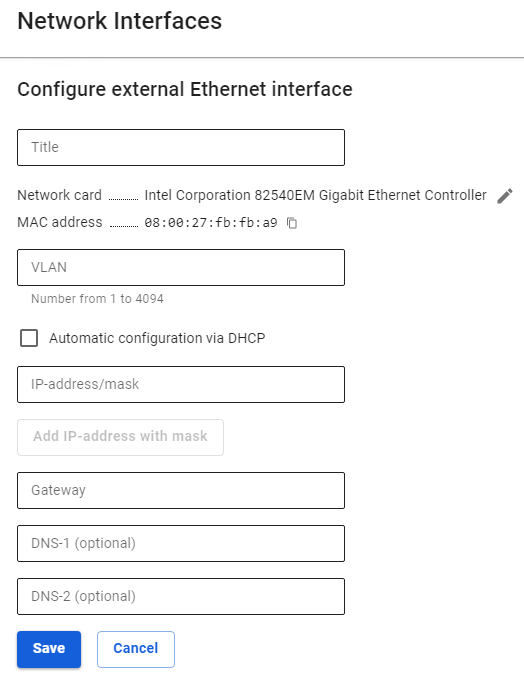
4. Check that all the data are correct and click Save.
Setting up other types of connection
If your provider uses another type of connection, you can see other setup manuals following the links below:
- PPPoE connection
- PPTP connection
- L2TP connection
- Local Ethernet connection
- 3G and 4G connection
- Simultaneous connection to several providers
After connecting to the internet, it is necessary to register a server.