**Mandatory conditions for work with SafeUTM:** 1. UEFI support. 2. Turn off Legacy boot mode, it may be called CSM (Compatibility Support Module). 3. Turn off the Secure Boot option in UEFI.
| **Hardware** | **Minimum system requirements** | **Note** |
| Processor | Intel Pentium G/i3/i5/Xeon E3/Xeon E5 with SSE 4.2 instructions support | Requirements may differ depending on network load and services used, as well as content filtering, antiviruses, and intrusion prevention system. The system requires at least 2 cores; a 4-core processor is better. |
| RAM | 8 Gb (16Gb if the number of users is over 75) | Requirements may differ depending on network load and services used, as well as content filtering, antiviruses, and intrusion prevention system. |
| Disk subsystem | HDD or SSD, capacity 64 Gb or more, with SATA, SAS. Additional HDD or SSD when using a mail server is required. | Software RAID controllers are not supported (those integrated into the chipset or motherboard). Using hardware RAID controllers is not recommended. |
| Network adapters | One network adapter | Gigabit (or 10G) Intel network cards are recommended. |
| Additional | Display and keyboard | No preinstalled OS or additional software is required to install and run SafeUTM. SafeUTM is installed to a dedicated server from an installation USB-flash, a file system is automatically created and all necessary components are installed. |
In order to choose the best hardware platform for you please follow the [**guidelines**](https://docs.safedns.com/books/6-instructions-and-troubleshooting/page/choosing-hardware-platform-for-safeutm) on equipment choice for SafeUTM. The approximate hard drive capacity to store the information of about 1000 users for 1 year is 10-15 Gb.
##### Browser support for server administration web interface All up-to-date versions of Firefox, Chrome, and browsers based on Chromium are supported. Internet Explorer is not supported. ##### Hypervisor support Microsoft Hyper-V (2nd generation, Windows 2012R2 or higher), VMware, VirtualBox, KVM, Citrix XenServer. More information can be found [**here**](https://docs.safedns.com/books/3-installation/page/setting-up-hypervisors). ##### Configuration examples Examples of several types of configurations depending on the number of users can be seen in the table below.| Hardware | 25 | 50-200 | 200-500 | 1000 | 2000 |
| Processor | Intel Pentium Gold G5400 or compatible | Intel i3 8100 or compatible | Intel i5, i7, Xeon E3, 3 GHz and up, or compatible | Intel Xeon E3, E5 or compatible | Intel Xeon or compatible 8-core one |
| RAM | 8 Gb | 8 Gb | 16 Gb | 16 Gb | 32 Gb |
| Storage space | 64 Gb | 64 Gb | 250 Gb | 500 Gb | 500 Gb |
| Network adapters | 2 pcs. | 2 pcs. | 2 pcs. | 2 pcs. | 2 pcs. |
Don’t forget to eject the USB drive when restarting UTM so that the system doesn’t start booting from the installation drive.
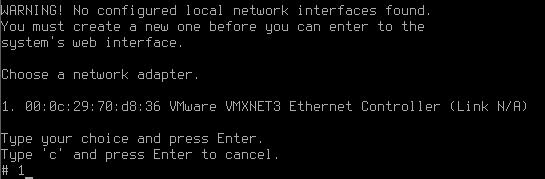
After the server restarts, you will see a window with system info. An example of such a window can be seen below. To continue press any key. [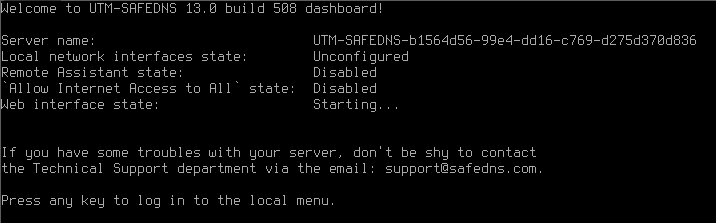](https://docs.safedns.com/uploads/images/gallery/2022-08/Hffo93zoAYIoTQqx-5-installation-process.png) If you want to configure the server as the second node of the cluster, press **y** and then **Enter**. For more information about configuring clustering, see the **[High Availability](https://docs.safedns.com/books/47-setup-server-management/page/high-availability)** article. If the clustering setup is not required, press **n** and then **Enter**. ##### Stage 2. Creating admin’s account Create an admin account. After typing in login press **Enter** and type in a new account password, then press **Enter**. Admin password requirements: - Minimum 10 symbols. - Upper- and lower-case Latin letters. - At least one digit - Special characters (! # $ % & ' \* + etc.) [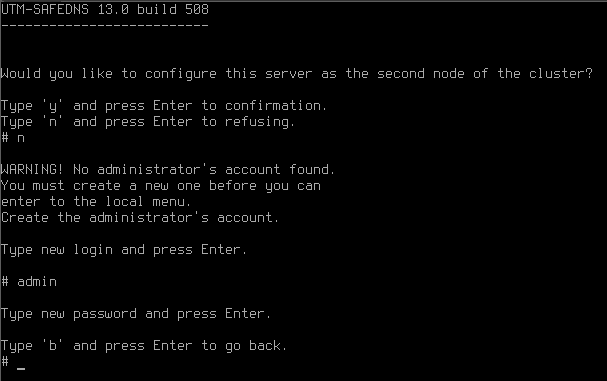](https://docs.safedns.com/uploads/images/gallery/2022-08/HQAydRsiUNzdA8dS-6-installation-process.png) **If the password does not pass the security policy requirements, a notification about password unreliability will appear.** You need to type in another password taking into consideration password requirements and press **Enter**. [](https://docs.safedns.com/uploads/images/gallery/2022-08/W1kurtEBjngLPgF9-7-installation-process.png) When the account has been created, press any key to switch to the local menu and type in data from the newly created admin’s account. [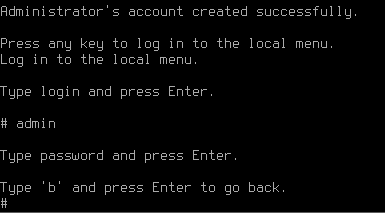](https://docs.safedns.com/uploads/images/gallery/2022-08/WwxY9hRzwLV00Nys-8-installation-process.png) ##### Stage 3. Network adapter setup Now the system will suggest that you set up a local network interface. It is the interface to which all your enterprise network will be connected. Type in the network adapter number from the list and press **Enter**.During local interface definition, you may encounter difficulties with NIC identification. Sometimes several adapters may have the same manufacturer. In such a case in order to avoid a mistake, you need to identify the device by its MAC address. Do not worry about making a mistake, you can change these settings later.
[](https://docs.safedns.com/uploads/images/gallery/2022-08/yGdM3aA29Sao6OUm-9-installation-process.png) Type in the local IP address subnet mask as `ip/mask` and press **Enter**. Next, if necessary, create a VLAN tag or leave the field empty and press **Enter**. [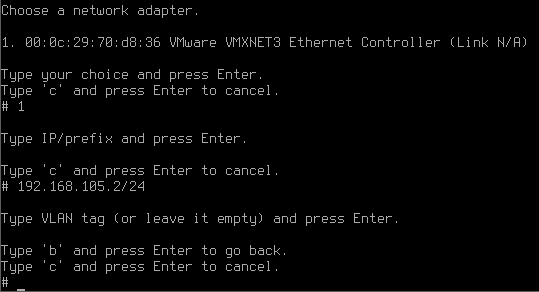](https://docs.safedns.com/uploads/images/gallery/2022-08/dLCbZzHh3VJES6ja-10-installation-process.png) After creating a local interface, the server administration menu will open. [](https://docs.safedns.com/uploads/images/gallery/2022-08/n97fm35825SkQpq5-11-installation-process.png)