Integration with Active Directory
- Integration with Active Directory
- Active Directory User Authorization
- Entering Server into Domain
- Automatic Authorization and De-authorization Scripts
- Import of Users
Integration with Active Directory
SafeUTM provides the possibility of one-way synchronization with a domain based on Microsoft Active Directory.
Only accounts are imported, excluding passwords. When the user undergoes the authorization procedure, verification is carried out by means of Active Directory.
Integration with Windows Server 2008 (only R2), 2012, 2016, and 2019 is supported.
Features of Using Integration with Multiple Active Directory Domains
When integrating SafeUTM with multiple domains, the following limitations apply:
- From the Active Directory domain tree, only the data of the domain controller to which SafeUTM is connected is imported into SafeUTM.
- With Single Sign-On authorization, when the browser is opened for the first time, the user will be offered a choice of domains for authorization. The selection will be saved using a cookie and will be used at the next authorization. If you want to change the domain, delete the cookie (for the local SafeUTM IP address).
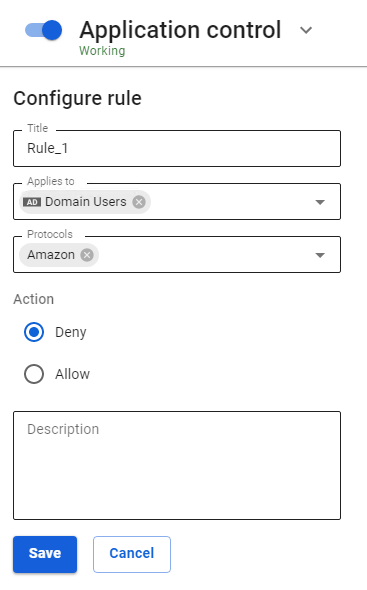
Using Security Groups and Accounts Imported from LDAP as Filter Rule Objects
Security groups and accounts imported from Active Directory can be used as filter rule objects in the following sections:
Usage example:
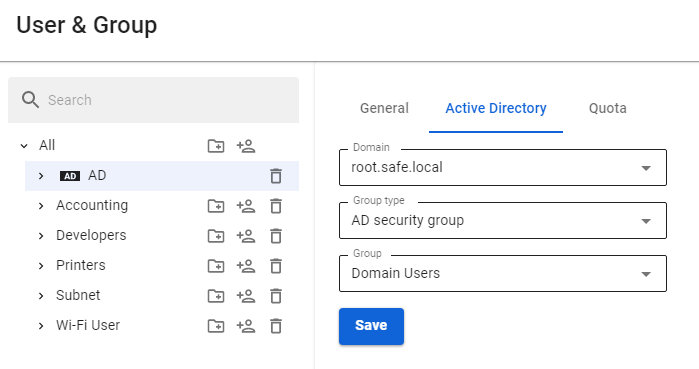
- Import accounts and/or security groups from Active Directory in the Users -> User & Group section (for more details, see Import of Users). This example imports the AD security group Domain Users:

- Go to the section where you want to use a group or account imported from Active Directory. For example, in Application Control:

- Fill in the required fields and click Save.
Active Directory User Authorization
Import accounts from Active Directory, see Import of Users for details.
Setting up user authorization
For users imported from Active Directory, all types of user authorization are available. The most commonly used user authorization options are Single Sign-On authentication via Active Directory using Kerberos/NTLM for authorization via a web browser and authorization via the Active Directory security log (simultaneous use of both types of authorization is recommended).
Setting up SafeUTM
To enable Single Sign-On Authentication and Authorization through the Active Directory Security Log, go to the Users -> Authorization -> General tab and enable these authorization types. Next, click the Save button.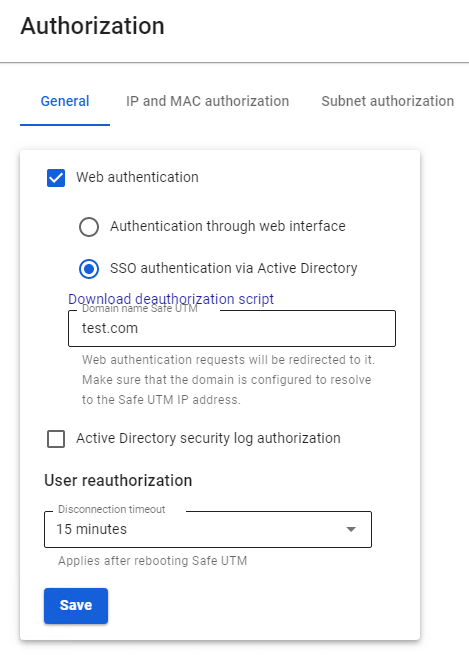
After filling in the Domain name field and saving the settings, a Let’s Encrypt certificate will be issued and the user will be redirected to the authorization window, bypassing the security exception page.
If a certificate for such a domain has already been loaded in the TLS Certificates section, then it will be used and a new certificate will not be issued.
Configuring user computers and domain policies
Authorization via Active Directory security log
Supported starting with the 2008 standard edition domain controller.
- In the Windows firewall settings on all domain controllers (or domains), allow Remote Event Log Management (RPC)

- Add SafeUTM to the Event Log Readers security group.
- After configuring access to the log, it is necessary to restart the Active Directory security log authorization service on SafeUTM, to do this, disable this setting and re-enable it.
- If you changed the security policies of domain controllers compared to the standard ones, then you need to enable logging-in security policies by activating the following setting: Default Domain Controllers Policy -> Computer Configuration->Policies->Windows Settings->Security Settings-> Advanced Audit Policy Configuration - > Audit Policies -> Logon/Logoff -> Audit Logon -> Success.
- The following settings must also be enabled: Default Domain Controllers Policy -> Computer Configuration->Policies->Windows Settings->Security Settings-> Advanced Audit Policy Configuration -> Audit Policies -> Account logon -> "Audit Kerberos Authentication Service" and "Audit Kerberos Service Ticket Operations" -> Success.
- To update domain controller policies, run the
gpupdate /force command - If user authorization does not occur during login, you need to check the security log for events 4768, 4769, and 4624.

Web Authorization (SSO or NTLM)
In order to configure authorization through a web browser, you must perform the following steps:
- Go to your browser's properties and go to the Security tab.
- Select Local Intranet -> Sites -> Advanced.
- In the window that opens, add a link to SafeUTM under the name under which you entered it into the domain. You need to specify two URLs: with
http://and withhttps://
In the screenshot below, SafeUTM is entered into the example.com domain under the name safeics.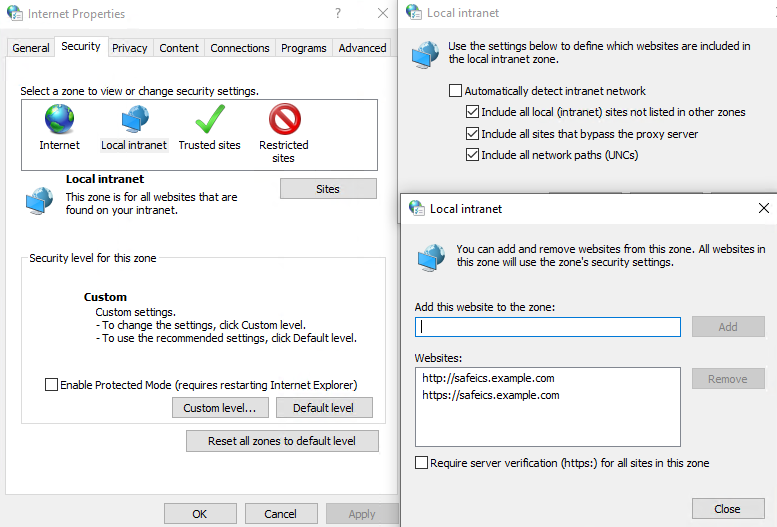
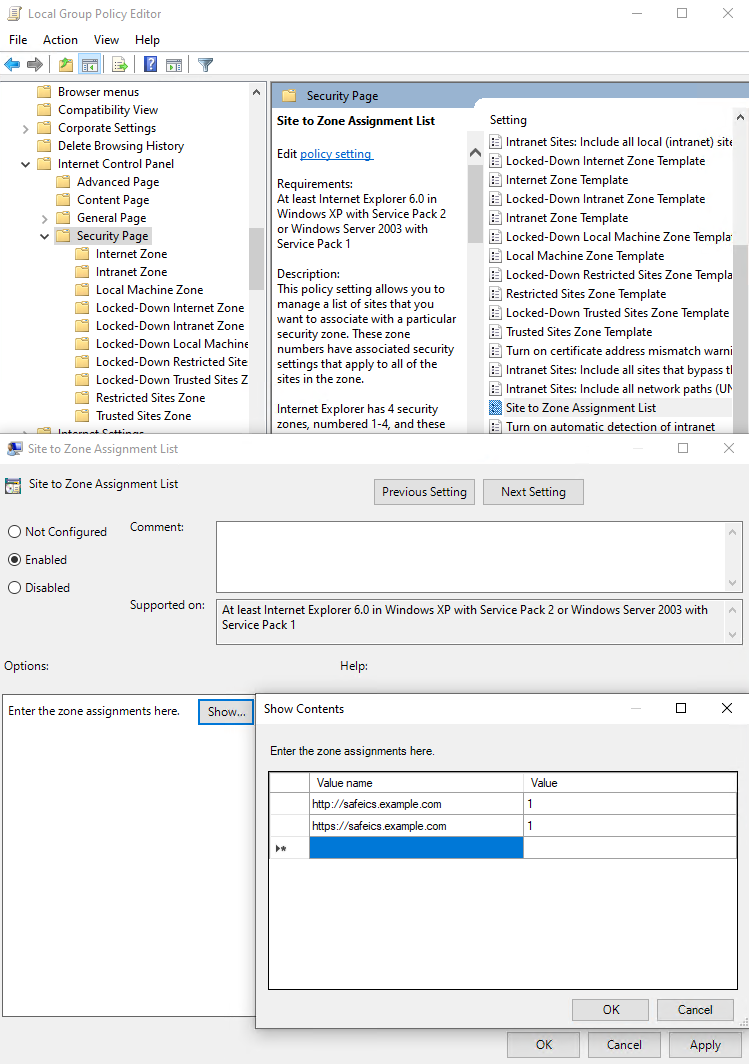
Also, this setting can be made using Active Directory group policies for all users at once. To do this, you must perform the following steps:
- In group policies for users, go to: Default Policy Group > Computer Configuration > Policies > Administrative Templates > Windows Components > Internet Explorer > Internet Control Panel > Security Page > Site to Zone Assignment List
- Enter the zone assignment for the SafeUTM DNS name (safeics.example.com in the example) with a value of 1 (intranet). It is necessary to specify two destinations, for schemes of work on HTTP and HTTPS.

When entering an HTTPS site, for authorization, you must allow the browser to trust the SafeUTM certificate (in order not to do this every time, you can add the SafeUTM root certificate to the trusted root certificates of the device. For example, using domain policies). You can also use scripts to automatically authorize users upon login.
On the Mozilla Firefox browser settings page (about:config in the address bar), configure the following settings:
- network.automatic-ntlm-auth.trusted-uris and network.negotiate-auth.trusted-uris add the address of the local SafeUTM interface (for example, safeUTM.example.com).
- security.enterprise_roots.enabled set to true will allow Firefox to trust the system certificate and authorize users when going to HTTPS sites.
Also, for users imported via AD, the following authorization methods are possible:
- Authorization by IP address - suitable if users always work from fixed IP addresses. IP addresses on UTM must be manually assigned to each user.
- Authorization via PPTP - if the network has increased requirements for the confidentiality of information transmitted between the gateway and user devices, or if Wi-Fi is weakly protected from traffic interception.
Configuring user authorization for direct connections to a proxy server
Setting up transparent user authorization for direct connections to a proxy server is similar to setting up transparent Single Sign-On authorization described above in the instructions. The only difference is that the proxy server address is not the IP address of SafeUTM, but its DNS name.
Configuring the Mozilla Firefox browser for authorization via NTLM when connecting directly to a proxy server
For computers that are not in the Active Directory domain, if they need to be authorized under a domain user account, configure the following settings on the Mozilla Firefox browser settings page (about:config in the address bar):
- network.automatic-ntlm-auth.allow-proxies = false;
- network.negotiate-auth.allow-proxies = false.
Do not disable these options for computers that are members of an Active Directory domain, as in this case, the outdated NTLM authorization method will be used.
Possible causes of authorization errors
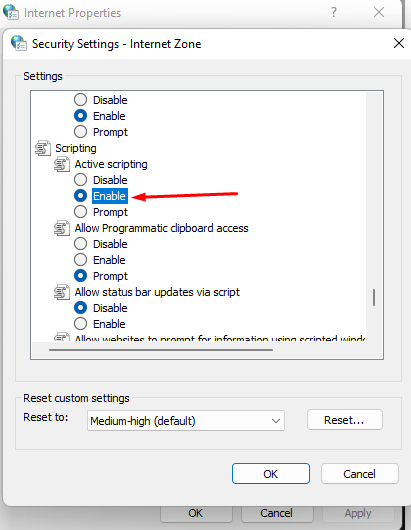
- If a window appears in Internet Explorer with the text Authentication is required to gain access, and authorization occurs only when manually following the authorization link, then for some reason the browser does not redirect to the authorization page (it may be limited by browser security settings). In this case, set Active Scripting in Internet Explorer to Enabled.

- The domain user must be allowed to log in to SafeUTM. On the domain controller, go to the properties of the selected users in the tab Account -> Login to..., select only on specified computers and enter the name of the workstation to log into the system.
- With authorization through the security log of an Active Directory domain controller, users will be authorized when they try to access the Internet (any traffic). There is no automatic authorization without traffic passing through UTM because a competitive authorization policy is used.
Entering Server into Domain
- Go to the tab Users -> Active Directory.
- Click Add.
- Fill in the following fields:
-
- Domain: enter the full domain name (domain DNS name, i.e., domain name, not domain controller). Maximum 64 characters. For example,
mydomain.example - AD DNS server: enter the address of the server that has the role of a DNS server in Active Directory (as a rule, one of the domain controllers), accessible from the local SafeUTM interface.
- SafeUTM server name: enter the server’s name. It can contain only letters (A-z), digits (0-9), and cannot begin or end with a hyphen. Maximum 15 characters.
- Login and password of a user with the right to join the domain: this data is not stored on the server and is used once to join the domain. The user doesn’t have to be the domain admin, but they must have the right to join computers to the domain.
- Domain: enter the full domain name (domain DNS name, i.e., domain name, not domain controller). Maximum 64 characters. For example,
An example of configuring integration with AD can be seen in the screenshot below: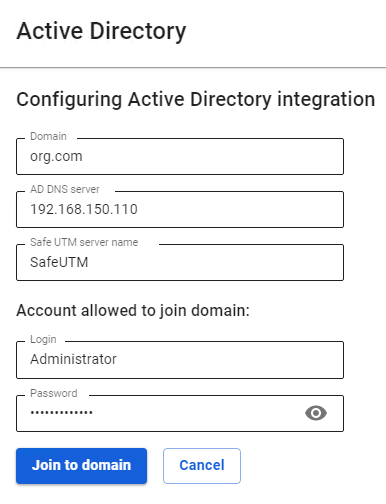
Attention: at least one domain controller must be located in the local SafeUTM network (or be accessible via a local interface using configured routing).
The process of joining the domain after clicking on the corresponding button may take up to one minute.
It is possible to join the server to several Active Directory domains, with some features of work described in the article.
Configuring DNS to Resolve Local Domain Names
In the DNS server settings, in order for the synchronization of users and their authorization to work correctly, it is necessary to configure local domain name resolution on the server. To do so, in the DNS server settings you need to enter the Forward zone and DNS servers for it (as a rule, the main and backup domain controllers).
In SafeUTM the DNS Forward zone is created automatically when the server is entered into the domain, and there is no need to configure it manually. Create it manually only if you mistakenly deleted this zone from the DNS server settings or if you failed to join the server to the domain.
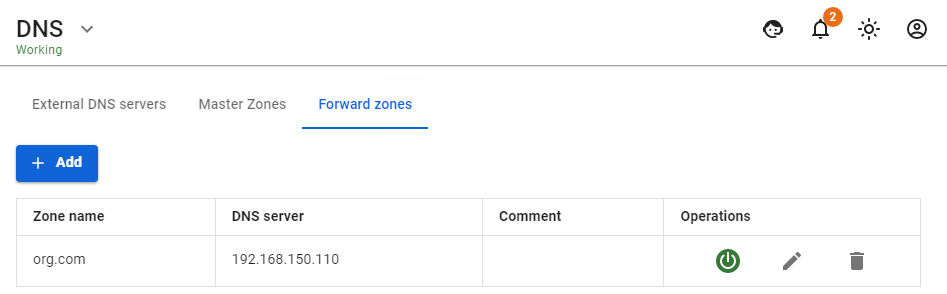
In the example:
- org.com - Active Directory domain name.
- 192.168.150.110 – domain controller IP address.
With this setup, computers can use SafeUTM as the preferred DNS server. At the same time, the resolution of local and internet names will work correctly, also for all services provided by Active Directory.
Automatic Authorization and De-authorization Scripts
For that, you need to configure scripts executed when users log on and log out of the system. For example, it can be done using domain group policies (GPOs).
For these scripts to work, it is necessary to set up all domain and browser security policies described in User Authorization.
User Authorization
You need to add the script to scenarios executed at the system log on.
UTMLogon_script.vbs
Dim IE
Set IE = CreateObject("InternetExplorer.Application")
IE.Visible = True
IE.Fullscreen = False
IE.Toolbar = False
IE.StatusBar = False
Wscript.Sleep(3000)
IE.Navigate2("http://google.com")
Wscript.Sleep(20000)
IE.Quit
User De-Authorization
It is convenient to use this script when one computer is used by different users to go to internet resources. This script can be downloaded from the web interface by clicking Download deauthorization script. To do this, in the section Users -> Authorization, check the box Web authentication: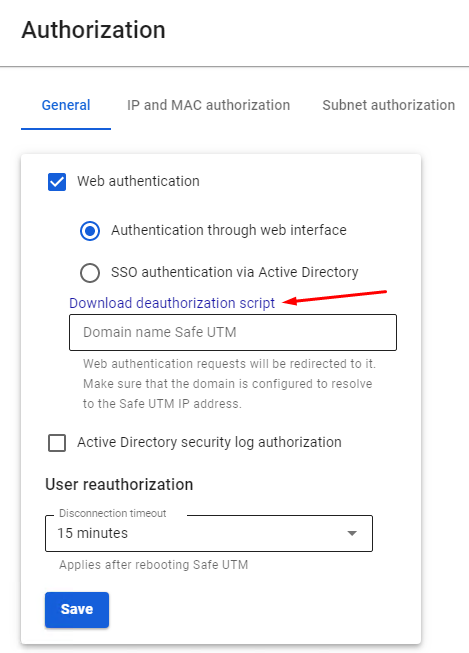
You also need to disable the warning about certificate address mismatch in Internet Explorer properties: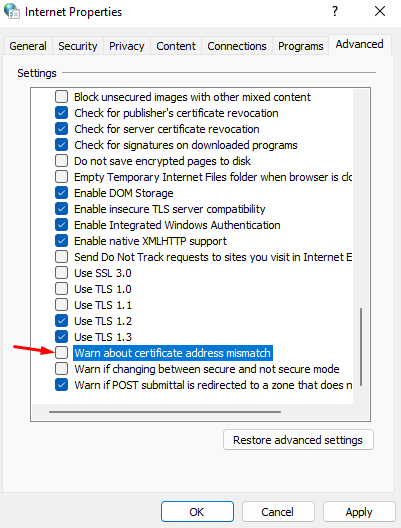
This parameter can also be set up in GPO by changing the registry parameter: HKEY_CURRENT_USER\Software\Microsoft\Windows\CurrentVersion\Internet Settings parameter WarnonBadCertRecving = 0
Next, you need to add the script executed when the user logs out of the system:
UTMLogout_script.ps1
add-type @"
using System.Net;
using System.Security.Cryptography.X509Certificates;
public class TrustAllCertsPolicy : ICertificatePolicy {
    public bool CheckValidationResult(
        ServicePoint srvPoint, X509Certificate certificate,
        WebRequest request, int certificateProblem) {
        return true;
    }
}
"@

[System.Net.ServicePointManager]::CertificatePolicy = New-Object TrustAllCertsPolicy
[Net.ServicePointManager]::SecurityProtocol = "tls12, tls11, tls"
Invoke-RestMethod -Uri "https://<utm ip-adress>:8443/auth/sessions/logout" -Method Delete
Enter the IP address of the local SafeUTM instead of the “UTM interface IP address”. If there are several local interfaces on SafeUTM, you must specify the IP address of the local interface from the same subnet as the user's computer.
Possible Errors When Executing Scripts
- If in Internet Explorer a window appears with the text “Authorization is required to gain access”, and authorization occurs only when you manually click on the authorization link, redirecting to the authorization page may not occur in the browser (it may be restricted by the browser security settings). In this case, set the parameter Active Scenarios in Internet Explorer to Enable.
- The group policy is not updated automatically immediately after the changes have been made. In order for the scripts to start working, update the policy manually by running the command
gpupdate /forceon the workstation.

Import of Users
Import of Accounts from LDAP
SafeUTM implements the possibility to import accounts from the Active Directory LDAP directory (hereinafter referred to as AD). Import is carried out by LDAP/LDAPS protocols (LDAPS protocol does not require additional settings from UTM and will be used automatically if needed on the domain controller).
AD user groups can be imported into specially created SafeUTM user groups. Any name can be used for them.
In order to import users from AD, you need to perform the following actions:
- Create a group in the SafeUTM user tree. Learn more about creating groups in the User & Group article.
- Select this group and go to the Active Directory tab on the right side of the screen.
- Select the domain to import users from (if SafeUTM is a member of several domains).
- In Group Type select LDAP/AD group.
- When you click on the LDAP group field, the Active Directory user tree will open. In the tree, select the group to import (you can also select the root group to import the entire tree).
- When you click Save, user import will be carried out (it may take a few minutes).

In the future, users will be synchronized with Active Directory automatically every 15 minutes.
If necessary, you can use the query filter. For example, if you have users and computers in the same containers, and you want to import only users, write the following text in the LDAP filter field:
(&(objectCategory=person)(objectClass=user))
It is possible to import different AD user groups to different SafeUTM groups for the convenience of assigning firewall rules, content filtering, app control, bandwidth limitation, and other modules to them.
You should not import subgroups of an already imported group, because they will automatically be imported together with the main group.
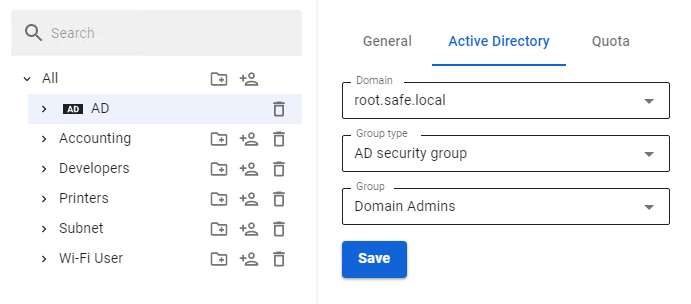
Importing Accounts from Security Groups
Active Directory users can only be imported into one SafeUTM group. Therefore, if it is in multiple Active Directory security groups, it will only appear in one of the UTM groups that were imported last.
You can import any number of AD security groups into different folders of the SafeUTM user tree.
- Create a group in the SafeUTM user tree.
- Select the group in the tree and go to the Active Directory tab.
- Select the intended domain in Domain Name.
- Select AD Security Group in Group Type.
- In the field below select the intended security group from the drop-down list.
- Click Save.
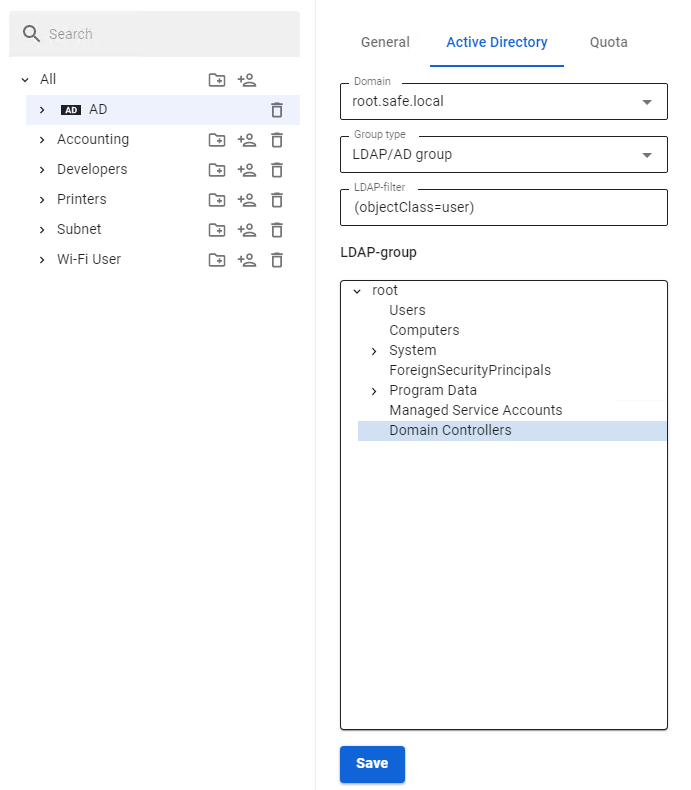
An example of configuring the import of users from security groups can be seen in the screenshot below: