# User tree
# User tree
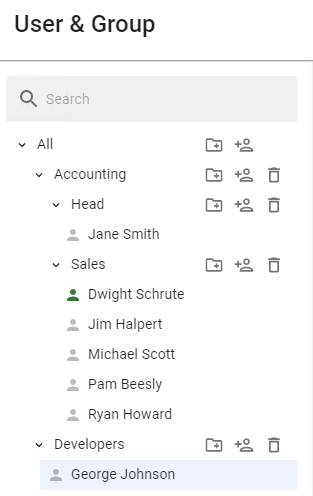
In the SafeUTM management interface, users are displayed as a tree.
---
Users can be organized into trees. The group nesting level is not limited.
The user account tree is available in **Users -> User & Group**.
SafeUTM implements the principle of inheritance, which makes it easy to set and change parameters common for users, defining them for the parent group, for example, quotas or remote VPN access. The principle of inheritance is very convenient for performing management operations related to all users in the group.
An example of a user tree can be seen below:
[](https://docs.safedns.com/uploads/images/gallery/2022-08/GDPTiGjjUEIgnw4i-1-user-tree.png)
The user’s icon can be colored differently. The table below provides a description of each color of the user’s icon:
| **User Account Status**
| **Description**
|
| [](https://docs.safedns.com/uploads/images/gallery/2022-08/d56P0mpNMPVj6QLl-2-user-tree.png)
| The user has completed the authorization procedure and has been granted internet access.
|
| [](https://docs.safedns.com/uploads/images/gallery/2022-08/pZOamG9xaWeQyB6h-3-user-tree.png)
| Authorization restriction has been set in the [**User Settings**](https://docs.safedns.com/books/42-setup-users/page/configuring-users).
|
| [](https://docs.safedns.com/uploads/images/gallery/2022-08/0L2I5ioKf4UcAmF7-4-user-tree.png)
| The user has not completed the authorization procedure and has not been granted internet access.
|
# User & Group
Creating, deleting, and moving user accounts.
---
#### General
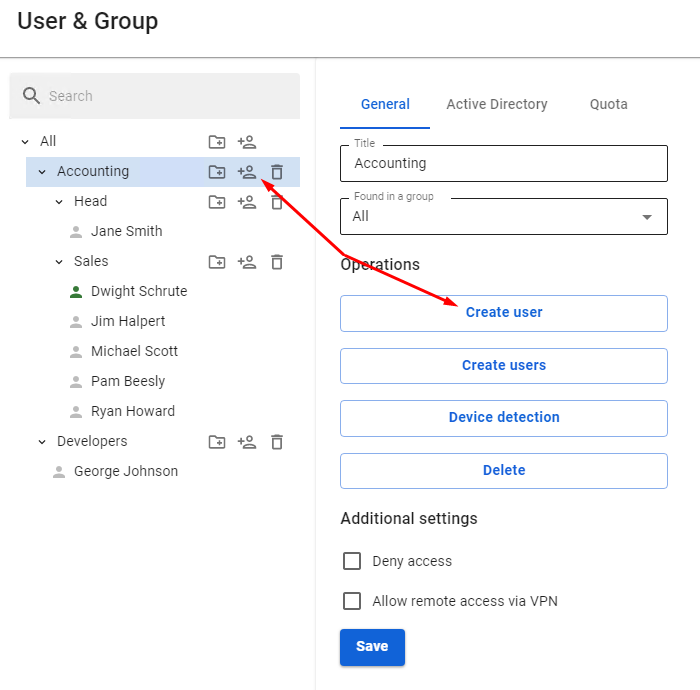
To manage groups and accounts in the user tree, there are corresponding buttons on each group:
| **Symbol**
| **Description**
|
| [](https://docs.safedns.com/uploads/images/gallery/2022-08/YAq39FQWhGYv3O9i-1-user-management.png)
| Create user account
|
| [](https://docs.safedns.com/uploads/images/gallery/2022-08/K4pymhc1B8JwLDdK-2-user-management.png)
| Create group
|
| [](https://docs.safedns.com/uploads/images/gallery/2022-08/VcIEe1oXa8mxAWwy-3-user-management.png)
| Delete user account or group
|
---
#### Creating User Account
To create an account in a certain group, click Create User Account in it. The control element symbols are illustrated in the table above.
The second way to create a user in a group is to select the designated group and click **Create User** in the right part of the window in the **General** tab.
[](https://docs.safedns.com/uploads/images/gallery/2022-08/pX1I2obUDPzEsjp4-4-user-management.png)
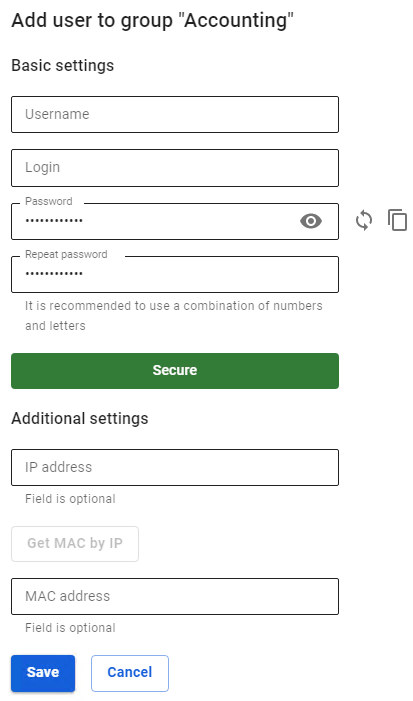
Next, you will see a window for creating a user account, where you need to define a number of parameters. The form for creating a user account is shown below.
[](https://docs.safedns.com/uploads/images/gallery/2022-08/iyc86CS2Bsjw4pRs-5-user-management.png)
**Login** must be entered in lowercase Latin characters, for example, j.smith
Recommendations for creating password complexity: minimum length - 10 characters; use of lowercase and uppercase Latin characters; use of numbers and special characters. You can generate a password.
When you fill in the **Additional settings**, a corresponding rule will be created in the user card in the **IP and MAC authorization** tab and in the **Authorization -> IP and MAC authorization** section.
If this IP address or MAC address is used in DHCP server rules, then the **[DHCP server](https://docs.safedns.com/books/45-setup-services/page/dhcp-server)** rule will be in priority.
For accounts imported from MS Active Directory (AD), password verification is carried out by means of AD. Active Directory user authorization is configured in the corresponding [**section**](https://docs.safedns.com/books/42-setup-users/page/active-directory-user-authorization).
You cannot create a user in the Active Directory group from SafeUTM. If you need to add an additional user to the Active Directory group, you must do so in the user tree on the domain controller.
It is impossible to view or restore the account password, only changing is allowed.
After you have entered all required parameters, click **Save**. An account will be created that will automatically get all the values of some parameters of the group in which it was created.
---
Creating Group
To create a group, you need to click on the corresponding control symbol to the right of the group name (you can create both a tree root group and a child group).
A window will open, in which you will need to type in the name of the new group and click **Save**. An example of adding a group can be seen below:
[](https://docs.safedns.com/uploads/images/gallery/2022-08/ryQDCUKCkHc51ECJ-6-user-management.png)
Mass Creation of Users with Authorization by IP
Mass creation of users for authorization by IP is possible. You can find out more in the [**article**](https://docs.safedns.com/books/42-setup-users/page/authorization-by-ip-address) about this kind of authorization.
Alternatively, you can use [**Netscan**](https://docs.safedns.com/books/42-setup-users/page/netscan) to create them automatically when you try to access the internet.
Deleting Group or User Account
To delete a user account, select the user and click on the corresponding symbol. You can also select the user and click **Delete** in the **General** tab.
[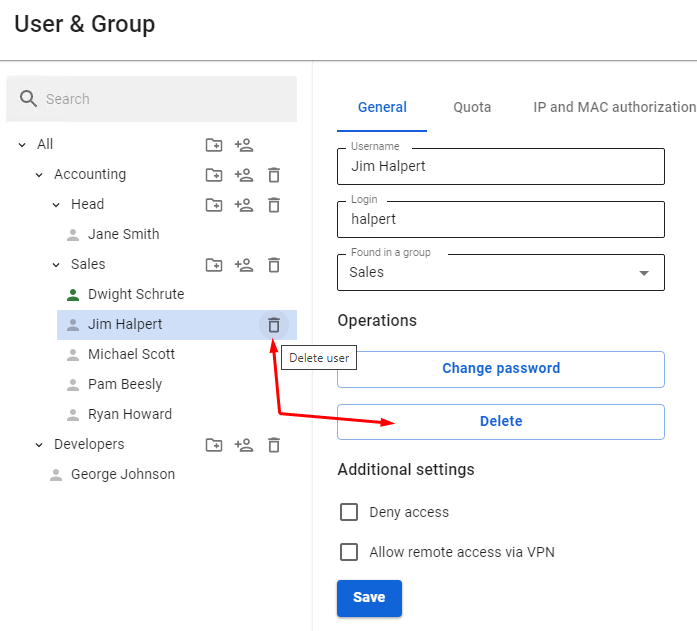](https://docs.safedns.com/uploads/images/gallery/2022-08/XkgyHkM3lNZkrTyM-7-user-management.png)
Deleting a group is done the same way.
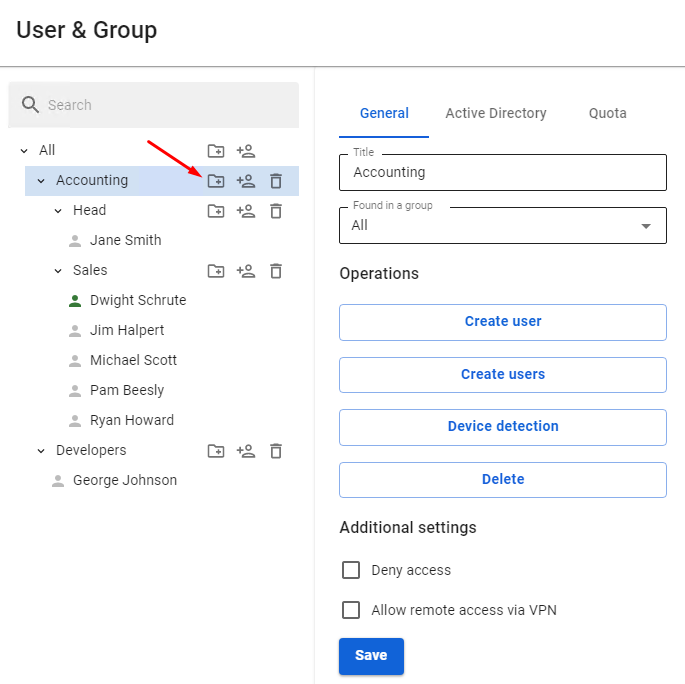
Moving User Account or Group
To move a user account to another group, select this user in the **General** tab and find **Found in a group** field. From the drop-down list, select the group to move the user into and click **Save**.
[](https://docs.safedns.com/uploads/images/gallery/2022-08/nyqtcS8sYAKXrNtA-8-user-management.png)
You can find the information about how to set up traffic quotas in the [**User Quotas**](https://docs.safedns.com/link/72#bkmrk-setting-up-user-and-) section.
---
##### IP and MAC Authorization category
This category contains authorization rules by IP and MAC created for a specific user in two sections:
- Users -> User & Group -> IP and MAC authorization [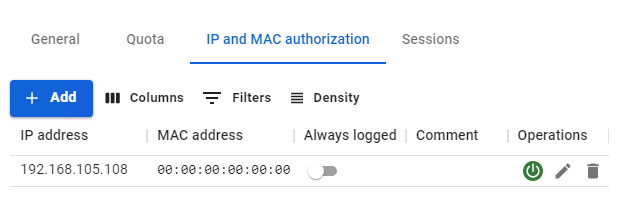](https://docs.safedns.com/uploads/images/gallery/2022-08/cwZqCgl3wiXfYQTx-4-configuring-users.png)
- Users -> [**Authorization** ](https://docs.safedns.com/books/42-setup-users/page/user-authorization)-> [**IP and MAC authorization**](https://docs.safedns.com/books/42-setup-users/page/authorization-by-ip-and-mac-address)[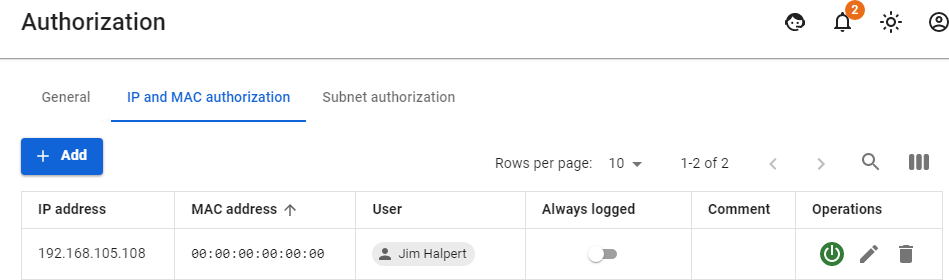](https://docs.safedns.com/uploads/images/gallery/2022-08/OFQ7FbgGwlR14rSt-5-configuring-users.png)
The **IP and MAC authorization** rules also create a similar binding in the SafeUTM [**DHCP server**](https://docs.safedns.com/books/45-setup-services/page/dhcp-server). But if the same IP and MAC addresses are used in enabled DHCP server rules, then the DHCP server rules will be executed first.
---
##### Sessions category
Contains a table with information about all active user sessions:
[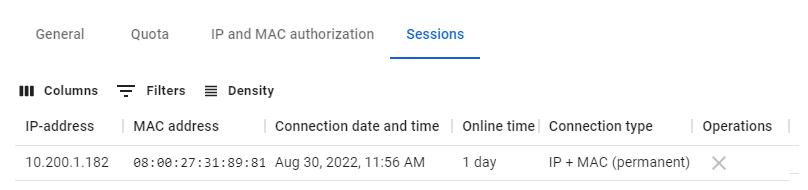](https://docs.safedns.com/uploads/images/gallery/2022-08/V1ipEba0PDvB06gB-6-configuring-users.png)When you click on "X" in the **Operations** column, UTM will terminate the user's session.
A similar table is located in the **Monitoring** -> [**Authorized users**](https://docs.safedns.com/books/43-setup-monitoring/page/authorized-users-and-vpn-users) section.
# Terminal Server Users
Used for remote work with the provision of a separate desktop for each user. Provides a service for the work of dozens and even hundreds of users.
---
#### Terminal Server Authorization
If the admin does not need the separate authorization of terminal server users, and the same access settings (content filtering and user firewall) can be applied to them, the server can be authenticated as a single user.
The best option is [**authorization by IP address**](https://docs.safedns.com/books/42-setup-users/page/authorization-by-ip-address).
Please note that when the number of users on the terminal server is large, it may be necessary to [**increase the number of simultaneous sessions**](https://docs.microsoft.com/en-us/windows-server/remote/remote-desktop-services/troubleshoot/remote-desktop-service-currently-busy#check-the-connection-limit-policy) from one address in advanced security settings.
---
#### Authorization of Terminal Server Users
**Separate authorization of terminal server users** (running under Windows Server 2008 R2 and Windows Server 2012 OS) is possible using [**SSO (NTLM)**](https://docs.safedns.com/link/50#bkmrk-web-authorization-%28s). In such a case server authorization by IP is not necessary.
For separate authorization of terminal server users, [**Remote Desktop IP Virtualization**](https://docs.microsoft.com/en-us/troubleshoot/windows-server/remote/remote-desktop-ip-virtualization) must be configured on the terminal server, and user authorization via web authorization (SSO or NTLM) must be configured on the SafeUTM server. Authorization of terminal server users based on logs of the AD domain controller has not yet been implemented.
---
Configuring Remote Desktop IP Virtualization on Windows Server 2012
For the [**Remote Desktop IP Virtualization**](https://docs.microsoft.com/en-us/troubleshoot/windows-server/remote/remote-desktop-ip-virtualization) to work on one of Windows servers, the role of a DHCP server must be added (this function may not work correctly with other DHCP servers) and an IP address area for terminal server users must be allocated.
In **Group Policy Management Editor,** you need to navigate to **Computer Configuration –> Administrative Templates –>Windows Components -> Remote Desktop Services –> Remote Desktop Session Host –> App Compatibility**.
Enable the option **Turn on Remote Desktop IP Virtualization** in group policy with the option **Per Sessions**:
[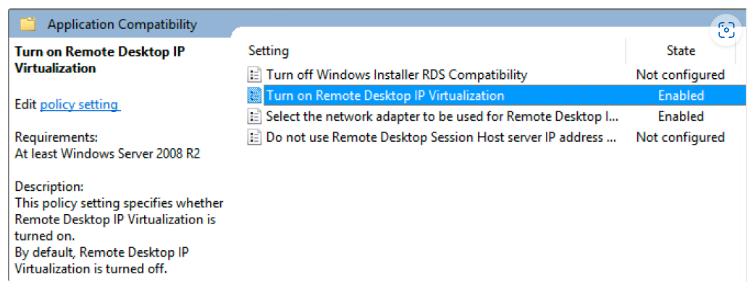](https://docs.safedns.com/uploads/images/gallery/2022-08/Ic36pAPOpzJ9sVNI-1-terminal-server-users.png)
It is also recommended to enable the option **Do not use the IP address of the remote desktop session host server if the virtual IP address is unavailable**.
Use command `gpupdate /force` to update all policies.
You can check that the settings have changed using the following command in PowerShell:
`Get-WmiObject -Namespace root\cimv2\TerminalServices -query "select * from Win32_TSVirtualIP"`
Where values must be: `VirtualIPActive = 1` (virtualization on) and `VirtualIPMode=0` (for a session).