VPN Connections
- VPN Connection
- Authorization by PPTP
- Authorization by PPPoE
- IPSec IKEv2
- SSTP
- L2TP IPSec
- User's Personal Account
- Features of Routing and Access Organization
- Instructions for running PowerShell scripts
VPN Connection
To gain access from outside (from home, hotel, or another office) to the enterprise's local network located behind SafeUTM, you can connect via VPN from this machine (computer or mobile device) to the SafeUTM server.
For client-to-site VPN, our server supports four tunneling protocols: IKEv2, SSTP, L2TP/IPsec, and PPTP.
For security reasons, it is not recommended to use the PPTP protocol (it is left for compatibility with outdated operating systems and equipment, as well as for authorization in a local network where there are no requirements for strict traffic encryption).
IKEv2 protocol is recommended in terms of speed and security.
You can use the user's personal account to distribute instructions on creating custom VPN connections.
Authorization by PPTP
Do not use this type of connection. This connection method is EXTREMELY insecure and has been left solely for compatibility with older solutions. Use IPsec-IKEv2.
- A login/password bundle is used for user authorization and Active Directory users.
- To authenticate by PPTP protocol you need to assign an IP address to a network device, as well as configure a connection using the PPTP protocol, specifying the SafeUTM gateway IP address as the PPTP server address.
Upon successful authorization and establishment of a network tunnel, an additional IP address will automatically be assigned to the network device to gain access to internet resources. Using authorization by PPTP does not affect the ability of a network device to access LAN resources in any way.
Configuring SafeUTM Global Settings
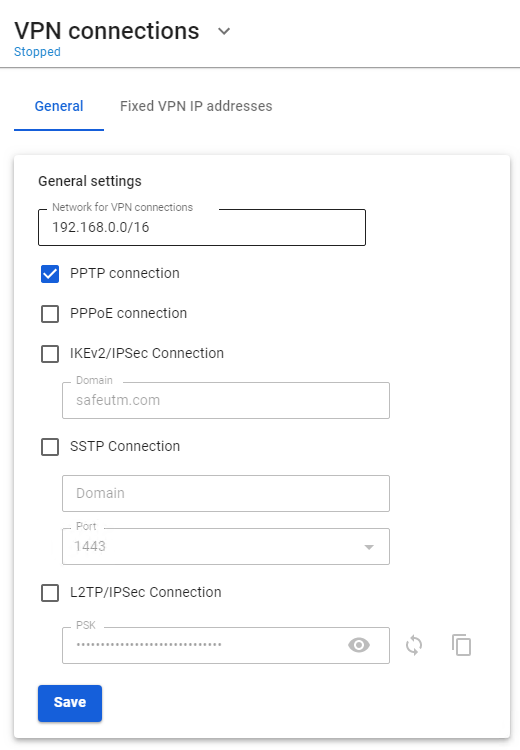
- Go to Users -> VPN connections.
- Select PPTP Authorization and click Save.

You can edit your login and password in the tab Users -> User & Group upon selection of a necessary user.
The user is assigned an IP address automatically from the pool of addresses for VPN configured in the section Users -> VPN connections (for example, 10.128.0.0/16).
In order to set up a static binding of addresses issued via VPN to certain users, go to Users -> VPN connections -> Fixed VPN IP Addresses, click "+ Add" and specify the intended user and IP address. An example of a fixed VPN IP address can be seen below: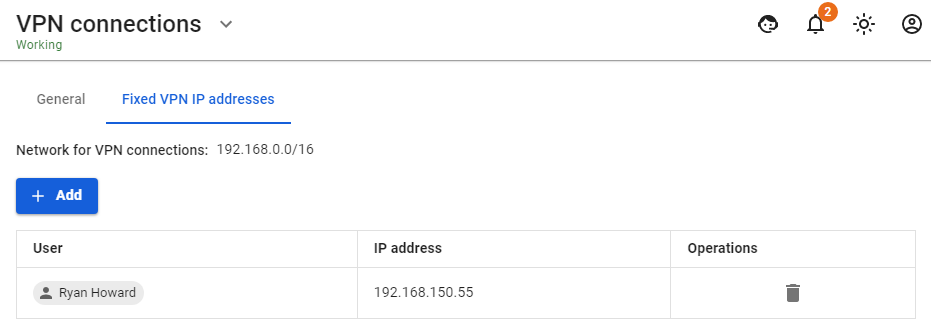 When connecting from the internet, we recommend using IPSec IKEv2, L2TP IPSec, or SSTP for more reliable traffic encryption.
Configuring Users in SafeUTM
Allow the user to connect via VPN from the Internet by checking in the user settings (Users -> User & Group -> General tab) in the box Allow remote access via VPN.
Possible Problems
- The provider from the gateway’s side or from the connected client’s side blocks the GRE protocol with which the PPTP connection takes place. In this case, when trying to connect to an external SafeUTM address, error 619 will occur. You can determine on which side the problem is by connecting from different places and from different providers. If it is possible to connect from some places, it means that the problem is on the side of those clients who cannot connect. When the provider is determined, you need to try to solve the problem with them or use IPsec-IKEv2 or SSTP.
- TCP port 1723 is blocked. You can check the port availability using standard network utilities such as telnet. If there is no connection to this port, then the tunnel cannot be established.
- The user's username or password is incorrect. If this happens, it is often suggested to specify the domain when reconnecting. Try to create alphanumeric passwords, preferably in Latin, for your accounts. If the password is entered incorrectly more than 6 times, the user's IP address will be blocked by the password attack protection service.
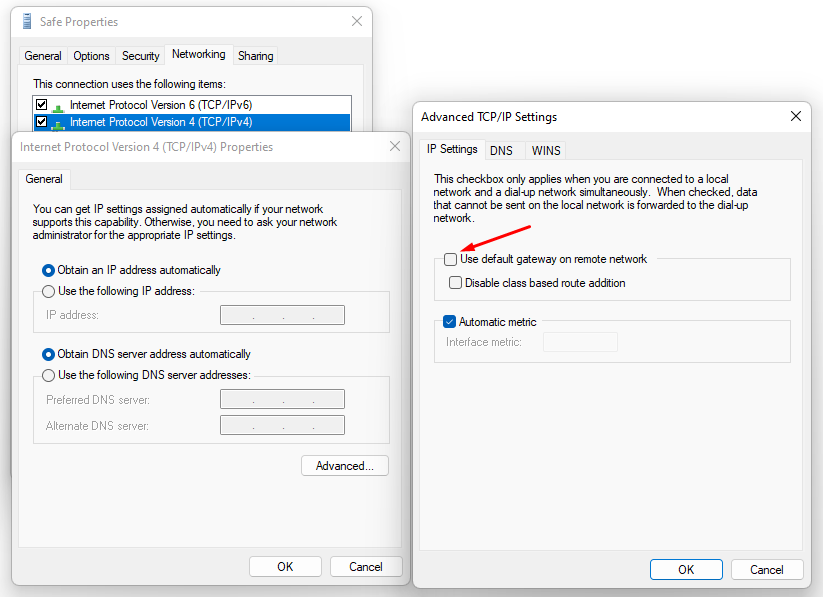
- If the connection is made with Windows OS, then in order for the packets to go through it, you need to make sure that the following box is checked in the connection settings Use default gateway on the remote network in the section VPN connection properties -> Network tab -> Internet Protocol Version 4 (TCP/IPv4) properties -> Advanced. If it is not necessary to route all packets to this interface, then the route must be written manually.
- When the error The connection was terminated by the remote computer occurs, it is necessary to enable MPPE 128-bit support (In Windows this option is enabled by default) and only check MSCHAPV2 among authorization protocols.
If a VPN connection is established but it is not possible to access local network resources
Follow the recommendations in the article Features of Routing and Access Organization.
Authorization by PPPoE
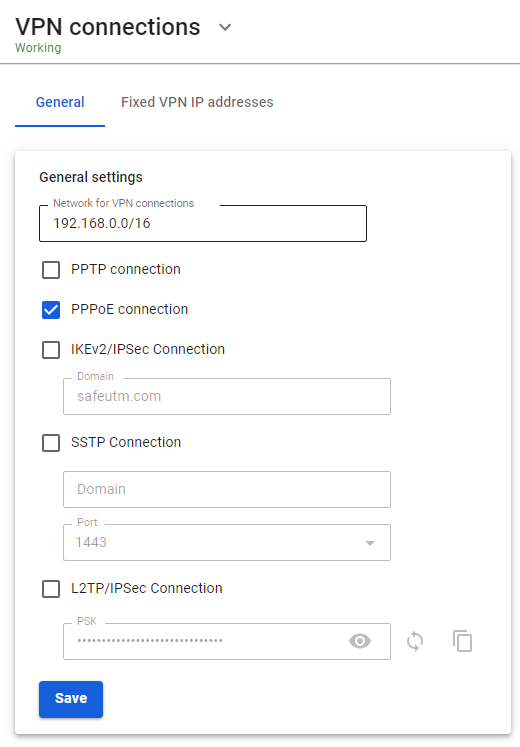
- Go to Users -> VPN connections.
- Select PPPoE Authorization and click Save.

You can edit your login and password in the tab Users -> User & Group upon selection of a necessary user.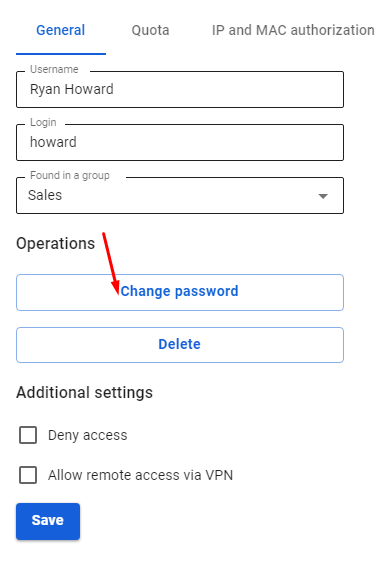
The user is assigned an IP address automatically from the pool of addresses for VPN configured in the section Users -> VPN connections (for example, 10.128.0.0/16).
In order to set up a static binding of addresses issued via VPN to certain users, go to Users -> VPN connections -> Fixed VPN IP Addresses, click and specify the intended user and IP address. An example of a fixed VPN IP address can be seen below:
IPSec IKEv2
This VPN protocol is preferable and recommended for all usage scenarios.
Instructions for setting up VPN connections on different operating systems are available here.
Setting up VPN Server in SafeUTM
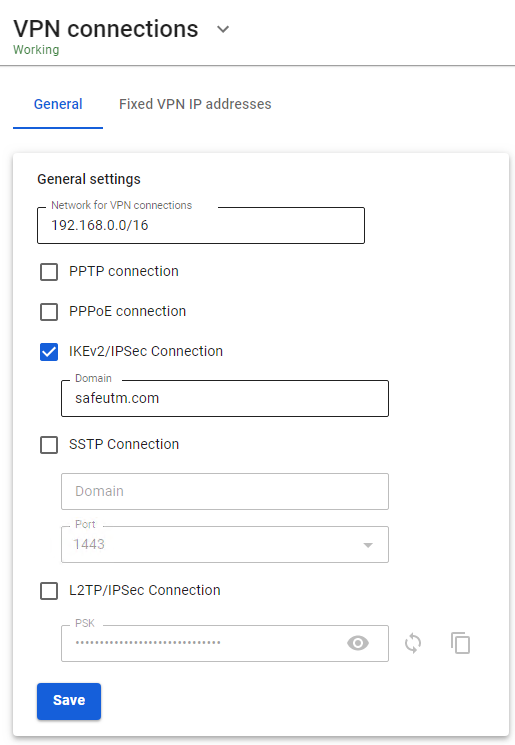
- To enable authorization by IKEv2, check the corresponding box Connection via IKEv2/IPsec in the Web interface section Users -> VPN connections.
- Routes are transmitted to clients to your local networks automatically. To control access to networks, use Firewall.
- Connection is possible only by domain name (not by IP address), therefore it is necessary to have a domain name that resolves to the IP address of the SafeUTM external interface. In the Domain field, this DNS name must be specified. It is necessary to issue a Let's Encrypt certificate.

- For users who need to connect from outside via VPN, check the box Allow remote access via VPN in the user tree. The username and password specified here will be used to connect.
IPsec IKEv2 Support in Client OS
- Microsoft Windows 7 (2009). Requires installation of a Let's Encrypt root certificate
- Apple MacOS X 10.11 "El Capitan" (2015)
- Linux NetworkManager plugin (since 2008)
- Google Android 11 (2020). On older versions, you can use the StrongSwan application
- Apple iOS 9 (iPhone 4S) (2015)
- KeeneticOS 3.5
- Mikrotik
- Cisco routers
SSTP
SSTP (Secure Socket Tunneling Protocol) is a protocol of secure traffic tunneling based on SSL/TLS. It is supported by Windows OS Vista and above, as well as Mikrotik, Keenetic routers, and others.
If possible, do not use this type of connection. This connection method passes through NAT better than others, but with unstable communication quality, it works much worse than other VPNs (especially when transmitting audio/video), since it encapsulates all data inside TCP. It is recommended to use IPsec-IKEv2 instead of SSTP.
UTM does not support Mikrotik connection over SSTP because Mikrotik uses an old and insecure SHA-1 algorithm.
Setting up SafeUTM
It is not recommended to use SSTP for VPN connections from the local network.
1. To enable SSTP, check the box SSTP connection in the web interface in Users -> VPN connections.
2. Connection is possible only by DNS name, so the IP address of SafeUTM external interface should resolve to one of the names of your external domain zone. In the Domain field, you need to specify this DNS name (use the real name with the correct A-record, because it is necessary for issuing a Let's Encrypt certificate).
3. Port - select the suggested port (from the options: 1443, 2443, 3443, 4443).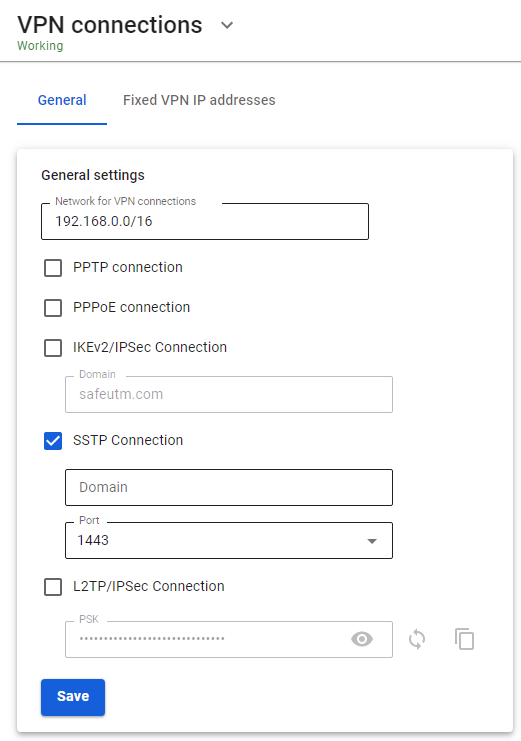 4. For users who need to connect from outside via VPN, check the box Allow remote access via VPN in the user tree. The specified username and password will be used for the connection.
VPN setup instructions for different operating systems can be found here.
If a VPN connection is established but it is not possible to access local network resources
Follow the recommendations in the article Features of Routing and Access Organization.
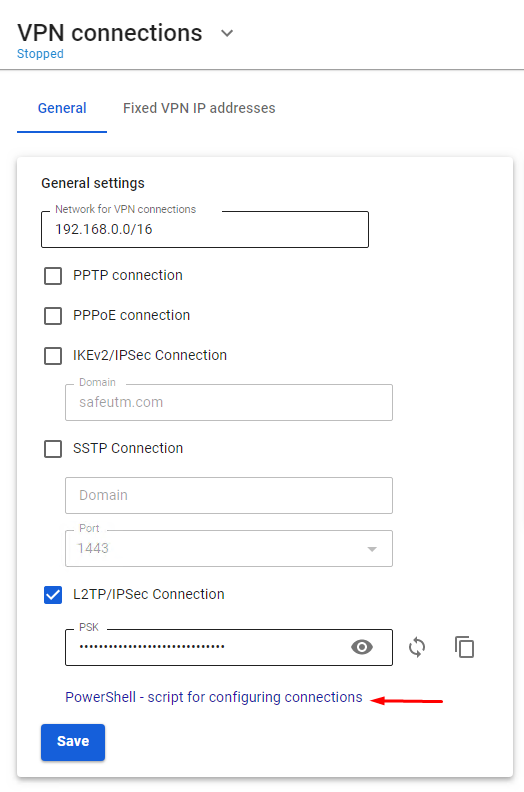
L2TP IPSec
If possible, do not use this type of connection. This connection method can be unstable, has huge redundancy, has low performance, and does not support the strongest encryption. IPsec-IKEv2 is recommended instead.
All modern operating systems support IKEv2, or there are applications for them.
Configuring SafeUTM Global Settings
1. Go to Users -> VPN connections.
2. Check the box L2TP/IPsec Connection.
3. Enter the secret phrase (PSK key).
4. Click on Save.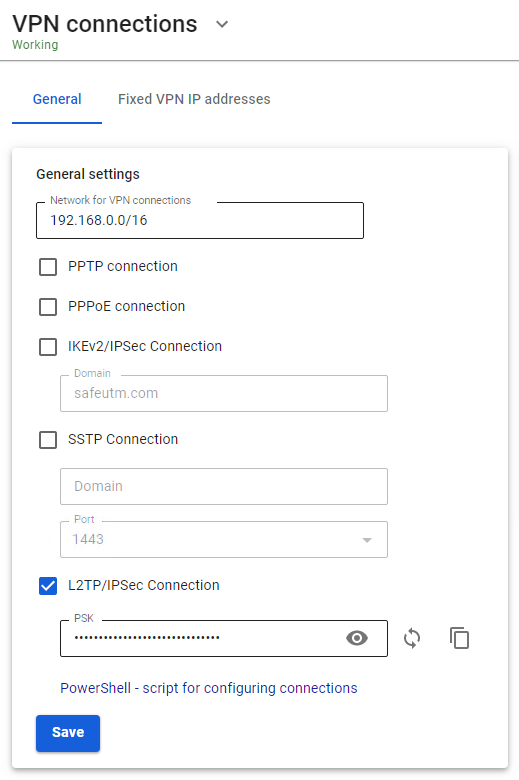
Configuring Users in SafeUTM
Allow the user to connect via VPN from the Internet by checking in the user settings (Users -> User & Group -> General tab) in the box Allow remote access via VPN.
L2TP IPsec clients behind the same NAT may experience connectivity issues if there is more than one client. Instructions can help solve the problem. We recommend using IKEv2 IPSec instead of L2TP IPsec.
If a VPN connection is established, but you cannot access local network resources
Follow the recommendations in the article Features of Routing and Access Organization.
User's Personal Account
To quickly configure user connections, you can enable access to the SafeUTM web interface.
In the personal account accessible with the use of SafeUTM accounts details (local or domain, in case of integration with Active Directory), users will be able to download ready-made PowerShell scripts to create user connections and a link to instructions for setting up a VPN and running scripts.
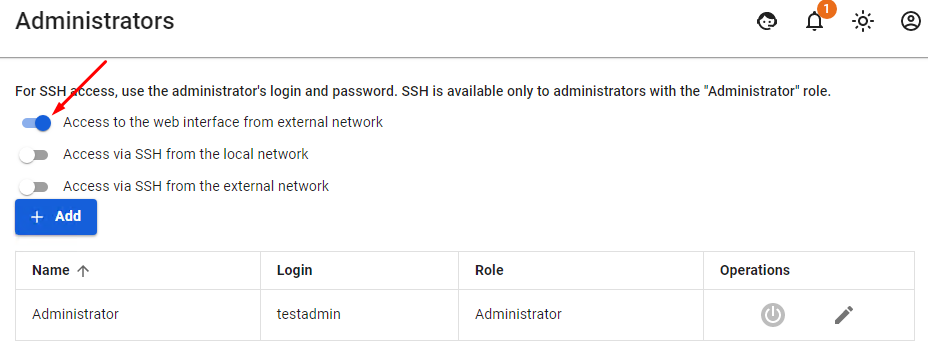
You can enable access from the Internet to your personal account and SafeUTM administration web interface in the section Server Management -> Administrators by enabling the setting Access to the web interface from external network. After enabling the parameter, the personal account and the web administration interface will be accessible by the IP address of the SafeUTM external interface.
If the external IP address of SafeUTM is not included in the "white" networks, then you need to forward port 8443 on the upstream device.
When logging in under a user account (including those imported from Active Directory), it will be possible to download scripts for creating VPN connections and a link to instructions for their implementation.
Users will also be able to remotely administer the SafeUTM server.
Features of Routing and Access Organization
If VPN is required only to access local network resources
If you need to access the Internet directly through your provider, and you need to use a VPN only to access corporate network resources on computers connected via VPN, you need to configure the following settings.
- In the VPN connection properties, uncheck the box Use primary gateway on remote network. Tab Network -> Internet Protocol version 4 -> Advanced -> IP Settings.

- Create a route to the corporate network (in Windows 7, 8, 8.1, and 10, a route based on the class will be automatically created, depending on the address that the connection will receive via VPN. For example, a route will be added for the 10.0.0.0/8 network if the VPN server receives an address from the 10.128.0.0/16 network). For IPsec-IKEv2, you can configure automatic route acquisition.
Route example: if the corporate network is172.16.0.0/16, and the network for VPN connections is configured to SafeUTM10.128.0.0/16(and the IP address is issued to the VPN connection from the same network), then the route will be:route -p add 172.16.0.0 mask 255.255.0.0 10.128.0.1 - In some cases, the route may not work, then there is a ping to the protected interface (
10.128.0.1), but there is no ping to the hosts in the LAN. In this case, when creating a route, you need to specify the number of the VPN connection interface. The final route will be as follows:route -p add 172.16.0.0 mask 255.255.0.0 10.128.0.1 if nnwhere nn is the number of the VPN connection interface which can be viewed when the VPN connection is active in the output of the route print command in the console section List of Interfaces.
If it is not possible to access computers in the local SafeUTM network
- Make sure that the local network (or the address on the network card) on the remote machine does not intersect with your organization's LAN, if it intersects, then there will be no access to your organization's network (traffic on the routing table will go to the physical interface, and not to VPN). Addressing must be changed.
- SafeUTM must be registered as the main gateway on LAN computers. If this is not the case, then you need to register the appropriate route manually on the devices, so that network packets go to SafeUTM for the VPN network.
Example:route -p add 10.128.0.0 mask 255.255.0.0 10.1.1.1where10.128.0.0/16is the address of the SafeUTM VPN network (configured in Users -> VPN connections), and10.1.1.1is the IP address of the local SafeUTM interface. - Check the firewall settings (FORWARD table) in SafeUTM for prohibiting rules.
- Computers and servers on Windows OS can restrict access to network folders using network profile settings rules (both on the side of the computer connecting via VPN, and on the side of computers and servers in LAN):


Enable access to files and printers for All Networks and Private Networks profile.
You can do this using PowerShell (launched with rights elevated to the administrator) by running the command:
Enable-NetFirewallRule -Group "@FirewallAPI.dll,-28502"
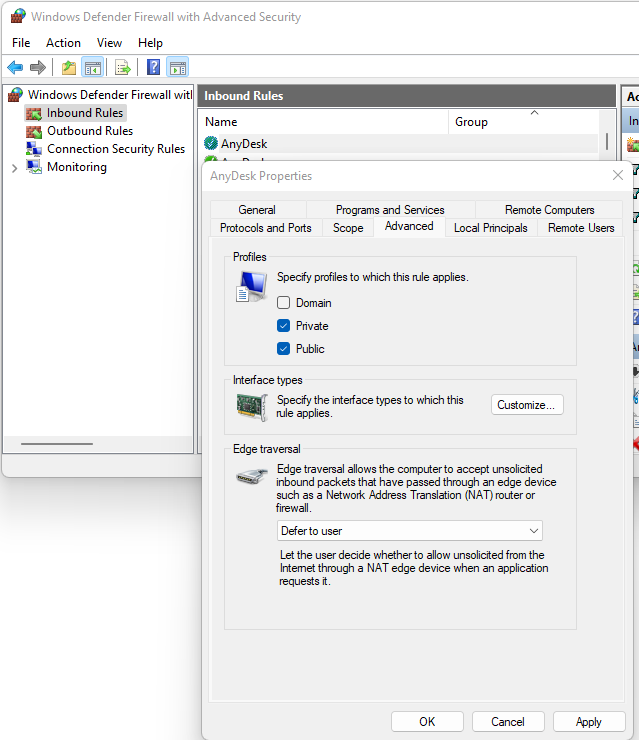
- Windows Defender Firewall may block access to certain programs or services (including RDP) to external networks.
Check it in the settings of incoming and outgoing connections (you need to allow access from frequent and local networks):
- Antivirus software on the computer may block access to it from non-local networks. Or block access to specific programs.
For example, for some antiviruses, it is necessary to add a network for VPN connections (10.128.0.0/16 by default ) to exceptions.
Instructions for running PowerShell scripts
Use ready-made scripts downloaded from your server to create a VPN connection in Windows versions 8.1 and 10.
If you are using Windows 7, you must create the connection manually (see Manually create user-side VPN connections).
Which VPN protocol should I choose?
With several options for possible VPN connections, choose protocols according to the following criteria:
- IKEv2/IPsec is the best protocol in terms of performance and connection reliability.
- SSTP is a protocol based on TCP and SSL. Choose it if the IKEv2 connection does not go through your provider.
- L2TP/IPsec is reliable in terms of encryption, but not the most optimal in terms of speed and performance.
How do I run a PowerShell script?
1. Download the script:
From SafeUTM:
- By navigating to the section Users -> VPN connections
- Set the flag for the required connection protocol, if required, fill in the fields and click Save
- Click on the link PowerShell - script to configure connections

- Transfer the downloaded file to the device where you want to create a VPN connection.
2. Right-click on the downloaded file and select Properties from the context menu.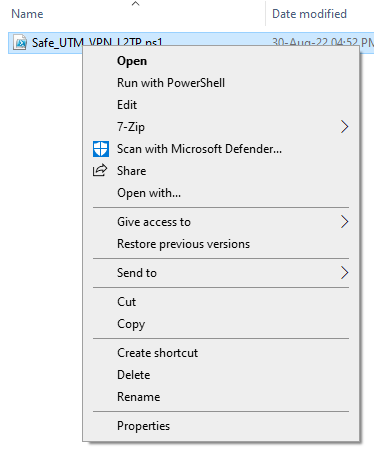
3. Check the box Unlock in the lower right corner of file properties (by default, the OS blocks the execution of files downloaded from the Internet)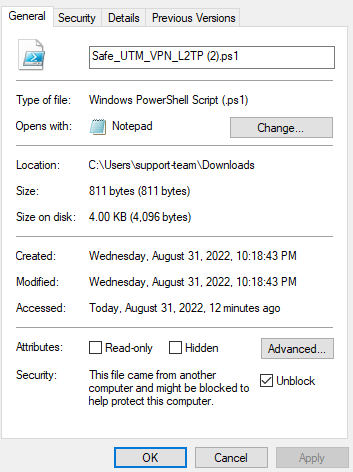
4. Right-click on the file again and select Run in PowerShell in the context menu.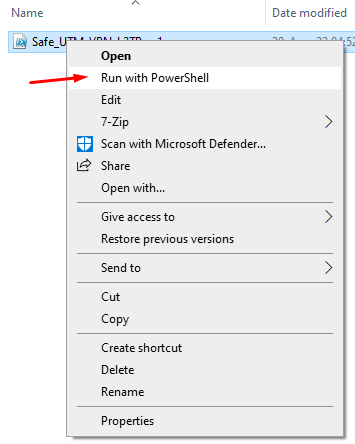
If the error "Script execution is disabled on this system" appears, you need to enable script execution by running the command in PowerShell (call it up from the Start menu): Set-ExecutionPolicy Unrestricted
5. Answer Yes to the question about making changes to your computer.
6. The connection is created. Click Connect in the list of your networks.
What should I do if I can't run the script?
You may not have enough rights to run scripts or PowerShell is not installed on the system.
Use the instructions for creating a connection in Windows 10 and Windows 7.