4.2. Setup - Users
- User tree
- User Authorization
- User Authorization
- Web Authorization
- Authorization by IP and MAC address
- Authorization by IP address
- Authorization by MAC address
- VPN Connections
- VPN Connection
- Authorization by PPTP
- Authorization by PPPoE
- IPSec IKEv2
- SSTP
- L2TP IPSec
- User's Personal Account
- Features of Routing and Access Organization
- Instructions for running PowerShell scripts
- Subnet Authorization
- Fixed VPN IPs
- Integration with Active Directory
- Integration with Active Directory
- Active Directory User Authorization
- Entering Server into Domain
- Automatic Authorization and De-authorization Scripts
- Import of Users
- Netscan
- Wi-Fi Networks
User tree
User tree
In the SafeUTM management interface, users are displayed as a tree.
Users can be organized into trees. The group nesting level is not limited.
The user account tree is available in Users -> User & Group.
SafeUTM implements the principle of inheritance, which makes it easy to set and change parameters common for users, defining them for the parent group, for example, quotas or remote VPN access. The principle of inheritance is very convenient for performing management operations related to all users in the group.
An example of a user tree can be seen below: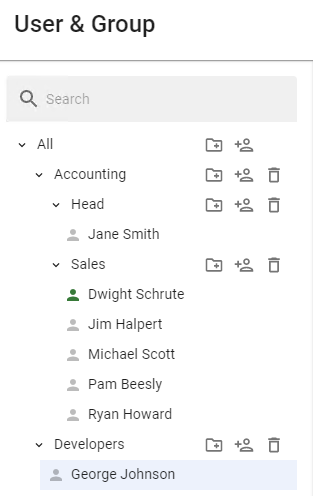
The user’s icon can be colored differently. The table below provides a description of each color of the user’s icon:
|
User Account Status |
Description |
|
|
The user has completed the authorization procedure and has been granted internet access. |
|
|
Authorization restriction has been set in the User Settings. |
|
|
The user has not completed the authorization procedure and has not been granted internet access. |


User & Group
Creating, deleting, and moving user accounts.
General
To manage groups and accounts in the user tree, there are corresponding buttons on each group:
|
Symbol |
Description |
|
|
Create user account |
|
|
Create group |
|
|
Delete user account or group |


Creating User Account
To create an account in a certain group, click Create User Account in it. The control element symbols are illustrated in the table above.
The second way to create a user in a group is to select the designated group and click Create User in the right part of the window in the General tab.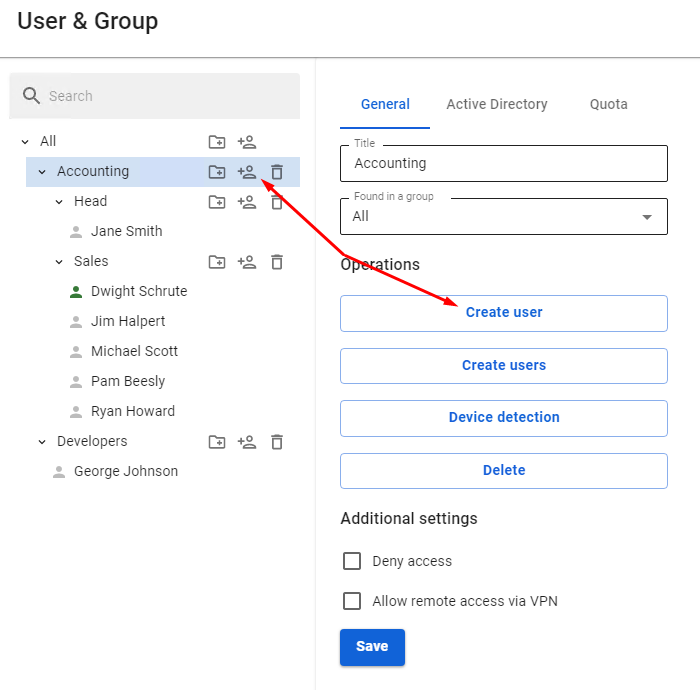
Next, you will see a window for creating a user account, where you need to define a number of parameters. The form for creating a user account is shown below.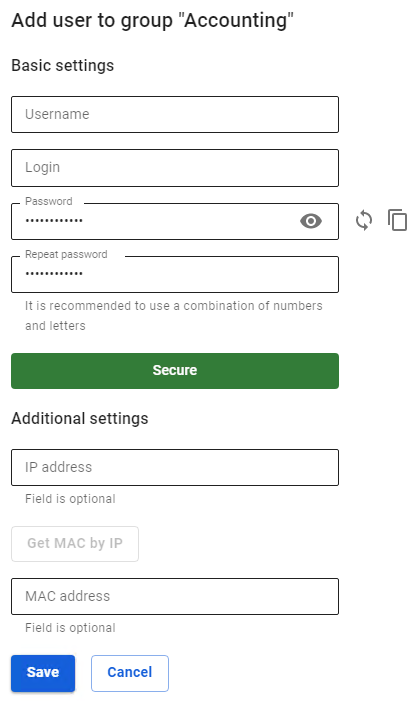
Login must be entered in lowercase Latin characters, for example, j.smith
Recommendations for creating password complexity: minimum length - 10 characters; use of lowercase and uppercase Latin characters; use of numbers and special characters. You can generate a password.
When you fill in the Additional settings, a corresponding rule will be created in the user card in the IP and MAC authorization tab and in the Authorization -> IP and MAC authorization section.
If this IP address or MAC address is used in DHCP server rules, then the DHCP server rule will be in priority.
For accounts imported from MS Active Directory (AD), password verification is carried out by means of AD. Active Directory user authorization is configured in the corresponding section.
You cannot create a user in the Active Directory group from SafeUTM. If you need to add an additional user to the Active Directory group, you must do so in the user tree on the domain controller.
It is impossible to view or restore the account password, only changing is allowed.
After you have entered all required parameters, click Save. An account will be created that will automatically get all the values of some parameters of the group in which it was created.
Creating Group
To create a group, you need to click on the corresponding control symbol to the right of the group name (you can create both a tree root group and a child group).
A window will open, in which you will need to type in the name of the new group and click Save. An example of adding a group can be seen below: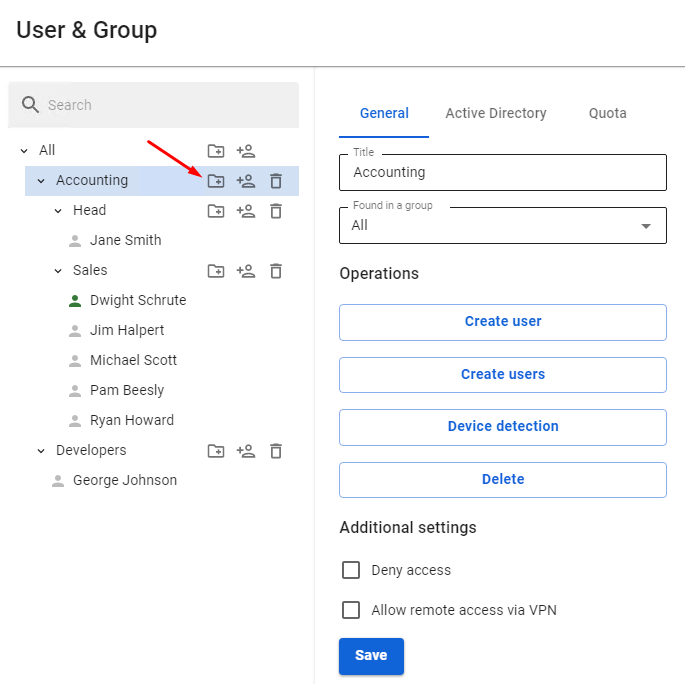
Mass Creation of Users with Authorization by IP
Mass creation of users for authorization by IP is possible. You can find out more in the article about this kind of authorization.
Alternatively, you can use Netscan to create them automatically when you try to access the internet.
Deleting Group or User Account
To delete a user account, select the user and click on the corresponding symbol. You can also select the user and click Delete in the General tab.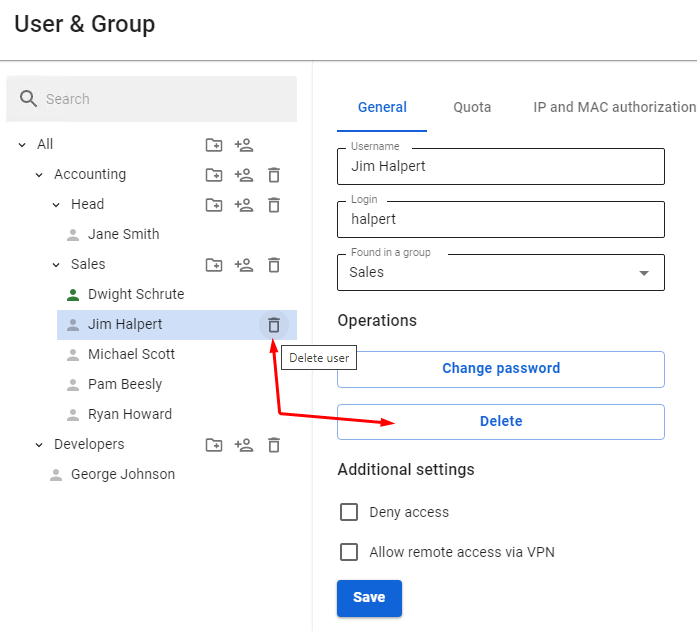
Deleting a group is done the same way.
Moving User Account or Group
To move a user account to another group, select this user in the General tab and find Found in a group field. From the drop-down list, select the group to move the user into and click Save.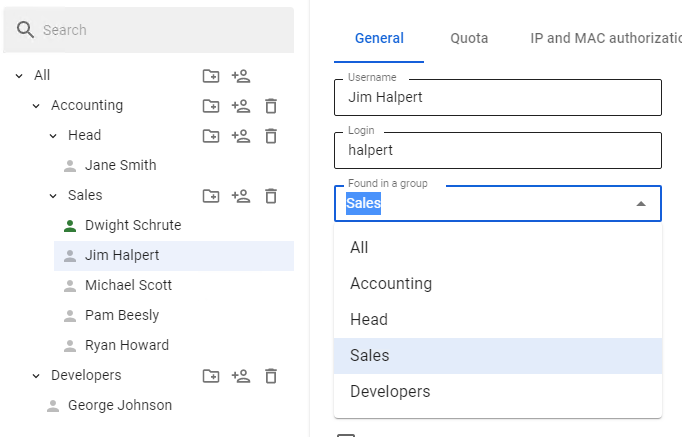
Configuring Users
Configuring user account settings.
Categories
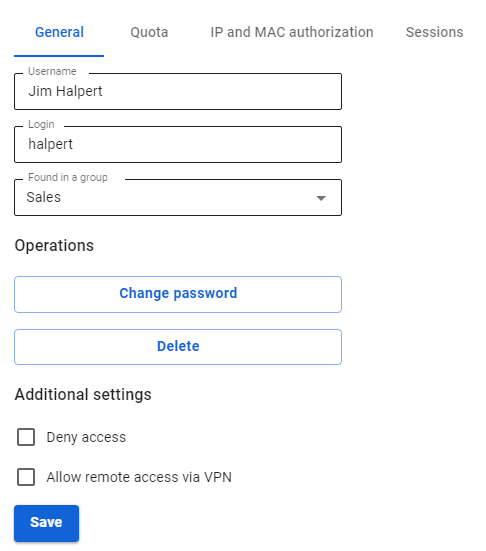
Users are configured in Users -> User & Group. To determine/edit the user account settings, select the account in the user tree by left-clicking on it. The parameters of the selected account will appear on the right side of the screen. All configurable parameters are divided into categories: General, Quota, IP and MAC authorization, and Sessions. If you want to change the parameters of all users in the group, select the corresponding group in the user tree.
General category
The section of main settings includes many parameters determining the user account status.
The basic parameters are:
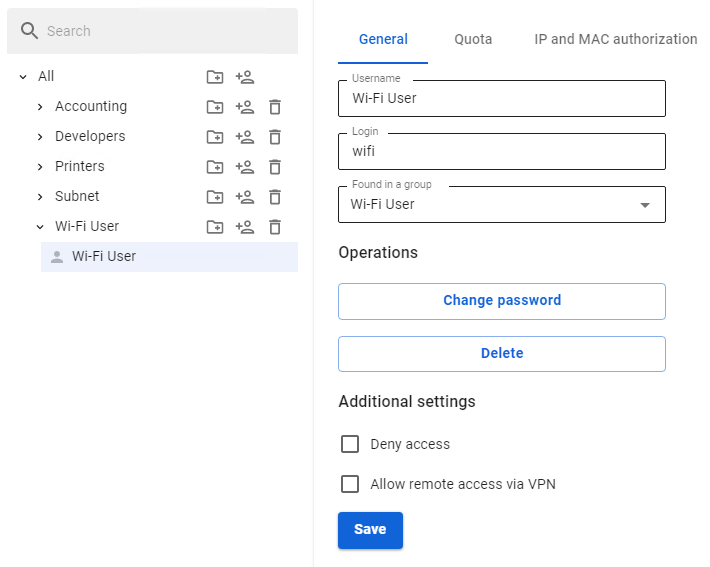
- Username. The name of the user for whom the account is being created, for example, John Smith. Maximum 128 characters.
- Login. The login is used to complete the authorization procedure in various SafeUTM services. The login must contain Latin lowercase letters, for example, j.smith. Maximum 32 characters.
- Found in a group. The group the user belongs to. You can use this field to move the user to another existing group.
- Deny access. Prohibit the user from being authenticated in the SafeUTM gateway. It means the user cannot use the internet, send an email, or access a personal account.
- Allow remote access via VPN. Allow connecting to the SafeUTM server via VPN from the internet.

For users exported from Active Directory, there is a corresponding line above the user settings. For such users, it is impossible to edit the name, login, or move them to another group in the General tab.
Quota category
This section allows you to view and increase the user quota in case of using traffic limits.
To increase the quota, use the Increase traffic for the current period field.
Example: A user is assigned a quota of 1000 MB for a week (Monday to Sunday). By Thursday, the amount of traffic exceeded the value set by the quota. It is required to provide the user with additional traffic once.
To do this, enter the required value in the Increase traffic for the current period field and click Increase. The Remaining line will reflect all available traffic, taking into account the added one.
You can find the information about how to set up traffic quotas in the User Quotas section.
IP and MAC Authorization category
This category contains authorization rules by IP and MAC created for a specific user in two sections:
- Users -> User & Group -> IP and MAC authorization

- Users -> Authorization -> IP and MAC authorization

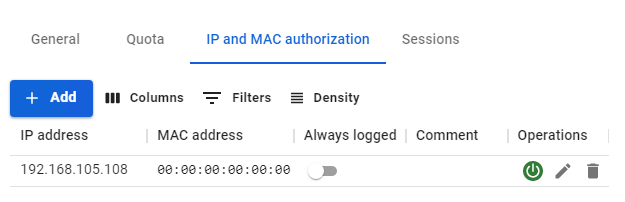
The IP and MAC authorization rules also create a similar binding in the SafeUTM DHCP server. But if the same IP and MAC addresses are used in enabled DHCP server rules, then the DHCP server rules will be executed first.
Sessions category
Contains a table with information about all active user sessions: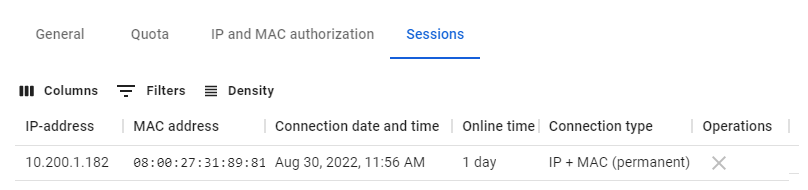 When you click on "X" in the Operations column, UTM will terminate the user's session.
A similar table is located in the Monitoring -> Authorized users section.
Terminal Server Users
Used for remote work with the provision of a separate desktop for each user. Provides a service for the work of dozens and even hundreds of users.
Terminal Server Authorization
If the admin does not need the separate authorization of terminal server users, and the same access settings (content filtering and user firewall) can be applied to them, the server can be authenticated as a single user.
The best option is authorization by IP address.
Please note that when the number of users on the terminal server is large, it may be necessary to increase the number of simultaneous sessions from one address in advanced security settings.
Authorization of Terminal Server Users
Configuring Remote Desktop IP Virtualization on Windows Server 2012
For the Remote Desktop IP Virtualization to work on one of Windows servers, the role of a DHCP server must be added (this function may not work correctly with other DHCP servers) and an IP address area for terminal server users must be allocated.
In Group Policy Management Editor, you need to navigate to Computer Configuration –> Administrative Templates –>Windows Components -> Remote Desktop Services –> Remote Desktop Session Host –> App Compatibility.
Enable the option Turn on Remote Desktop IP Virtualization in group policy with the option Per Sessions: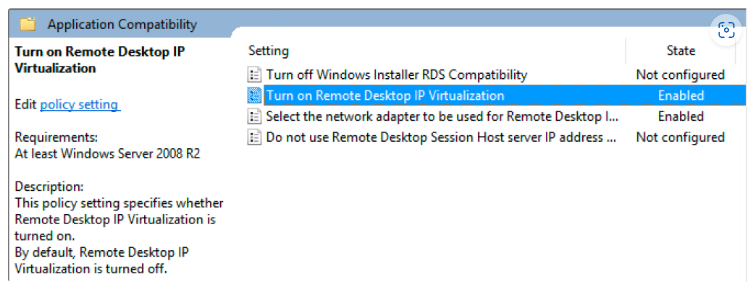
It is also recommended to enable the option Do not use the IP address of the remote desktop session host server if the virtual IP address is unavailable.
Use command gpupdate /force to update all policies.
You can check that the settings have changed using the following command in PowerShell:
Get-WmiObject -Namespace root\cimv2\TerminalServices -query "select * from Win32_TSVirtualIP"
Where values must be: VirtualIPActive = 1 (virtualization on) and VirtualIPMode=0 (for a session).
User Authorization
User Authorization
General Information
There are several authorization methods that you can find in this subsection.
The user is automatically logged out when inactive (no internet connections) for 15 minutes (except connections via VPN).
Keep in mind, that the operating system itself can also generate traffic (for example Windows telemetry) without user intervention. Because of this, the timeout for the user will be constantly reset and will not be able to function correctly.
You can change the time of automatic logout using the settings Disconnection timeout by going to Users -> Authorization: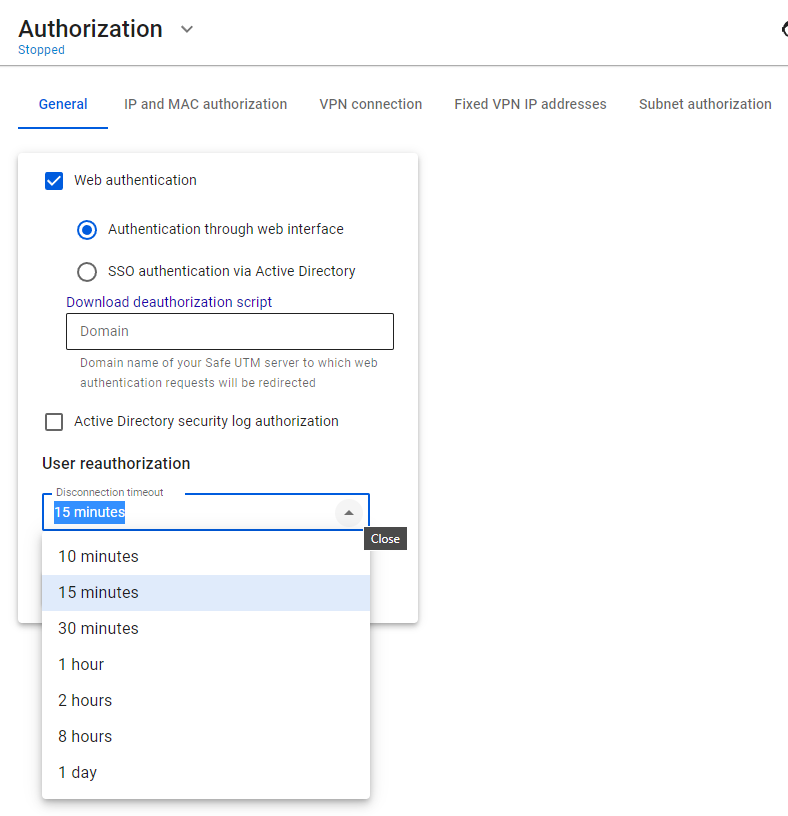
For the new timeout to be applied, you need to reboot SafeUTM.
You can also authenticate users connecting via VPN using IPSec IKEv2, SSTP, L2TP IPSec, PPTP, and PowerShell scripts.
Web Authorization
Supported browsers:
- Google Chrome, version >= 76
- Firefox, version >= 71
- Safari, version >= 13
In this type of authorization, any request from an unauthenticated user sent via a web browser will be redirected to a special authorization page of SafeUTM. After successful authorization, you will be redirected to the specified request.
For this type of authorization, the user must have the IP address of the SafeUTM local network interface specified on the network card as a gateway (chained into a gateway chain) or for direct connections to a proxy. Also, before connecting to the Internet, the DNS resolution of addresses must work, otherwise, the browser request to the example.com address will not be redirected to the gateway and the username and password request will not appear in the browser.
You can check name resolution in Windows using the command: nslookup google.com. The output of this command must contain IP addresses.
To configure authorization via the web interface, go to Users -> Authorization and select Web authentication and Authentication through web Interface, as shown in the screenshot below: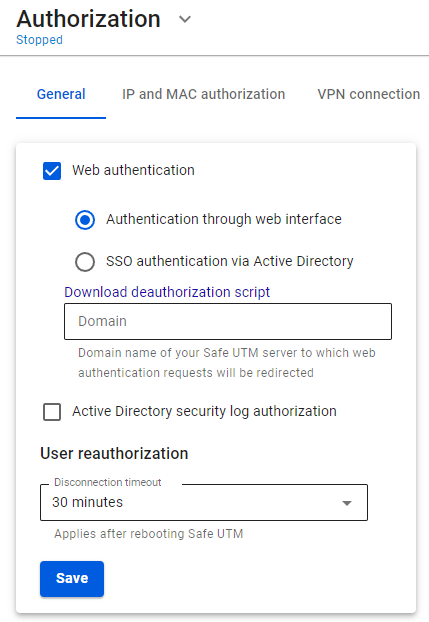
After filling in the Domain name field and saving the settings, a Let’s Encrypt certificate will be issued and the user will be redirected to the authorization window, bypassing the security exception page: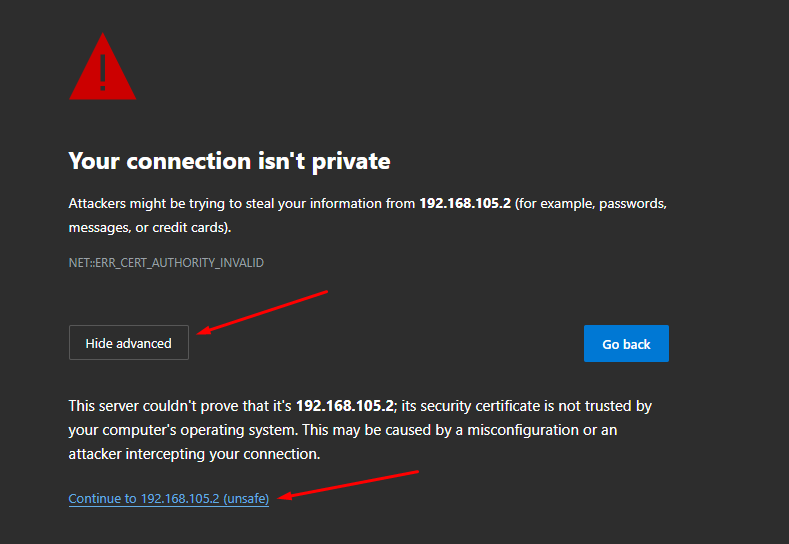
If a certificate for such a domain has already been loaded in the Certificates section, then it will be used and a new certificate will not be issued.
Next, try to access the internet via a web browser. An authorization window should appear where you need to type in the account’s login and password of the user created on SafeUTM. The authorization window can be seen in the screenshot below: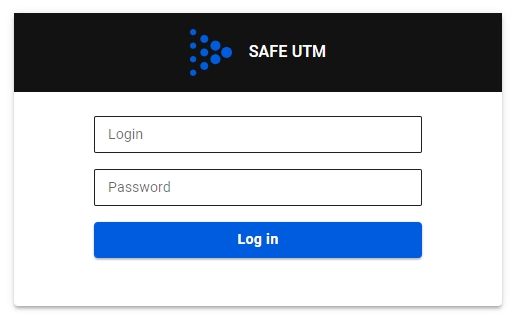 When the user is authenticated via the web, access to the internet will be provided until the authorization is forcibly canceled or terminated due to the user’s inactivity.
When logging into an HTTPS website, the user must confirm the trust of the SafeUTM certificate. Alternatively, the certificate can be added to trusted root certification centers on the device (for example, through domain policies).
It is recommended to specify the IP address of the local SafeUTM as a DNS server on the LAN computers and devices.
You can learn more about the authorization of Active Directory (SSO-authentication) users by clicking on this link.
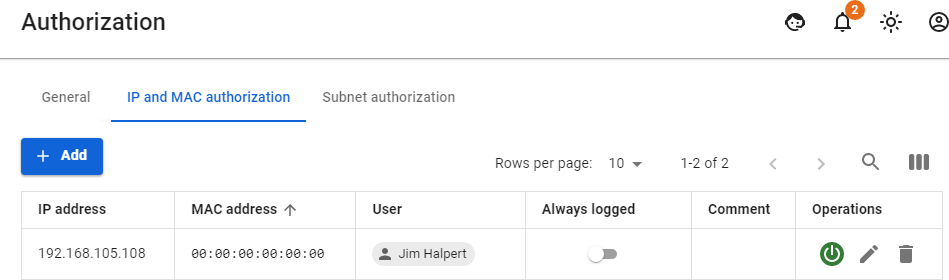
Authorization by IP and MAC address
General Information
The IP and MAC authorization rules also create a similar binding in the SafeUTM DHCP server. However, if the same IP and MAC addresses will be used in the enabled rules of the DHCP server, then the DHCP server rules will be executed first.
To configure IP and MAC authorization, you must:
- In section Authorization -> IP and MAC authorization click Add.
- Create an IP and MAC authorization binding rule:

Set the flag Permanently authorized to provide unlimited internet connection even if the user is not active.
The rules created in this section are reflected in the user card.
Find out more about user authorization only by IP address or MAC address in the articles Authorization by IP address and Authorization by MAC address
Authorization by IP address
Configuring Authorization by IP
If the device is a router and SNAT is enabled on it, then when its external IP is authorized in UTM, all users behind this router will gain Internet access.
Users who are behind the router in the local UTM network cannot be authorized using the IP address - MAC address bind, since the router does not handle L2-level traffic.
If authorization by IP address is configured, this IP will not be issued by DHCP.
1. Create a user that will be authorized by IP in SafeUTM or import a user from Active Directory.
2. Go to Users -> Authorization -> IP and MAC authorization.
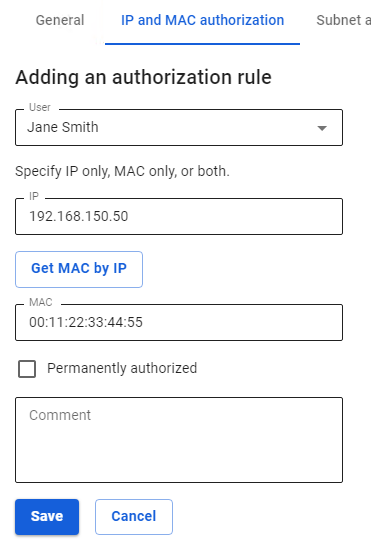
3. Create a binding rule IP address <--> User, as shown in the screenshot.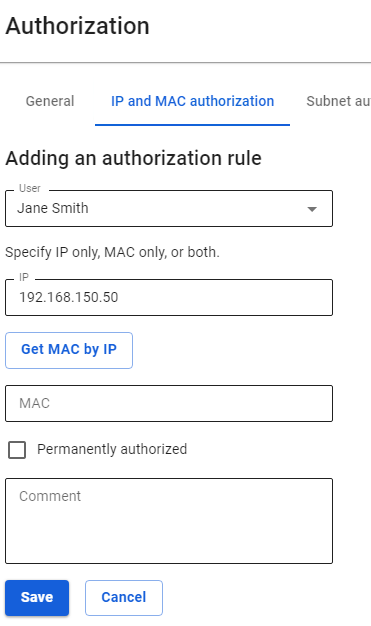
The user's IP address is to be used when creating a session. The computer/device's IP address must match the one specified in the rule.
If the user is network equipment (video cameras, servers, etc.), it is recommended to select Permanently Authorized, in which case the user session will be created after the UTM is turned on, and the network equipment does not need to make a web request. For such equipment, it is recommended to configure a static IP address or DHCP with an IP address binding.
This is required, for example, for resources published via DNAT.
After the user makes a web request, a session with the IP authorization type will automatically be created on UTM in Monitoring -> Authorized Users.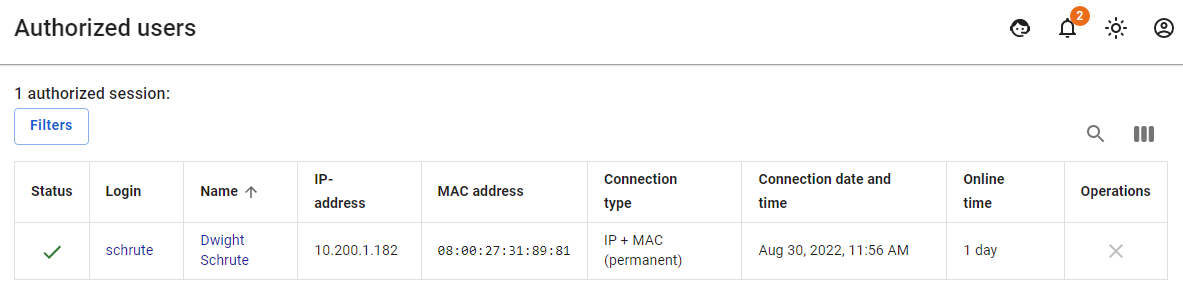
For sessions with an IP authorization type, the MAC address field is not filled in, because, with this type of authorization, there is already an IP address required to create an authorization session.
You can use device search to automatically create users when they try to access the Internet. To do this, see the Netscan article.
Only one device can be authorized under one user by IP address (simultaneously with this type of authorization, two more devices can be authorized under one user by any other authorization method).
Adding Group of Devices with Authorization by IP
You can add users from a range of IP addresses (for example, a network distributed by access points to wireless devices over Wi-Fi). To do this, you need to follow these steps:
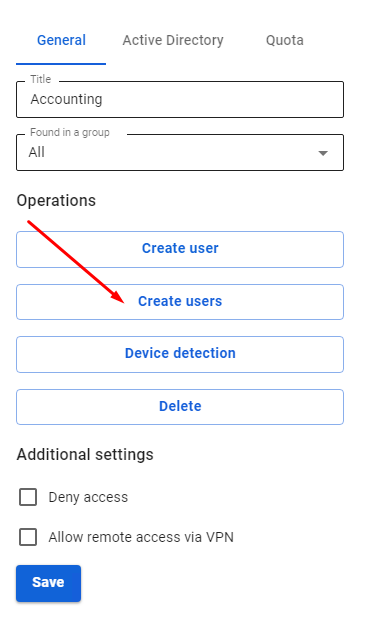
- Create a new group in the user tree.
- Select a group from the user tree to which you want to add devices.
- In the General tab, click Create Users.
A window opens with the settings of the users created. Fill in the following fields:
- Name Prefix. Users will be created with names of the type "User IP address ".
- Login prefix. Users will be created with logins of the type "user_ip-address ".
- IP addresses of the first and last users.


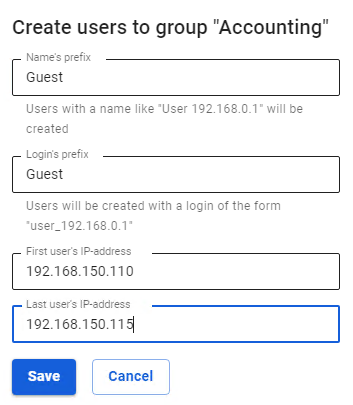
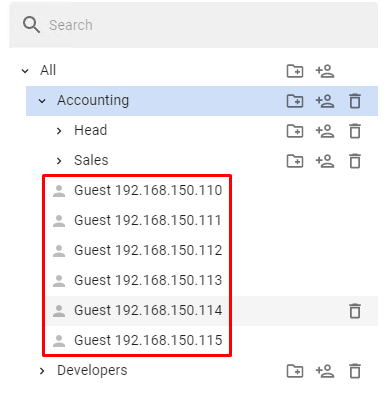
If some IP addresses from the range are already used by other SafeUTM users, they will be skipped during creation, and as a result, fewer users will be created than addresses in the range.
Users will be created with the settings of the created group and an IP address from the range. In addition to the user tree, in the section Users -> Authorization -> IP and MAC authorization for each user, a binding rule IP address <--> User will be created automatically, as shown in the screenshot:
Authorization by MAC address
In order for a device to be authorized on UTM by MAC address, they must both be in the same broadcast domain, and UTM serves as the gateway for the devices.
Users who are behind the router in the local UTM network cannot authorize by MAC address, since the router breaks broadcast domains and does not process L2-level traffic. Such users can authorize only by IP address.
Configuring MAC Authorization
1. You need to find out the MAC address of the device. To do this, in the Windows command prompt, type the command: ipconfig /all | findstr Address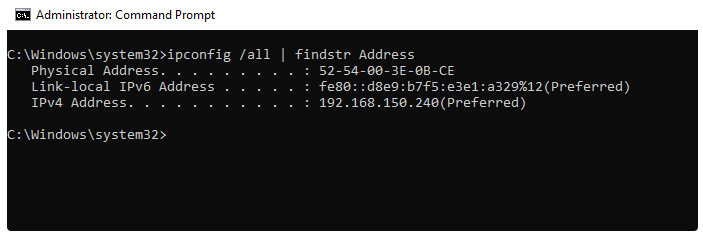
2. Make sure that the computer and UTM are in the same broadcast domain.
To do this, on UTM in Server Management -> Terminal section, enter the command: ip neigh
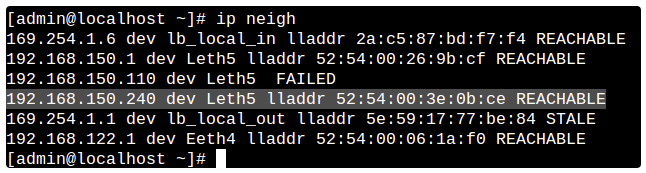
This command outputs the UTM's ARP table, and the presence of an entry with the device MAC address and REACHABLE status indicates L2 availability between UTM and the device.
3. Create a binding rule User <--> MAC address in Users -> Authorization -> IP and MAC authorization:
It is not possible to set up permanent authorization for MAC authorization.
This is technically impossible because an IP address is required to create an authorized session. Therefore, it is recommended to use MAC authorization in combination with a DHCP server.
The result can be viewed in Monitoring -> Authorized users, where a session with the MAC authorization type will be displayed.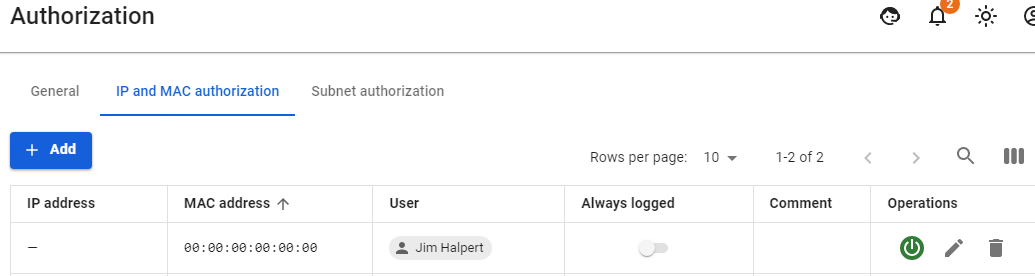
MAC authorization behavior when moving a device between local networks
In organizations, there is often a situation when it is necessary to move between local networks with a laptop and at the same time always stay online. In such cases, authorization by MAC address works perfectly well.
You must have your own DHCP server configured or on SafeUTM. In the distributed credentials, the gateway should be the local SafeUTM interface.
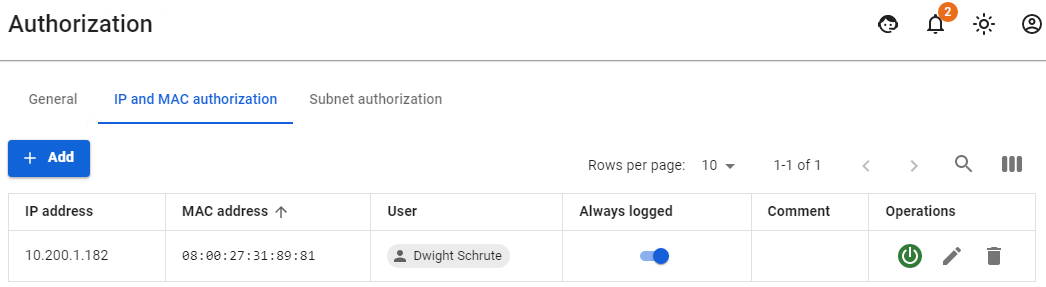
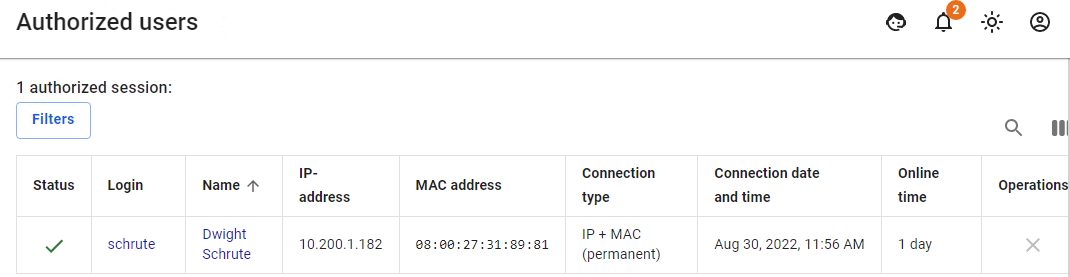
Let's take as an example a situation where a user Dwight Schrute needed to move with a laptop between local networks:
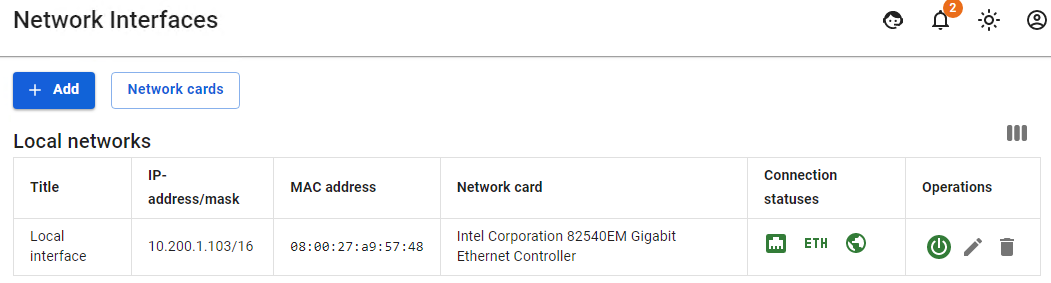
- There are local interfaces configured on UTM as follows:

- This user has a MAC address authorization rule configured:

- He also has one active session in the Authorized Users section:

- Then the user moves from one local network to another. He is given other network credentials from the DHCP server, in which UTM is specified by the gateway, and if any activity on the part of the user is detected, the second session with authorization by MAC address will appear.
If the user does not have access and can’t see the second session with authorization by MAC address, then most likely this could have happened due to the fact that the user's network credentials were not updated.
Reset the old network credentials from the DHCP server and get new ones using the command:ipconfig /release && ipconfig /renew.
Configuring MAC Address Authorization for Network Printer and Other Network Devices
Network printers and other network devices that need access to the internet must be authorized on UTM. Such devices can be called static and authorization by MAC address is perfect for them.
In order to authorize a network printer, you need to create a user for this printer manually or through Netscan.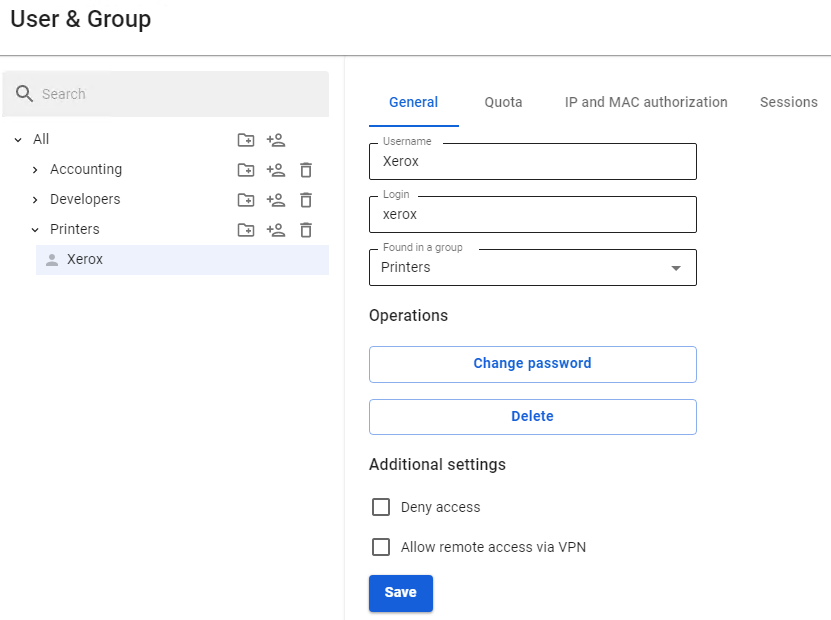
For a network printer, in Users -> Authorization -> IP and MAC authorization you need to create a rule User <--> MAC address.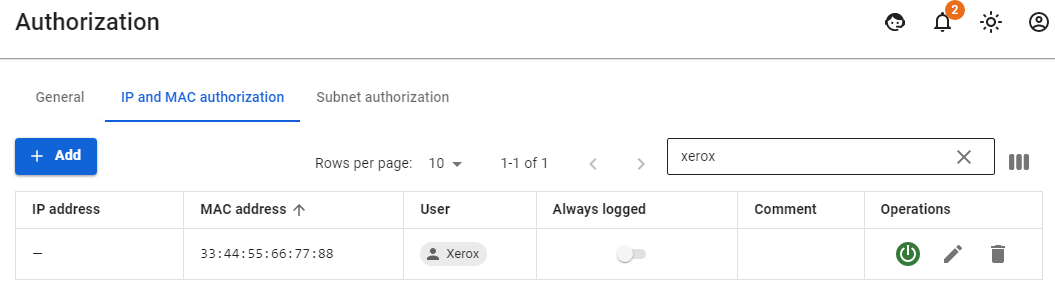
When detecting activity from a network printer or other device, its user will immediately appear in Monitoring -> Authorized users.
In modern phones, there is an option for MAC Randomization. This option will interfere with phone authorization by MAC address. It is recommended to disable this option or use other types of authorization (for example, web authorization)
VPN Connections
VPN Connection
To gain access from outside (from home, hotel, or another office) to the enterprise's local network located behind SafeUTM, you can connect via VPN from this machine (computer or mobile device) to the SafeUTM server.
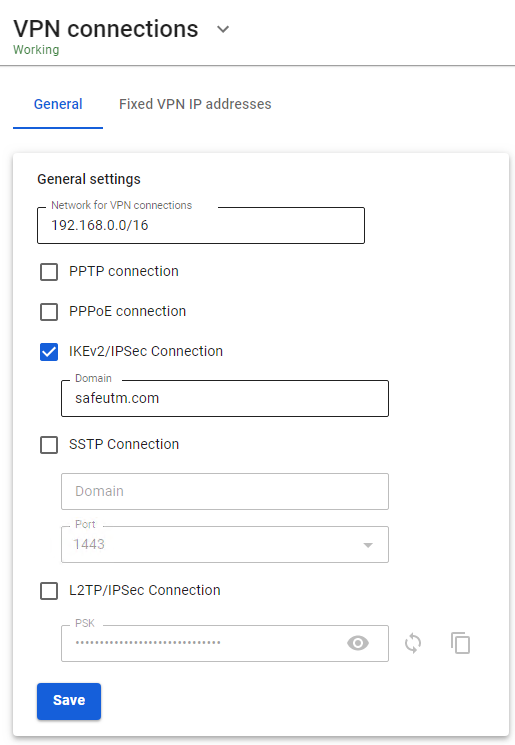
For client-to-site VPN, our server supports four tunneling protocols: IKEv2, SSTP, L2TP/IPsec, and PPTP.
For security reasons, it is not recommended to use the PPTP protocol (it is left for compatibility with outdated operating systems and equipment, as well as for authorization in a local network where there are no requirements for strict traffic encryption).
IKEv2 protocol is recommended in terms of speed and security.
You can use the user's personal account to distribute instructions on creating custom VPN connections.
Authorization by PPTP
Do not use this type of connection. This connection method is EXTREMELY insecure and has been left solely for compatibility with older solutions. Use IPsec-IKEv2.
- A login/password bundle is used for user authorization and Active Directory users.
- To authenticate by PPTP protocol you need to assign an IP address to a network device, as well as configure a connection using the PPTP protocol, specifying the SafeUTM gateway IP address as the PPTP server address.
Upon successful authorization and establishment of a network tunnel, an additional IP address will automatically be assigned to the network device to gain access to internet resources. Using authorization by PPTP does not affect the ability of a network device to access LAN resources in any way.
Configuring SafeUTM Global Settings
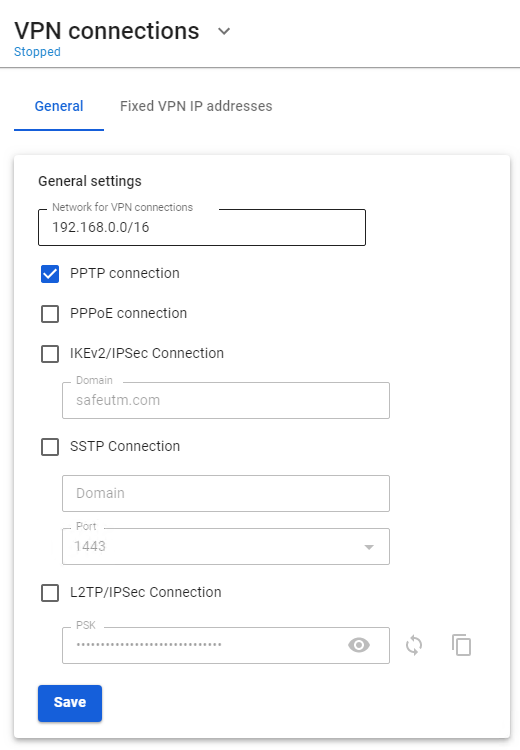
- Go to Users -> VPN connections.
- Select PPTP Authorization and click Save.

You can edit your login and password in the tab Users -> User & Group upon selection of a necessary user.
The user is assigned an IP address automatically from the pool of addresses for VPN configured in the section Users -> VPN connections (for example, 10.128.0.0/16).
In order to set up a static binding of addresses issued via VPN to certain users, go to Users -> VPN connections -> Fixed VPN IP Addresses, click "+ Add" and specify the intended user and IP address. An example of a fixed VPN IP address can be seen below: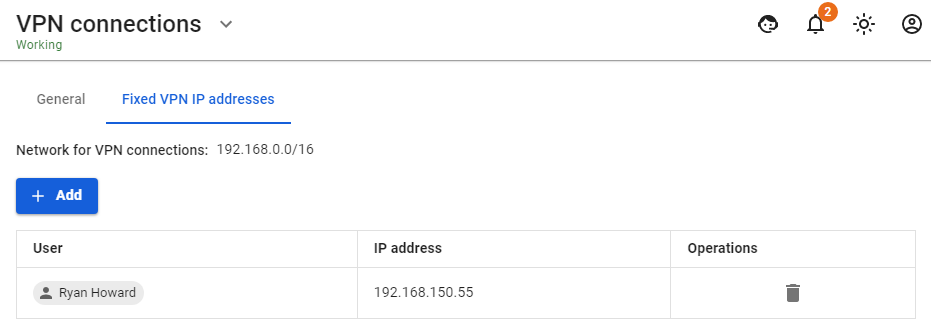 When connecting from the internet, we recommend using IPSec IKEv2, L2TP IPSec, or SSTP for more reliable traffic encryption.
Configuring Users in SafeUTM
Allow the user to connect via VPN from the Internet by checking in the user settings (Users -> User & Group -> General tab) in the box Allow remote access via VPN.
Possible Problems
- The provider from the gateway’s side or from the connected client’s side blocks the GRE protocol with which the PPTP connection takes place. In this case, when trying to connect to an external SafeUTM address, error 619 will occur. You can determine on which side the problem is by connecting from different places and from different providers. If it is possible to connect from some places, it means that the problem is on the side of those clients who cannot connect. When the provider is determined, you need to try to solve the problem with them or use IPsec-IKEv2 or SSTP.
- TCP port 1723 is blocked. You can check the port availability using standard network utilities such as telnet. If there is no connection to this port, then the tunnel cannot be established.
- The user's username or password is incorrect. If this happens, it is often suggested to specify the domain when reconnecting. Try to create alphanumeric passwords, preferably in Latin, for your accounts. If the password is entered incorrectly more than 6 times, the user's IP address will be blocked by the password attack protection service.
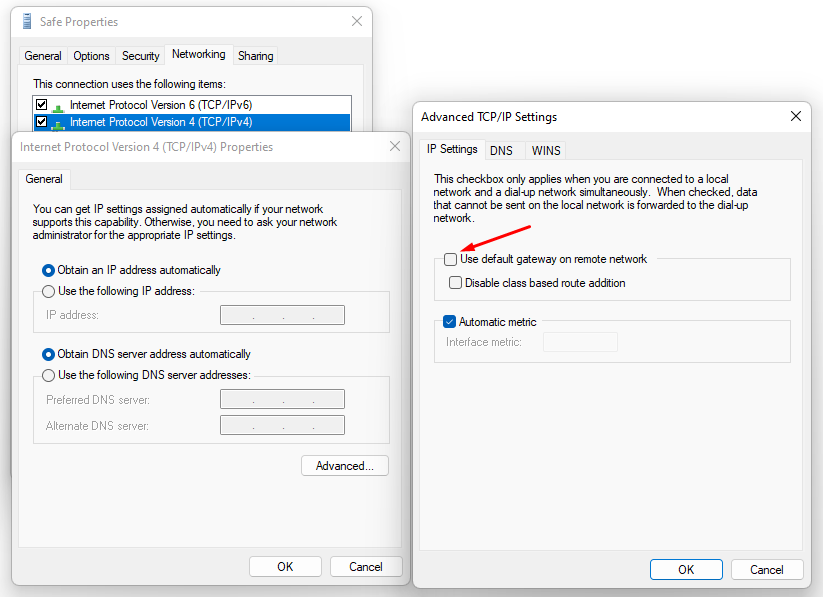
- If the connection is made with Windows OS, then in order for the packets to go through it, you need to make sure that the following box is checked in the connection settings Use default gateway on the remote network in the section VPN connection properties -> Network tab -> Internet Protocol Version 4 (TCP/IPv4) properties -> Advanced. If it is not necessary to route all packets to this interface, then the route must be written manually.
- When the error The connection was terminated by the remote computer occurs, it is necessary to enable MPPE 128-bit support (In Windows this option is enabled by default) and only check MSCHAPV2 among authorization protocols.
If a VPN connection is established but it is not possible to access local network resources
Follow the recommendations in the article Features of Routing and Access Organization.
Authorization by PPPoE
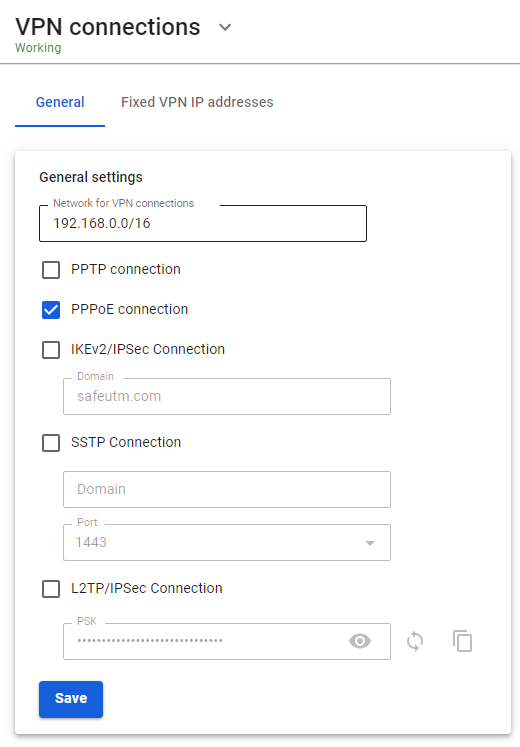
- Go to Users -> VPN connections.
- Select PPPoE Authorization and click Save.

You can edit your login and password in the tab Users -> User & Group upon selection of a necessary user.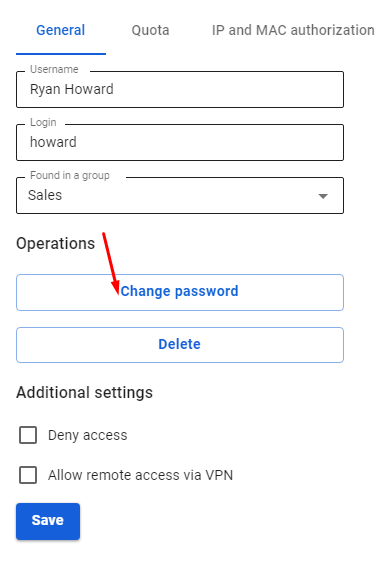
The user is assigned an IP address automatically from the pool of addresses for VPN configured in the section Users -> VPN connections (for example, 10.128.0.0/16).
In order to set up a static binding of addresses issued via VPN to certain users, go to Users -> VPN connections -> Fixed VPN IP Addresses, click and specify the intended user and IP address. An example of a fixed VPN IP address can be seen below:
IPSec IKEv2
This VPN protocol is preferable and recommended for all usage scenarios.
Instructions for setting up VPN connections on different operating systems are available here.
Setting up VPN Server in SafeUTM
- To enable authorization by IKEv2, check the corresponding box Connection via IKEv2/IPsec in the Web interface section Users -> VPN connections.
- Routes are transmitted to clients to your local networks automatically. To control access to networks, use Firewall.
- Connection is possible only by domain name (not by IP address), therefore it is necessary to have a domain name that resolves to the IP address of the SafeUTM external interface. In the Domain field, this DNS name must be specified. It is necessary to issue a Let's Encrypt certificate.

- For users who need to connect from outside via VPN, check the box Allow remote access via VPN in the user tree. The username and password specified here will be used to connect.
IPsec IKEv2 Support in Client OS
- Microsoft Windows 7 (2009). Requires installation of a Let's Encrypt root certificate
- Apple MacOS X 10.11 "El Capitan" (2015)
- Linux NetworkManager plugin (since 2008)
- Google Android 11 (2020). On older versions, you can use the StrongSwan application
- Apple iOS 9 (iPhone 4S) (2015)
- KeeneticOS 3.5
- Mikrotik
- Cisco routers
SSTP
SSTP (Secure Socket Tunneling Protocol) is a protocol of secure traffic tunneling based on SSL/TLS. It is supported by Windows OS Vista and above, as well as Mikrotik, Keenetic routers, and others.
If possible, do not use this type of connection. This connection method passes through NAT better than others, but with unstable communication quality, it works much worse than other VPNs (especially when transmitting audio/video), since it encapsulates all data inside TCP. It is recommended to use IPsec-IKEv2 instead of SSTP.
UTM does not support Mikrotik connection over SSTP because Mikrotik uses an old and insecure SHA-1 algorithm.
Setting up SafeUTM
It is not recommended to use SSTP for VPN connections from the local network.
1. To enable SSTP, check the box SSTP connection in the web interface in Users -> VPN connections.
2. Connection is possible only by DNS name, so the IP address of SafeUTM external interface should resolve to one of the names of your external domain zone. In the Domain field, you need to specify this DNS name (use the real name with the correct A-record, because it is necessary for issuing a Let's Encrypt certificate).
3. Port - select the suggested port (from the options: 1443, 2443, 3443, 4443).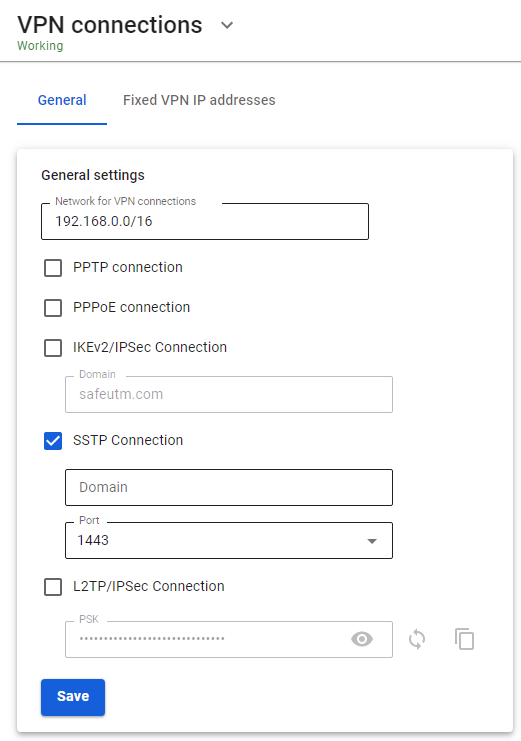 4. For users who need to connect from outside via VPN, check the box Allow remote access via VPN in the user tree. The specified username and password will be used for the connection.
VPN setup instructions for different operating systems can be found here.
If a VPN connection is established but it is not possible to access local network resources
Follow the recommendations in the article Features of Routing and Access Organization.
L2TP IPSec
If possible, do not use this type of connection. This connection method can be unstable, has huge redundancy, has low performance, and does not support the strongest encryption. IPsec-IKEv2 is recommended instead.
All modern operating systems support IKEv2, or there are applications for them.
Configuring SafeUTM Global Settings
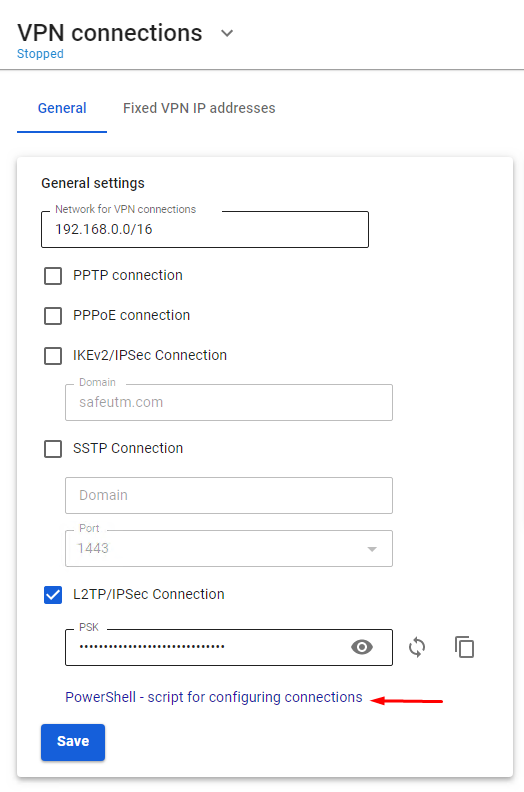
1. Go to Users -> VPN connections.
2. Check the box L2TP/IPsec Connection.
3. Enter the secret phrase (PSK key).
4. Click on Save.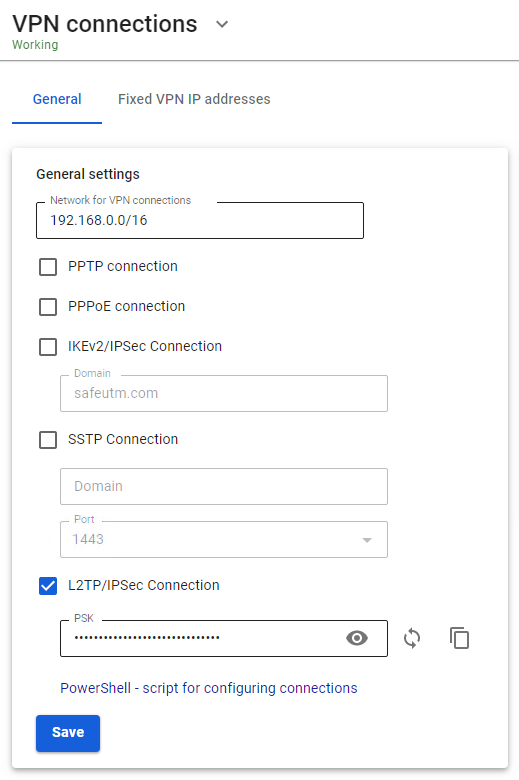
Configuring Users in SafeUTM
Allow the user to connect via VPN from the Internet by checking in the user settings (Users -> User & Group -> General tab) in the box Allow remote access via VPN.
L2TP IPsec clients behind the same NAT may experience connectivity issues if there is more than one client. Instructions can help solve the problem. We recommend using IKEv2 IPSec instead of L2TP IPsec.
If a VPN connection is established, but you cannot access local network resources
Follow the recommendations in the article Features of Routing and Access Organization.
User's Personal Account
To quickly configure user connections, you can enable access to the SafeUTM web interface.
In the personal account accessible with the use of SafeUTM accounts details (local or domain, in case of integration with Active Directory), users will be able to download ready-made PowerShell scripts to create user connections and a link to instructions for setting up a VPN and running scripts.
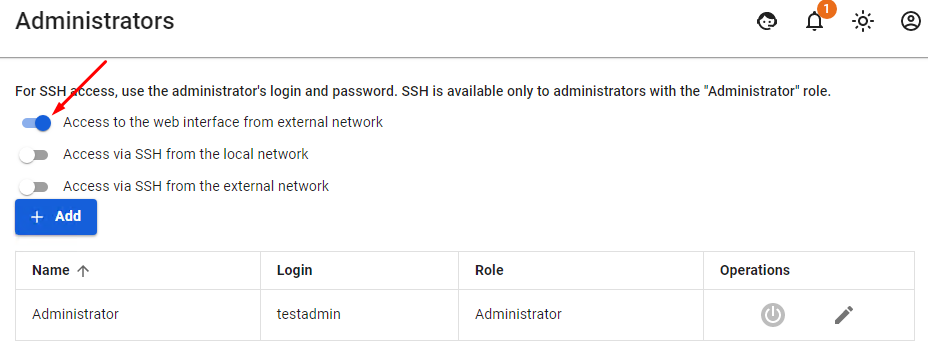
You can enable access from the Internet to your personal account and SafeUTM administration web interface in the section Server Management -> Administrators by enabling the setting Access to the web interface from external network. After enabling the parameter, the personal account and the web administration interface will be accessible by the IP address of the SafeUTM external interface.
If the external IP address of SafeUTM is not included in the "white" networks, then you need to forward port 8443 on the upstream device.
When logging in under a user account (including those imported from Active Directory), it will be possible to download scripts for creating VPN connections and a link to instructions for their implementation.
Users will also be able to remotely administer the SafeUTM server.
Features of Routing and Access Organization
If VPN is required only to access local network resources
If you need to access the Internet directly through your provider, and you need to use a VPN only to access corporate network resources on computers connected via VPN, you need to configure the following settings.
- In the VPN connection properties, uncheck the box Use primary gateway on remote network. Tab Network -> Internet Protocol version 4 -> Advanced -> IP Settings.

- Create a route to the corporate network (in Windows 7, 8, 8.1, and 10, a route based on the class will be automatically created, depending on the address that the connection will receive via VPN. For example, a route will be added for the 10.0.0.0/8 network if the VPN server receives an address from the 10.128.0.0/16 network). For IPsec-IKEv2, you can configure automatic route acquisition.
Route example: if the corporate network is172.16.0.0/16, and the network for VPN connections is configured to SafeUTM10.128.0.0/16(and the IP address is issued to the VPN connection from the same network), then the route will be:route -p add 172.16.0.0 mask 255.255.0.0 10.128.0.1 - In some cases, the route may not work, then there is a ping to the protected interface (
10.128.0.1), but there is no ping to the hosts in the LAN. In this case, when creating a route, you need to specify the number of the VPN connection interface. The final route will be as follows:route -p add 172.16.0.0 mask 255.255.0.0 10.128.0.1 if nnwhere nn is the number of the VPN connection interface which can be viewed when the VPN connection is active in the output of the route print command in the console section List of Interfaces.
If it is not possible to access computers in the local SafeUTM network
- Make sure that the local network (or the address on the network card) on the remote machine does not intersect with your organization's LAN, if it intersects, then there will be no access to your organization's network (traffic on the routing table will go to the physical interface, and not to VPN). Addressing must be changed.
- SafeUTM must be registered as the main gateway on LAN computers. If this is not the case, then you need to register the appropriate route manually on the devices, so that network packets go to SafeUTM for the VPN network.
Example:route -p add 10.128.0.0 mask 255.255.0.0 10.1.1.1where10.128.0.0/16is the address of the SafeUTM VPN network (configured in Users -> VPN connections), and10.1.1.1is the IP address of the local SafeUTM interface. - Check the firewall settings (FORWARD table) in SafeUTM for prohibiting rules.
- Computers and servers on Windows OS can restrict access to network folders using network profile settings rules (both on the side of the computer connecting via VPN, and on the side of computers and servers in LAN):


Enable access to files and printers for All Networks and Private Networks profile.
You can do this using PowerShell (launched with rights elevated to the administrator) by running the command:
Enable-NetFirewallRule -Group "@FirewallAPI.dll,-28502"
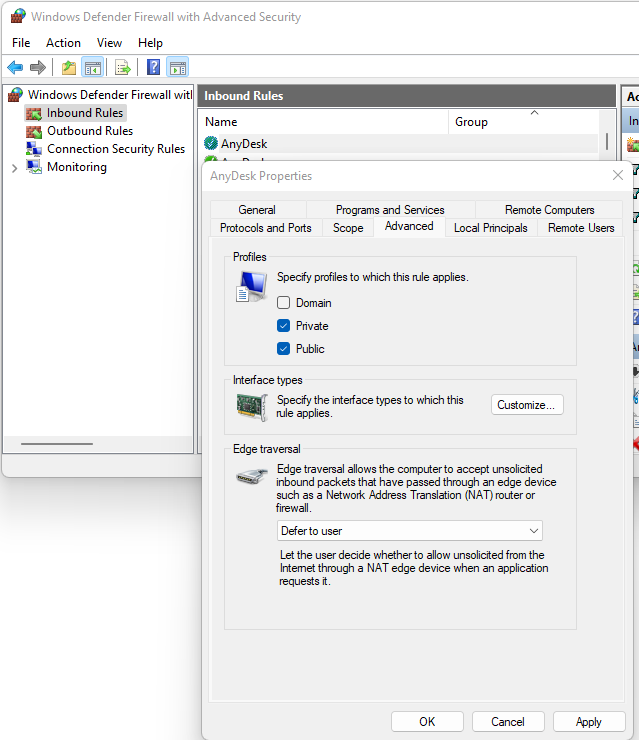
- Windows Defender Firewall may block access to certain programs or services (including RDP) to external networks.
Check it in the settings of incoming and outgoing connections (you need to allow access from frequent and local networks):
- Antivirus software on the computer may block access to it from non-local networks. Or block access to specific programs.
For example, for some antiviruses, it is necessary to add a network for VPN connections (10.128.0.0/16 by default ) to exceptions.
Instructions for running PowerShell scripts
Use ready-made scripts downloaded from your server to create a VPN connection in Windows versions 8.1 and 10.
If you are using Windows 7, you must create the connection manually (see Manually create user-side VPN connections).
Which VPN protocol should I choose?
With several options for possible VPN connections, choose protocols according to the following criteria:
- IKEv2/IPsec is the best protocol in terms of performance and connection reliability.
- SSTP is a protocol based on TCP and SSL. Choose it if the IKEv2 connection does not go through your provider.
- L2TP/IPsec is reliable in terms of encryption, but not the most optimal in terms of speed and performance.
How do I run a PowerShell script?
1. Download the script:
From SafeUTM:
- By navigating to the section Users -> VPN connections
- Set the flag for the required connection protocol, if required, fill in the fields and click Save
- Click on the link PowerShell - script to configure connections

- Transfer the downloaded file to the device where you want to create a VPN connection.
2. Right-click on the downloaded file and select Properties from the context menu.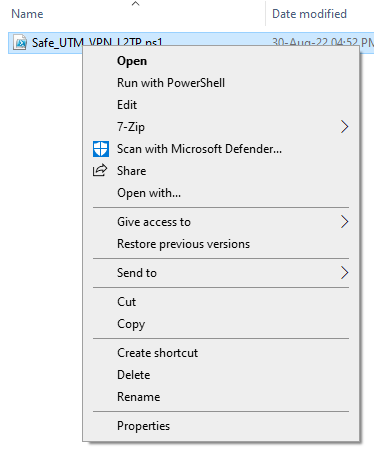
3. Check the box Unlock in the lower right corner of file properties (by default, the OS blocks the execution of files downloaded from the Internet)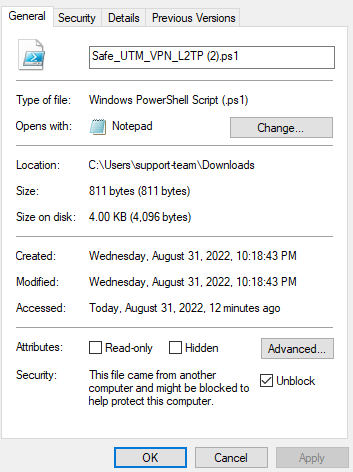
4. Right-click on the file again and select Run in PowerShell in the context menu.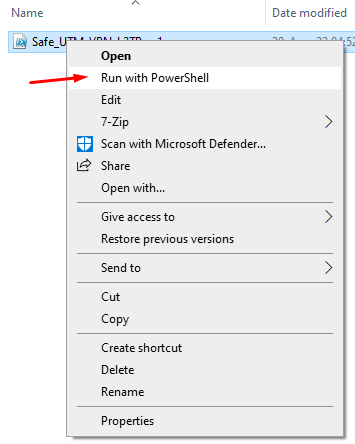
If the error "Script execution is disabled on this system" appears, you need to enable script execution by running the command in PowerShell (call it up from the Start menu): Set-ExecutionPolicy Unrestricted
5. Answer Yes to the question about making changes to your computer.
6. The connection is created. Click Connect in the list of your networks.
What should I do if I can't run the script?
You may not have enough rights to run scripts or PowerShell is not installed on the system.
Use the instructions for creating a connection in Windows 10 and Windows 7.
Subnet Authorization
In order not to register each device as a separate UTM user and not to fix authorization factors for it, you can use Subnet Authorization.
This feature will allow a UTM user from the desired subnet to auto-authorize without being tied to a MAC and/or specific IP and will be useful if a large number of devices need to be auto-authorized.
Traffic across the entire subnet will be recorded per user.
In a network for which a Subnet Authorization rule has been created, DHCP can work.
For example, there is a WiFi subnet on the 192.168.10.0/24 subnet from which devices should be allowed to log in. Create an authorization rule:
1. Go to the Users –> User & Group section and click Add user
2. Fill in the fields Subnet name, Login, and click Save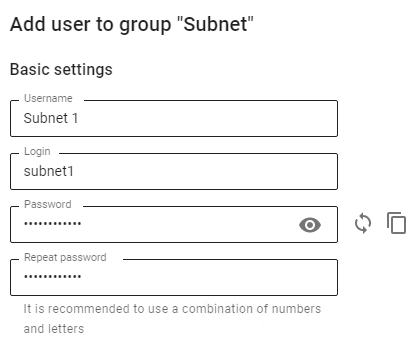
3. Go to the section Users –> Authorization –> Subnet authorization and click Add in the upper left corner
4. Fill in the fields and click Save:
- User - select the user created in step 2
- Subnet - enter IP and subnet mask
- Comment - (optional)


Be careful when creating Subnet authorization rules
There will be problems with authorization if:
- There are overlapping networks for different users
- There are rules for authorizing users by IP addresses from a subnet in the Subnet authorization rule;
- Rules have been created in the Fixed VPN IP addresses subsection with binding to an IP address from the subnet of the Subnet authorization rule.
Fixed VPN IPs
The section allows you to bind a specific IP address for a specific user for VPN connections.
If you create a fixed binding for any user, then only one active VPN session will be possible for this user.
For example, you have a host on a local network that only users with certain IP addresses can connect to. To provide direct VPN access to this host, go to Users -> VPN connections -> Fixed VPN IP addresses, click Add, fill in the User and IP address fields, and click Apply.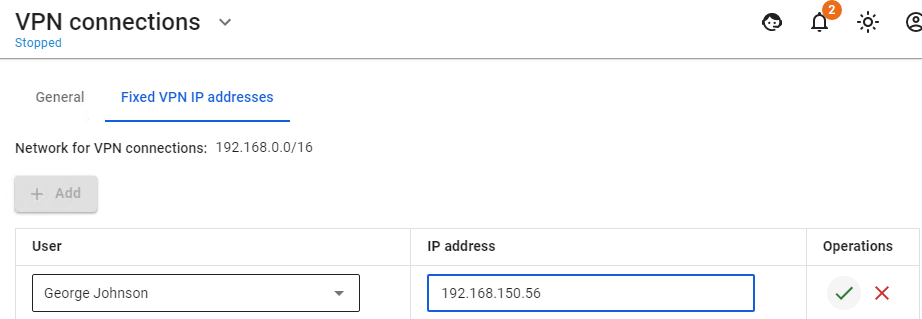
Integration with Active Directory
Integration with Active Directory
SafeUTM provides the possibility of one-way synchronization with a domain based on Microsoft Active Directory.
Only accounts are imported, excluding passwords. When the user undergoes the authorization procedure, verification is carried out by means of Active Directory.
Integration with Windows Server 2008 (only R2), 2012, 2016, and 2019 is supported.
Features of Using Integration with Multiple Active Directory Domains
When integrating SafeUTM with multiple domains, the following limitations apply:
- From the Active Directory domain tree, only the data of the domain controller to which SafeUTM is connected is imported into SafeUTM.
- With Single Sign-On authorization, when the browser is opened for the first time, the user will be offered a choice of domains for authorization. The selection will be saved using a cookie and will be used at the next authorization. If you want to change the domain, delete the cookie (for the local SafeUTM IP address).
Using Security Groups and Accounts Imported from LDAP as Filter Rule Objects
Security groups and accounts imported from Active Directory can be used as filter rule objects in the following sections:
Usage example:
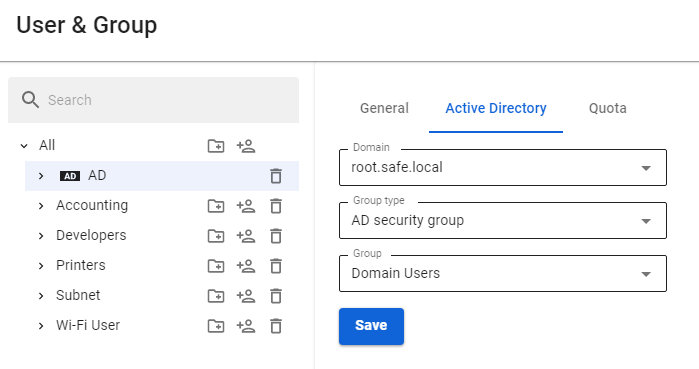
- Import accounts and/or security groups from Active Directory in the Users -> User & Group section (for more details, see Import of Users). This example imports the AD security group Domain Users:

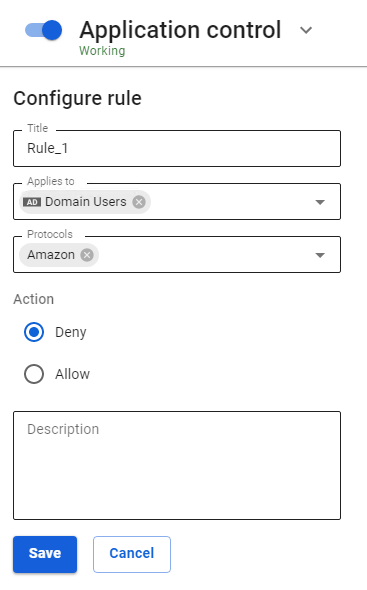
- Go to the section where you want to use a group or account imported from Active Directory. For example, in Application Control:

- Fill in the required fields and click Save.
Active Directory User Authorization
Import accounts from Active Directory, see Import of Users for details.
Setting up user authorization
For users imported from Active Directory, all types of user authorization are available. The most commonly used user authorization options are Single Sign-On authentication via Active Directory using Kerberos/NTLM for authorization via a web browser and authorization via the Active Directory security log (simultaneous use of both types of authorization is recommended).
Setting up SafeUTM
To enable Single Sign-On Authentication and Authorization through the Active Directory Security Log, go to the Users -> Authorization -> General tab and enable these authorization types. Next, click the Save button.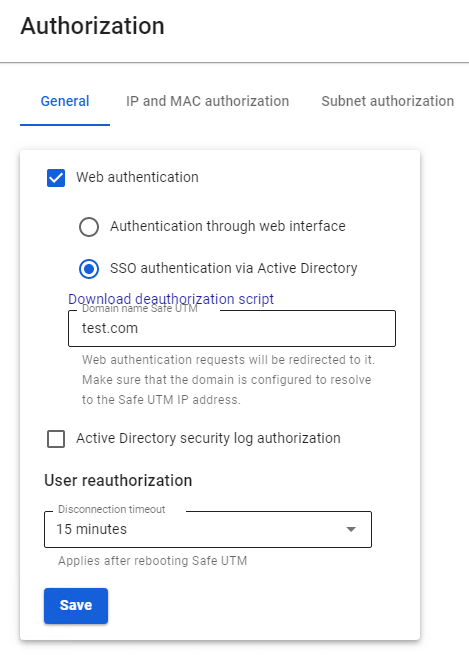
After filling in the Domain name field and saving the settings, a Let’s Encrypt certificate will be issued and the user will be redirected to the authorization window, bypassing the security exception page.
If a certificate for such a domain has already been loaded in the TLS Certificates section, then it will be used and a new certificate will not be issued.
Configuring user computers and domain policies
Authorization via Active Directory security log
Supported starting with the 2008 standard edition domain controller.
- In the Windows firewall settings on all domain controllers (or domains), allow Remote Event Log Management (RPC)

- Add SafeUTM to the Event Log Readers security group.
- After configuring access to the log, it is necessary to restart the Active Directory security log authorization service on SafeUTM, to do this, disable this setting and re-enable it.
- If you changed the security policies of domain controllers compared to the standard ones, then you need to enable logging-in security policies by activating the following setting: Default Domain Controllers Policy -> Computer Configuration->Policies->Windows Settings->Security Settings-> Advanced Audit Policy Configuration - > Audit Policies -> Logon/Logoff -> Audit Logon -> Success.
- The following settings must also be enabled: Default Domain Controllers Policy -> Computer Configuration->Policies->Windows Settings->Security Settings-> Advanced Audit Policy Configuration -> Audit Policies -> Account logon -> "Audit Kerberos Authentication Service" and "Audit Kerberos Service Ticket Operations" -> Success.
- To update domain controller policies, run the
gpupdate /force command - If user authorization does not occur during login, you need to check the security log for events 4768, 4769, and 4624.

Web Authorization (SSO or NTLM)
In order to configure authorization through a web browser, you must perform the following steps:
- Go to your browser's properties and go to the Security tab.
- Select Local Intranet -> Sites -> Advanced.
- In the window that opens, add a link to SafeUTM under the name under which you entered it into the domain. You need to specify two URLs: with
http://and withhttps://
In the screenshot below, SafeUTM is entered into the example.com domain under the name safeics.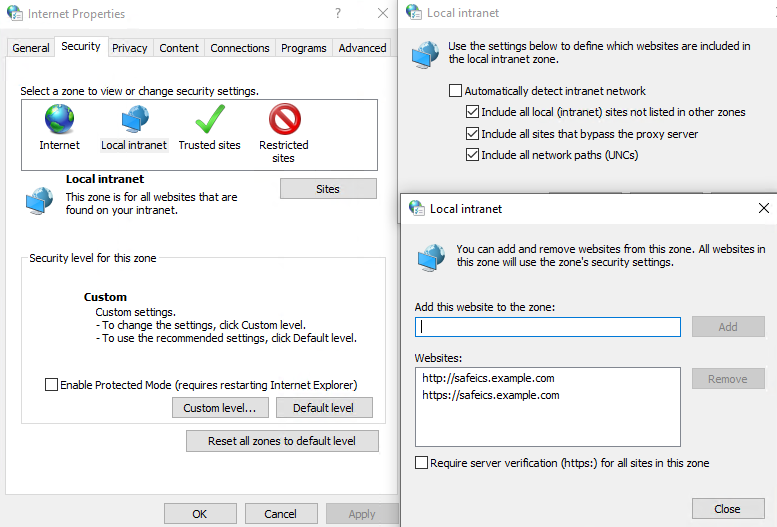
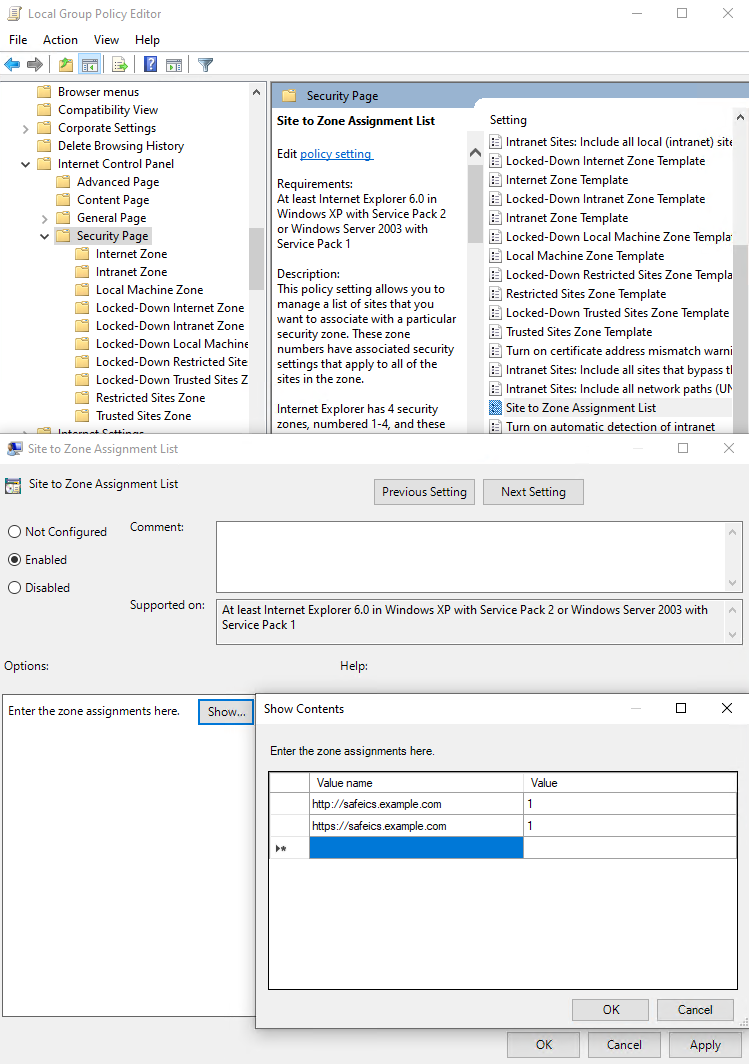
Also, this setting can be made using Active Directory group policies for all users at once. To do this, you must perform the following steps:
- In group policies for users, go to: Default Policy Group > Computer Configuration > Policies > Administrative Templates > Windows Components > Internet Explorer > Internet Control Panel > Security Page > Site to Zone Assignment List
- Enter the zone assignment for the SafeUTM DNS name (safeics.example.com in the example) with a value of 1 (intranet). It is necessary to specify two destinations, for schemes of work on HTTP and HTTPS.

When entering an HTTPS site, for authorization, you must allow the browser to trust the SafeUTM certificate (in order not to do this every time, you can add the SafeUTM root certificate to the trusted root certificates of the device. For example, using domain policies). You can also use scripts to automatically authorize users upon login.
On the Mozilla Firefox browser settings page (about:config in the address bar), configure the following settings:
- network.automatic-ntlm-auth.trusted-uris and network.negotiate-auth.trusted-uris add the address of the local SafeUTM interface (for example, safeUTM.example.com).
- security.enterprise_roots.enabled set to true will allow Firefox to trust the system certificate and authorize users when going to HTTPS sites.
Also, for users imported via AD, the following authorization methods are possible:
- Authorization by IP address - suitable if users always work from fixed IP addresses. IP addresses on UTM must be manually assigned to each user.
- Authorization via PPTP - if the network has increased requirements for the confidentiality of information transmitted between the gateway and user devices, or if Wi-Fi is weakly protected from traffic interception.
Configuring user authorization for direct connections to a proxy server
Setting up transparent user authorization for direct connections to a proxy server is similar to setting up transparent Single Sign-On authorization described above in the instructions. The only difference is that the proxy server address is not the IP address of SafeUTM, but its DNS name.
Configuring the Mozilla Firefox browser for authorization via NTLM when connecting directly to a proxy server
For computers that are not in the Active Directory domain, if they need to be authorized under a domain user account, configure the following settings on the Mozilla Firefox browser settings page (about:config in the address bar):
- network.automatic-ntlm-auth.allow-proxies = false;
- network.negotiate-auth.allow-proxies = false.
Do not disable these options for computers that are members of an Active Directory domain, as in this case, the outdated NTLM authorization method will be used.
Possible causes of authorization errors
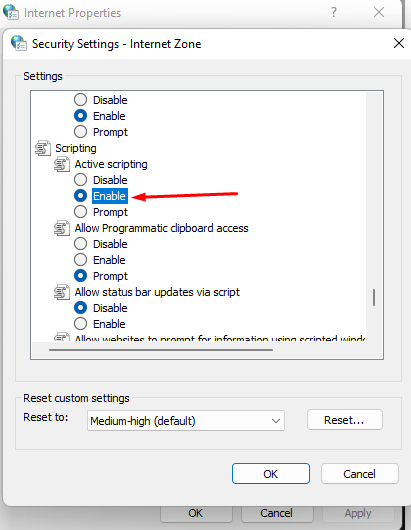
- If a window appears in Internet Explorer with the text Authentication is required to gain access, and authorization occurs only when manually following the authorization link, then for some reason the browser does not redirect to the authorization page (it may be limited by browser security settings). In this case, set Active Scripting in Internet Explorer to Enabled.

- The domain user must be allowed to log in to SafeUTM. On the domain controller, go to the properties of the selected users in the tab Account -> Login to..., select only on specified computers and enter the name of the workstation to log into the system.
- With authorization through the security log of an Active Directory domain controller, users will be authorized when they try to access the Internet (any traffic). There is no automatic authorization without traffic passing through UTM because a competitive authorization policy is used.
Entering Server into Domain
- Go to the tab Users -> Active Directory.
- Click Add.
- Fill in the following fields:
-
- Domain: enter the full domain name (domain DNS name, i.e., domain name, not domain controller). Maximum 64 characters. For example,
mydomain.example - AD DNS server: enter the address of the server that has the role of a DNS server in Active Directory (as a rule, one of the domain controllers), accessible from the local SafeUTM interface.
- SafeUTM server name: enter the server’s name. It can contain only letters (A-z), digits (0-9), and cannot begin or end with a hyphen. Maximum 15 characters.
- Login and password of a user with the right to join the domain: this data is not stored on the server and is used once to join the domain. The user doesn’t have to be the domain admin, but they must have the right to join computers to the domain.
- Domain: enter the full domain name (domain DNS name, i.e., domain name, not domain controller). Maximum 64 characters. For example,
An example of configuring integration with AD can be seen in the screenshot below: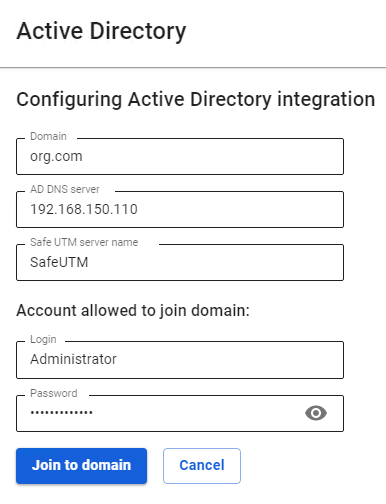
Attention: at least one domain controller must be located in the local SafeUTM network (or be accessible via a local interface using configured routing).
The process of joining the domain after clicking on the corresponding button may take up to one minute.
It is possible to join the server to several Active Directory domains, with some features of work described in the article.
Configuring DNS to Resolve Local Domain Names
In the DNS server settings, in order for the synchronization of users and their authorization to work correctly, it is necessary to configure local domain name resolution on the server. To do so, in the DNS server settings you need to enter the Forward zone and DNS servers for it (as a rule, the main and backup domain controllers).
In SafeUTM the DNS Forward zone is created automatically when the server is entered into the domain, and there is no need to configure it manually. Create it manually only if you mistakenly deleted this zone from the DNS server settings or if you failed to join the server to the domain.
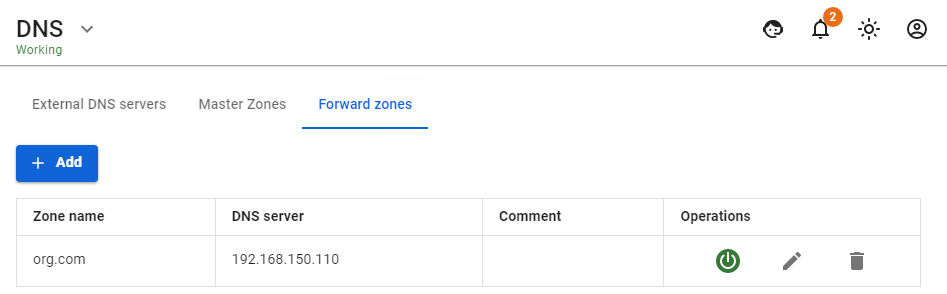
In the example:
- org.com - Active Directory domain name.
- 192.168.150.110 – domain controller IP address.
With this setup, computers can use SafeUTM as the preferred DNS server. At the same time, the resolution of local and internet names will work correctly, also for all services provided by Active Directory.
Automatic Authorization and De-authorization Scripts
For that, you need to configure scripts executed when users log on and log out of the system. For example, it can be done using domain group policies (GPOs).
For these scripts to work, it is necessary to set up all domain and browser security policies described in User Authorization.
User Authorization
You need to add the script to scenarios executed at the system log on.
UTMLogon_script.vbs
Dim IE
Set IE = CreateObject("InternetExplorer.Application")
IE.Visible = True
IE.Fullscreen = False
IE.Toolbar = False
IE.StatusBar = False
Wscript.Sleep(3000)
IE.Navigate2("http://google.com")
Wscript.Sleep(20000)
IE.Quit
User De-Authorization
It is convenient to use this script when one computer is used by different users to go to internet resources. This script can be downloaded from the web interface by clicking Download deauthorization script. To do this, in the section Users -> Authorization, check the box Web authentication: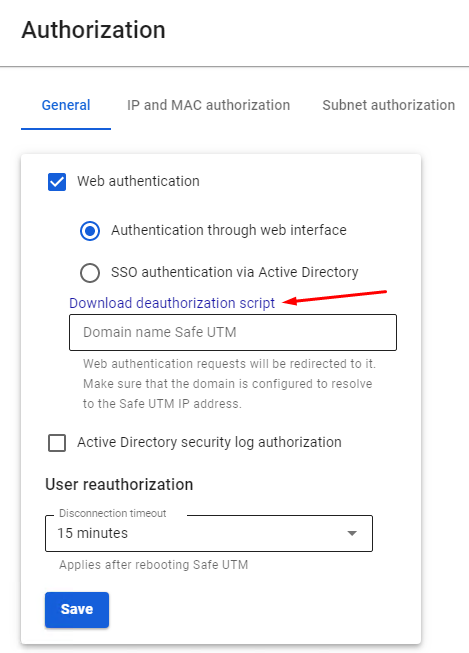
You also need to disable the warning about certificate address mismatch in Internet Explorer properties: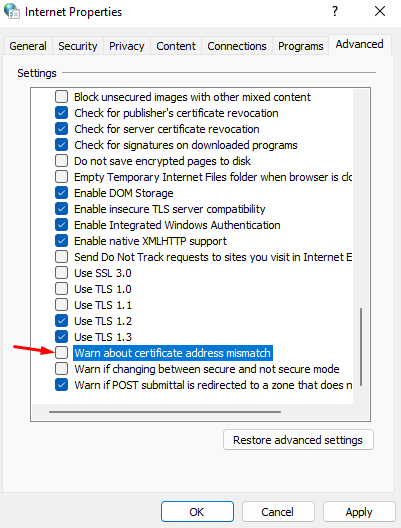
This parameter can also be set up in GPO by changing the registry parameter: HKEY_CURRENT_USER\Software\Microsoft\Windows\CurrentVersion\Internet Settings parameter WarnonBadCertRecving = 0
Next, you need to add the script executed when the user logs out of the system:
UTMLogout_script.ps1
add-type @"
using System.Net;
using System.Security.Cryptography.X509Certificates;
public class TrustAllCertsPolicy : ICertificatePolicy {
    public bool CheckValidationResult(
        ServicePoint srvPoint, X509Certificate certificate,
        WebRequest request, int certificateProblem) {
        return true;
    }
}
"@

[System.Net.ServicePointManager]::CertificatePolicy = New-Object TrustAllCertsPolicy
[Net.ServicePointManager]::SecurityProtocol = "tls12, tls11, tls"
Invoke-RestMethod -Uri "https://<utm ip-adress>:8443/auth/sessions/logout" -Method Delete
Enter the IP address of the local SafeUTM instead of the “UTM interface IP address”. If there are several local interfaces on SafeUTM, you must specify the IP address of the local interface from the same subnet as the user's computer.
Possible Errors When Executing Scripts
- If in Internet Explorer a window appears with the text “Authorization is required to gain access”, and authorization occurs only when you manually click on the authorization link, redirecting to the authorization page may not occur in the browser (it may be restricted by the browser security settings). In this case, set the parameter Active Scenarios in Internet Explorer to Enable.
- The group policy is not updated automatically immediately after the changes have been made. In order for the scripts to start working, update the policy manually by running the command
gpupdate /forceon the workstation.

Import of Users
Import of Accounts from LDAP
SafeUTM implements the possibility to import accounts from the Active Directory LDAP directory (hereinafter referred to as AD). Import is carried out by LDAP/LDAPS protocols (LDAPS protocol does not require additional settings from UTM and will be used automatically if needed on the domain controller).
AD user groups can be imported into specially created SafeUTM user groups. Any name can be used for them.
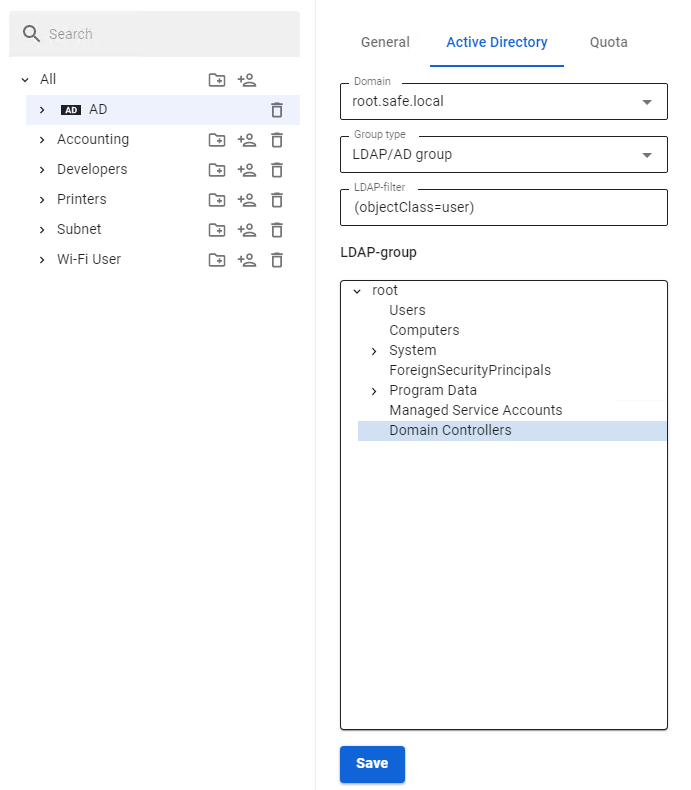
In order to import users from AD, you need to perform the following actions:
- Create a group in the SafeUTM user tree. Learn more about creating groups in the User & Group article.
- Select this group and go to the Active Directory tab on the right side of the screen.
- Select the domain to import users from (if SafeUTM is a member of several domains).
- In Group Type select LDAP/AD group.
- When you click on the LDAP group field, the Active Directory user tree will open. In the tree, select the group to import (you can also select the root group to import the entire tree).
- When you click Save, user import will be carried out (it may take a few minutes).

In the future, users will be synchronized with Active Directory automatically every 15 minutes.
If necessary, you can use the query filter. For example, if you have users and computers in the same containers, and you want to import only users, write the following text in the LDAP filter field:
(&(objectCategory=person)(objectClass=user))
It is possible to import different AD user groups to different SafeUTM groups for the convenience of assigning firewall rules, content filtering, app control, bandwidth limitation, and other modules to them.
You should not import subgroups of an already imported group, because they will automatically be imported together with the main group.
Importing Accounts from Security Groups
Active Directory users can only be imported into one SafeUTM group. Therefore, if it is in multiple Active Directory security groups, it will only appear in one of the UTM groups that were imported last.
You can import any number of AD security groups into different folders of the SafeUTM user tree.
- Create a group in the SafeUTM user tree.
- Select the group in the tree and go to the Active Directory tab.
- Select the intended domain in Domain Name.
- Select AD Security Group in Group Type.
- In the field below select the intended security group from the drop-down list.
- Click Save.
An example of configuring the import of users from security groups can be seen in the screenshot below: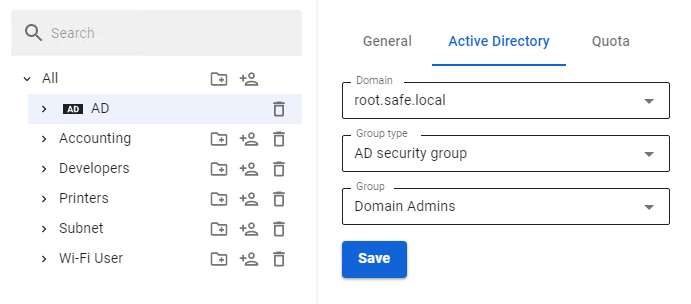
Netscan
Automatic creation of a user with authorization by IP address for a device trying to access the internet via SafeUTM.
Netscan creates MAC authorization for local addresses on a single Ethernet segment. If the device is located on a local network behind a router, then Netscan will create authorization by IP address.
This module does not scan the network in search of devices but works in a passive mode.
A user will automatically be created when trying to access the internet in the specified group with the name corresponding to the IP address or NetBIOS name. If the NetBIOS name could not be determined, then by IP address.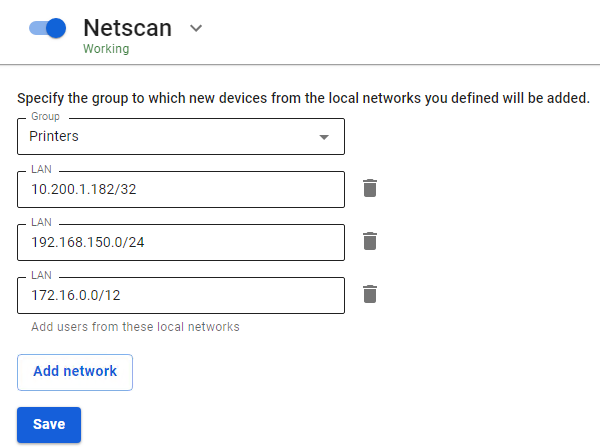
If necessary, you can restrict LANs, users from which will be automatically added and authenticated on SafeUTM. For example, this way you can authenticate users connecting via Wi-Fi or another open network.
When connecting to UTM as a proxy server the Netscan system will not work.
Wi-Fi Networks
Configuring access point and router modes.
In the current version, SafeUTM does not support Wi-Fi adapters. For wireless clients to work, it is necessary to use special wireless access points or Wi-Fi routers.
To access the internet, users connected via Wi-Fi must be authenticated on UTM, or the Wi-Fi router needs to be authenticated. It depends on the operating mode of the device distributing Wi-Fi.
Access Point Mode (Bridge)
In this mode, the Wi-Fi device enables wireless clients to connect to the LAN.
To do this, you need to individually authenticate all wireless clients on SafeUTM. As a rule, the easiest way to do it is by IP authorization. Use the following recommendations for configuration:
- It is recommended to use a separate logical network for Wi-Fi clients with a configured DHCP server. At the same time, on the local SafeUTM interface, you need to add an IP address that serves as a gateway for this network.
- Using the group addition of users create a user group from the entire range of addresses allocated for the Wi-Fi network, or configure the automatic creation of users from the IP address range issued to devices.
- Using content filter and firewall configure necessary restrictions for Wi-Fi users.
- If the Wi-Fi router is connected to a separate UTM physical interface, then in the firewall, it is advisable to prohibit access from the wireless network to the local network.
An example of configuring the interface for clients connecting via Wi-Fi can be seen in the screenshot below: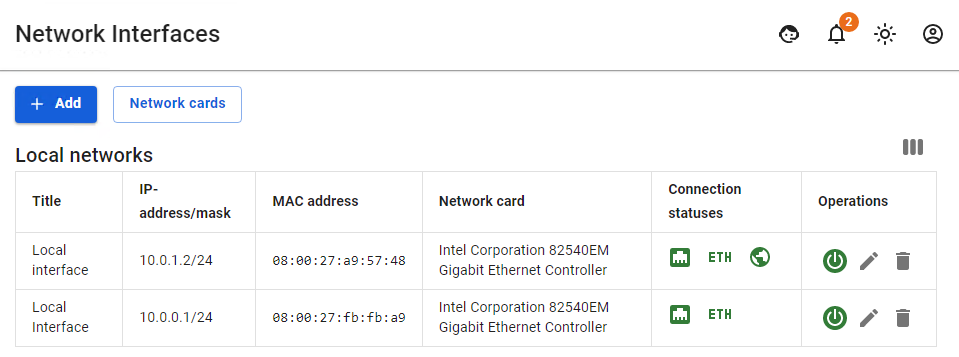
- 10.0.1.2/24 – gateway for the wireless Wi-Fi network.
- 10.0.0.1/24 – gateway for the local Ethernet network.
Router Mode
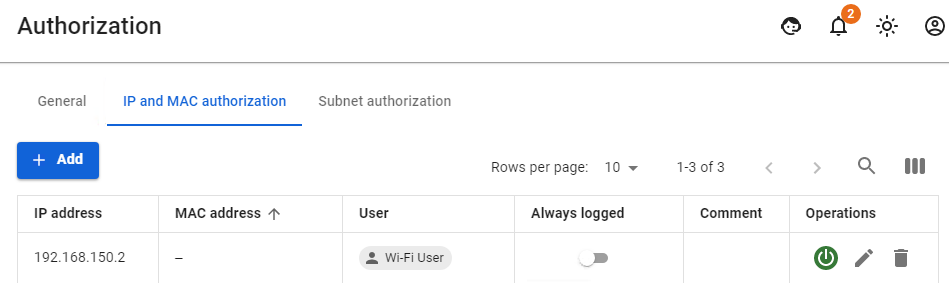
In this mode, the Wi-Fi device hides the wireless network devices behind the NAT. Thus, it will be enough for SafeUTM to authenticate only the access point as one of the users.
An example of user configuration in router mode can be seen in the screenshot below:
- Create a user for the Wi-Fi router.
Users can have any password.
- In the section Users -> Authorization -> IP and MAC authorization create a rule of the following type:

General restrictions of content filter and firewall for Wi-Fi network must be applied for this user.
With this SafeUTM authorization method, one license per Wi-Fi access point will be used. It will be impossible to separately set up traffic filtering and calculate traffic statistics in reports for individual Wi-Fi clients.