Setting up HTTPS Filtering
HTTPS traffic filtering provides the possibility for further processing of websites accessible via HTTPS.
Filtering is implemented by several methods:
- Analysis of Server Name Indication (SNI) headings. Thanks to this method, it is possible to analyze the domain to which the client connects without certificate substitution and interference with HTTPS traffic. Domains specified in the certificate are also analyzed.
- SSL-Bump Method. Filtering occurs by substitution on the fly of the certificate used to sign the requested site. The original site certificate is substituted by a new one signed by the SafeUTM root certificate instead of a certificate authority. Thus, the traffic transmitted over a secure HTTPS connection becomes available for processing by all modules provided by SafeUTM, namely by the content filter (it is possible to categorize the full URL of the query and MIME-type content), ClamAV, as well as external ICAP services.
The specifics of implementing HTTPS traffic filtering with certificate substitution require configuring both sides of the connection – the SafeUTM server and each user’s workstation in the local network.
Setting up SafeUTM Server
By default, the server performs HTTPS filtering without certificate substitution by analyzing SNI and domains in the certificate.
HTTPS traffic decryption is configured in Rules -> Content Filter -> Rules using the rules created by the admin with the action Decrypt.
An example of a decryption rule can be seen below: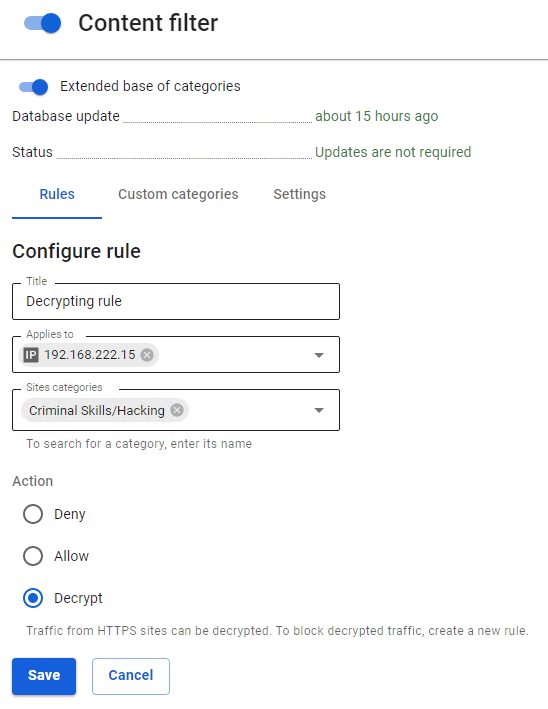
Setting up the User’s Workstation
When the HTTPS traffic decryption option is enabled, the browser and other network software (for example, antiviruses, IM clients, etc.) on the user’s workstation will require explicit confirmation to use a substitute certificate created and issued by the SafeUTM server. To improve the user’s convenience, the SafeUTM server’s root certificate should be installed in the workstation’s operating system and made trusted. The root SSL certificate is available for download from the section Traffic Rules -> Content Filter -> Settings.
In order to install the root certificate, you need to follow these steps:
1. Download the root SSL certificate by opening the SafeUTM web interface section Traffic Rules -> Content Filtering -> Settings:
2. Open the certificate management center on the workstation Start -> Run by executing the command certmgr.msc in the dialog: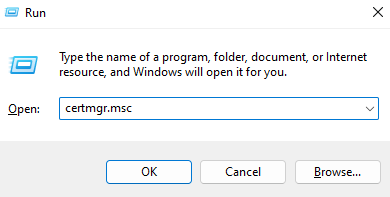
3. Select the section Trusted Root Certificates -> Certificates:
4. In the right part of the window, right-click and select action All Tasks -> Import... The Certificate Import Wizard will open. Follow the wizard’s instructions to import the SafeUTM server’s root certificate. The imported certificate will appear on the list in the right part of the window: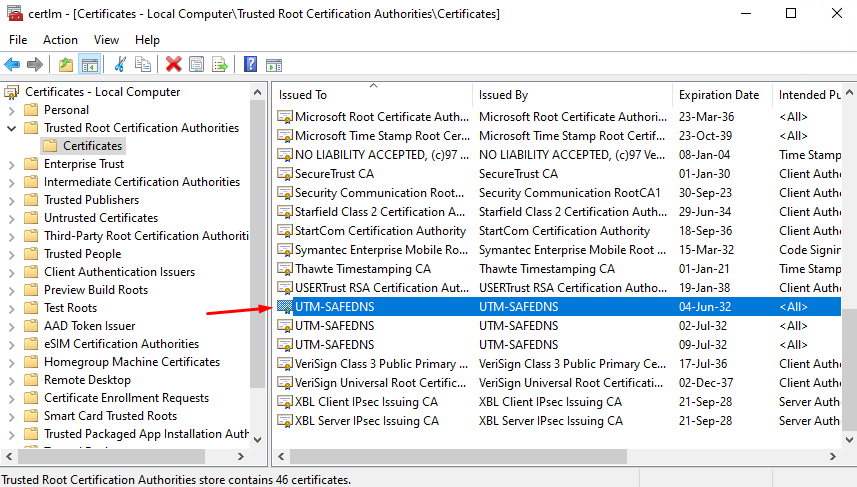
Adding Certificate via Microsoft Active Directory Domain Policies
In networks where users are managed using Microsoft Active Directory, you can install a SafeUTM certificate for all users automatically using Active Directory. To do this, follow these steps:
1. Download the root SSL certificate by opening the SafeUTM interface section Access rules -> Content Filtering -> Settings:
2. Log in to the domain controller with administrator privileges.
3. Launch the group policy management snap-in by executing the command gpmc.msc.
4. Find the domain policy used on users’ computers in Group Policy Objects (Default Domain Policy in the screenshot). Right-click on it and select Change.
5. In the group policy management editor that opens, select: Computer Configuration -> Policies -> Windows Configuration -> Security Settings -> Public Key Policies -> Trusted Root Certificate Authorities.
6. Right-click on the list that opens, select Import... and import the SafeUTM key.
7. After restarting workstations or executing the command gpupdate /force on them, the certificate will appear in the local certificate stores and the required level of trust will be established for it.
Possible Problems and Troubleshooting
- Some browsers, such as Mozilla Firefox, do not use the system certificate store, in which case it is necessary to add a SafeUTM certificate to the browser’s trusted certificates. In Firefox, you can also set the parameter security.enterprise_roots.enabled (in about:config) to true for trusting system certificates.
- If the local machine uses an antivirus that checks HTTPS traffic using certificate substitution, sites may not open because of double certificate substitution. HTTPS traffic check must be disabled in the antivirus settings.
- With SNI filtering enabled, the server will not allow non-HTTPS traffic through the HTTPS port. Thus, problems with programs trying to do this may occur. In order for them to run, is necessary to allow bypassing the proxy server to the resources they require.
- When blocking HTTPS resources, in order to display the blocking page, it is necessary to set up trusting the UTM root SSL certificate even if only SNI filtering is enabled, as in case the resource opened via HTTPS is blocked, SSL-bumping with UTM SSL-certificate replacement will be applied for the possibility of replacing the resource content with the page about it being blocked by the server.