IPSec
Branches and Head Office
This type of connection allows you to combine the LANs of several SafeUTM servers.
Features of IPsec technology implementation in SafeUTM assume two roles of using SafeUTM:
- Head office – SafeUTM must have a public address on the Internet and accept connections from other SafeUTM (Branches), network equipment, or workstations (Remote Users).
- Branch office – SafeUTM connects to the Head Office and, as a rule, does not have a public address on the Internet. But if the Branch has a public address, then any other device can also be connected to it.
Setting up Connection Between Branch and Head Office
Head offices and Branches are added on the tabs with the same names in the section Services -> IPsec.
- Before creating a connection between the Branch and the Head Office, make sure that the time zone is correctly configured on each of the connected parties. It is impossible to establish a connection without this.
- Before configuring IPsec, it should be taken into account that for it to work, no IP subnets involved in connections, including the networks of the Head Office and all Branches, should overlap and, moreover, coincide.
- Networks of local interfaces of the Head offices and Branches to which you want to give access, must be set statically.
- Before setting up the connection, you need to make sure that one of the servers has a public (white) IP address from the Internet provider. If it turns out that the Head Office does not have a public IP address, and the Branch has such an address, then the server roles for this connection should be reversed.
- When replacing/reissuing the root certificate in the TLS Certificates section, IPsec connections Head Office <-> Branch will stop working and they will need to be recreated.
Step 1. Creating a connection in a Branch
In order to create a connection on SafeUTM, which will act as a Branch, it is necessary to perform the following settings in the web interface of this UTM:
1. Open the section Services -> IPsec -> Branch office and click Add in the upper left corner of the screen.
2. Fill in the following fields:
- Head office name – maximum 42 characters.
- Head office's external address – the domain name or external IP address of the head office issued by the provider. If necessary, you can enter the Head office's additional address.
- Branch office LANs – the IP address of the Branch's subnet that will be available to users in the Head Office, in the IP address/mask format.

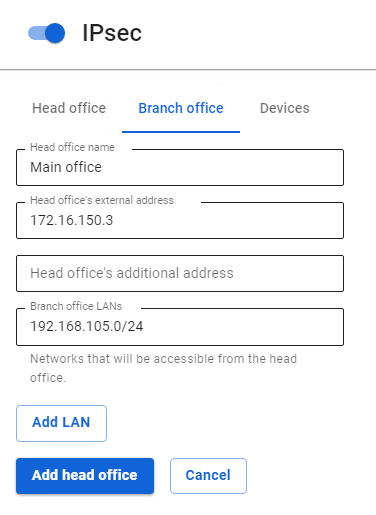
3. After filling in the fields, click Add head Office.
4. Click on the edit icon next to the added Head Office.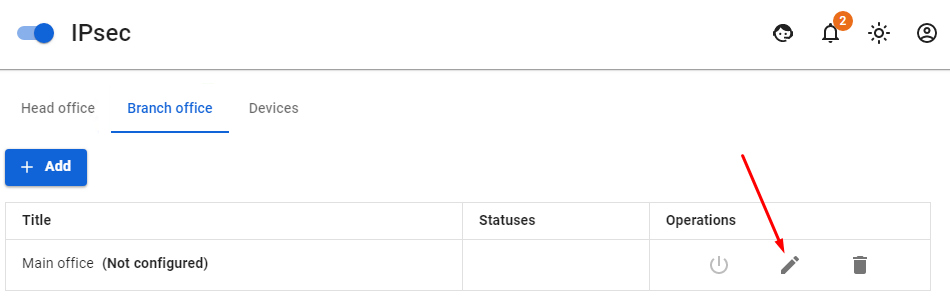
5. Copy the contents of the Branch office settings field. The contents need to be pasted when setting up the Head Office to which the connection is being made (see step 2).
Step 2. Creating a connection in the Head Office
In order to create a connection on SafeUTM which will act as the Head Office it is necessary to perform the following settings in the web interface of this UTM:
1. Open the section Services -> IPsec -> Head Office and click Add.
2. Fill in the following fields:
- Branch office name – maximum 42 characters.
- Branch office settings – paste the settings that you copied from the Branch after completing step 1.

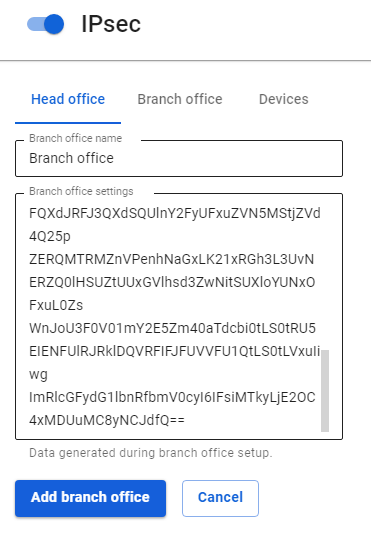
3. Click Add branch office.
4. Click the edit icon next to the added Branch.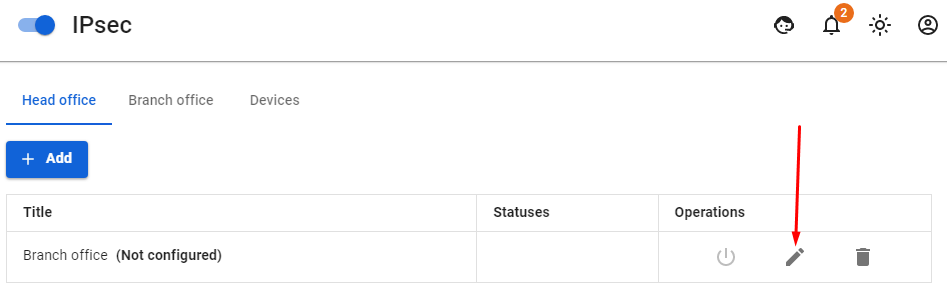
5. Select the LANs of the Head Office and click Save.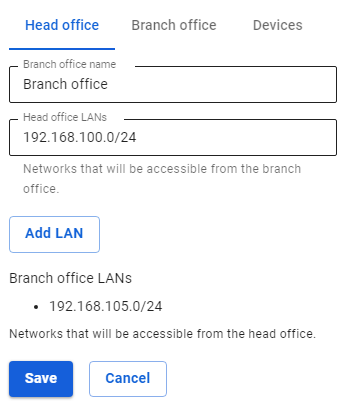
6. Go back to editing the added Branch and copy the contents of the Head office settings field. The contents need to be added to the Branch settings (see step 3).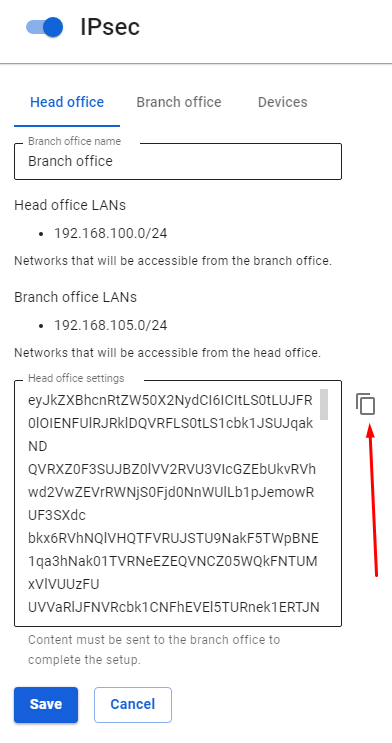
Step 3. Final setup of the Branch
In order to complete the creation of a connection on SafeUTM which will act as a Branch it is necessary to perform the following settings in the web interface of this UTM:
1. Open section Services -> IPsec -> Branch office.
2. Select the desired head office and click Edit.
3. Insert into the Head Office Settings field the settings text received from the Head Office during step 2.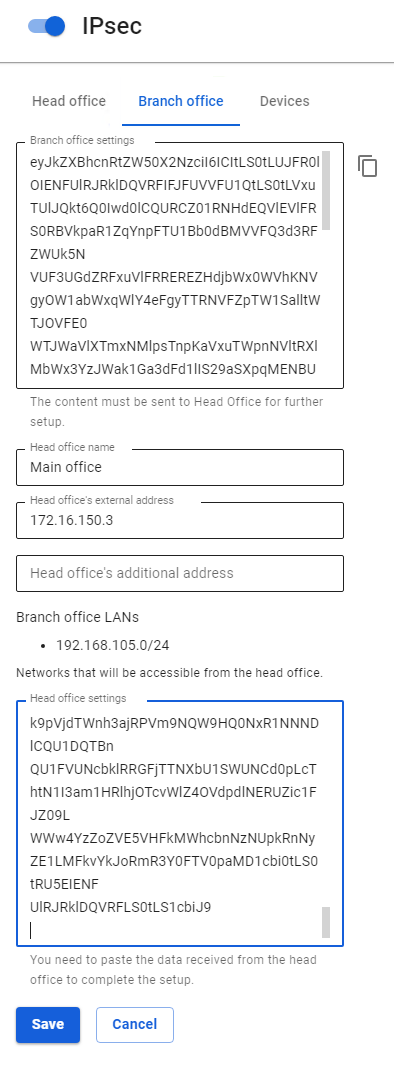
4. Click Save.
5. Open section Services -> IPsec -> Branch office on UTM acting as a Branch and section Services -> IPsec -> Head Office on UTM acting as the Head Office and make sure that the connection to the Head Office is established. The confirmation Established should appear in a green frame.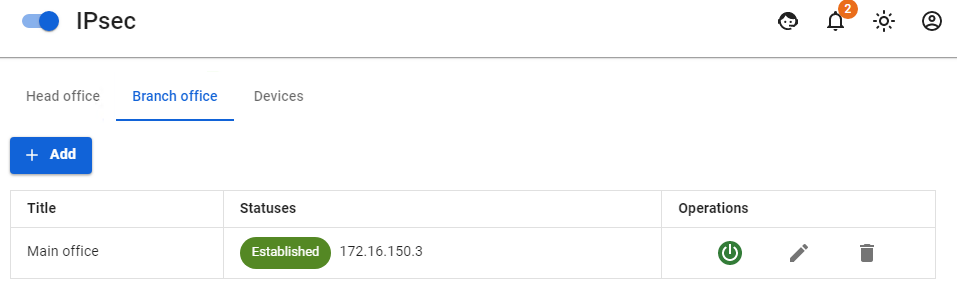
Routing of additional networks located behind the router in the local UTM network through an IPsec tunnel.
In order to configure the routing of networks located behind the router in the local UTM network, it is necessary to create a route to an additional network via the router's IP on SafeUTM (UTM, router and target host will be on the same network).
- If SafeUTM is behind NAT, then in order to work with IPsec you need to forward ports 500 and 4500 UDP.
- When installing an IPsec tunnel between SafeUTM servers (Branch and Head Office), 256-bit AES encryption is always used, as it is common and very reliable.
Connecting Devices
Description of options for connecting various routers (Mikrotik, Zyxel Keenetic, etc.) to SafeUTM for site-to-site VPN using IPsec IKEv2 protocol.
Devices that are not described in this manual as a rule can be connected using similar settings.
When combining networks using a VPN, LANs in different offices should not overlap.
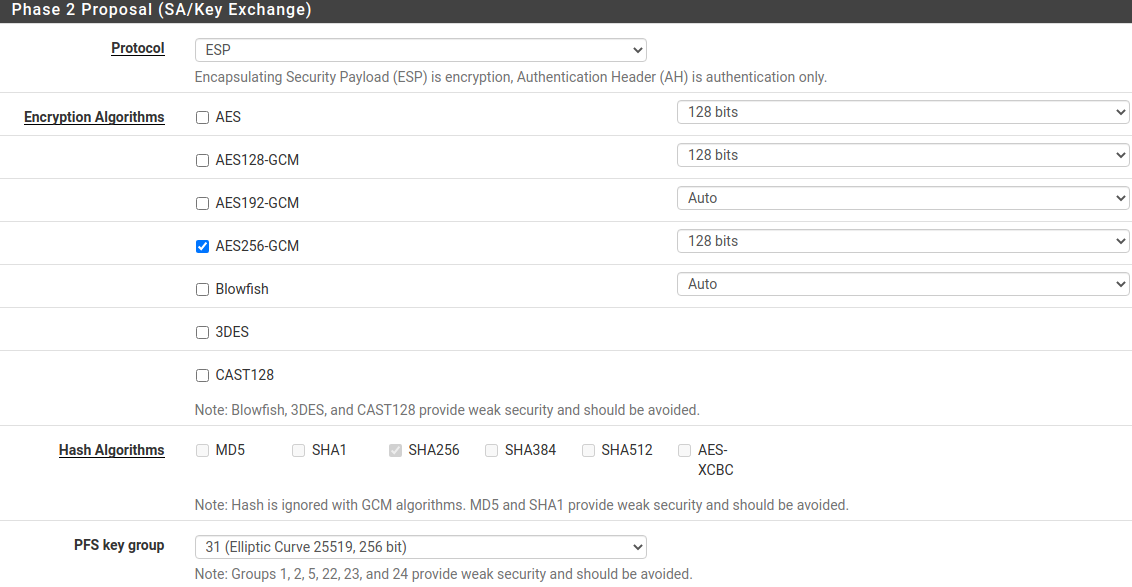
The choice of crypto algorithms on remote devices.
When configuring third-party devices, you must explicitly specify the crypto algorithms used for the connection. SafeUTM supports the most up-to-date and at the same time sufficiently secure algorithms that do not load the server and devices. At the same time, outdated algorithms and those considered unsafe (MD5, SHA1, AES128, DES, 3DES, Blowfish, etc.) are not supported. When configuring third-party devices, as a rule, you can enter several supported algorithms at the same time. In fact, one algorithm of each kind is needed. Unfortunately, not all devices support the best algorithms, so SafeUTM supports several at once. Find below the list of algorithms of each type in descending order of priority for selection.
- Phase 1 (IKE):
- encryption:
- AES256-GCM
- AES256
- integrity (hash):
- for AES256-GCM - not required, since integrity check is built into AEAD algorithms.
- for AES256, by priority: SHA512, SHA256.
- prf (random value generation function):
- as a rule, it is configured automatically, depending on the choice of integrity algorithms (therefore, in the example below, the value of prf is PRF-HMAC-SHA512).
- for AES-GCM, you may need to specify explicitly. In this case, by priority: AESXCBC, SHA512, SHA384, SHA256.
- DH (Diffie-Hellman Group):
- Curve25519 (group 31)
- ECP256 (group 19)
- modp4096 (group 16)
- modp2048 (group 14)
- modp1024 (group 2)
- Timeouts:
- Lifetime: 14400 seconds
- DPD Timeout (for L2TP/IPsec): 40 seconds
- DPD Delay: 30 seconds
- encryption:
- Phase 2 (ESP):
- encryption:
- AES256-GCM
- AES256
- integrity:
- for AES256-GCM - not required, since integrity check is built into AEAD algorithms
- for AES-256, by priority: SHA512, SHA384, SHA256
- DH (Diffie-Hellman Group, PFS). ATTENTION! if not specified, it will connect, but rekey will not work after a while:
- Curve25519 (group 31)
- ECP256 (group 19)
- modp4096 (group 16)
- modp2048 (group 14)
- modp1024 (group 2)
- Timeouts:
- Lifetime: 3600 seconds
- encryption:
Example
- Phase 1 (IKE) (one of the lines is needed):
- AES256-GCM\PRF-HMAC-SHA512\Curve25519
- AES256\SHA512\PRF-HMAC-SHA512\ECP384
- AES256\SHA256\PRF-HMAC-SHA256\MODP2048
- Phase 2 (ESP) (one of the lines is needed):
- AES256-GCM\ECP384
- AES256\SHA256\MODP2048
An example of setting up a pfSense connection to SafeUTM via IPsec is shown in the screenshots below:
Connecting SafeUTM to MikroTik Using PSK
If there is a public IP address on the MikroTik device, follow the steps below to configure the SafeUTM connection to MikroTik.
Step 1.
Setting up SafeUTM
1. In SafeUTM, open the tab Services -> IPsec -> Devices, click on the icon (+), and fill in the following fields:
- Connection name – specify an arbitrary name for the connection. Maximum 42 characters.
- Connection type – select Outcoming, since the connection is made from UTM to MikroTik.
- Remote device address – specify the external IP address of the MikroTik device.
- Authentication type – select the PSK
- PSK – a random PSK key will be generated. You will need it to set up a connection in MikroTik.
- UTM identifier – the key you enter will be used to identify the outgoing connection.
- Home local network – list all UTM LANs that will be available in an IPsec connection, i.e. will be visible to the opposite side.
- Remote local networks – list all MikroTik LANs that will be available in an IPsec connection, i.e. will be visible to the opposite side.

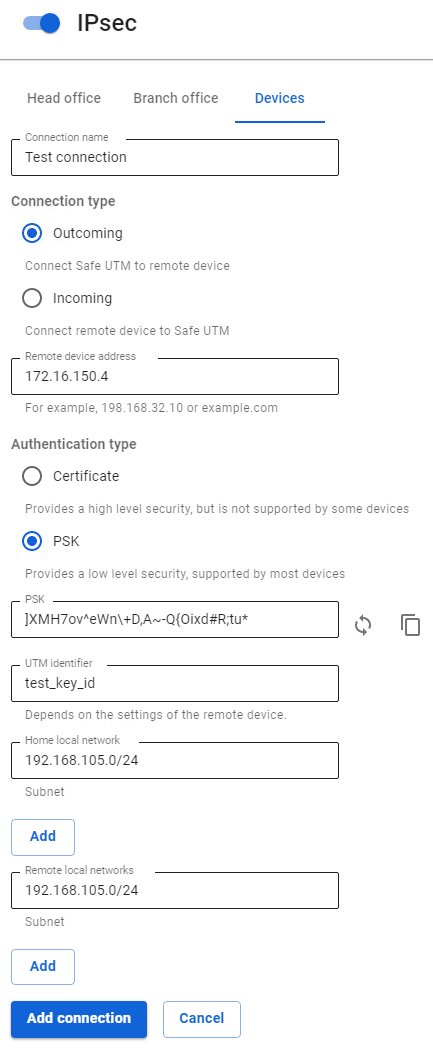
2. After filling in all the fields, click Add connection. Your connection will appear in the list of connections: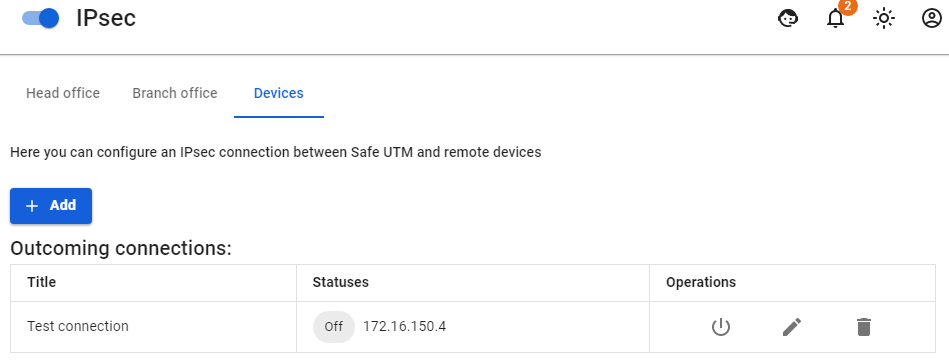
Step 2.
You can configure the MikroTik device in several ways - through the GUI, and through the device console.
Connecting MikroTik to SafeUTM Using PSK
If there is a public IP address on SafeUTM, follow the steps below to configure the connection of the MikroTik device to SafeUTM.
Step 1.
You can configure the MikroTik device in several ways - through the GUI, and through the device console
Step 2.
Setting up SafeUTM
1. In SafeUTM, open the tab Services -> IPsec -> Devices, click on the icon (+), and fill in the following fields:
- Connection name – specify an arbitrary name for the connection. Maximum 42 characters.
- Connection type – select Incoming, since the connection to UTM is being made.
- Authentication type – select the PSK type.
- PSK – insert the PSK key received from MikroTik.
- Remote side identifier – insert the MikroTik ID (Key ID parameter in
/ip ipsec peers). - Home local network – list all UTM LANs that will be available in an IPsec connection, i.e. will be visible to the opposite side.
- Remote local networks – list all MikroTik LANs that will be available in an IPsec connection, i.e. will be visible to the opposite side.

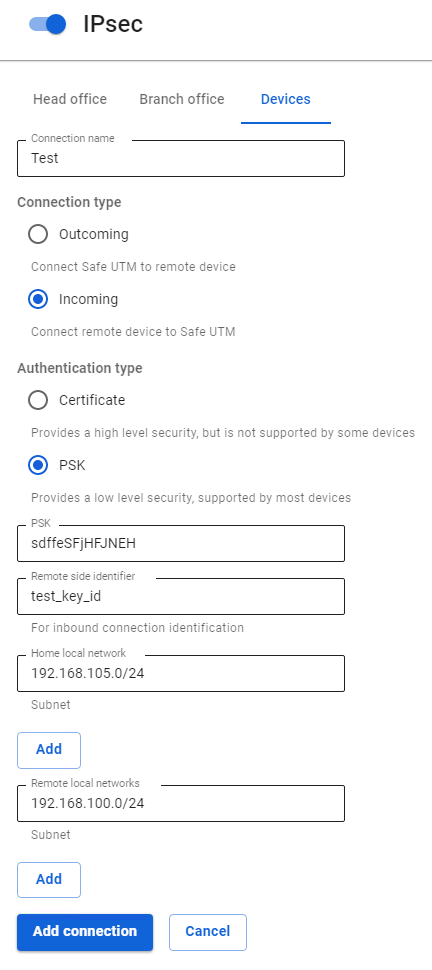
2. After filling in all the fields, click Add connection. Your connection will appear in the list of connections.
Connecting SafeUTM to MikroTik Using Certificates
Connection with certificates is used because it is more secure than a PSK connection, or in cases when the device does not support PSK.
For the correct operation of certificate connections, it is necessary that the time on MikroTik be synchronized via NTP. To do this, it is sufficient for the device to have access to the Internet.
The creation of outgoing IPsec connections using certificates to MikroTik below version 6.45 does not work due to the inability to use modern crypto algorithms in certificates.
Step 1.
Setting up SafeUTM
1. In SafeUTM, open the tab Services -> IPsec -> Devices, click on the icon (+), and fill in the following fields:
- Connection name – specify an arbitrary name for the connection. Maximum 42 characters.
- Connection type – select Outcoming, because the connection is made from UTM.
- Authentication type – specify the type of Certificate.
- Address of the remote device – specify the external IP address of MikroTik.
- Certificate signing request – a request will be generated which must be sent to MikroTik for signing.

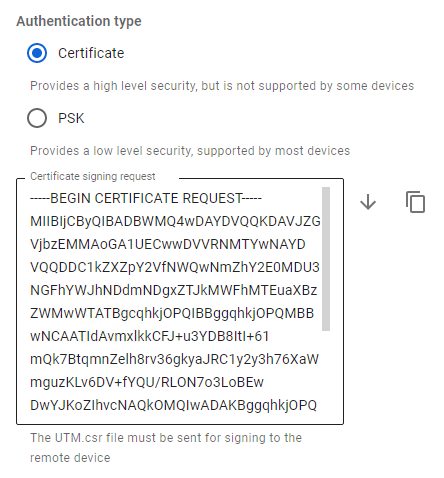
2. After the request is signed, you will need to continue configuring the connection in SafeUTM.
Do not close the settings tab!
Step 2.
Setting up MikroTik
At this stage, you should configure MikroTik to continue configuring UTM.
The UTM.csr file obtained from SafeUTM must be uploaded to the MikroTik file storage. To do this, open the File section, click Browse, select the file and upload it.
You can configure MikroTik in several ways - through the GUI, and through the device console.
Two files will appear in the MikroTik file system which you need to download in order to upload to UTM later.

The file of the type cert_export_device_<random character set>.ipsec.crt is a signed UTM certificate. The file of the type cert_export_mk_ca.crt is the root certificate of MikroTik.
At this point, the MikroTik setup can be considered complete.
Step 3.
Finishing up the SafeUTM setup
Go back to SafeUTM to the tab with the device connection settings and continue filling in the following fields:
- Signed UTM certificate – upload a signed UTM certificate to MikroTik.
- Remote Device Root Certificate – download the MikroTik root certificate.
- Home local networks – list all UTM LANs that will be available in an IPsec connection, i.e. will be visible to the opposite side.
- Remote local networks – list all MikroTik local networks that will be available in an IPsec connection, i.e. will be visible to the opposite side.

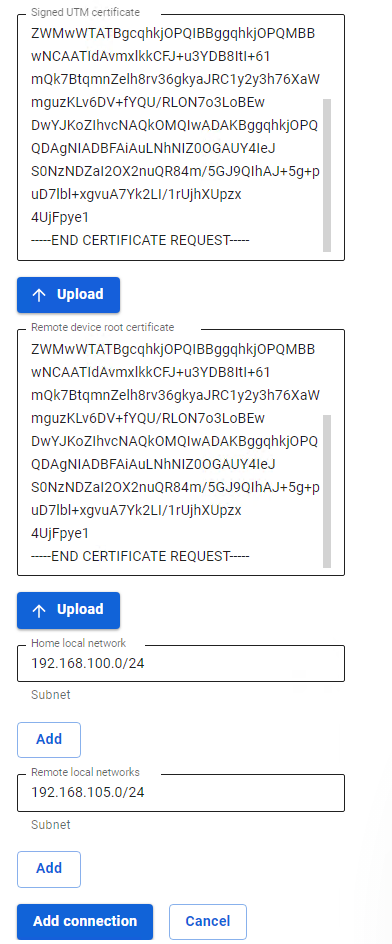
After filling in the fields, click Add connection. Your connection will appear in the list of connections.
Connecting MikroTik to SafeUTM by certificates
Connection with certificates is used because it is more secure than a PSK connection, or in cases when the device does not support PSK.
For the correct operation of certificate connections, it is necessary that the time on MikroTik be synchronized via NTP. To do this, it is sufficient for the device to have access to the Internet.
Step 1.
Setting up MikroTik
You can configure MikroTik in several ways - through the GUI, and through the device console.
Two files will appear in the MikroTik file storage which must be downloaded since they are required for further configuration.:

- File
certificate-request.pemis a certificate signing request. - File
certificate-request_key.pemis a private key.
Next, you will need to fill in the Certificate Signing Request field in SafeUTM, here is how to configure it.
Step 2.
Setting up SafeUTM
1. In SafeUTM, open the tab Services -> IPsec -> Devices, click on the icon (+), and fill in the following fields:
- Connection name – specify an arbitrary name for the connection. Maximum 42 characters.
- Connection type – select Incoming, since the connection to UTM is being made.
- Authentication type – select the type Certificate.
- Certificate Signing Request - Upload the signature request received from MikroTik.
- Home local network – it is necessary to list all UTM LANs that will be available in an IPsec connection, i.e. they will be visible to the opposite side.

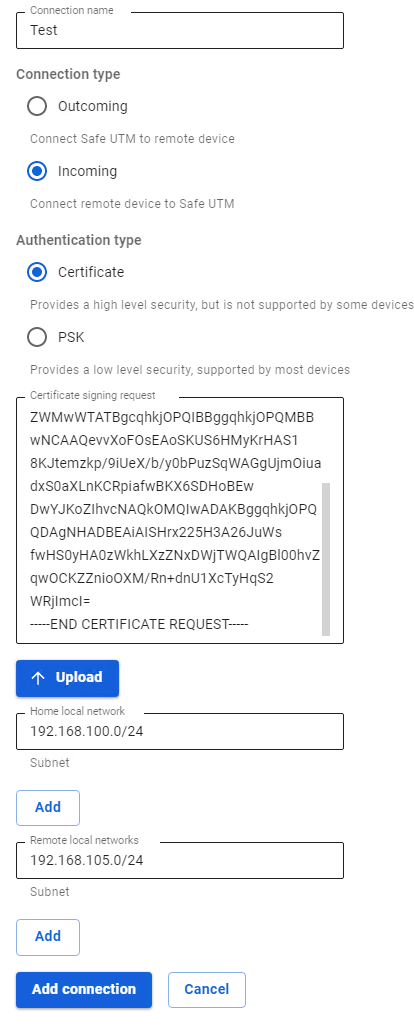
2. After the settings, click Add connection. Your connection will appear in the list of connections. Click on the edit connection button to continue the setup.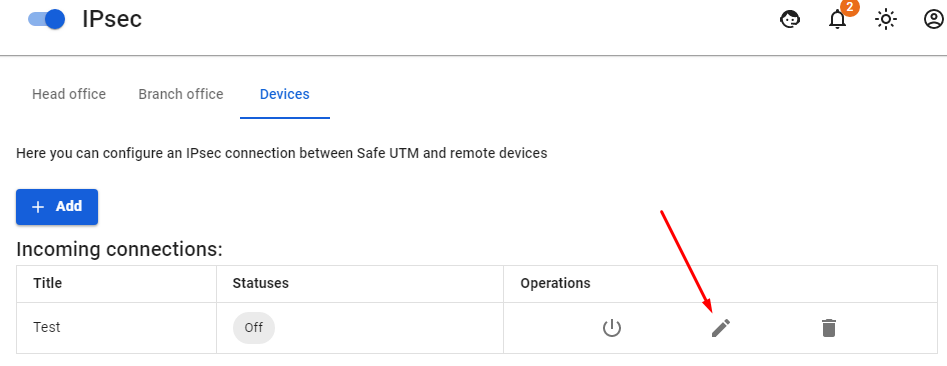
3. The connection settings editing area will appear. You need to download the files that are in the fields UTM root certificate and Signed device certificate for their subsequent use in MikroTik.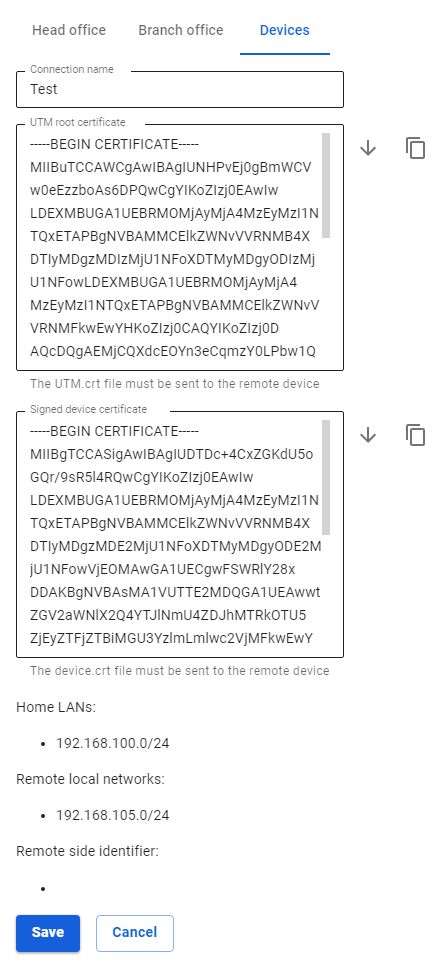
Problems when reactivating an incoming connection to SafeUTM
If after using this connection you turned it off, for example, as unnecessary, and when trying to re-enable the connection failed to be established, then most likely the remote device got into fail2ban (a tool that tracks attempts to access services in log files, and if it finds repeated unsuccessful authorization attempts from the same IP-address or host, it blocks further attempts).
Connecting Mikrotik to SafeUTM via L2TP/IPsec
Configure the connection by running the following commands:
- Edit the IPsec profile:
ip ipsec profile set default hash-algorithm=sha1 enc-algorithm=aes-256 dh-group=modp2048
- Edit IPsec proposals:
ip ipsec proposal set default auth-algorithms=sha1 enc-algorithms=aes-256-cbc,aes-192-cbc,aes-128-cbc pfs-group=modp2048
- Create a connection to SafeUTM:
interface l2tp-client add connect-to={server} profile=default disabled=no name={interface_name} password="{password}" user="{login}" use-ipsec="yes" ipsec-secret="{psk}"
Connecting users
Connecting remote users via L2TP/IPsec protocol.
The settings for connecting users (client-to-site VPN) are described in the article VPN connection L2TP IPsec.
Allow remote users to connect via L2TP/IPsec protocol
1. Go to Users -> VPN connections.
2. Check the item L2TP/IPsec connection. Unchecking the box disables all users connected via L2TP/IPsec and makes their connection impossible.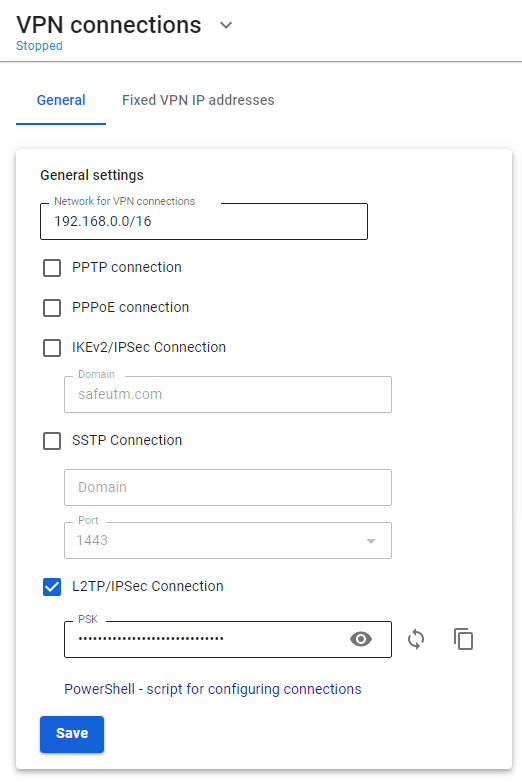
3. Change the default PSK. The pre-shared key is a line that will need to be entered in the L2TP/IPsec connection settings on end devices.
When changing the Pre-shared key, all remotely connected users will be disconnected. To restore connectivity, specify a new PSK on remote user devices.