# Connecting Kerio Control to SafeUTM via IPsec
Following the steps of the article below, you can combine Kerio Control and SafeUTM networks via IPsec using PSK.
---
The combined LANs should not overlap!
---
#### Setting up SafeUTM
1\. In the SafeUTM web interface, open tab **Services -> IPsec -> Devices.** 2. Add a new connection and fill in the following fields:
- **Connection name** – specify an arbitrary name for the connection. Maximum 42 characters.
- **Type** – select **Incoming**.
- **Authentication type** – select the PSK type.
- **PSK** – specify the PSK key to be used for the connection.
- **Remote side identifier** – specify the key that will be used to identify the connection on Kerio.
- **Home local network** – Select the SafeUTM LAN that will be visible from the Kerio Control subnet.
- **Remote local networks** - specify the Kerio Control LAN that will be visible from the SafeUTM subnet.
3\. Save the created connection, then activate the connection by clicking on the Enable icon in the column **Operations.** 4. The setup is complete, Kerio Control needs to be configured.
---
#### Configuring Kerio Control
1\. By default, Kerio Control uses IKEv1 to create connections to third-party devices. You can enable IKEv2 via the console. To do this, follow these steps:
1.1. Connect to Kerio Control via SSH.
1.2. Go to the folder `/var/winroute`1.3. Open `winroute.cfg` file for editing.
1.4. In it, find the section starting with the text ``
1.5. In this section, find the line `ikev1` and change `ikev1` in it to `ikev2`
1.6. After that, it is advisable to restart the server and make sure that the changes in the settings are saved.
2\. In the section **Traffic rules**, allow VPN services traffic.
3\. Then go to the section **Interfaces** and click **Add**. In the drop-down list, select **VPN tunnel...** 4. The connection creation window will open. In it, select:
- **Type** – IPsec.
- **The name** is arbitrary.
- Activate **Enable this tunnel.**
- Select type **Active** and in the field below it, enter the IP address of the SafeUTM external interface that will be used for the connection.
- Select the **Predefined key** and enter the PSK key that will be used to connect.
- **Local ID** - specify the key that was set in the **Remote side identifier** field (p. 2);
- **Remote ID** - specify the IP address of the SafeUTM external interface;
- Under setting the ciphers, click on Edit. Set ciphers as in the screenshot: [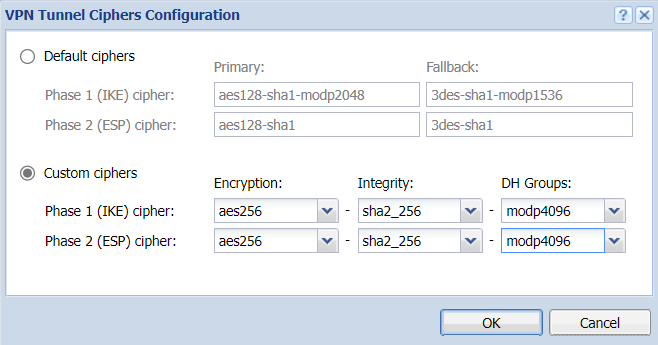](https://docs.safedns.com/uploads/images/gallery/2022-10/KAUs3ocV8WuULdeE-screenshot-34.png)
An example of the final settings is shown in the screenshot below.
[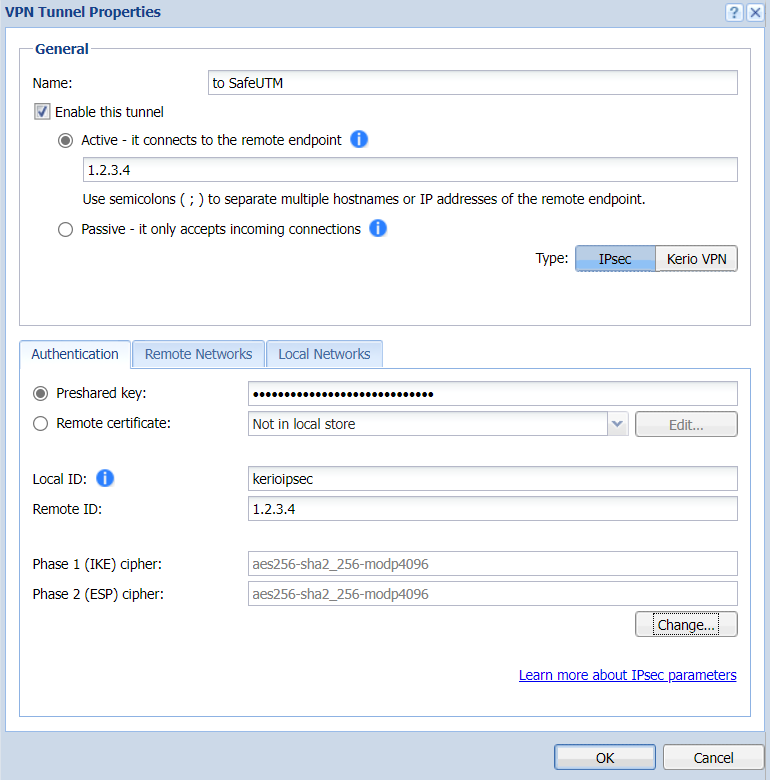](https://docs.safedns.com/uploads/images/gallery/2022-10/C8I6NJWurHIwf2zl-screenshot-35.png)
5\. Go to the section **Remote networks,** click **Add** and enter the information about SafeUTM local network, which will be visible from the Kerio Control subnet.
6\. Then in the section **Local networks** either click on the button **Use automatically defined local networks,** or configure networks that will be visible from the SafeUTM subnet manually, as in the previous step.
7\. Setup is complete. After adding a new interface, you need to click **Apply**. After that, the connection should be successfully established, and the information about this is displayed in the table in the **Interfaces** section.
In case of problems, first of all, pay attention to Kerio Control firewall settings.