# Reverse Proxy
Publishing local network web resources in such a way that they become available to consumers from the Internet.
---
Reverse proxy technology allows you to proxy web traffic in the opposite direction: from the Internet to the LAN, unlike the most commonly used option, from the LAN to the Internet. This approach replaced port mapping (DNAT) and expanded the possibilities for publishing web resources.
Reverse proxy differs from DNAT in that it works at a higher level (the HTTP application protocol instead of the IP network protocol) and allows for a more flexible implementation of resource publishing. The main parameter when publishing a web resource is the **Requested address on the Internet.** A request to UTM will be made from the external network via HTTP protocol and this URL. A reverse proxy allows you to "route" (HTTP-routing) such a request to an HTTP server on the LAN. Thus, having one resource A-record for the UTM external network interface you can publish several resources on the LAN by distributing them to several incoming URLs. If several A-records are associated with an external UTM IP address, then routing becomes even simpler, and incoming URLs are more convenient for resource visitors.
---
#### Creating and Configuring Rule
Configuring certificates for published resources does not require their manual download. Now SafeUTM itself sends a request to issue a Let's Encrypt certificate. The certificate issue may take up to 20 minutes. The issued certificates will be available in the [**TLS Certificates**](https://docs.safedns.com/books/45-setup-services/page/tls-certificates) section.
To create a rule, go to **Services -> Reverse Proxy** and click **Add**. The form for adding a rule is divided into two subsections: **Basic settings** and **Additional settings.
[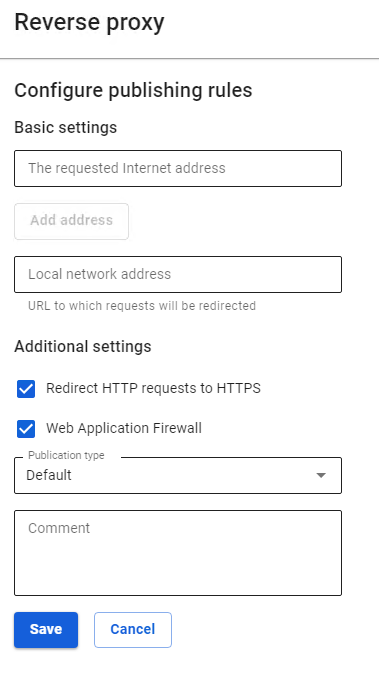](https://docs.safedns.com/uploads/images/gallery/2022-09/XKMBTflAIjRbzxw2-1-reverse-proxy.png)**
#### Basic Settings
- **Requested Internet address** – enter the IP address that will be requested by users. To add additional addresses, click **Add address**.
- **Local network address** – enter the IP address from the LAN to which users will be redirected.
If you specify 0.0.0.0 in the **Requested Internet address** line, the redirection will work from all external IP addresses to the address from the **Local network address** line.
If you specify any IP that does not belong to the external UTM interface, then such a redirect will work similarly to 0.0.0.0.
#### Additional Settings
- **Redirect HTTP requests to HTTPS** is used if your site only works via HTTPS protocol, but at the same time, you don't want to lose visitors who have accessed your site via HTTP.
- The **Web Application Firewall** function allows you to protect published resources using the SafeUTM web applications from various types of attacks (including SQLi, XSS, DoS, and others).
**Web Application Firewall** parses requests to the site and blocks attacks on vulnerable components of the web application (in particular, the types of attacks included in the [**OWASP TOP-10**](https://owasp.org/www-project-top-ten/)). When activating this module, attackers who are scanning the site for vulnerabilities will also be blocked using the brute force attack protection module.
- Field **Publication type** allows you to choose one of the following types: **Standard** and **Outlook** **Web Access.** The **Outlook Web Access** type is used for Microsoft Exchange publishing.
In the fields **Requested address on the Internet** and **Address in the LAN** for the **Outlook** **Web Access** type**,** specify only domains `https://yourdomain/` without the rest of the URL (it is not used when publishing in this way).
! When publishing Outlook Web Access, do not enable the Web Application Firewall. Their collaboration will be possible in the next versions.
If you have a trusted SSL certificate for the domain through which a request to the published resource will go from outside, then you can upload it to the section **Services -> TLS Certificates** by clicking **Add**.
Domain names specified in the field **Requested Internet address** must resolve to the external IP address of the UTM server. Domain names specified in the field **Local network address** must resolve to the IP addresses of the published resources by the UTM server itself.
#### CMS Publication
So far, we have tested and officially support the publication of sites on two popular CMSs: **Joomla** and **WordPress.** The publication details of each CMS are described below.
Joomla
Joomla in the current implementation is published if you configure redirection from an external domain to a local domain without a prefix:
- Associate an additional domain name with an external UTM address specifically for Joomla publishing: `joomla.mydomain.com`
- Set up a publishing rule `joomla.mydomain.com` -> `joomla.local:port` (port is optional).
WordPress
WordPress in the current implementation is published only in the configuration when the same domain is configured in WordPress and in reverse proxy:
- Add an A-record for the company's domain `wordpress.mydomain.com` pointing to an external UTM IP address.
- On the local server, the domain must be configured in the WordPress admin panel `wordpress.mydomain.com` on the standard HTTP port.
- Add a publishing rule to reverse proxy `wordpress.mydomain.com` -> `wordpress.mydomain.com`