4.8. Setup - Mail Relay
- Mail Relay
- General Settings
- Advanced Settings
- Rules
- Mail Queue
- Configuring Email Clients
- Mail Traffic Filtering Scheme
Mail Relay
This section provides instructions for configuring the mail service, as well as for using additional features, such as webmail, spam checking, mail relay, forwarding, etc.
All mail traffic filtering capabilities can also be applied to an internal mail server by publishing it via a mail relay.
To configure the mail server in the SafeUTM web interface, go to the Mail relay menu. This section contains all the key parameters that affect mail service work. All configurable parameters are divided into several categories. Each section of the mail server is described below.
If you use the SafeUTM mail server as a full-fledged server with mail storage, it is mandatory to store mail on an additional HDD/SSD drive. Connect an additional hard drive to the server before using mail.
When configuring the cluster, mail will be available for operation only in the mail relay mode. Mailbox storage is disabled.
General Settings
General Settings
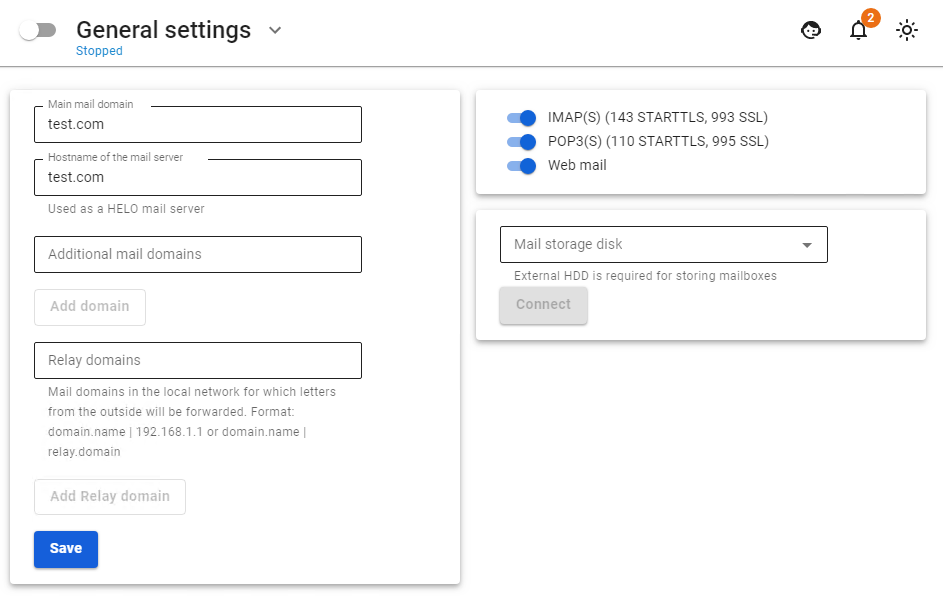
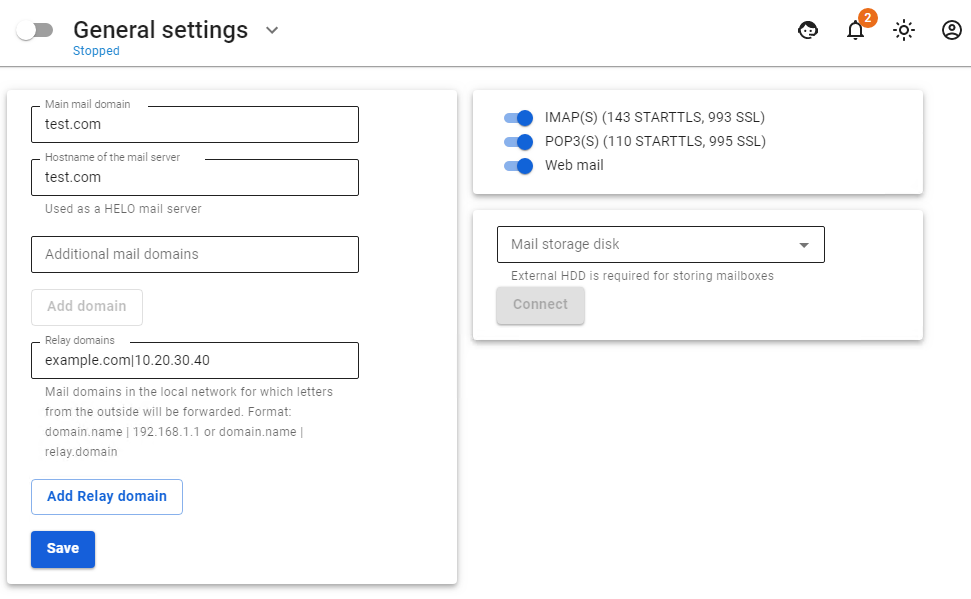
The basic settings section includes many basic parameters necessary for the operation of a mail server on the Internet.
- Main mail domain. Points the server to its mail domain for which it should receive and process emails. All user mailboxes will belong to this domain. On behalf of this domain, you will correspond with correspondents.
- Hostname of the mail server. As a rule, it matches the MX record for your domain. This name must be resolved from the Internet to an external UTM IP address. It is used by the mail server in the dialog when transporting mail between other mail servers as a unique identifier. It is necessary for the correct operation of the mail server on the Internet.
- Additional mail domains. Additional domains that the mail server will consider it's own. Correspondence sent from mailboxes in these mail domains will also be processed by the server, provided that MX records are installed correctly.
- Relay domains. Mail domains in the local network for which emails will be forwarded from the outside.
- Mail storage disk. If you use the SafeUTM mail server as a full-fledged server with mail storage, then it is mandatory to store mail on an additional HDD/SSD disk. Only SATA/SAS drives are supported. Before connecting the disk, fill in the fields Main mail domain and Hostname of the mail server, and enable mail.
- If you have connected a disk, but it is not displayed, please contact technical support: by phone at +1 (800) 820-25-30 (US), +1 (571) 421-29-90 (outside the US), via chat inside the UTM web interface, or by mail support@safedns.com.
- IMAP(S) (143 STARTTLS, 993 SSL). Enabling work with server mailboxes via IMAP protocol (with STARTTLS encryption) from the local network and the Internet.
- POP3(S) (110 STARTTLS, 995 SSL). Enabling work with server mailboxes via POP3 protocol (with STARTTLS encryption) from the local network and the Internet.
- Webmail. Enabling the web interface of the mail client to access mail on the server from the local network.
SSL Certificate for Mail Domain
After saving the settings of the main mail domain and the hostname of the mail server, SafeUTM creates a local certificate signed by the root (self-signed) certificate. Simultaneously with the creation of a local certificate, a request is sent to issue a Let's Encrypt certificate.
- If the Let's Encrypt certificate has been successfully issued, it will replace the local certificate.
- If the Let's Encrypt certificate issue fails, then the local certificate will be used.
Work with certificates is carried out in the section Services -> TLS Certificates.
If you want to replace an automatically issued certificate with your own, then when uploading your own certificate chain, the CN (Common name) of the last certificate must match the domain for which the certificate is being downloaded.
To upload your certificate to the server, you can use the instructions.
Webmail
Configuring the mail web interface to work on the local and external interface of SafeUTM.
1. In order for webmail to work on the local interface, you need to activate the Webmail setting in Mail Relay -> General settings.
2. To work on the external interface, you need to create a rule in the section Services -> Reverse proxy:
Example of a rule for the domain name and IP address access: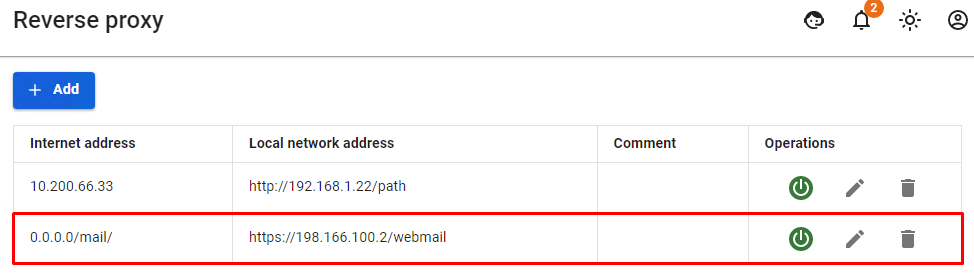
After creating a rule from the local network in the browser, type this in the browser: https:// x.x.x.x:8443/webmail/, where x.x.x.x is the local interface address.
From the Internet, type in the browser: https://[domain name]:8443/webmail/. For example: https://test.com:8443/webmail/
A less prioritized alternative option: from the Internet, type in the browser: https://x.x.x.x/webmail/, where x.x.x.x is the external interface address.
For example: https://66.77.88.99/webmail/
You must use HTTPS to connect.
- In the mailbox login form that opens, specify the username from the user account as the login.
- The password for the user account is always specified as the password. It is impossible to set up a separate password for mail.

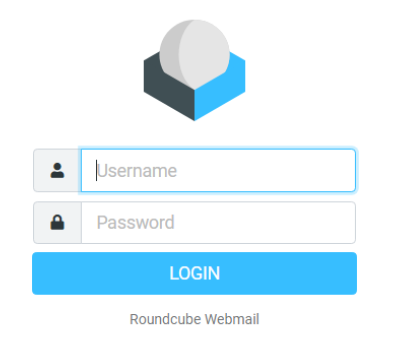
Upon successful login, the web interface of the user's mailbox will open in the browser.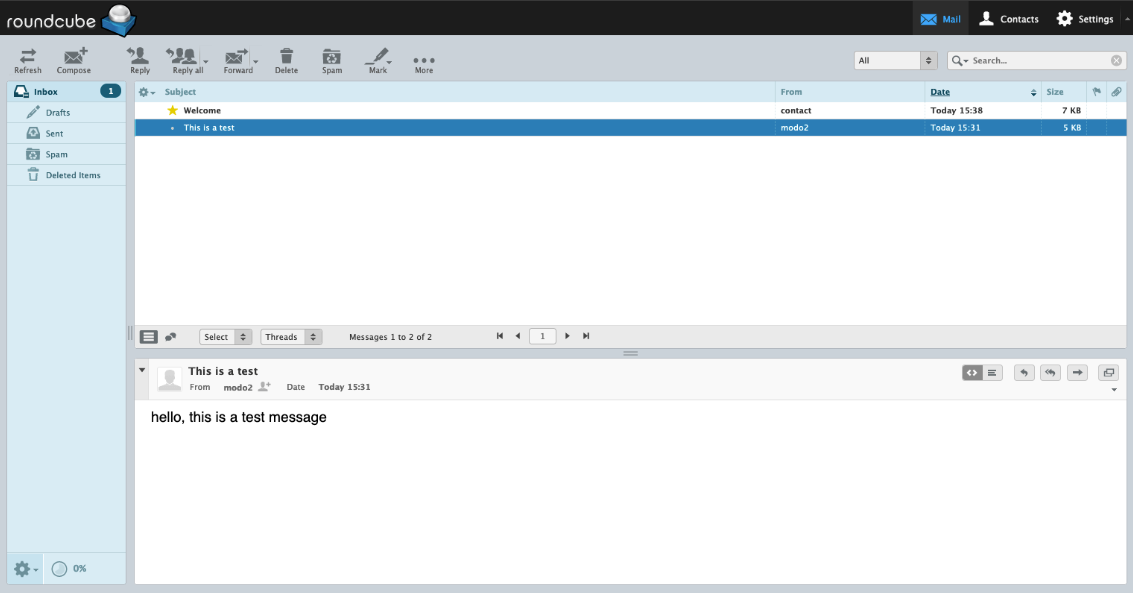
The web interface of the embedded mail client works with the mail server via IMAP protocol and has the following capabilities:
- Create and send emails. Multiple attachments are supported.
- View, delete, and move emails. Manage IMAP folders of the mailbox.
- A personal (for a specific mailbox) address book that works only within the framework of the web application.
- The address book supports the VCARD contact format and can be exported or saved on your computer in this format.
- A calendar with the ability to create events and notify employees about them by mail.
- Colored message labels, as is customary in Thunderbird mail client. They are assigned keys from 1 to 5. Changes are saved on the server so that the labels are visible in another mail client.
- Flexible advanced search for all mailbox emails. Located in the More... section of the drawer toolbar.
Setting up Mail Relay
If SafeUTM has an external IP address, a domain is registered to it, and the necessary records are configured with the registrar and provider, but you want another server to handle the sending and delivery of mail (for example, a pre-configured Exchange server in LAN), then SafeUTM can relay all incoming mail to this machine.
Before setting up the mail relay, make sure that the mail server is enabled on SafeUTM. To set up a mail relay, add an entry of this type to the Relay domains field: mydomain.com|10.20.30.40, where:
mydomain.comis your mail domain assigned to a public SafeUTM address on the Internet.10.20.30.40is the address of your mail server in LAN.
When setting up a mail relay on SafeUTM, it is essential that the main SafeUTM mail domain differs from the Relay domain. For this, in the Main mail domain field in the mail server settings, you need to register a fictional domain that does not match the registered one. This way you can specify multiple Relay domains for several different servers in LAN. All mail domains must be associated with the external address of the SafeUTM server (A and MX records in the DNS zone).
With this scheme, SafeUTM will allow the mail to pass through it directly to the mail server on the local network. Along the way, emails can be checked for spam. For this, enable the appropriate services in the SafeUTM web interface.
SafeUTM will accept mail addressed only to the specified Relay domain. Any other mail will be rejected by the server, so the possibility of receiving an open mail relay during setup is excluded.
Advanced Settings
Advanced Settings
Advanced Settings section consists of three subsections: General, Security, and DKIM-signature.
General
- External SMTP relay. All outgoing mail will be sent to the specified address. It is used, for example, if mail must pass through the provider's upstream server before being sent to the Internet.
- Forward all outgoing mail to address. All outgoing mail will be duplicated to the specified mailbox. It is recommended to turn it on only when absolutely necessary.
- Forward all incoming mail to address. All incoming mail will be duplicated to the specified mailbox. It is recommended to turn it on only when absolutely necessary.
- Maximum box size. Limit the maximum mailbox size, in megabytes.
- Maximum letter size. Limit the maximum size of the message generated by the server, in megabytes.
- Message storage period in the trash folder. The number of days during which the mail is stored in the trash before being deleted.
Security
- SASL support for SMTP client authentication. Connecting to the mailbox from the Internet and sending an email using the UTM SMTP server will be possible only by logging in with the username and password set for this user account on the server. Do not enable this parameter if you use UTM as a mail relay.
- Secure connection only (TLS) authentication. Prohibits the unsecured transfer of client credentials during authorization on the SMTP server.
- Greylisting for incoming mail. Enables filtering by gray lists (graylisting) for incoming mail. In this case, mail from unknown sender domains may arrive with a slight delay.
- DNSBL filtering for incoming mail. Enables DNSBL filtering for incoming mail.
- Trusted networks. Authorization on the server to access the mailbox is not required when access attempts come from these networks. IP networks and hosts are specified in CIDR notation or with a network prefix, for example,
10.0.0.5/255.255.255.255or192.168.0.0/16
DKIM-signature
Configured in section Mail Relay -> Advanced Settings -> DKIM-signature. Signs correspondence originating from the server with a signature unique to your mail domain so that other mail servers on the Internet can verify that your mail is legitimate and trustworthy.
For the technology to function, you will need to create a TXT record for your domain from the zone holder with a value that our server will generate for your mail domain. TXT records will be generated for the main mail domain configured for SafeUTM and additional mail domains (if specified). The server will also check whether the entry for your zone was specified correctly and whether it resolves to the Internet.
The volume of a TXT record is quite large and many registrars/zone holders have difficulty providing an interface to clients to specify TXT records longer than 256 characters. They often provide the possibility to specify TXT records up to 256 characters long in accordance with the RFC1035 standard. However, another standard, RFC4408, suggests combining strings in cases where you need to use long TXT records when configuring SPF and DKIM. Use this information in a dialogue with your domain zone holder. As a rule, zone holders find a way to create long TXT records.
The signature contains a combination of quotation marks (quote-space-quote: " ").
If your hosting does not accept this recording format, then delete these characters.
Setting up Domain at Registrar/Zone Holder
To create a mail server, you will need a domain name. You can register it with your Internet service provider or directly with the registrar.
After you register a domain name, you will need to make changes to the zone description on the DNS server (at the domain zone holder, which is often the registrar).
1. Create an A-type resource record with a name for the mail server in your domain, pointing to the external IP address of SafeUTM. Make sure that a public address accessible from the Internet is assigned on the UTM external interface.
2. Add an MX-type resource record pointing to the A record that was created in the previous step. An MX-type record points to a network node that processes mail messages for the domain. It should refer to the domain name of the mail server, not the IP address.
We also recommend
3. Adding a reverse PTR-type resource record. This entry must be registered in the reverse zone file. These changes must be made on your Internet provider's side. Contact them with a request to register a reverse resource record for your IP address, which should refer to your MX-type record.
4. Configuring an SPF record for your mail server.
5. After configuring the mail server, also configure the DKIM signature of mail messages. To do this, go to Mail Relay -> Advanced Settings -> DKIM-signature and activate the item Sign outgoing mail with DKIM.
Also, create a TXT record for your domain from the zone holder with the name from the Record Name line and with the content that was generated by SafeUTM in Record Value.
Let's look at the set of necessary records using the example of a fictional domain example.net:
- A-record of the type:
mail.example.net. IN A 23.45.67.89, where 23.45.67.89 is the external IP address of SafeUTM. - MX-record of the type:
example.net. MX 10 mx.example.net - Contact your hosting to register a PTR record for the desired IP address of the type:
89.67.45.23.in-addr.arpa IN PTR mail.example.net - SPF-record that announces to other mail servers on the Internet that sending emails from your domain is allowed only from the mail server host specified in the MX-record:
example.net. IN TXT "v=spf1 a mx -all"
SPF syntax:
"v=spf1" — SPF version, required parameter, always spf1, no other versions work.
"+" — accept emails (by default).
"-" — reject.
"~" — "soft" rejection (the email will be accepted, but will be marked as spam).
"?" — neutral attitude.
“MX" — includes all server addresses specified in MX records of the domain.
When using a mail server on UTM as a mail relay, resource records will look the same, since on the Internet your LAN mail server will be represented by an SMTP relay on UTM.
Rules
Rules
Rules section consists of three subsections: Forwarding, Permitted addresses, and Forbidden addresses.
Forwarding
Allows you to configure mail forwarding on the server using mail aliases. Aliases, unlike mailboxes, do not require logins and passwords, they are assigned to a mailbox and serve as its copy with a different name, or, if an alias is assigned to several mailboxes, it can serve as a mailing group. Mail incoming to the alias is automatically forwarded to all real mailboxes associated with this alias. If forwarding is done to a mailbox in another domain on the Internet, then the mailbox registered in the Recipient column must actually exist.
You can read more about setting up mail aliases on SafeUTM in the article Mail forwarding.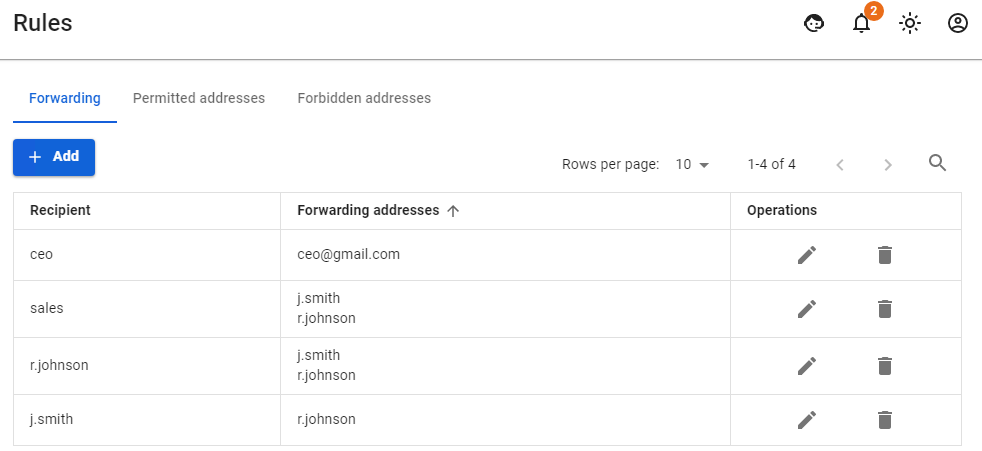
Permitted addresses
Allows you to specify mail domains, IP addresses of mail servers and mailboxes, and emails from which will not be checked for spam.
If the mailbox is simultaneously specified in Forbidden addresses and Permitted addresses, then the Permitted address has the highest priority.

When you add overlapping sources to both lists, there is no correlation between the sources. Priority will be given first to IP addresses, then to mailboxes, and then to domains. That is, if the IP address of the mail server is forbidden and the domain it serves is permitted, then emails from it will be blocked (blocking by IP address is prioritized). Reverse example: An IP address is permitted, but a domain is forbidden. Emails are blocked, just at a later stage, when checking the mail domain.
Another example: the domain is in Permitted addresses, a mailbox from this domain is in Forbidden addresses, then emails from the mailbox will be blocked.
Reverse example: emails from a mailbox listed in Permitted addresses will be allowed even if the domain that the mailbox belongs to is listed in Forbidden addresses.
The scheme of letter processing in the mail server is presented in the article Mail traffic filtering scheme. Please note that Permitted and Forbidden addresses are triggered after several preliminary filtering steps.
Forbidden addresses
Allows you to specify mail domains and mailboxes from which emails will not be accepted by the server.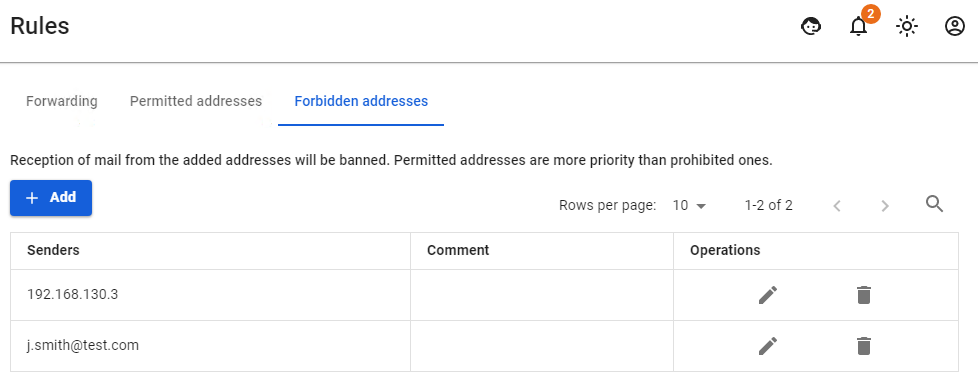
Mail Forwarding
Setting up mail forwarding rules (aliases)
To create and edit mail forwarding rules (aliases), go to Mail Relay -> Rules -> Forwarding.
Mail aliases differ from mailboxes in that they do not require logins and passwords. They are assigned to a mailbox and serve as its copy with a different name, or, in case of assigning an alias to several mailboxes, we can say that alias is a group of mailboxes or a mailing group. Mail incoming to the alias is automatically forwarded to all real mailboxes associated with this alias. You can omit part of the address @yourdomain.com when creating rules if the mailbox is located on the SafeUTM mail server. If the redirection is done to any mailbox in another domain on the Internet, then the mailbox that is registered in the Recipient field must actually exist.
Examples:
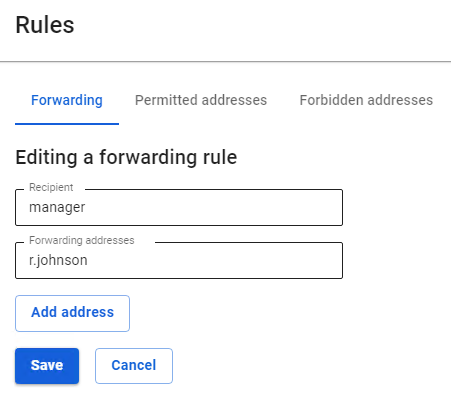
- Create an alias
manager@yourdomain.comfor the mailbox of your company's manager for communications with customers and partners, whose real mailbox isr.johnson@yourmaildomain.com:
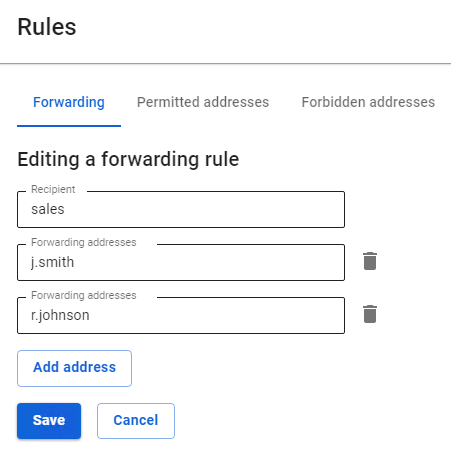
- Create a corporate alias for the sales department
sales@yourmaildomain.comso that mail is forwarded to all employees of this department:
- Create a temporary alias for forwarding the mail of an employee on vacation
r.johnson@yourmaildomain.comto his colleague's mailboxj.smith@yourmaildomain.comwith mail saved in the mailboxr.johnson@yourmaildomain.com:
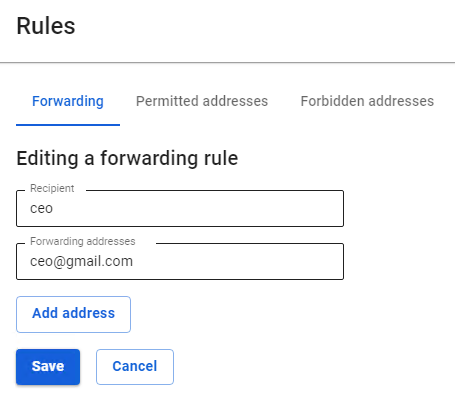
- Create alias
ceo@yourmaildomain.com, which will forward mail to a real mailboxceo@gmail.com:

After creating all the rules, we got this list: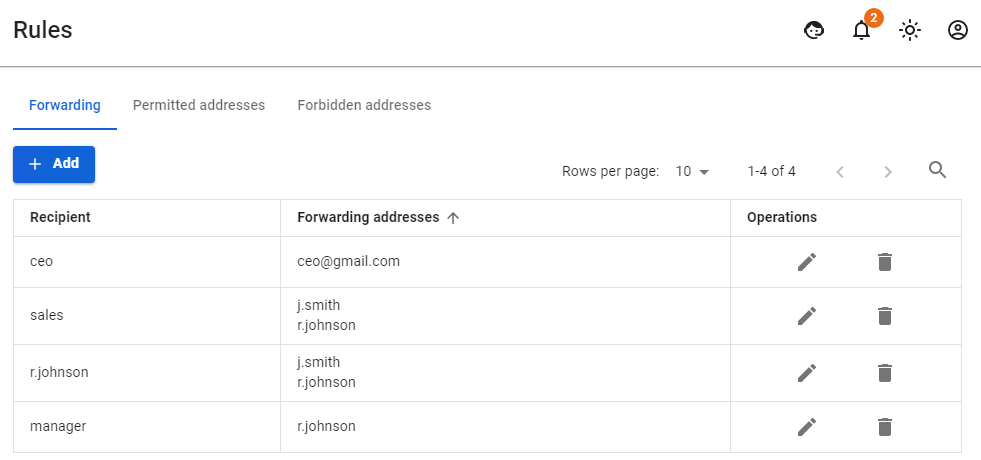
Let's describe how mail will work with such forwarding rules:
Emails coming to a non-existent mailbox (alias) manager@yourdomain.com will appear in the real one r.johnson@yourmaildomain.com. There is also an alias for the sales department sales@yourmaildomain.com which does not store letters itself. This is convenient if there is information for the sales department that needs to be distributed to each employee. All the same, can be done if you just specify all recipients in the letter, but using an alias is much more convenient. Also, an employee with an email address r.johnson@yourmaildomail.com is now on vacation and all the mail coming to his mailbox is duplicated to j.smith@yourmaildomain.com. The last rule allows the CEO to receive mail not to the corporate mailbox, but to their personal one on Gmail.
The alias is not a valid mailbox. You cannot connect to it with an email client using a username and password, as in a regular email account. Thus, creating aliases does not increase the maximum possible number of real mail accounts on SafeUTM, which is equal to the number of user accounts in the license you purchased.
Mail Queue
Allows you to manage the queue of mail that for some reason cannot be sent or received right now. The module allows you to manage both incoming and outgoing deferred correspondence. To analyze possible reasons for the delay of correspondence in the queue, you can use information from the corresponding column of the table for each letter. There are both individual and group actions with items in the queue (clearing the queue, resending a single letter, deleting single letters from the queue, and resending all correspondence from the queue).
Checking Mail Server Settings
It is recommended to check the correctness of all DNS and mail server settings using the service mail-tester.com.
With the correct configuration, the mail server on SafeUTM should receive 10 points out of 10.
Configuring Email Clients
Configuration and examples of settings for popular email clients.
It is not possible to connect from the Internet with Outlook (any version) via POP3 protocol. Outlook does not support STARTTLS encryption type for POP3, but only supports outdated and insecure SSL/TLS ones, which are no longer used in our mail server. Connection from outside without encryption is also prohibited on our mail server. Nevertheless, it remains possible to connect via IMAP using STARTTLS. To do this, select encryption type Auto in Outlook.
Configuring Email Client When Working from LAN
1. The incoming mail server runs on 995 TCP port (ROR3) and on 143 TCP port (IMAP) with STARTTLS/SSL encryption.
- The login for the user account is registered as login.
- The password for the user account is always registered as a password (including for users imported from Active Directory); it is impossible to set a separate password for the mailbox.
2. The outgoing mail server runs on TCP port 587 with STARTTLS encryption. Without authorization, it is possible to send mail only from trusted networks (they can be configured in Mail Relay -> Advanced Settings -> Security).
Configuring Email Client When Working from the Internet
1. The incoming mail server runs on 995 TCP port (POP3S) and 143 TCP port (IMAP- STARTTLS), encryption is required.
- The username from the user account is registered as a username.
- The password for the user account is always registered as a password, it is impossible to set a separate password for the mailbox.
2. The outgoing mail server works only with authorization and encryption. It is mandatory to use port 587 for connection (not 25). The encryption type, login, and password are specified similarly to the incoming mail server.
For any email client, except for the mail web interface as part of UTM, install the root certificate of the UTM server; you can download it from the section Services -> TLS Certificates.
Examples of Settings for Popular Email Clients
Configuring Outlook 2013 and 2016
Example of Microsoft Outlook 2013 and 2016 settings using IMAP protocol: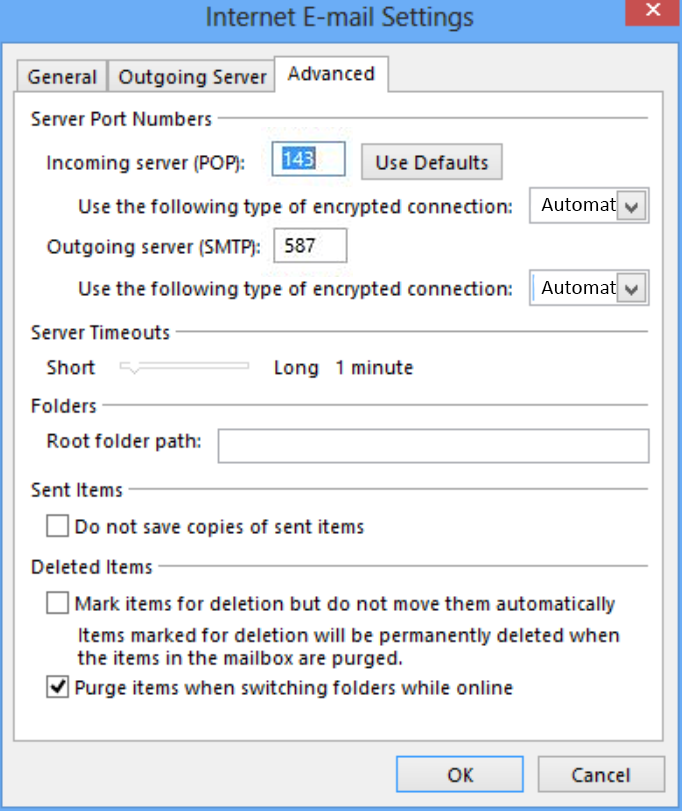
To display IMAP folders, uncheck the box When viewing the tree in Outlook show only signed folders in IMAP folders properties.
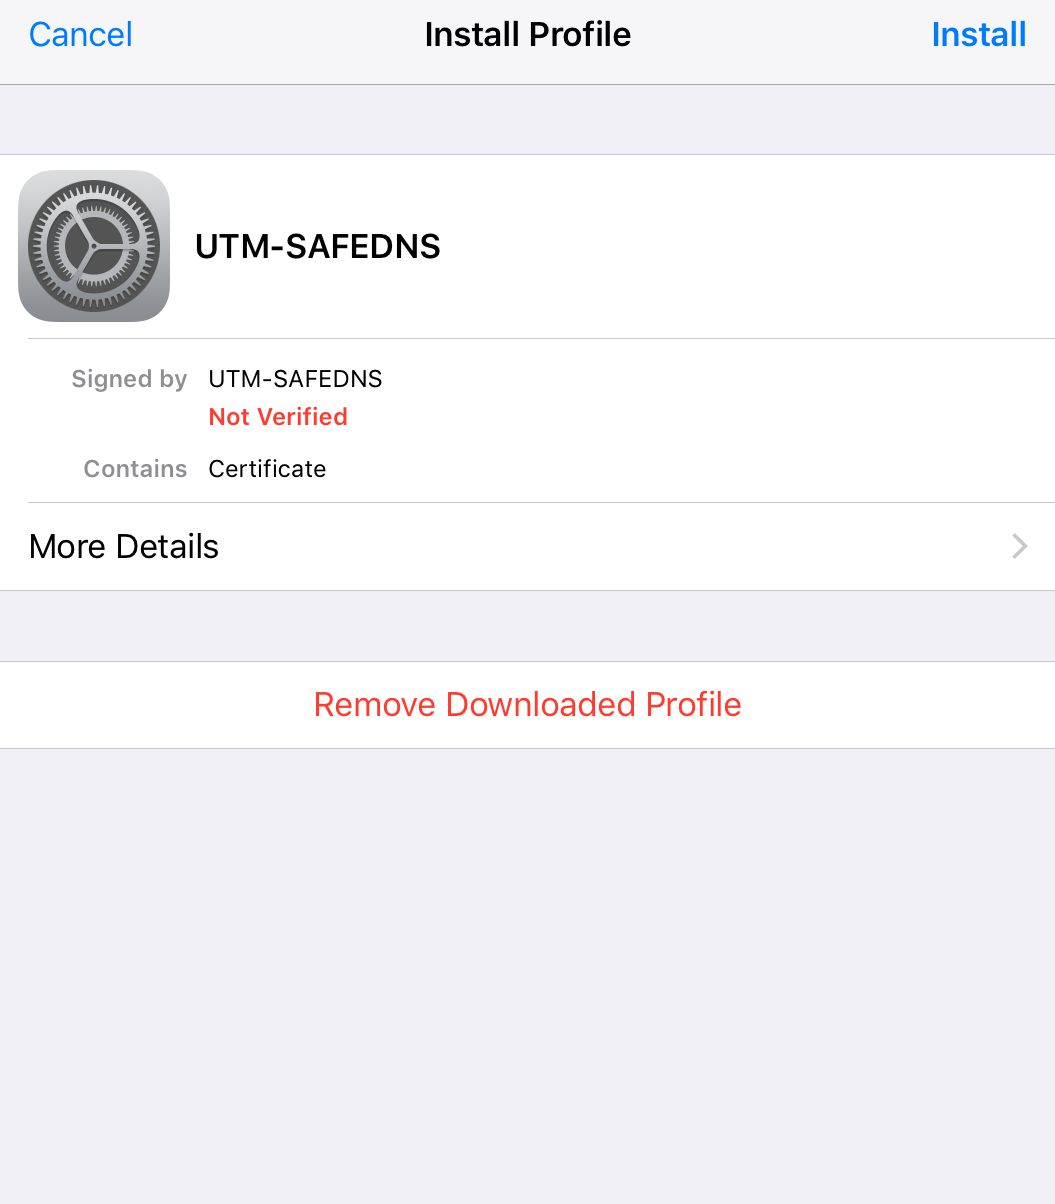
Configuring iPhone Email Client
Before configuring the mailbox, you need to install the UTM root SSL certificate. You can download it from the section Services -> TLS Certificates. For example, send the certificate to your email and open it on your iPhone.
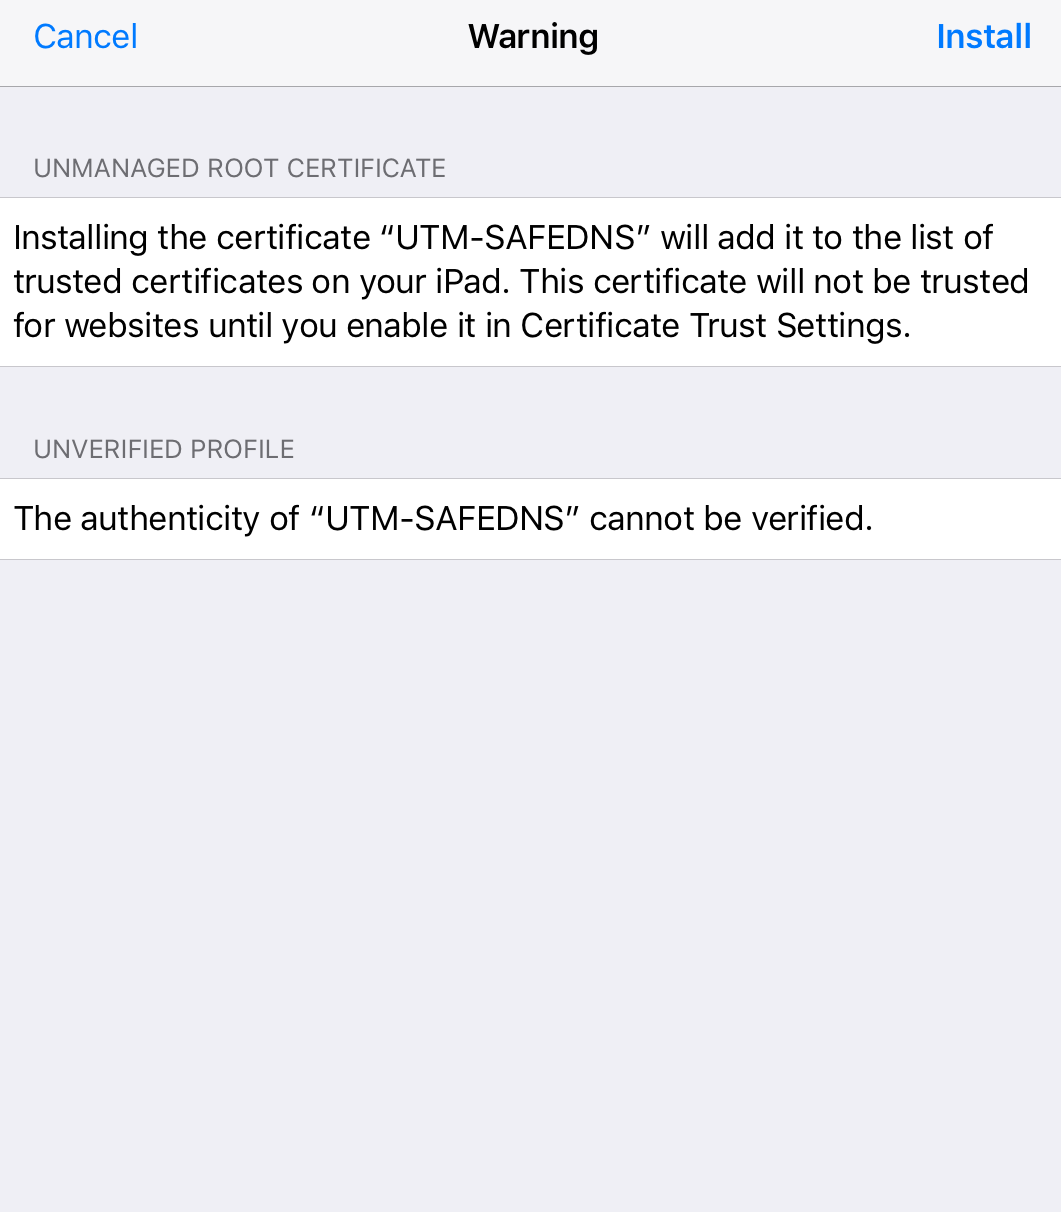
- Click on Install.
- Go to Settings -> General.

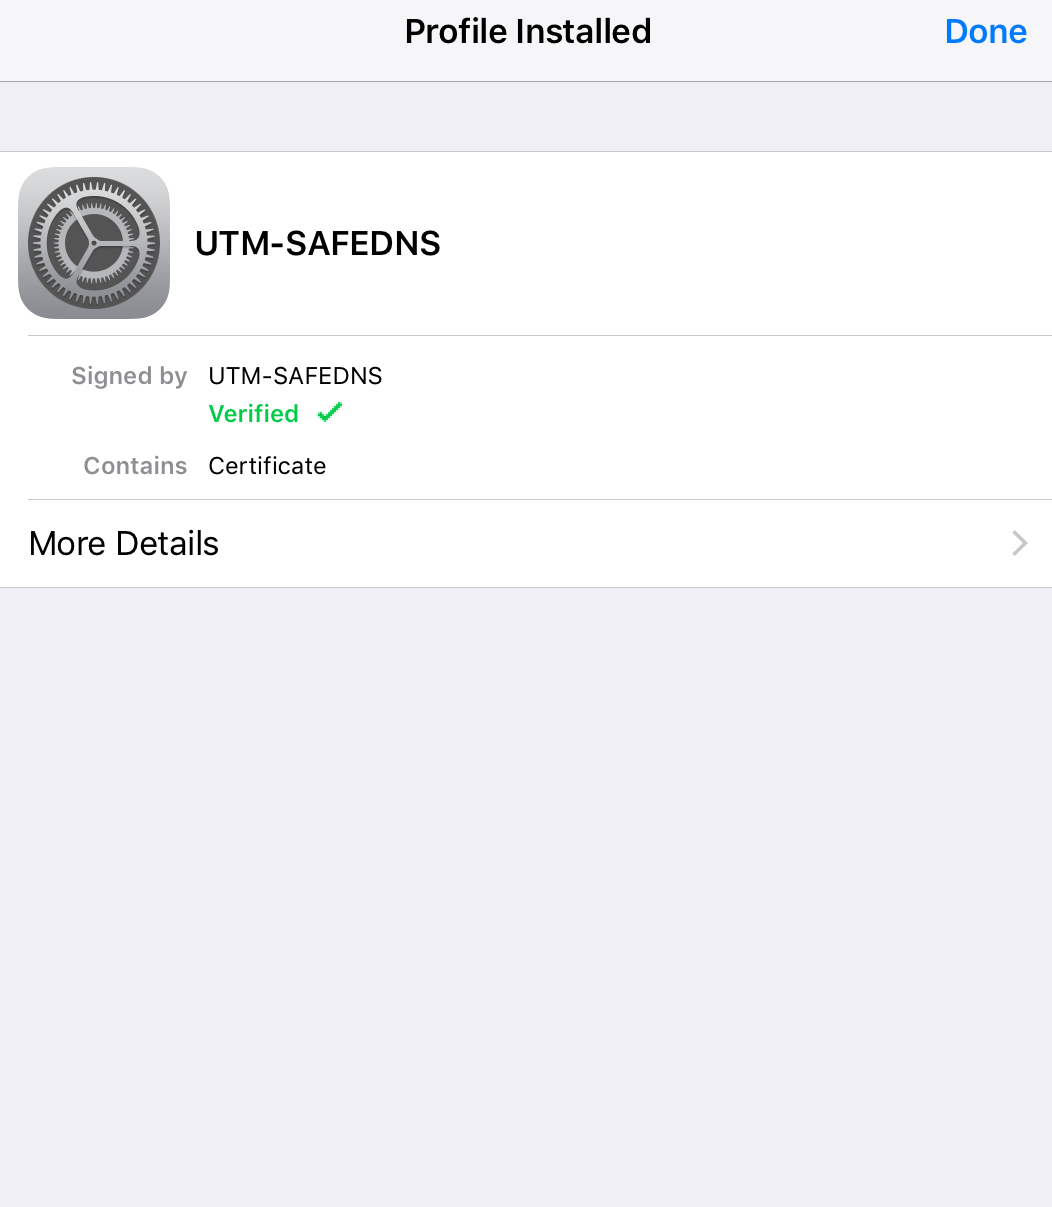
- Press Install. Then press Install one more time. Then press Done.


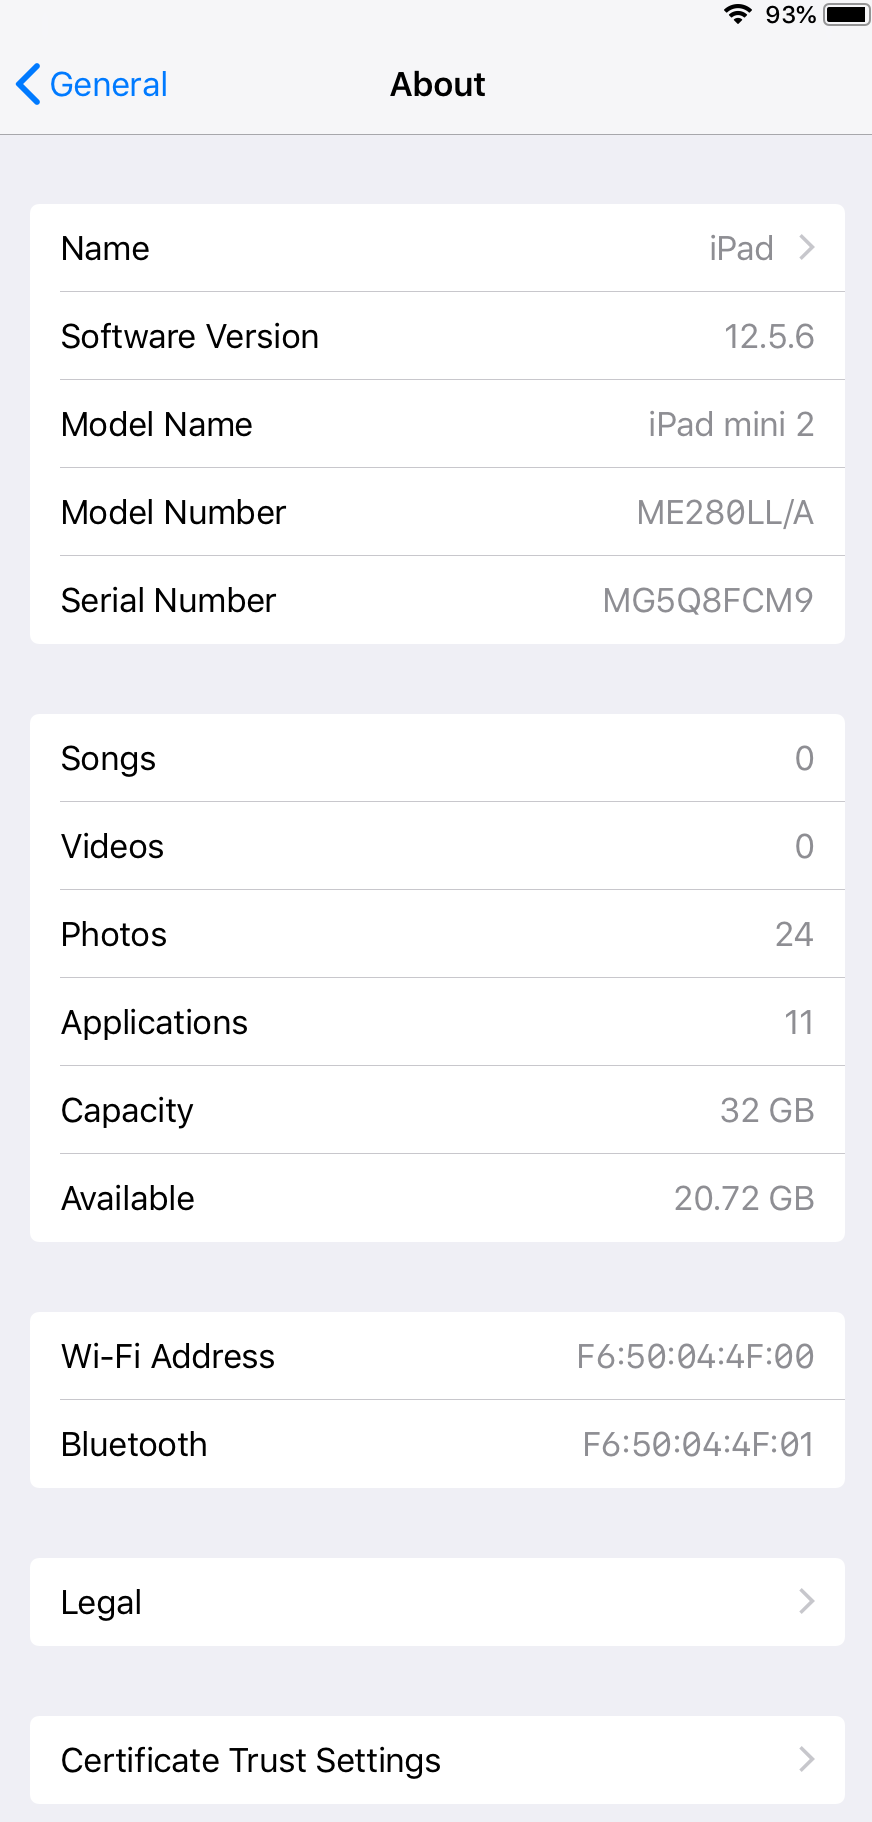
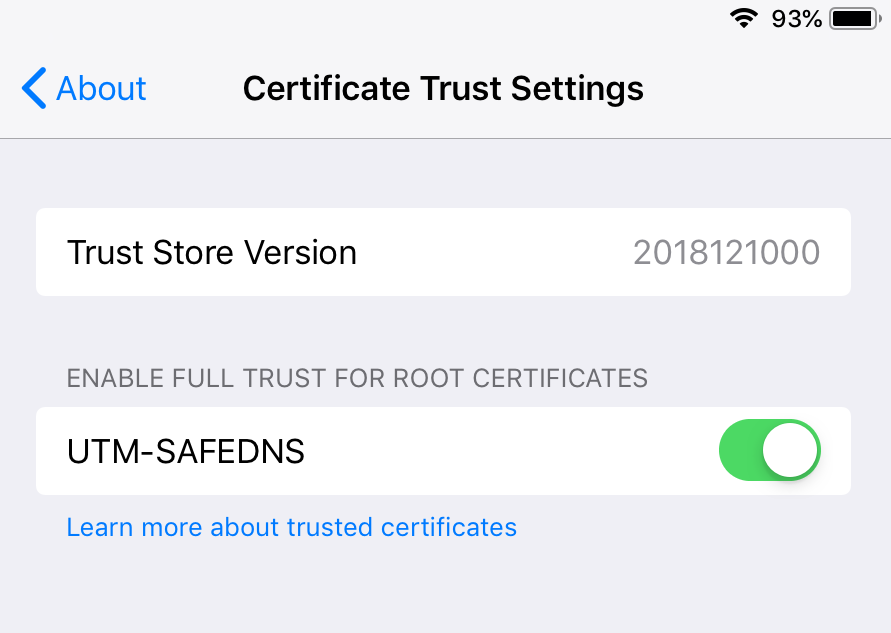
- Select About -> Certificate Trust Settings:

- Enable setting Trust Root Certificates Completely.

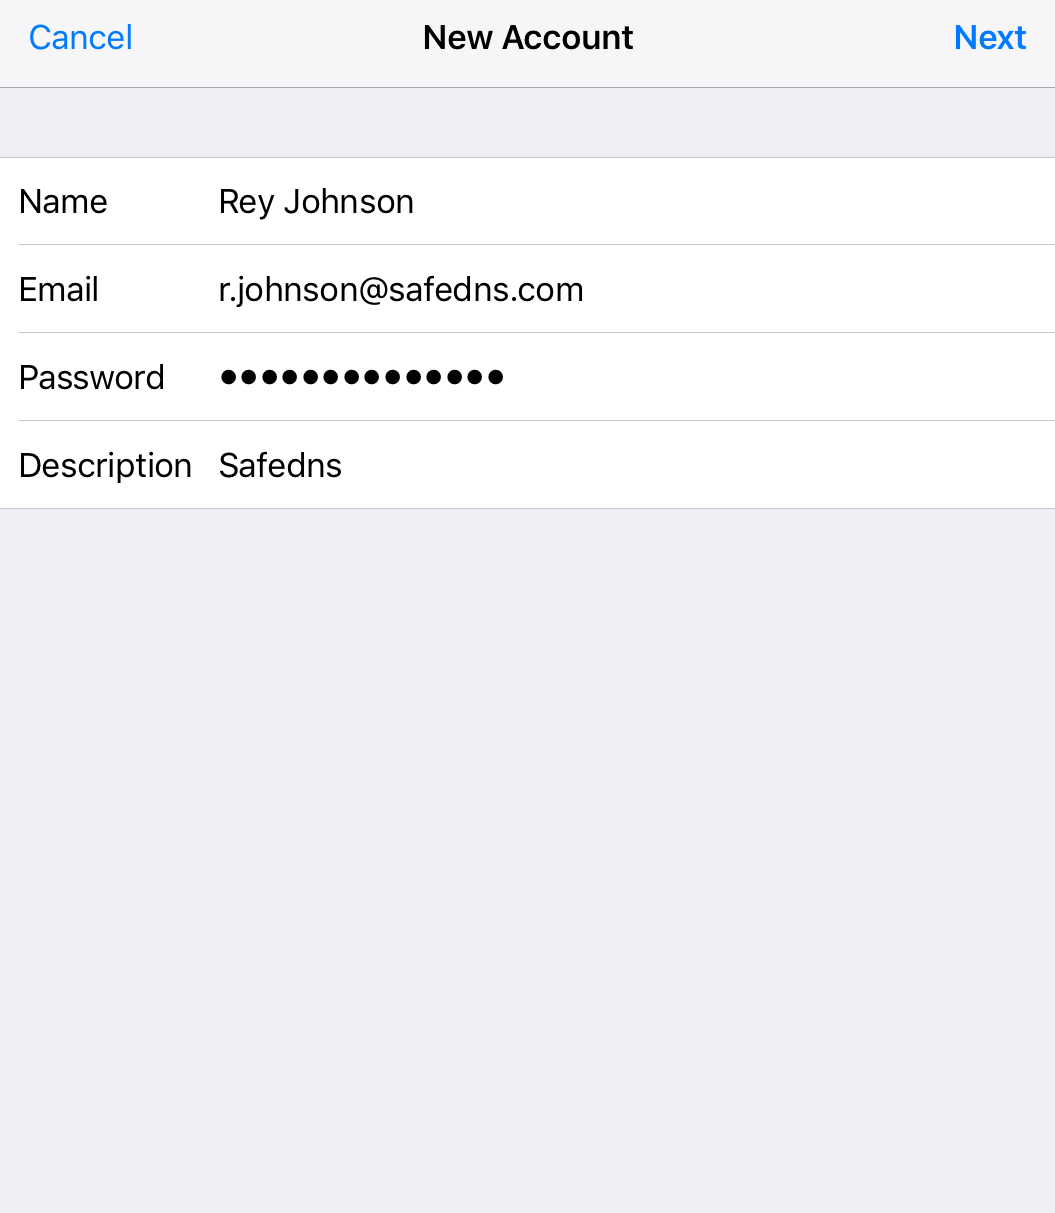
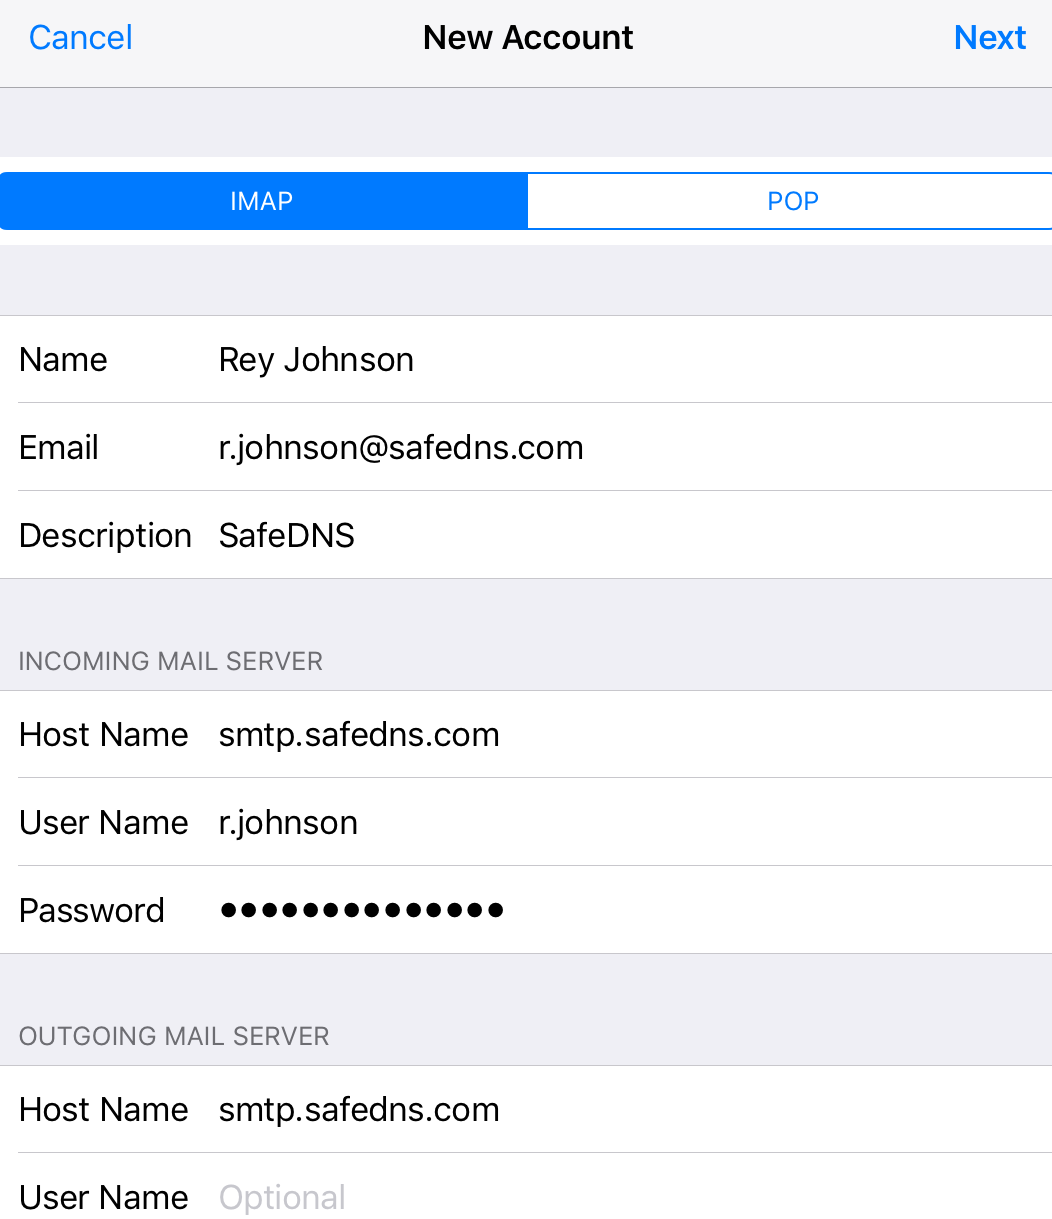
After installing the certificate, configure access to the mailbox:
- Go to your Mail Account and click Advanced.

- Adjust the settings.

Configuring Thunderbird Email Client
- Go to Settings -> Account Settings.
- Fill in the required fields:
-
- Server Name
- Port
- Username
- Connection protection
- Authentication method (we recommend a Normal password)
If necessary, fill in Server parameters and Message storage.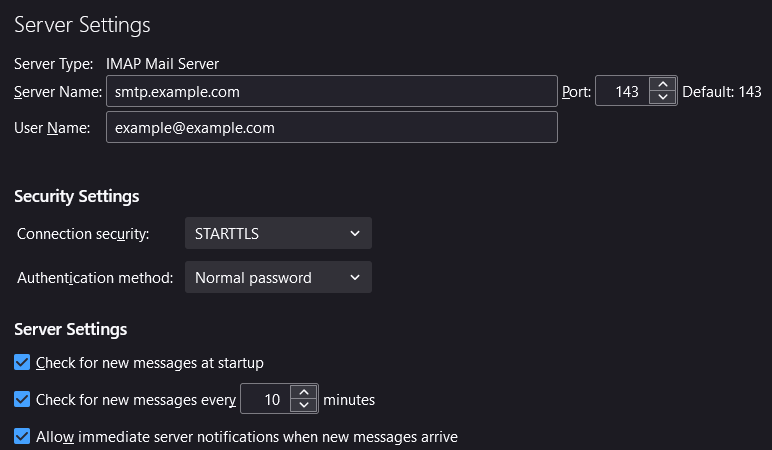
Mail Traffic Filtering Scheme
Besides mail filters, other services are involved in filtering mail traffic on SafeUTM.
The complete scheme and sequence of filtering are shown in the diagram.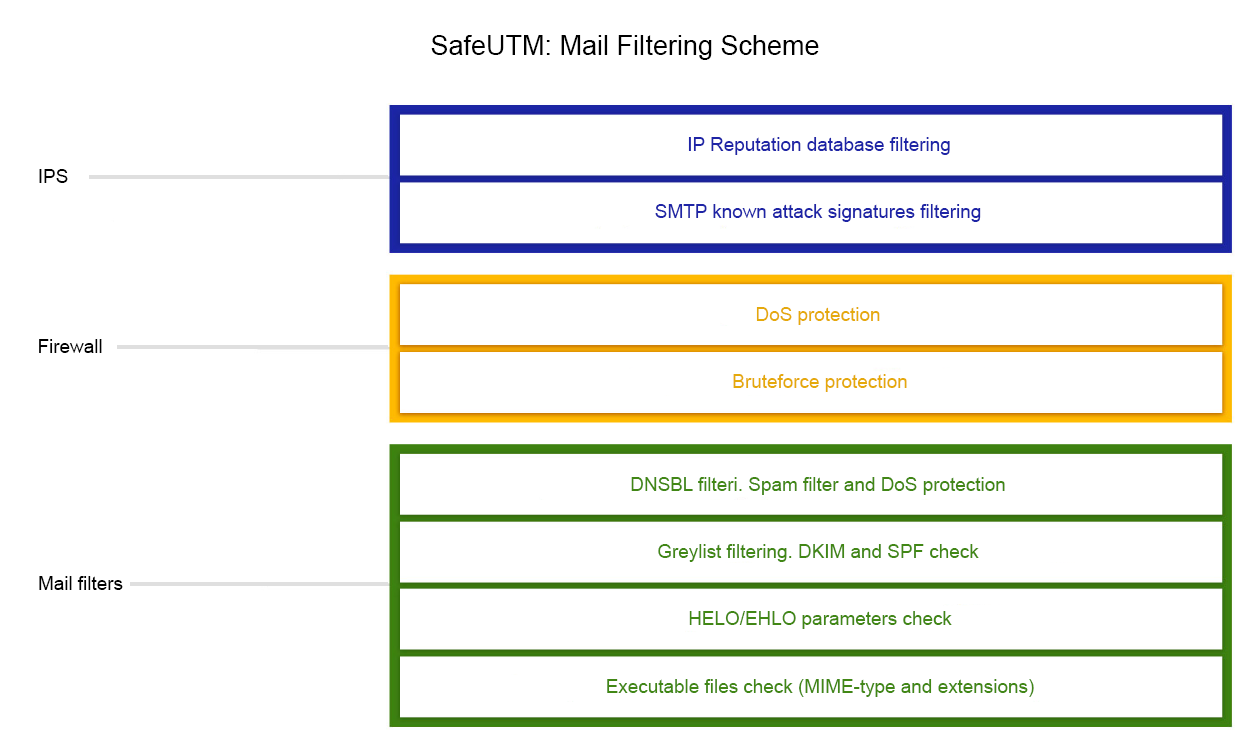
The white list in the mail settings ensures the passage of emails without filtering, starting from the level of "Filtering by gray lists and checking DKIM/SPF". Preliminary spam filters are triggered for any recipients.