5. Maintenance
- License Management
- Server Update
- Server Registration
- Data Backup and Recovery
- Remote Assistant Mode
- Allow Internet to Everyone
- Remote Access for Server Management
License Management
Licensing Scheme
At the moment SafeUTM license has two types of licenses:
- Free trial;
- Enterprise.
Both types of licenses can be acquired by contacting your SafeDNS manager.
Viewing license information
A detailed view of the server and license information is available by clicking on the eye icon in the Operations column of the Server + License table.
Detailed information about the license contains data about the license validity period, number of users, expiration date of updates, and technical support of the product.
Server Update
Updating the server is possible exclusively over the network. It is not possible to upgrade using an installation disk or USB flash drive.
Automatic Update
Automatic update parameters are configured in Server Management -> Automatic update.
- Field Defer update – the time for which the update will be postponed (maximum period of 6 months).
- Field Day of week – the day of the week when the automatic update is launched.
- Field Auto reboot time – allows you to select the time to start automatic updates.
- Field Update channel – select Release or Beta channel allows you to update to stable versions. The Beta channel allows you to update to the latest beta versions of the product (the versions are relatively stable, but in some cases, the product may not work correctly). By default, the Release option is selected.
- Button Start update – starts the forced update mechanism. If the button is inactive, there are no updates for your version.
When initiating a forced update, the update will be downloaded, after which a full reboot of the server will be required.
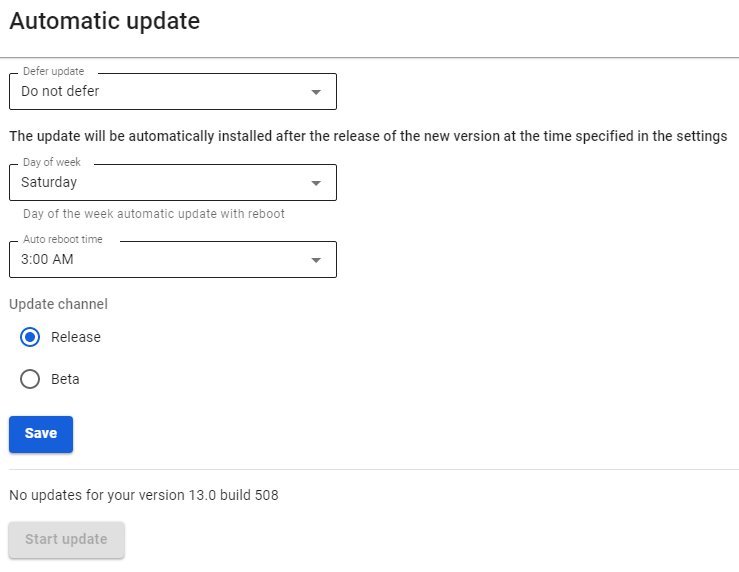
After the update procedure, the new version will be displayed in the upper-left corner of the local console and the administrator web interface.
Server Registration
It is necessary for the full operation of SafeUTM after installation.
To register a server, the Internet must be available on it (be sure to set up a connection to the Internet provider before registration).
After that, please contact your manager or technical support engineer to receive the registration link.
After registration, the server will automatically receive a license (if it has access to the Internet). Click Update license information, after which you will see the license status.
Data Backup and Recovery
Backup
Providing users with stable access to the Internet is the main task solved by the Internet gateway. However, sometimes there are situations that lead to system failures and subsequent disruption of Internet access. Depending on the complexity of the failure, it may be necessary to completely reinstall the Internet gateway and restore data from backups. In this section, you will find a description of the backup-creating process for the SafeUTM Internet gateway.
The Internet gateway supports the following types of automatic backups:
- To a network file storage via FTP
- To a network file storage via NetBIOS protocol
- To a local hard drive
To set up automatic backups, go to Server Management -> Backup -> Settings. A backup copy is created every day at the hour specified in the settings (it is recommended to choose the nighttime to create a backup).
You can store backups for a week or a month.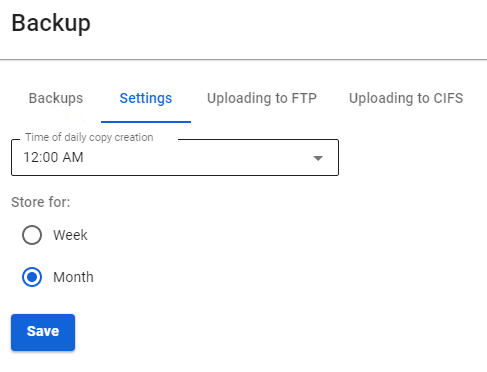
Backup to Remote File Storage via FTP or to Network File Storage using NetBIOS Protocol (CIFS)
To create a setting, go to Server Management -> Backup -> Upload to FTP server/Upload to CIFS shared folder, check the box Enable uploading to FTP server/to CIFS shared folder, and fill in the appropriate fields.
The Server Address line specifies the IP address or domain of the remote FTP/NetBIOS server that will host the database copies.
The path to the directory must be specified in UNIX format.
For example, in Windows OS, the directory is opened by the following path \\192.168.1.1\dir_1\dir_2\backup, so you need to enter dir_1/dir_2/backup in the Directory path field.
Using the FTP and NetBIOS(CIFS) protocols, only automatically created backups are uploaded at the frequency specified in the Settings tab.
Backup to Local Hard Drive
It is possible to upload a backup copy from the server or from a computer to the server using the web interface or the local menu.
The backup management interface in the web interface is shown in the screenshot below.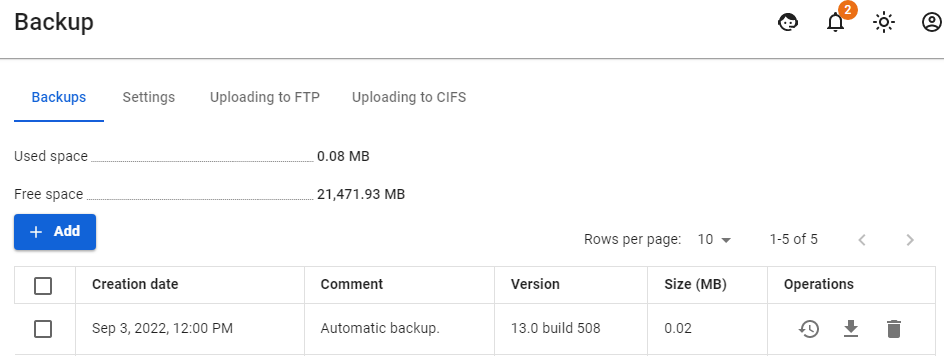
Managing backups via the local menu
- To create a new backup via the SafeUTM local menu, select 9 and press Enter. Next, enter a comment for the backup and press Enter.
An example of creating a backup via the local menu is shown in the screenshot below: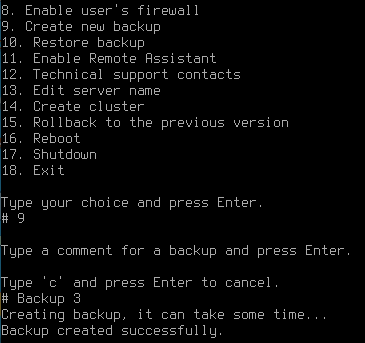
- To restore the configuration from the backup, select 10 and press Enter. Select a backup copy from the list (if there are several copies) by entering the item of the desired copy, and pressing Enter. To restore from a backup, you need to reboot the server. Type y and then Enter to reboot.
An example of restoring from a backup via the local menu is shown in the screenshot below: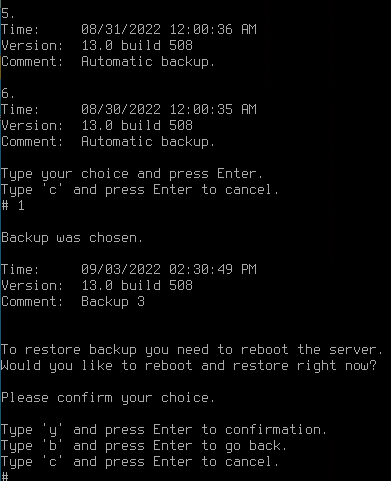
When migrating UTM from one physical machine to another (disk transfer or backup restore on new hardware), the settings of all network interfaces specified before the migration will be restored. Use the trash button to remove unnecessary interfaces.
Example: the original version of UTM 13.X -> migrated UTM to new hardware -> configured new hardware -> upgraded -> in the Network interfaces section, old (before migration) and new (after migration and configuration) network interfaces will be displayed.
Remote Assistant Mode
In order for the technical support service to connect to your server remotely, you need to enable the remote assistant mode. Operation of the server in this mode does not affect users' work.
To enable the remote assistant mode, click on the assistant icon in the upper right corner of the screen and drag the slider near Remote Assistant to Enabled.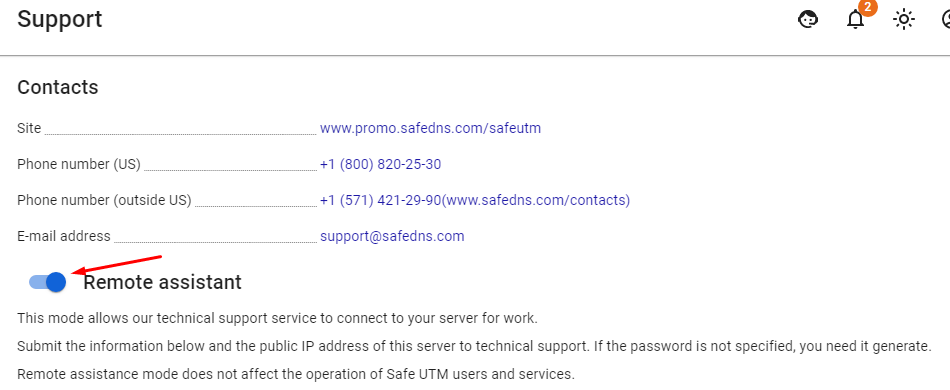
Enabling Remote Assistant Mode from Web Interface
To connect with a technical support specialist, provide them with Information for technical support by clicking Copy. You also need to send the server’s public IP address separately. If the server is not connected directly to SafeUTM, then forward TCP port 22 to SafeUTM from an external router.
The Remote Assistant mode remains enabled even when the server is rebooted. Disable this mode when it is not necessary to use it. Continuous operation of the SafeUTM server in this mode is highly discouraged.
Enabling Remote Assistant Mode from the Local Server Menu
To enable the Remote Assistant mode in the SafeUTM local menu, select Enable Remote Assistant Access by typing 11 and pressing Enter.
A password will be generated, which must be reported to technical support for an SSH connection.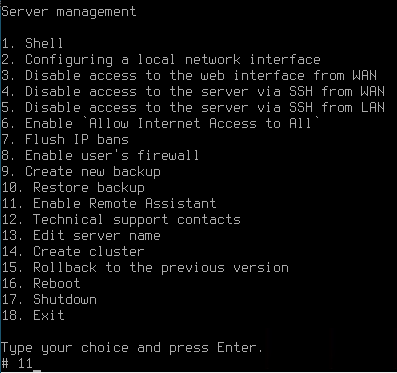
Working with Server via SSH Protocol in Remote Assistant Mode
To organize work with the local server console remotely via SSH protocol from the root user in the remote assistant mode, you must perform the following actions:
1. Connect to the server using the PuTTY SSH client. The program is free and you can download it from the developers' website (https://www.putty.org).
2. When connecting from a LAN, use the address that is configured on the UTM LAN card. Enter the necessary parameters to connect:
- Port – 22.
- Username – remsup.
- Password specified when enabling remote assistant.
The "#" symbol indicates that you are working as the superuser.
Allow Internet to Everyone
This mode is used to diagnose problems.
Active Allow Internet to everyone mode does not automatically turn off and works until you turn it off.
In this case:
- Firewall rules won't work.
- Traffic filtering will not occur.
- Web statistics will not be collected.
- Users will be allowed to access the Internet without authorization.
There are two ways to enable this mode:
1. In the web interface.
To do this, click on the technical support icon in the upper right part of the window, and in the window that opens, drag the mode activation slider to the Active position.
2. In the local menu.
To do this, enter number 6. Enable 'Allow Internet to all’ mode and press Enter to apply the setting.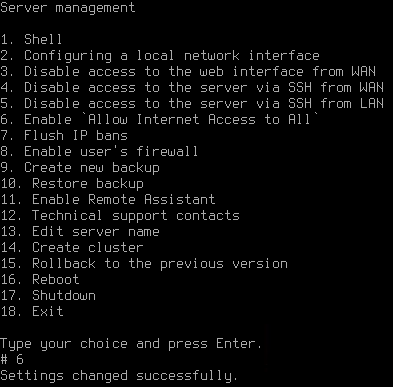
Remote Access for Server Management
SSH Connection from Local Network
To connect to the server's local menu from a local network via SSH, you must:
1. Allow SSH connection. To do this, go to Server Management -> Administrators and activate item Access via SSH from the local network.
2. Connect to the server using any SSH client (for example, PuTTY) using port 22. You can download the PuTTY SSH client from https://www.putty.org/. It is necessary to specify the Administrator’s login and password.
SSH Connection from the Internet
To connect via SSH from the Internet to the local server menu, you must:
1. Allow SSH connection from the Internet. To do this, go to Server Management -> Administrators and activate item Access via SSH from the external network.
2. Connect to the server using any SSH client (for example, PuTTY) using port 22. It is necessary to specify the Administrator’s login and password.
Access to Server Management Web Interface from the Internet
Direct access to the SafeUTM web interface from the Internet is prohibited by default. You can use one of the methods listed below:
1. Enable the function Access to the web interface from external network in Server Management -> Administrators (this will only allow access by IP address with port 8443).
2. Create a VPN connection to the server, for example, via IPsec, IKEv2, or SSTP. After connecting, you can go to the web interface with the IP address of any local interface (including the IP address from the range for VPN connections. The default address is 10.128.0.1).
3. Create a rule in the reverse proxy for publishing the web interface:
3.1. Go to Services -> Reverse Proxy.
3.2. Add a new rule by filling in the fields as follows: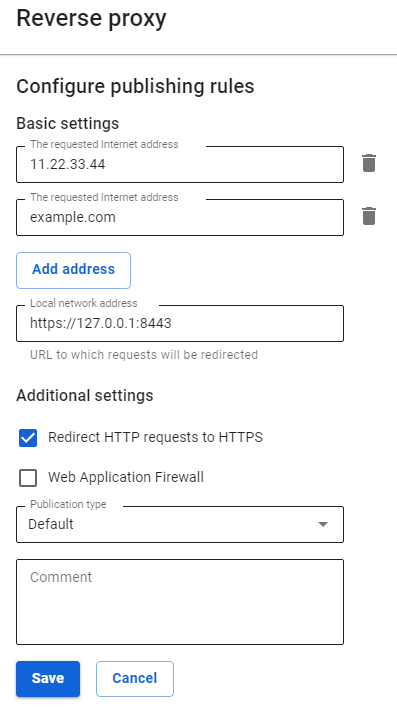
As the requested address, specify the IP address or domain name assigned to SafeUTM external interface.
3.3. Click Save.
3.4. Go to one of the addresses that you specified in the requested addresses.