# Instructions for Creating VPN Connections
# Instructions for Creating VPN connection in Ubuntu
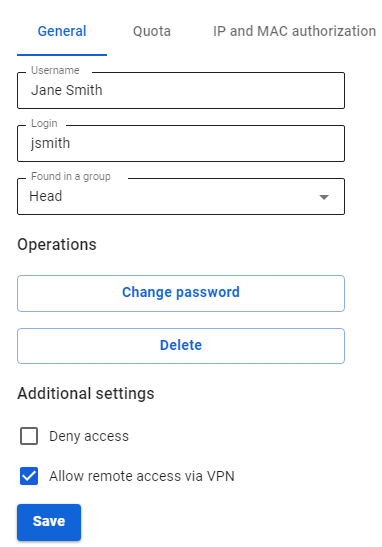
Before setting up a VPN connection, in the user tree in the desired user’s card, check the box **Allow remote access via VPN.** To do this, go to **Users -> User & Group**:
[](https://docs.safedns.com/uploads/images/gallery/2022-09/nPAzmWJwbZNorTN4-1-instructions-for-creating-vpn-connection-in-ubuntu.png)
---
PPTP Protocol
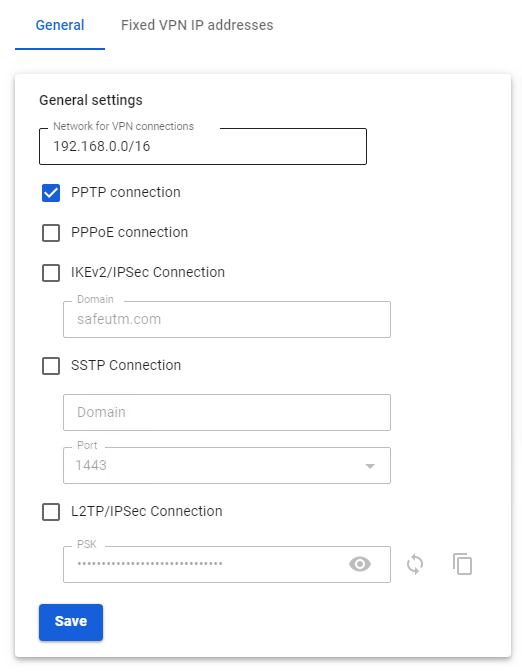
Before creating a connection in Ubuntu, go to SafeUTM, **Users -> VPN connections,** and check the box **PPTP Connection**:
[](https://docs.safedns.com/uploads/images/gallery/2022-09/jameUxXzfpFg6QqQ-2-instructions-for-creating-vpn-connection-in-ubuntu.png)
**Creating a connection in Ubuntu**
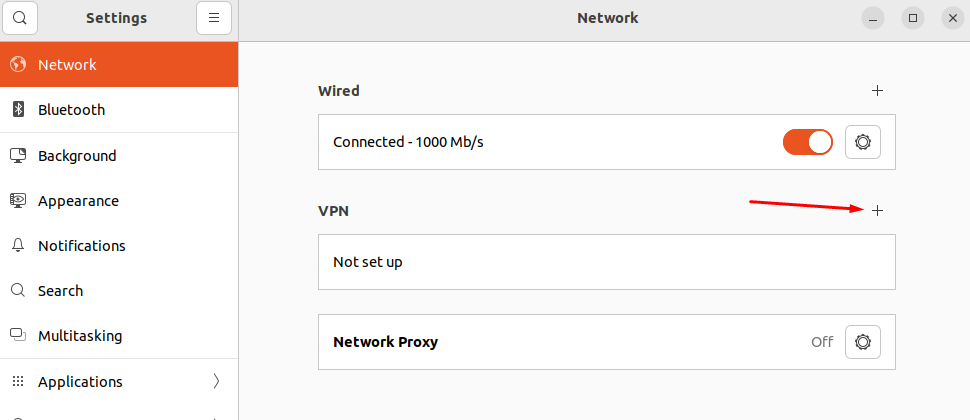
1\. Go to **Settings -> Networks** and in the **VPN** line**,** click **(+)**:
[](https://docs.safedns.com/uploads/images/gallery/2022-09/LobD8ntHfpCdpcJn-3-instructions-for-creating-vpn-connection-in-ubuntu.png)
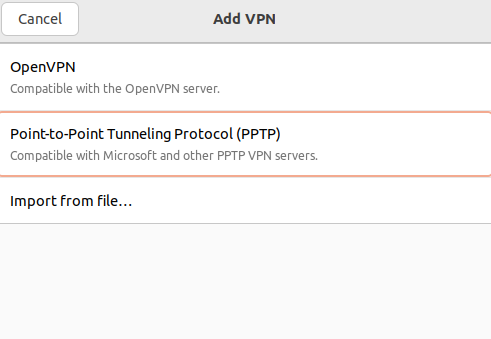
2\. In the connection creation window, select **Point-to-Point Tunnel Protocol (PPTP)**:
[](https://docs.safedns.com/uploads/images/gallery/2022-09/McWjRc8VlWWOBEda-4-instructions-for-creating-vpn-connection-in-ubuntu.png)
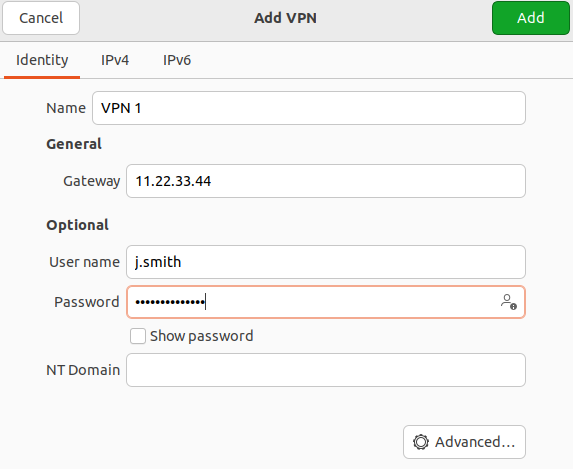
3\. In the **Identification** section fill in the following fields:
- **Name** – the connection name.
- **Gateway** – the domain name or IP address of the UTM interface.
- **Username** – the name of the user allowed to connect via VPN.
- **Password** – the user's password. In the right part of the field, select the storage option for the VPN connection password.
- **NT domain** – leave the field empty.
[](https://docs.safedns.com/uploads/images/gallery/2022-09/ymyUevrAgq5z5HKB-5-instructions-for-creating-vpn-connection-in-ubuntu.png)
We recommend that you click **Advanced** and check the following:
- **Allow the following authentication methods** – check the item
- **Use MPPE encryption** – in the Encryption line, select 128-bit (the most protected).
- **Use BSD compression for data** – using the BSD-compress algorithm.
- **Use Deflate compression for data** – using Deflate algorithm.
- **Use TCP Header Compression** – using Van Jacobson's TCP/IP header compression method.
[](https://docs.safedns.com/uploads/images/gallery/2022-09/nmjlFvQUeVzulhEh-6-instructions-for-creating-vpn-connection-in-ubuntu.png)
4\. Click **OK** and **Add**.
5\. Set the switch of the created VPN connection to the Enabled position:
[](https://docs.safedns.com/uploads/images/gallery/2022-09/ztAsaMuvyk2C5yOx-7-instructions-for-creating-vpn-connection-in-ubuntu.png)
IKEv2/IPsec Protocol
Before creating a connection in Ubuntu, configure SafeUTM:
1\. Go to **Users -> VPN connections**.
2\. Check the box **IKEv2/IPsec** **Connection** and fill in the **Domain** fields:
[](https://docs.safedns.com/uploads/images/gallery/2022-09/6lFZ5wZvaqbC3gkO-8-instructions-for-creating-vpn-connection-in-ubuntu.png)
3\. Download the root certificate from **Services -> TLS Certificates**:
[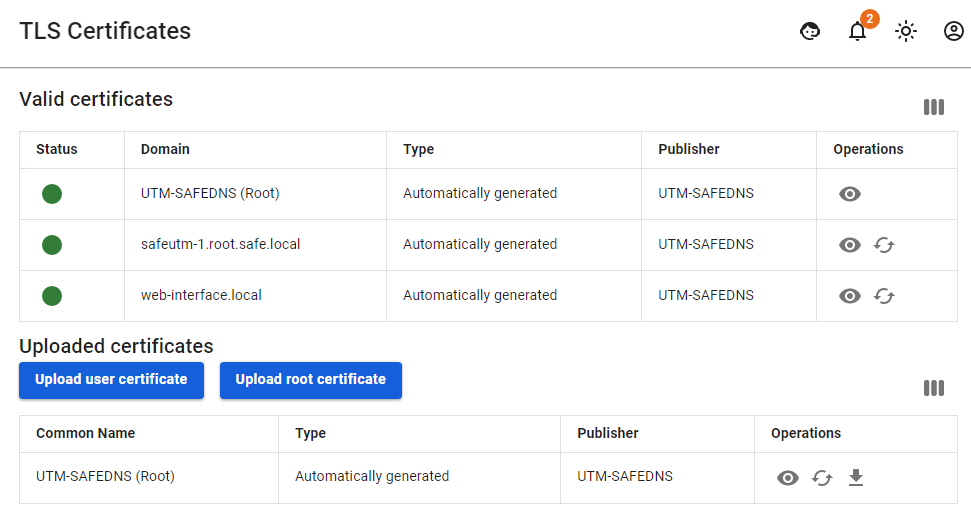](https://docs.safedns.com/uploads/images/gallery/2022-09/dapxaPqnQuoilSZR-9-instructions-for-creating-vpn-connection-in-ubuntu.png)
The root certificate will be required to configure the connection of the user's workstation if the root certificate was not obtained via Let’s Encrypt. If necessary, transfer the certificate file to the workstation.
If a certificate issued by Let's Encrypt is used for a VPN connection, then installing a root certificate on the device is not required.
##### Creating a connection in Ubuntu
1\. Open the terminal with the keyboard shortcut Ctrl+Alt+F1 and run the command: `sudo apt install -y network-manager-strongswan libcharon-extra-plugins libstrongswan-extra-plugins`
2\. After the installation is complete, restart the computer: `sudo reboot`
3\. Go to **Settings -> Networks** and in the **VPN** line, click (+):
[](https://docs.safedns.com/uploads/images/gallery/2022-09/DLwICOx18DtouT96-10-instructions-for-creating-vpn-connection-in-ubuntu.png)
4\. In the window that opens, select **IPsec\\IKEv2 (strongswan)**:
[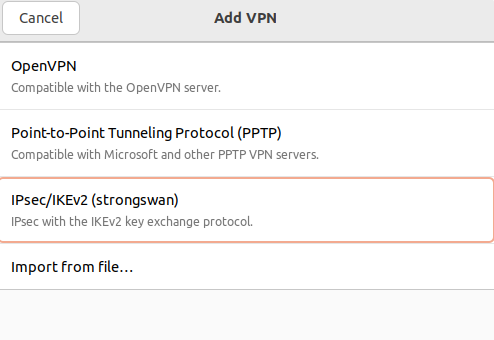](https://docs.safedns.com/uploads/images/gallery/2022-09/lUuzniPFCEbcg1j6-11-instructions-for-creating-vpn-connection-in-ubuntu.png)
5\. In **Identification** fill in the following fields:
- **Name** – connection name.
- **Address** – enter the domain specified in **Users -> Authorization -> VPN Connection -> IKEv2/IPsec Connection.**
- **Certificate** – select the previously saved root certificate (if it was not issued by Let's Encrypt).
- **Authentication** – we recommend choosing EAP.
**Username** – the name of the user allowed to connect via VPN.
- **Password** – the user's password. In the right part of the field, select the storage option for the VPN connection password.
Check the box **Request an inner IP address** and click **Add:
[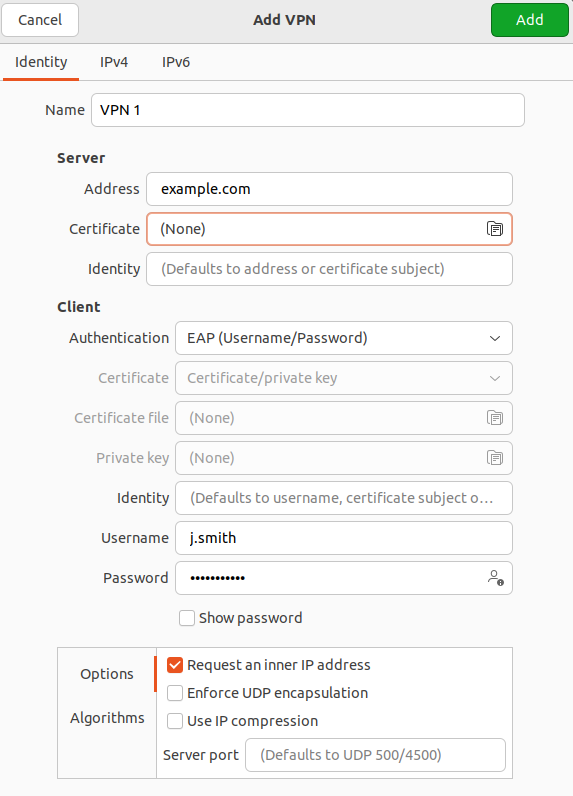](https://docs.safedns.com/uploads/images/gallery/2022-09/66nzuFa2zN9VqO6p-12-instructions-for-creating-vpn-connection-in-ubuntu.png)**
6. Set the switch of the created VPN connection to the Enabled position.
SSTP Protocol
Before creating a connection in Ubuntu, configure SafeUTM:
1\. Go to **Users -> VPN connections**.
2\. Check the box **SSTP Connection** and fill in **Domain** and **Port** fields:
[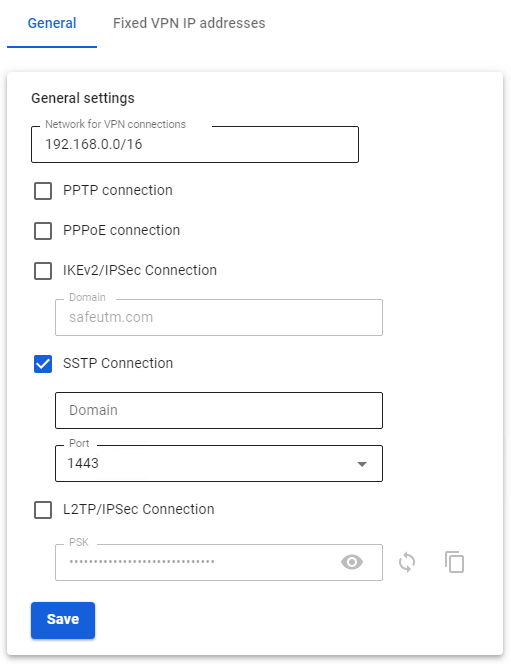](https://docs.safedns.com/uploads/images/gallery/2022-09/xjaRWQEoShCAur0O-13-instructions-for-creating-vpn-connection-in-ubuntu.png)
##### Creating a connection in Ubuntu
1\. Open the terminal with the keyboard shortcut Ctrl+Alt+F1 and run two commands:
```
sudo apt-add-repository ppa:eivnaes/network-manager-sstp
sudo apt install -y network-manager-sstp sstp-client
```
2\. After the installation is complete, restart the computer: `sudo reboot`
3\. Having installed the packages, go to **Settings -> Networks,** and in the **VPN** line, click (+):
[](https://docs.safedns.com/uploads/images/gallery/2022-09/KQCWsVAWtyAfrrmt-14-instructions-for-creating-vpn-connection-in-ubuntu.png)
4\. In the window that opens, select **Point-to-Point Tunnel Protocol (SSTP)**:
[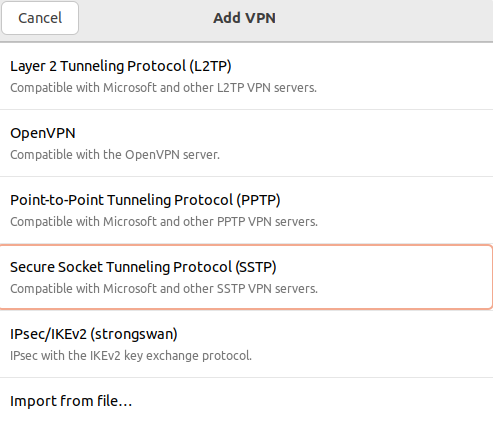](https://docs.safedns.com/uploads/images/gallery/2022-09/VPsR8Jtv2NTXq0Yt-15-instructions-for-creating-vpn-connection-in-ubuntu.png)
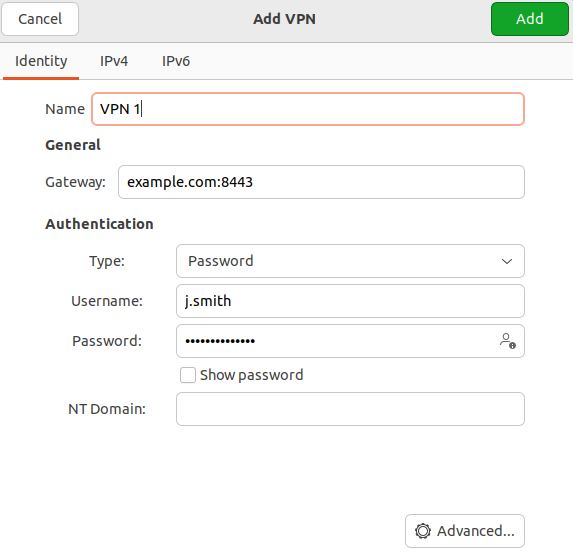
5\. In **Identification** fill in the following fields:
- **Name** – connection name.
- **Gateway** – specify in the format *domain:\[port selected on UTM\].*
- **Username** – the name of the user allowed to connect via VPN.
- **Password** – the user's password. In the right part of the field, select the storage option for the VPN connection password.
- **NT domain** – leave the field empty.
[](https://docs.safedns.com/uploads/images/gallery/2022-09/hadL9k0sWW6pExR9-16-instructions-for-creating-vpn-connection-in-ubuntu.png)
We recommend that you click **Advanced** and check the following:
- **Allow the following authentication methods** – check the item
- **Use MPPE encryption** – in the Encryption line, select 128-bit (the most protected).
- **Use BSD compression for data** – using the BSD-compress algorithm.
- **Use Deflate compression for data** – using Deflate algorithm.
- **Use TCP Header Compression** – using Van Jacobson's TCP/IP header compression method.
6\. Click **Add** and set the switch of the created VPN connection to the Enabled position:
[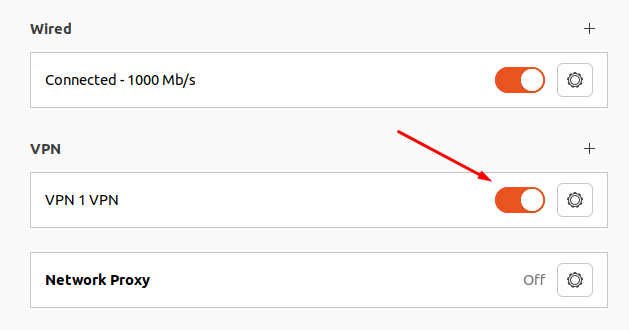](https://docs.safedns.com/uploads/images/gallery/2022-09/4hIOMVgmWdEHEaKE-17-instructions-for-creating-vpn-connection-in-ubuntu.png)
L2TP/IPsec Protocol
**Important**: L2TP IPsec clients behind the same NAT may experience connectivity issues if there is more than one. We recommend using IKEv2 IPSec instead of L2TP IPsec.
Before creating a connection, configure SafeUTM:
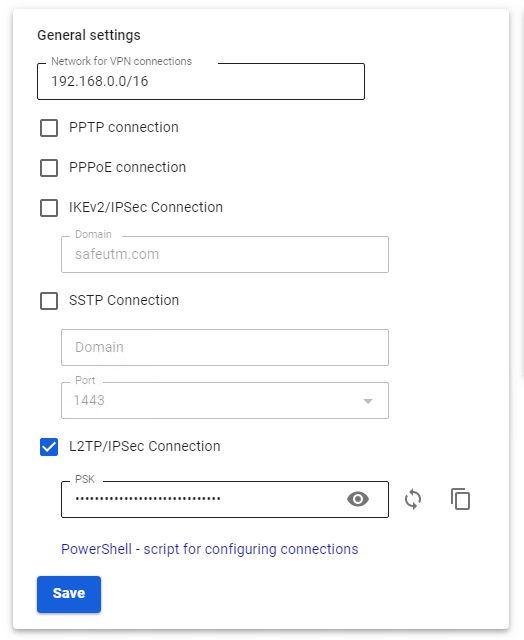
1\. Go to **Users -> VPN connections**.
2\. Check the box **L2TP/IPsec Connection** and copy the **PSK** key:
[](https://docs.safedns.com/uploads/images/gallery/2022-09/h8WhsFe46xVApxPT-18-instructions-for-creating-vpn-connection-in-ubuntu.png)
##### Creating a connection in Ubuntu
1\. Connect the repository that contains the necessary packages to create an L2TP VPN connection, and then update the information about the repositories. To do this, run the following commands:
```
sudo add-apt-repository ppa:nm-l2tp/network-manager-l2tp
sudo apt update
```
2\. Install the add-on to the standard NetworkManager using two packages: `sudo apt install -y network-manager-l2tp network-manager-l2tp-gnome`
3\. After the installation is complete, restart the computer: `sudo reboot`
4\. Having installed the packages, go to **Settings -> Networks** and in the **VPN** line, click (+):
[](https://docs.safedns.com/uploads/images/gallery/2022-09/4hIOMVgmWdEHEaKE-17-instructions-for-creating-vpn-connection-in-ubuntu.png)
5\. In the VPN connection creation window, select **Layer** **2 Tunneling Protocol (L2TP)**:
[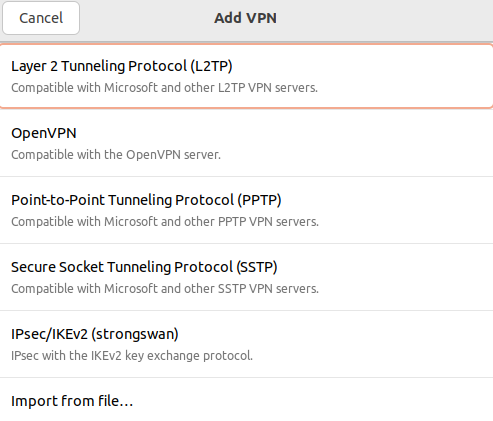](https://docs.safedns.com/uploads/images/gallery/2022-09/5ZIxGecn3tfHTJ2a-19-instructions-for-creating-vpn-connection-in-ubuntu.png)
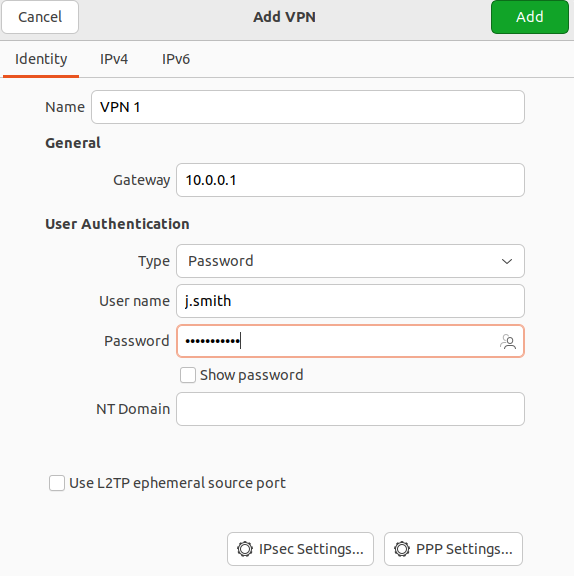
6 . In the tab **Identification** fill in the following fields:
- **Name** – connection name.
- **Gateway** – the domain name or IP address of the UTM interface.
- **Type** – user authentication by a password.
- **Username** – the name of the user allowed to connect via VPN.
- **Password** – the user's password. In the right part of the field, select the storage option for the VPN connection password.
- **NT domain** – leave the field empty.
[](https://docs.safedns.com/uploads/images/gallery/2022-09/ZFvr5lriBbiDyeNr-20-instructions-for-creating-vpn-connection-in-ubuntu.png)
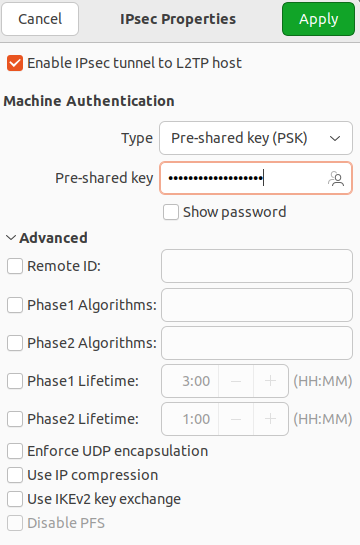
7\. Go to **IPsec settings** and enable **IPsec tunnel to L2TP host** to activate the ability to configure other parameters:
- **Type: Pre-shared key (PSK)** – public key authentication.
- **Pre-shared key** - the key that needs to be copied along the path **Users -> Authorization -> VPN connection** from the field **PSK.**
The section **Advanced** is optional.
[](https://docs.safedns.com/uploads/images/gallery/2022-09/jBbkOoQpwC2BaIRF-21-instructions-for-creating-vpn-connection-in-ubuntu.png)
Having finished configuring L2TP **IPsec Options,** click **OK.**
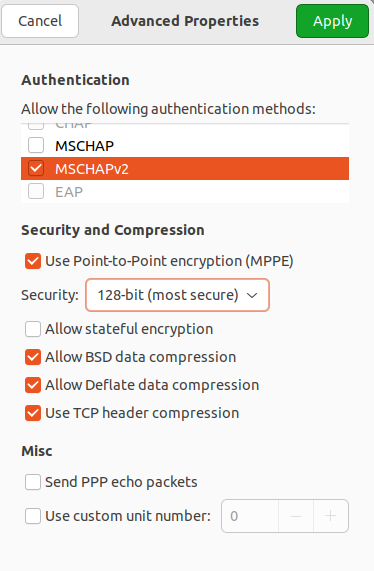
8\. If necessary, go to **PPR settings** and configure **Authentication**, **Encryption and Compression,** and **Other**:
[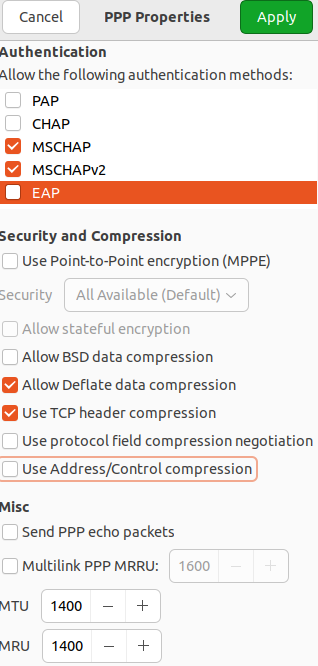](https://docs.safedns.com/uploads/images/gallery/2022-09/LnYYcco0xqGM6rnv-22-instructions-for-creating-vpn-connection-in-ubuntu.png)
After setting up **PPR parameters** click OK** and **Apply**.
9\. Set the switch of the created VPN connection to the Enabled position:
[](https://docs.safedns.com/uploads/images/gallery/2022-09/7h9Urvdl67djkbne-23-instructions-for-creating-vpn-connection-in-ubuntu.png)
Before configuring a VPN connection, in the user tree, open the card of the required user and set the **Allow remote access via VPN** flag. To do this, go to the **Users -> User & Group** section:
[](https://docs.safedns.com/uploads/images/gallery/2022-09/5uJN0lFrLEyeDs2k-1-automatic-connection-creation.png)
---
L2TP/IPsec Protocol
**Important**: L2TP IPsec clients behind the same NAT may experience connectivity issues if there is more than one. [**Instructions**](https://docs.microsoft.com/en-us/troubleshoot/windows-server/networking/configure-l2tp-ipsec-server-behind-nat-t-device) can help solve the problem. We recommend using IKEv2 IPSec instead of L2TP IPsec.
You can run the following PowerShell script to automatically create a connection on users' computers running Windows 8.1 and 10. To do this, download the ready-made scripts for connecting your server from **Users -> VPN connections**.
The connection will be created with the following parameters:
1. **L2TP/IPsec** protocol using a PSK key.
2. The parameter **Use the primary gateway in the remote network** is disabled.
LANs of the same class that was obtained for a VPN connection by default in Windows 7 and 10 will be accessed via a VPN connection, so you do not need to create additional routes (unless you use different network classes in the office LAN).
Create a file named **safe\_utm\_l2tp.ps1** (in Notepad or Windows PowerShell ISE Editor) and copy the following text into it:
```Powershell
param([switch]$Elevated)
$currentUser = New-Object Security.Principal.WindowsPrincipal $([Security.Principal.WindowsIdentity]::GetCurrent())
if (!$currentUser.IsInRole([Security.Principal.WindowsBuiltinRole]::Administrator)) {
if (!$elevated) {
Start-Process `
powershell.exe `
-Verb RunAs `
-ArgumentList ('-noprofile -noexit -file "{0}" -elevated' -f ( $myinvocation.MyCommand.Definition ))
}
exit
}
Enable-NetFirewallRule -Group "@FirewallAPI.dll,-28502"
Add-VpnConnection `
-Force `
-Name "SafeUTM L2TP VPN" `
-TunnelType L2TP `
-ServerAddress my.domain.com `
-L2tpPsk "XXXXXXXXXXXXXXXXXXXXXXXXXXXXXXXX" `
-EncryptionLevel "Required" `
-AuthenticationMethod MSChapV2 `
-SplitTunneling $False `
-DnsSuffix activedirectory.domain `
-RememberCredential
```
**Change the necessary parameters in it to match your settings:**
- **SafeUTM L2TP VPN** – the connection name in the system (can be arbitrary).
- **domain.com** – the domain or IP address of the main external interface of SafeUTM.
- **XXXXXXXXXXXXXXXXXXXXXXXXXXXXXX** – your server's PSK key.
- **domain** – your Active Directory domain (if there is one if not, you need to delete this line from the script).
**You can run the script on the user's computer from the file context menu "Run with PowerShell". Click OK in the elevation dialog (the rights are required to allow access to shared files and printers).**
After that, a connection will be created in the system and shared access to files and printers for all networks will be enabled (otherwise access to file resources in the local network may not be possible).
The user must enter their username/password at the first authorization.
**Possible errors when executing the script**
If the error "Script execution is disabled on this system" appears, you need to enable script execution by running the following command in PowerShell: `Set-ExecutionPolicy Unrestricted`
SSTP Protocol
You can run the following PowerShell script to automatically create a connection on users' computers running Windows 8.1 and 10. To do this, download the ready-made script from **Users -> VPN connections**.
**The connection will be created with the following parameters:**
1. **SSTP** protocol using the PSK key.
2. The parameter **Use the primary gateway in the remote network** is disabled.
LANs of the same class that was obtained for VPN connections by default in Windows 7 and 10 will be accessed via a VPN connection, so you do not need to create additional routes (unless you use different network classes in the office LAN).
Create a text file named **safe\_utm\_sstp.ps1** (in Notepad or Windows PowerShell ISE editor) and copy the following text there:
```Powershell
param([switch]$Elevated)
$currentUser = New-Object Security.Principal.WindowsPrincipal $([Security.Principal.WindowsIdentity]::GetCurrent())
if (!$currentUser.IsInRole([Security.Principal.WindowsBuiltinRole]::Administrator)) {
if (!$elevated) {
Start-Process `
powershell.exe `
-Verb RunAs `
-ArgumentList ('-noprofile -noexit -file "{0}" -elevated' -f ( $myinvocation.MyCommand.Definition ))
}
exit
}
Enable-NetFirewallRule -Group "@FirewallAPI.dll,-28502"
Add-VpnConnection `
-Force `
-Name "SafeUTM SSTP VPN" `
-TunnelType SSTP `
-ServerAddress my.domain.com:4443 `
-EncryptionLevel "Required" `
-AuthenticationMethod MSChapV2 `
-SplitTunneling $False `
-DnsSuffix activedirectory.domain `
-RememberCredential
```
**Change the necessary parameters in it to match your settings:**
1. **SafeUTM SSTP VPN** – the connection name in the system (can be arbitrary).
2. **my.domain. com:4443** – SafeUTM external interface domain and the port on which you enabled SSTP.
3. **activedirectory.domain** – your Active Directory domain (if there is no domain, you need to delete this line from the script).
**You can run the script on the user's computer from the file context menu "Run with PowerShell". Click OK in the elevation dialog (the rights are required to allow access to shared files and printers).**
After that, a connection will be created in the system and shared access to files and printers for all networks will be enabled (otherwise access to file resources in the local network may not be possible).
The user must enter their username/password at the first authorization.
**Possible errors when executing the script**
If the error "Script execution is disabled on this system" appears, you need to enable script execution by running the following command in PowerShell: `Set-ExecutionPolicy Unrestricted`
IPsec IKEv2 Protocol
You can run a PowerShell script to automatically create a connection on users' computers running Windows 8.1 and 10. To do this, download the ready-made script from **Users -> VPN connections**.
**The connection using the script will be created with the following parameters:**
1. IKEv2/IPsec Protocol
2. The parameter **Use the primary gateway in the remote network** is disabled. LANs of the same class that was obtained for the default VPN connection in Windows 7 and 10 will be accessed via a VPN connection, so you do not need to create additional routes (unless you use different network classes in the office LAN).
Create a text file named **safe\_utm\_ikev2.ps1** (in Notepad or Windows PowerShell ISE editor) and copy the following text there:
```Powershell
param([switch]$Elevated)
$currentUser = New-Object Security.Principal.WindowsPrincipal $([Security.Principal.WindowsIdentity]::GetCurrent())
if (!$currentUser.IsInRole([Security.Principal.WindowsBuiltinRole]::Administrator)) {
if (!$elevated) {
Start-Process \`
powershell.exe `
-Verb RunAs `
-ArgumentList ('-noprofile -noexit -file "{0}" -elevated' -f ( $myinvocation.MyCommand.Definition ))
}
exit
}
Enable-NetFirewallRule -Group "@FirewallAPI.dll,-28502"
Add-VpnConnection `
-Force `
-Name "SafeUTM IKEv2 VPN" `
-TunnelType IKEv2 `
-ServerAddress my.domain.com `
-EncryptionLevel "Required" `
-AuthenticationMethod EAP `
-SplitTunneling $False `
-DnsSuffix activedirectory.domain `
-RememberCredential
```
**Change the necessary parameters in it to match your settings:**
1. **SafeUTM IKEv2 VPN** – the connection name in the system (can be arbitrary).
2. **my.domain.com** – the domain of SafeUTM external interface (A-record for the domain must refer to the IP address of SafeUTM external interface).
3. **activedirectory.domain** – your Active Directory domain (if there is one if not, you need to delete this line from the script).
You can run the script on the user's computer from the file context menu "Run with PowerShell". Click OK in the elevation dialog (the rights are required to allow access to shared files and printers).
After that, a connection will be created in the system, and file and printer sharing will be enabled for all networks (otherwise access to shared folders in the local network will not be possible).
During the first authorization, it is necessary to enter the username/password.
**Possible errors when executing the script**
If the error "Script execution is disabled on this system" appears, you need to enable script execution by running the following command in PowerShell: `Set-ExecutionPolicy Unrestricted`
If a VPN connection using IPsec protocols in Windows is automatically terminated after 7 hours and 45 minutes and a "Group policy mapping" error or error 13868 occurs when connecting via IKEv2.
To restore the connection, the following actions are suitable:
1\. Reconnect. In this case, the connection will be restored, but after 7 hours and 45 minutes, it will be automatically disconnected again. If you do not want the connection to be terminated automatically, follow the steps from the following paragraph.
2\. Make changes to the registry:
- Open the **Registry editor**.
- Follow the path `HKEY_LOCAL_MACHINE\SYSTEM\CurrentControlSet\Services\RasMan\Parameters`
- Right-click on the parameter **NegotiateDH2048\_AES256** and click **Change**.
- In the **Value** line, specify value 1: [](https://docs.safedns.com/uploads/images/gallery/2022-09/w3V4oh7EPXEl6NaA-2-automatic-connection-creation.png)
- Click **OK**.
- Restart Windows.
If there is no parameter named **NegotiateDH2048\_AES256**, then create it. To do this:
- Right-click on the free registry space in **Parameters** and select **Create -> DWORD**:
- Set the name **NegotiateDH2048\_AES256.**
- Right-click on the created file and select **Change**:
- In the **Value** line, specify value 1:
- Click **OK**.
3\. Restart Windows.
Before configuring a VPN connection, in the user tree, open the card of the required user and set the **Allow remote access via VPN** flag. To do this, go to the **Users -> User & Group** section:
[](https://docs.safedns.com/uploads/images/gallery/2022-09/dOVT5oIc6sOWd11n-1-creating-a-vpn-connection-in-windows-10.png)
---
#### Creating a VPN connection in Windows 10
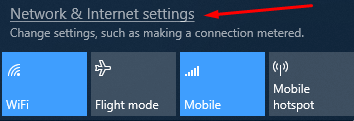
1\. Click on the network connection icon in the system tray, and in the window that appears, select **Network & Internet settings**:
[](https://docs.safedns.com/uploads/images/gallery/2022-09/nzXDV9jQPXABLZnW-2-creating-a-vpn-connection-in-windows-10.png)
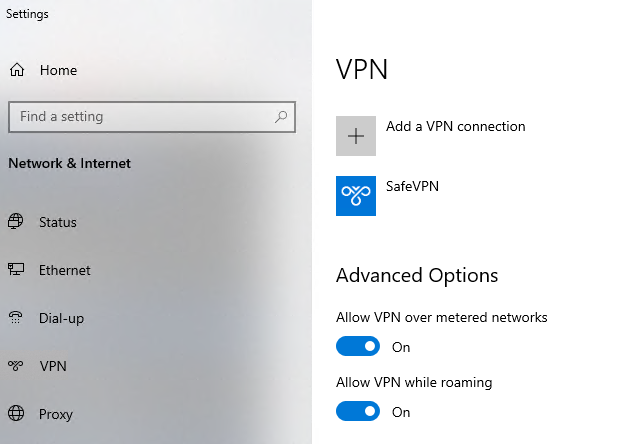
2\. Go to **VPN** and click **Add a VPN connection**:
[](https://docs.safedns.com/uploads/images/gallery/2022-09/T5fho4aiqV8HXhz1-3-creating-a-vpn-connection-in-windows-10.png)
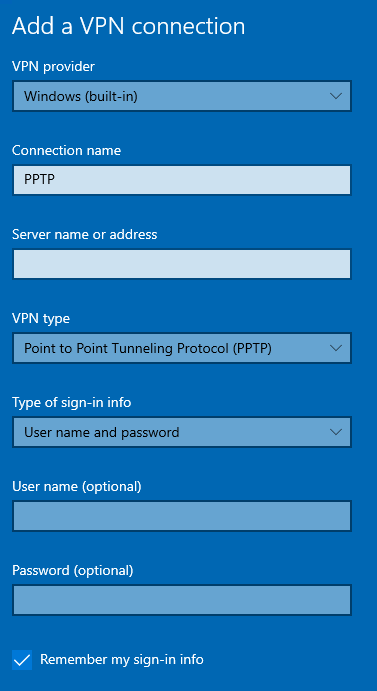
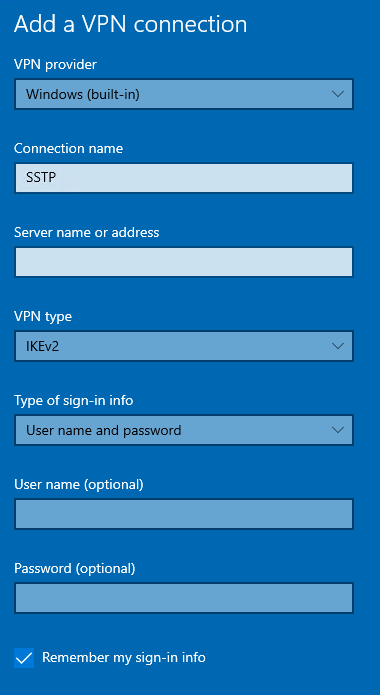
3\. Fill in the following fields and click **Save**:
For PPTP
- Connection name - the name of the connection being created;
- Server name or address - VPN server address;
- VPN type - PPTP protocol;
- Login data type - Username and password;
- Username - the name of the user who is allowed to connect via VPN;
- Password - user password.
[](https://docs.safedns.com/uploads/images/gallery/2022-09/vmM7Lqdzo9ZgLfLg-4-creating-a-vpn-connection-in-windows-10.png)
When setting up a VPN connection from the Internet, the following parameters must be specified in the VPN connection properties:
- Go to **Settings of adapter parameters.**
- Right-click on the created connection and select **Properties**.
- Go to the tab **Security** and install:
- **Data encryption** – mandatory (disable if there is no encryption).
- **Extensible Authentication Protocol (EAP)** – Microsoft Protected Password (EAP MSCHAPV2).
For L2TP/IPsec with the shared key
**Important**: L2TP IPsec clients behind the same NAT may experience connectivity issues if there is more than one. Instructions can help solve the problem. We recommend using IKEv2 IPSec instead of L2TP IPsec.
- Connection name - the name of the connection being created;
- Server name or address - VPN server address;
- VPN type - L2TP/IPSec protocol with shared key;
- Shared key - the value of the **PSK** string in the **Users -> VPN connections -> L2TP/IPSec Connection** section;
- Login data type - Username and password;
- Username - the name of the user who is allowed to connect via VPN;
- Password - user password.
[](https://docs.safedns.com/uploads/images/gallery/2022-09/vmM7Lqdzo9ZgLfLg-4-creating-a-vpn-connection-in-windows-10.png)
When setting up a VPN connection from the Internet, you need to specify the following parameters in the VPN connection properties:
- Go to Adapter Options Settings;
- Right-click on the created connection and select Properties;
- Go to the Security tab and set:
- Data encryption - mandatory (disable if no encryption)
- Extensible Authentication Protocol (EAP) - Microsoft Secure Password (EAP MSCHAPV2)
If you are creating a VPN connection to UTM via port forwarding, we recommend following these steps:
1. Open **Registry editor**.
2. Go to `HKEY_LOCAL_MACHINE\SYSTEM\CurrentControlSet\Services\PolicyAgent` and create a DWORD parameter named AssumeUDPEncapsulationContextOnSendRule and set it to 2.
3. Restart Windows.
**Possible problems**
1. The user's username or password is incorrect. Often, when reconnecting, it is suggested to specify the domain. Try to create alphanumeric passwords, preferably in Latin letters, for your accounts. If there are doubts, temporarily set the username and password as "user" and "123456".
2. In order for the packets to go through the VPN tunnel, you need to make sure that in the settings of this connection the box **Use primary gateway in remote network** is checked in **Configuring adapter settings -> Right-click on the connection -> Properties -> Network -> Properties of the option "Internet Protocol version 4 (TCP/IPv4)" -> Advanced.** If it is not necessary to route all packets to this interface, then the route must be written manually.
3. The connection takes place via DNAT, i.e. the external interface of SafeUTM does not have a "white" IP address, and the ports necessary for operation (500 and 4500) are "forwarded" to the external interface of the device located in front of SafeUTM and having a "white" IP address. In this case, the VPN connection will either not be established at all, or there will be periodic interruptions. The solution is to exclude the device before SafeUTM and specify a "white" IP address on the external interface of SafeUTM, to which L2TP/IPsec connections will eventually be made. Otherwise, use the SSTP protocol, because it is easier to publish it using port forwarding.
4. If you reconnect via L2TP in Windows 10 OS, but use the **invalid** PSK key (by entering it in the advanced parameters \[screenshot below\]), the connection will still be established successfully. This is due to the features of the OS.
Make sure that the local network (or address on the network card) on the remote machine does not overlap with your organization's LAN. If it does, there will be no access to your organization's network (traffic through the routing table will go to the physical interface, not to the VPN). The address needs to be changed.
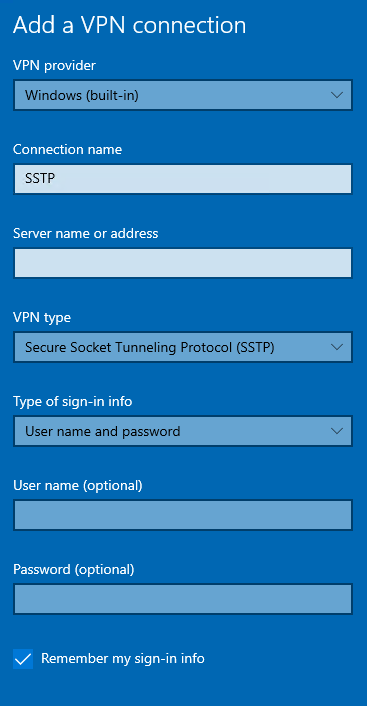
For SSTP
- Connection name - the name of the connection being created;
- Server name or address - VPN server address in the format VPN\_server\_address:port;
- VPN type - SSTP protocol;
- Login data type - Username and password;
- Username - the name of the user who is allowed to connect via VPN;
- Password - user password.
[](https://docs.safedns.com/uploads/images/gallery/2022-09/Mwe1LclYVeWG6Ou6-6-creating-a-vpn-connection-in-windows-10.png)
For IKEv2
- Connection name - the name of the connection being created;
- Server name or address - VPN server address;
- VPN type - IKEv2 protocol;
- Login data type - Username and password;
- Username - the name of the user who is allowed to connect via VPN;
- Password - user password.
[](https://docs.safedns.com/uploads/images/gallery/2022-09/5Cjv2XW1mDHGtCjE-7-creating-a-vpn-connection-in-windows-10.png)
When setting up a VPN connection from the Internet, you need to specify the following parameters in the VPN connection properties:
- Go to Adapter Options Settings;
- Right-click on the created connection and select Properties;
- Go to the Security tab and set:
- Data encryption - mandatory (disable if no encryption)
- Extensible Authentication Protocol (EAP) - Microsoft Secure Password (EAP MSCHAPV2)
If a VPN connection using IPsec protocols in Windows is automatically terminated after 7 hours and 45 minutes and a "Group policy mapping" error or error 13868 occurs when connecting via IKEv2.
To restore the connection, the following actions are suitable:
1\. Reconnect. In this case, the connection will be restored, but after 7 hours and 45 minutes, it will be automatically disconnected again. If you do not want the connection to be terminated automatically, follow the steps from the following paragraph.
2\. Make changes to the registry:
- Open the **Registry editor**.
- Follow the path `HKEY_LOCAL_MACHINE\SYSTEM\CurrentControlSet\Services\RasMan\Parameters`
- Right-click on the parameter **NegotiateDH2048\_AES256** and click **Change**.
- In the **Value** line, specify value 1: [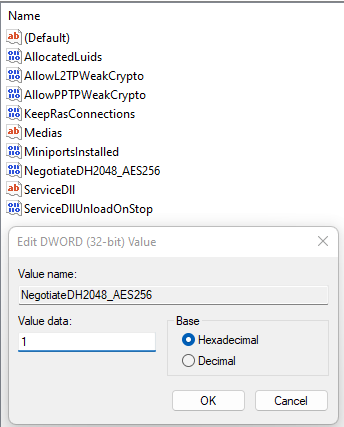](https://docs.safedns.com/uploads/images/gallery/2022-09/Su8brsrGBFFL76L0-10-creating-a-vpn-connection-in-windows-10.png)
- Click **OK**.
- Restart Windows.
If there is no parameter named **NegotiateDH2048\_AES256**, then create it. To do this:
- Right-click on the free registry space in **Parameters** and select **Create -> DWORD**
- Set the name **NegotiateDH2048\_AES256.**
- Right-click on the created file and select **Change**
- In the **Value** line, specify value 1
- Click **OK**.
3\. Restart Windows.
If you do not want Internet traffic to go to external resources through SafeUTM after connecting via VPN, then in the properties of the VPN connection Network / Internet Protocol TCP / IP version 4 / Advanced, uncheck Use the default gateway on the remote network. Next, to access computers behind SafeUTM, manually enter routes.
# Creating a VPN connection in Windows 7
Before configuring a VPN connection, in the user tree, open the card of the required user and set the **Allow remote access via VPN** flag. To do this, go to the **Users -> User & Group** section.
[](https://docs.safedns.com/uploads/images/gallery/2022-09/FY6K7TDIEPEpl9ir-1-creating-a-vpn-connection-in-windows-7.png)
---
#### Creating a VPN connection in Windows 7
L2TP IPsec clients behind the same NAT may experience connectivity issues if there is more than one. [**Instructions**](https://docs.microsoft.com/en-us/troubleshoot/windows-server/networking/configure-l2tp-ipsec-server-behind-nat-t-device) can help solve the problem. We recommend using IKEv2 IPSec instead of L2TP IPsec.
Before creating a VPN connection for SSTP, L2TP, and IKEv2 protocols, you must install the root certificate locally on the computer:
1\. Download the Let's Encrypt root certificate from [**https://letsencrypt.org/certs/isrgrootx1.pem**](https://letsencrypt.org/certs/isrgrootx1.pem);
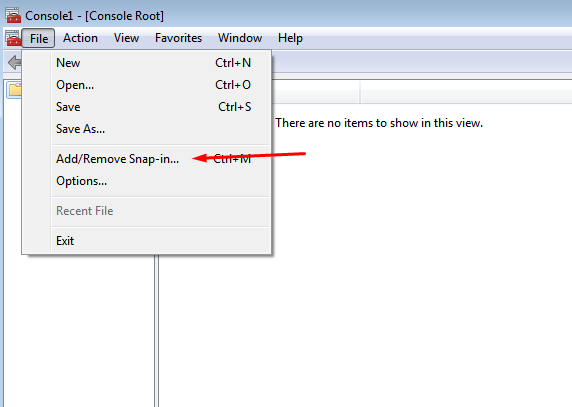
2\. Click **Start**, find and run mmc.exe;
3\. Click **File -> Add or Remove Snap-in**:
[](https://docs.safedns.com/uploads/images/gallery/2022-09/ij2ATLhVqbh9jN8T-2-creating-a-vpn-connection-in-windows-7.png)
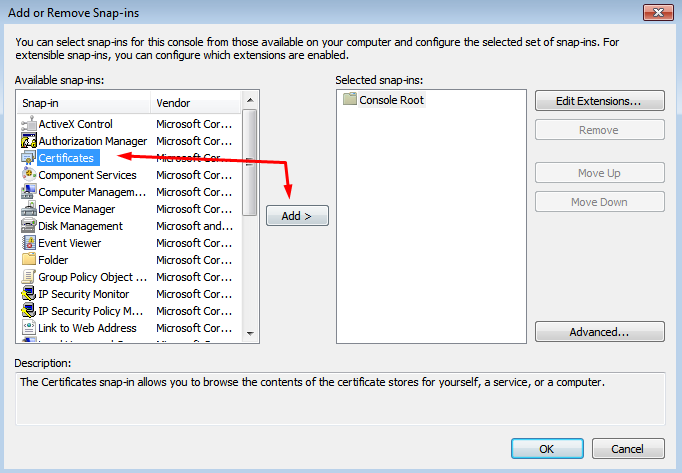
4\. Select **Certificates** and click **Add**:
[](https://docs.safedns.com/uploads/images/gallery/2022-09/Cc8RSBnFqR9MVAul-3-creating-a-vpn-connection-in-windows-7.png)
5\. Set the flag in the **computer account** line, click **Next -> Finish -> OK**:
[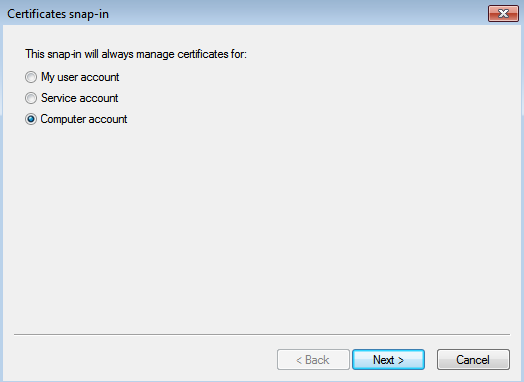](https://docs.safedns.com/uploads/images/gallery/2022-09/yuweAc5Fvdmzvte6-4-creating-a-vpn-connection-in-windows-7.png)
6\. The **Certificates (local computer)** item will appear in the Console window:
- Select it and right-click on **Trusted Root Certification Authorities**;
- Next **All tasks -> Import**
- In the **Certificate Import Wizard** window, click **Next -> Browse -> Select the one you downloaded in step 1 -> Next -> Next -> Finish**.
##### Create a VPN connection
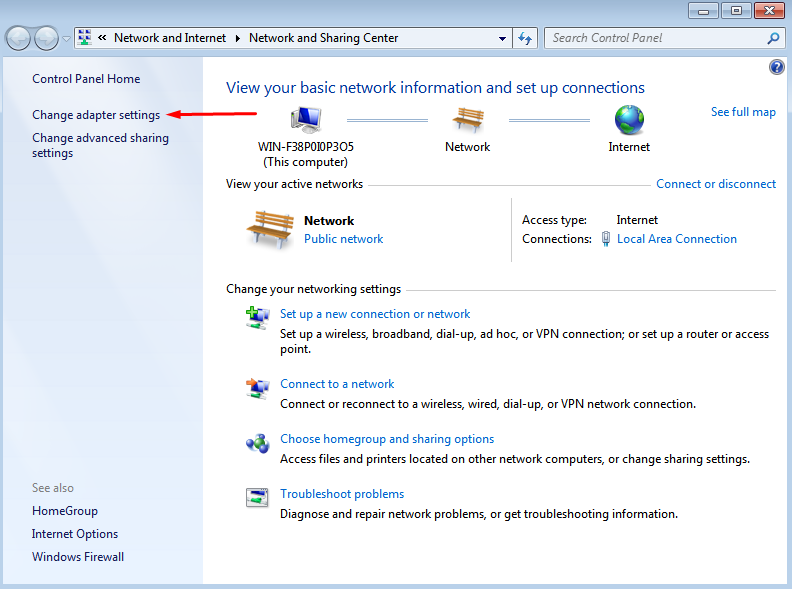
1\. Select **Network -> Network and Sharing Center**:
[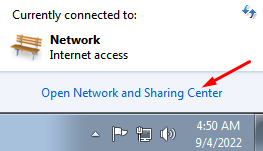](https://docs.safedns.com/uploads/images/gallery/2022-09/wXaZnPSs8QSVzDja-5-creating-a-vpn-connection-in-windows-7.png)
2\. Click **Set up a new connection or network**:
[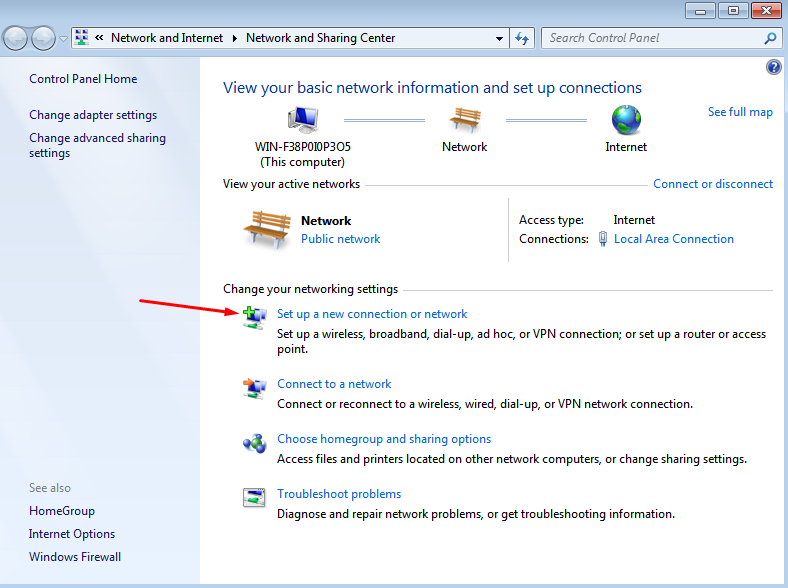](https://docs.safedns.com/uploads/images/gallery/2022-09/KNKhE5l8t6eNhlJd-6-creating-a-vpn-connection-in-windows-7.png)
3\. Select **Connect to a workplace** and **Next**:
[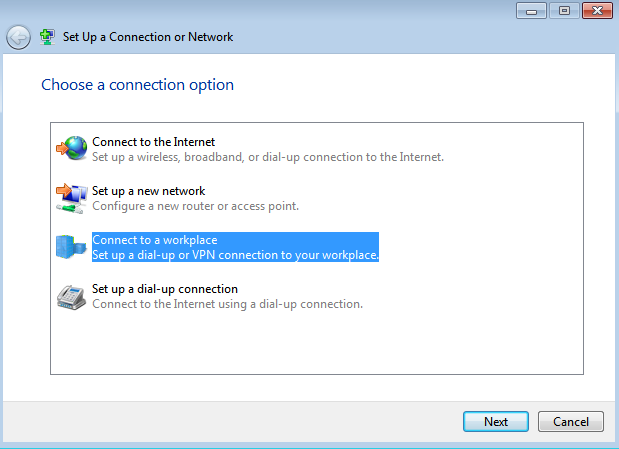](https://docs.safedns.com/uploads/images/gallery/2022-09/VAHLO0JUvZeXgkSX-7-creating-a-vpn-connection-in-windows-7.png)
4\. Click **Use my internet connection (VPN)** and fill in the following fields:
- **Internet address** - enter the name of the VPN server, for example, vpn.test.com
- **Destination name** - write an arbitrary name for the connection
Set the checkbox to **Do not connect now, only install to connect in the future
[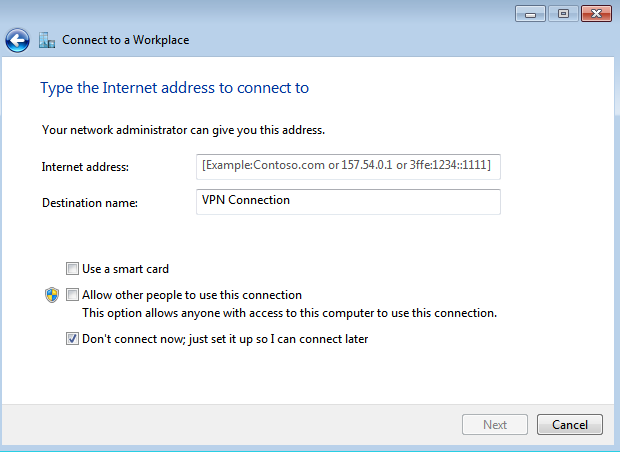](https://docs.safedns.com/uploads/images/gallery/2022-09/Ikpjeev7CWstuc6j-8-creating-a-vpn-connection-in-windows-7.png)**
5\. In the **Enter username and password** window, fill in the appropriate fields;
6\. Click **Create**, then **Close**;
7\. In the **Network and Sharing Center** window, select **Change adapter settings** in the upper left corner:
[](https://docs.safedns.com/uploads/images/gallery/2022-09/Z2yAr7WBWc1syxzf-9-creating-a-vpn-connection-in-windows-7.png)
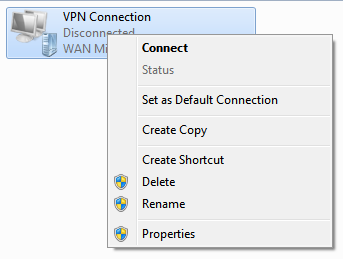
8\. Right-click on the created connection, and select **Properties**:
[](https://docs.safedns.com/uploads/images/gallery/2022-09/u9I6m1qU3ASsEILW-10-creating-a-vpn-connection-in-windows-7.png)
9\. In the window that opens, do the following:
- On the Network tab, uncheck all items except Internet Protocol Version 4
- On the Security tab:
- in the VPN type line, select the desired connection type
- in the Data encryption line, select mandatory (turn off if there is no encryption)
- in the Authentication line, select Allow the following protocols
- leave the flag only in the Microsoft CHAP protocol version 2 (MS-CHAP v2)
If necessary, fill in **Additional properties**
10\. Click **OK** and close the **Network and Sharing Center**;
11\. In the tray, click **Network**. A window will open with the created VPN connection;
12\. Right-click on the connection and select **Connect**.
---
#### VPN connection errors
If a VPN connection using IPsec protocols in Windows is automatically terminated after 7 hours and 45 minutes and a "Group policy mapping" error or error 13868 occurs when connecting via IKEv2.
To restore the connection, the following actions are suitable:
1\. Reconnect. In this case, the connection will be restored, but after 7 hours and 45 minutes, it will be automatically disconnected again. If you do not want the connection to be terminated automatically, follow the steps from the following paragraph.
2\. Make changes to the registry:
- Open the **Registry editor**.
- Follow the path `HKEY_LOCAL_MACHINE\SYSTEM\CurrentControlSet\Services\RasMan\Parameters`
- Right-click on the parameter **NegotiateDH2048\_AES256** and click **Change**.
- In the **Value** line, specify value 1: [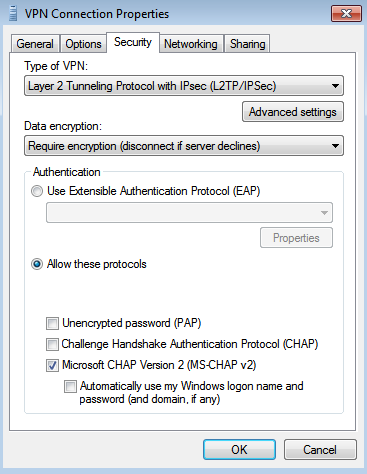](https://docs.safedns.com/uploads/images/gallery/2022-09/ejdltjDXEc2ljjuB-11-creating-a-vpn-connection-in-windows-7.png)
- Click **OK**.
- Restart Windows.
If there is no parameter named **NegotiateDH2048\_AES256**, then create it. To do this:
- Right-click on the free registry space in **Parameters** and select **Create -> DWORD**
- Set the name **NegotiateDH2048\_AES256.**
- Right-click on the created file and select **Change**
- In the **Value** line, specify value 1
- Click **OK**.
3\. Restart Windows.
If you do not want Internet traffic to go to external resources through SafeUTM after connecting via VPN, then in the properties of the VPN connection **Network / Internet Protocol TCP / IP version 4 / Advanced**, uncheck **Use the default gateway on the remote network**. Next, to access computers behind SafeUTM, manually enter routes.
# Instructions for Creating VPN Connection on Mobile Devices
Before configuring a VPN connection, in the user tree, open the card of the required user and set the **Allow remote access via VPN** flag. To do this, go to the **Users -> User & Group** section:
[](https://docs.safedns.com/uploads/images/gallery/2022-09/wrpo4a4WgzzWvDsB-1-instructions-for-creating-vpn-connection-on-mobile-devices.png)
---
Connecting via the StrongSwan app
1\. Click **Add a VPN profile**:
[](https://docs.safedns.com/uploads/images/gallery/2022-09/YbtgYQVs380VOJtj-2-instructions-for-creating-vpn-connection-on-mobile-devices.png)
2 . Fill in the fields:
- Server – the domain specified in SafeUTM in **Users -> VPN connections -> IKEv2/IPsec Connection**;
- VPN type – IKEv2 EAP (Login/Password).
- Login – the name of the user allowed to connect via VPN.
- Password – the user's password.
[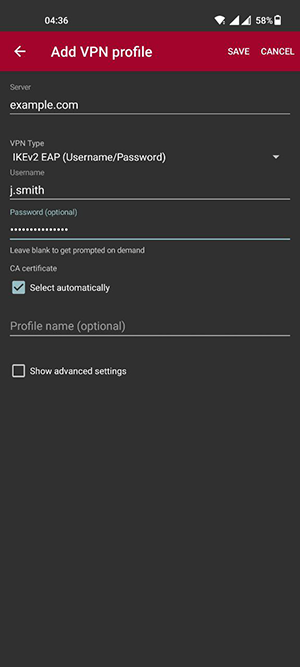](https://docs.safedns.com/uploads/images/gallery/2022-09/MCUDM3c1wjYUeq9G-3-instructions-for-creating-vpn-connection-on-mobile-devices.png)
3\. Click **Save** and then click on the created connection.
Connecting on Android
1\. Go to VPN in **Settings -> Connections -> Other settings.** If necessary, use the settings search bar.
2\. Select the connection type and fill in the following fields:
**For PPTP:**
- Name – connection name.
- Server address – the address of the VPN server.
- Username – the name of the user allowed to connect via VPN.
- Password – the user's password.
**For IKEv2/IPsec MSCHAPv2:**
- Name – connection name.
- Server address – the address of the VPN server.
- IPsec ID – user's login.
- Server Certificate – received from the server.
- IPsec CA Certificate – do not check the server.
- User name – the name of the user allowed to connect via VPN.
- Password – the user's password.
[](https://docs.safedns.com/uploads/images/gallery/2022-09/ptGDZ3vnRwi5vu3Y-4-instructions-for-creating-vpn-connection-on-mobile-devices.png)
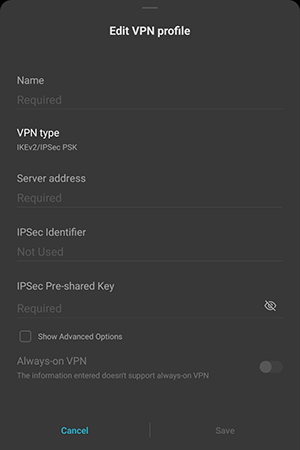
**For L2TP/IPsec PSK:**
- Name – connection name.
- Server address – the address of the VPN server.
- IPsec shared key – the value of the **PSK** line in **Users -> VPN Connections -> L2TP/IPsec Connection**
4\. Click **Save** and activate the connection.
Connecting on iOS
1\. Go to **Settings -> General -> VPN:
[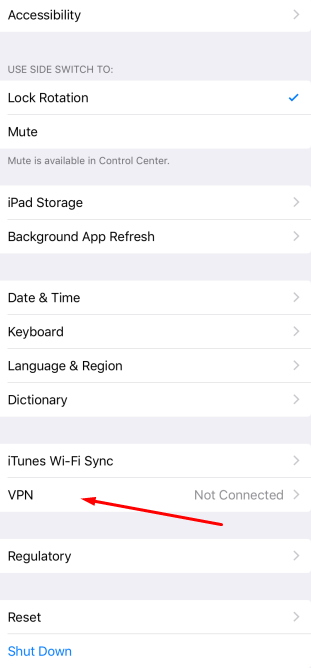](https://docs.safedns.com/uploads/images/gallery/2022-09/X2eNxerFgxMYSntH-5-instructions-for-creating-vpn-connection-on-mobile-devices-png.png)**
2\. Click **Add VPN configuration**:
[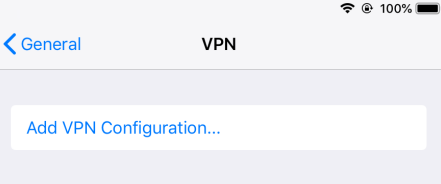](https://docs.safedns.com/uploads/images/gallery/2022-09/KIjfdzVXdfJeTQkZ-6-instructions-for-creating-vpn-connection-on-mobile-devices-png.png)
3\. Select **Type** and fill in the corresponding fields:
**For PPTP:** Starting with iOS 10, Apple has removed support for the PPTP protocol.
- Description – connection name.
- Server – VPN server address.
- Account – the name of the user allowed to connect via VPN.
- Password – the user's password
**For L2TP:**
- Description – connection name.
- Server – VPN server address.
- Account – the name of the user allowed to connect via VPN.
- Password – the user's password.
- The shared key – the value of the **PSK** line in **Users -> VPN connections -> L2TP/IPsec Connection**.
[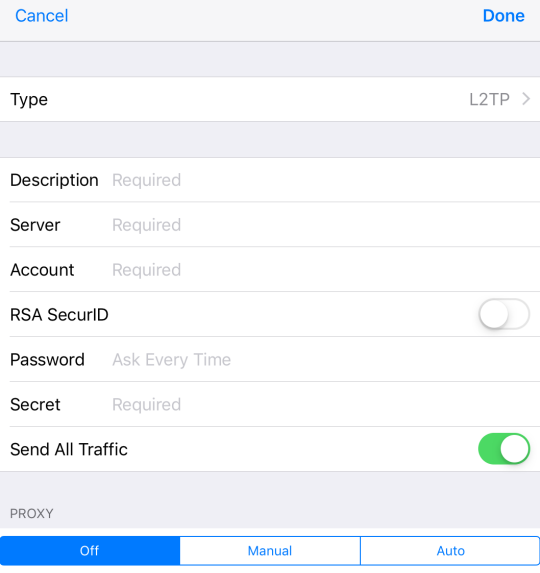](https://docs.safedns.com/uploads/images/gallery/2022-09/wsSwFKCIy5DVnk2x-7-instructions-for-creating-vpn-connection-on-mobile-devices-png.png)
**For IKEv2:**
- Description – connection name.
- Server – VPN server address.
- Remote ID – VPN server address.
- User name – the name of the user allowed to connect via VPN.
- Password – the user's password.
[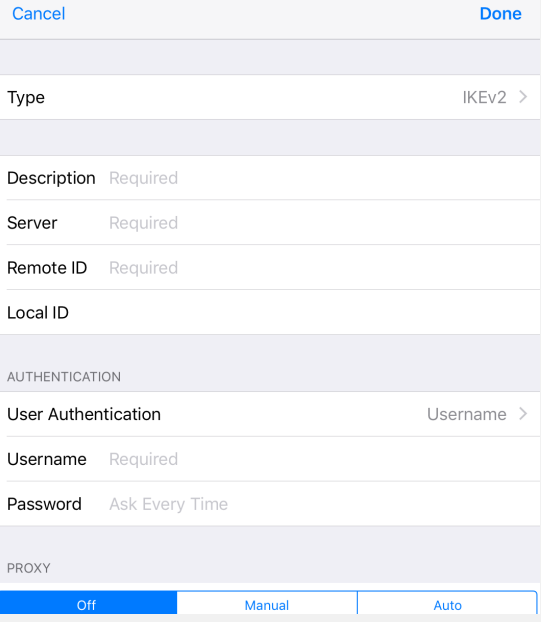](https://docs.safedns.com/uploads/images/gallery/2022-09/kT3i2EAzPC33fCLb-8-instructions-for-creating-vpn-connection-on-mobile-devices-png.png)
4\. Click **Done**.
5\. To connect, slide the **Status** switch to the right.
PPPoE Protocol
To configure SafeUTM, go to **Users -> VPN connections** and check the box **PPPoE Connection**:
[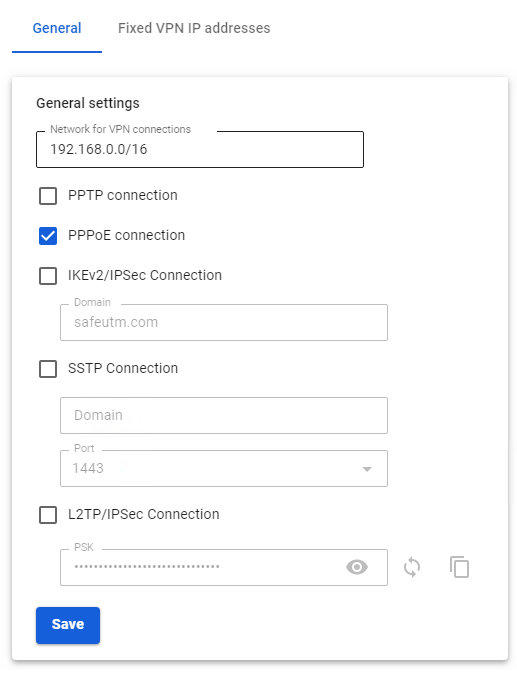](https://docs.safedns.com/uploads/images/gallery/2022-09/agmS3WoA7R9zFPcd-2-instructions-for-creating-a-connection-in-mac-os.png)
**Creating a connection in Mac OS**
1\. Go to **System Preferences -> Network.** 2. Click **Add** in the lower left corner (icon +).
3\. In the window that appears, fill in:
- **Interface** – PPPoE
- **Ethernet** – for example, Wi-Fi.
- **Service name** – connection name.
[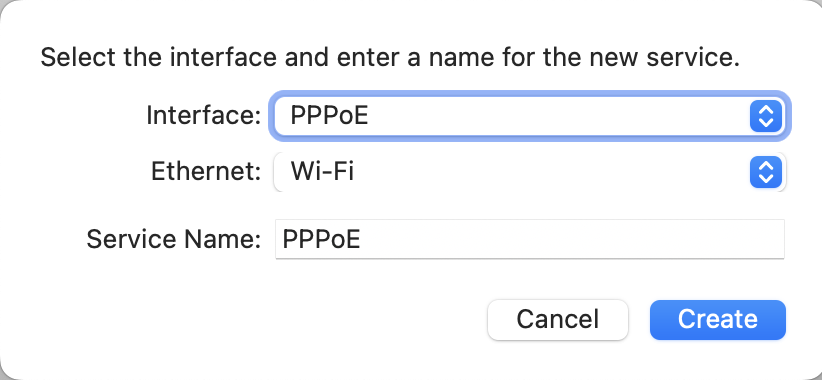](https://docs.safedns.com/uploads/images/gallery/2022-09/X5cQnygWyazt90Us-3-instructions-for-creating-a-connection-in-mac-os.png)
4\. Click **Create** and fill in:
- **PPPoE service name –** the name of the service.
- **Account name –**
- **Password** **–** the user's password.
[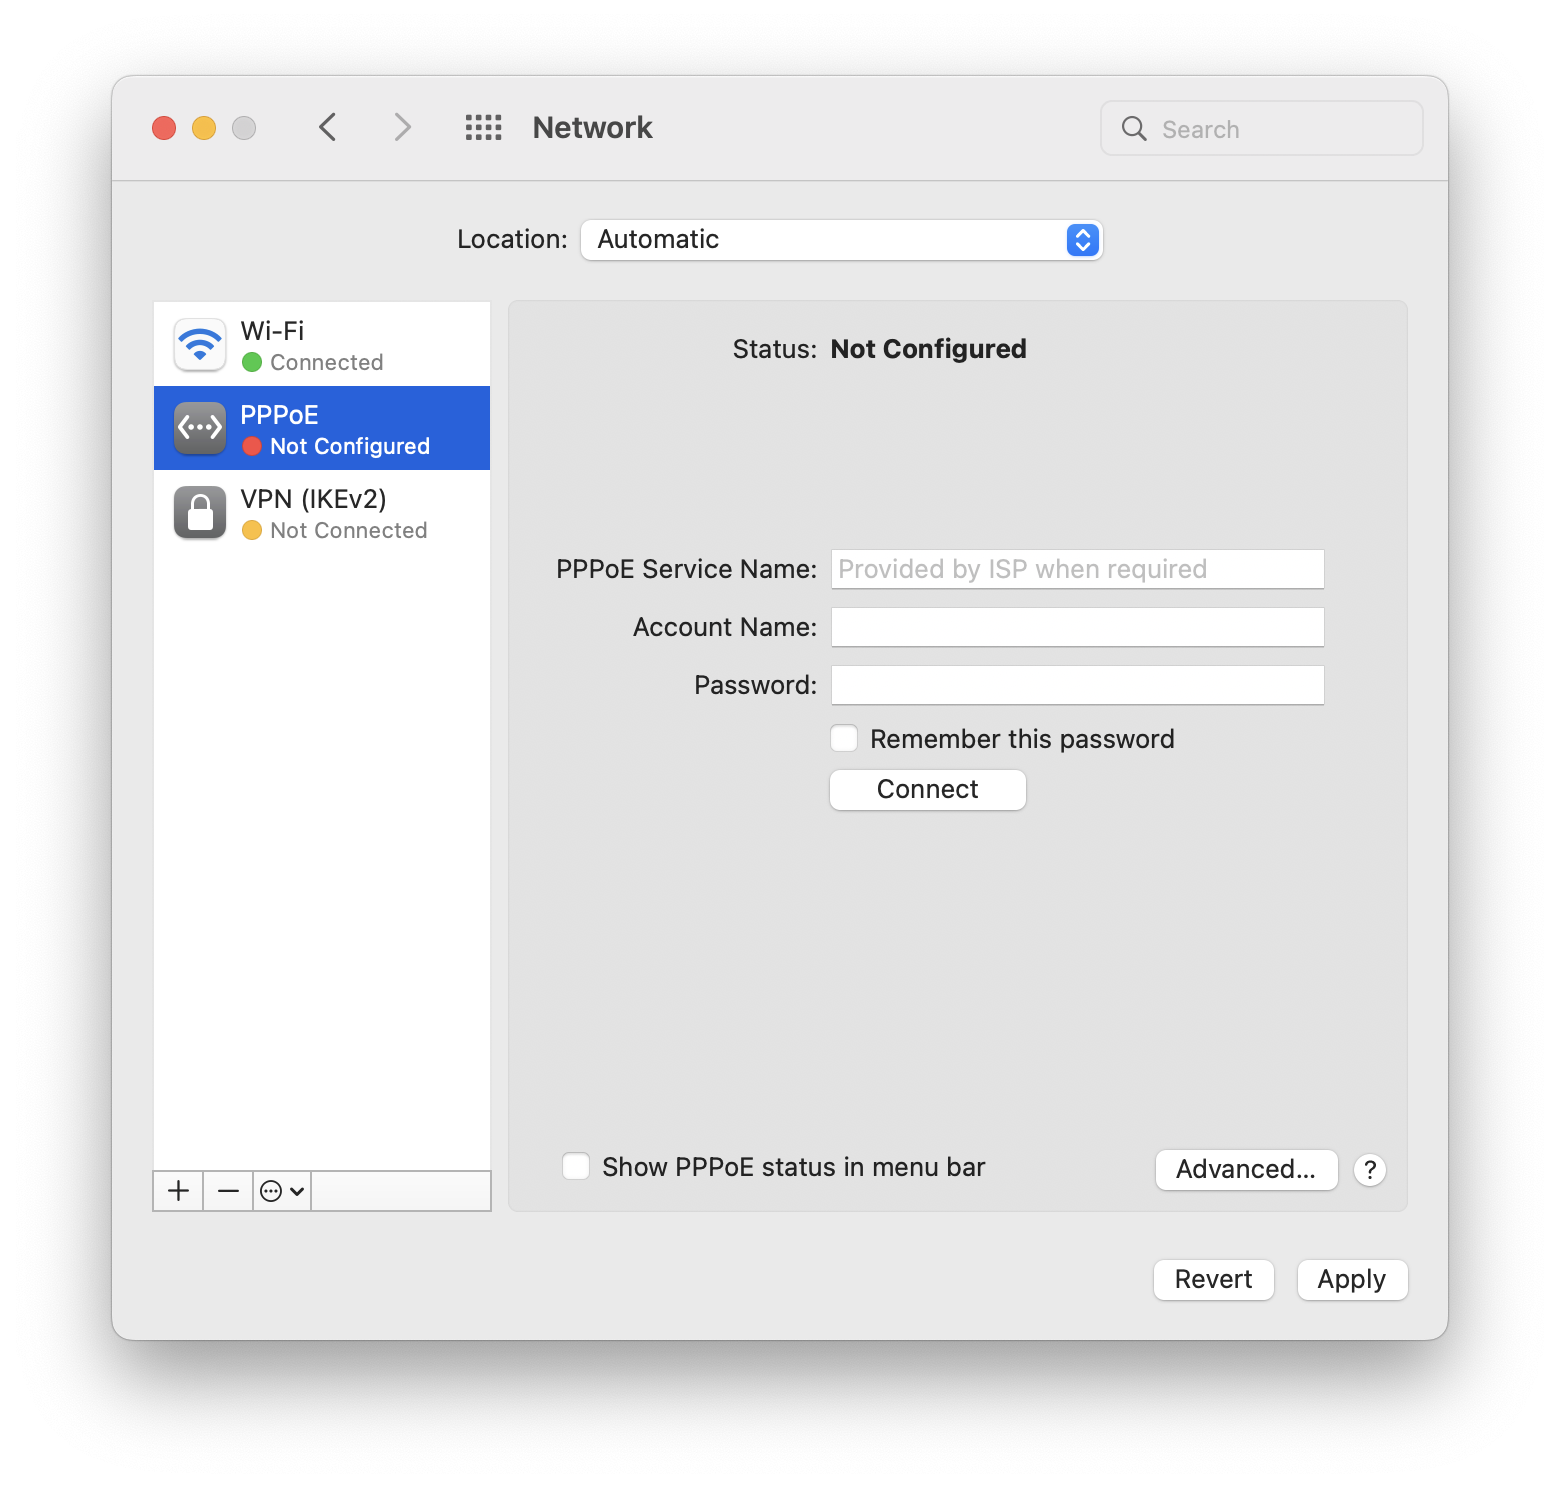](https://docs.safedns.com/uploads/images/gallery/2022-09/oBAMsKo1opQbKTDs-4-instructions-for-creating-a-connection-in-mac-os.png)
5\. Click **Connect**.
IKEv2/IPsec Protocol
Configure SafeUTM:
1\. Go to **Users -> VPN connections**.
2\. Check the box **IKEv2/IPsec** **Connection** and fill in the **Domain** fields:
[](https://docs.safedns.com/uploads/images/gallery/2022-09/BZoHz8HxnhJExEgi-5-instructions-for-creating-vpn-connection-in-ubuntu.png)
**Creating a connection in Mac OS**
1\. Go to **System Preferences -> Network:** 2. Click **Add** in the lower left corner (icon +).
3\. In the window that appears, fill in the fields:
- **Interface** – VPN
- **VPN type** – IKEv2
- **Service name** – connection name.
[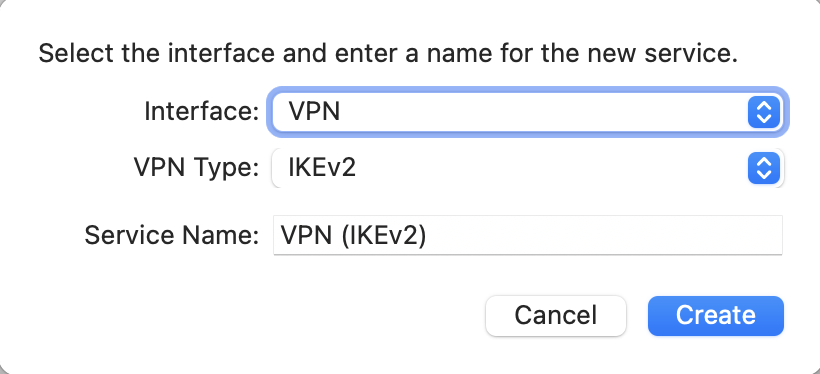](https://docs.safedns.com/uploads/images/gallery/2022-09/4TUsOixIB3hYKBxt-6-instructions-for-creating-a-connection-in-mac-os.png)
4\. Click **Create**.
5\. Configure the connection parameters:
- **Server address –** the address of the VPN server.
- **Remote ID –** duplicate the address of the VPN server.
[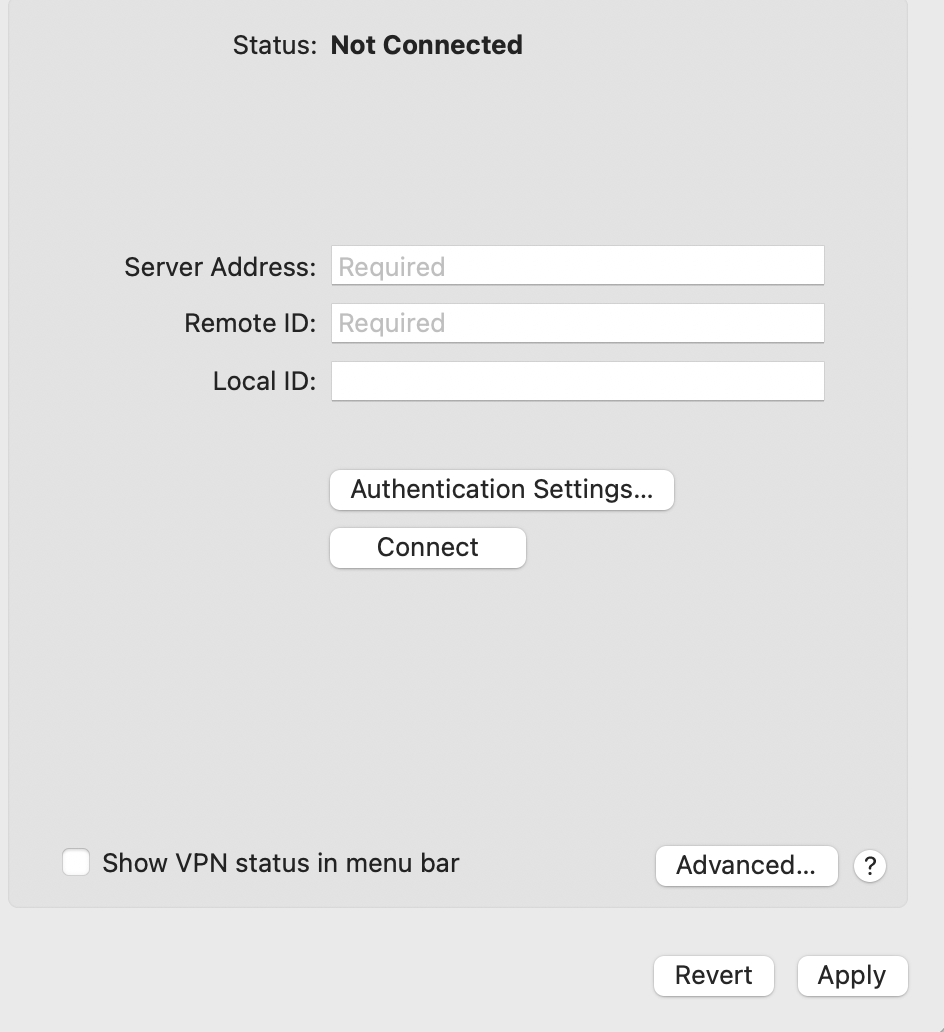](https://docs.safedns.com/uploads/images/gallery/2022-09/SHbY5FVhkLzZADJ9-7-instructions-for-creating-a-connection-in-mac-os.png)
6\. Select **Authentication settings.** 7. Enter the identification data and click **OK**:
- **Username** **–** the name of the user allowed to connect via VPN.
- **Password** **–** the user's password.
[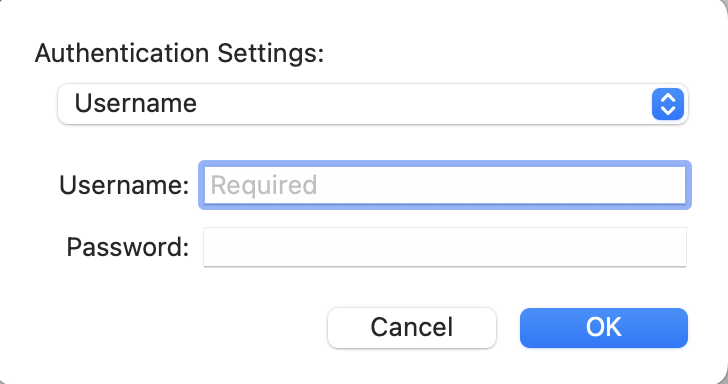](https://docs.safedns.com/uploads/images/gallery/2022-09/N9s2w8pE0K90Ia0K-8-instructions-for-creating-a-connection-in-mac-os.png)
8\. Click **OK**.
9\. Check the box **Show VPN status in the menu bar** and click **Apply**.
L2TP/IPsec Protocol
**Important**: L2TP IPsec clients behind the same NAT may experience connectivity issues if there is more than one. We recommend using IKEv2 IPSec instead of L2TP IPsec.
Before creating a connection, configure SafeUTM:
1\. Go to **Users -> VPN connections**.
2\. Check **L2TP/IPsec Connection** and copy the **PSK** key:
[](https://docs.safedns.com/uploads/images/gallery/2022-09/a5YZIoFlMP39D0f4-9-instructions-for-creating-vpn-connection-in-ubuntu.png)
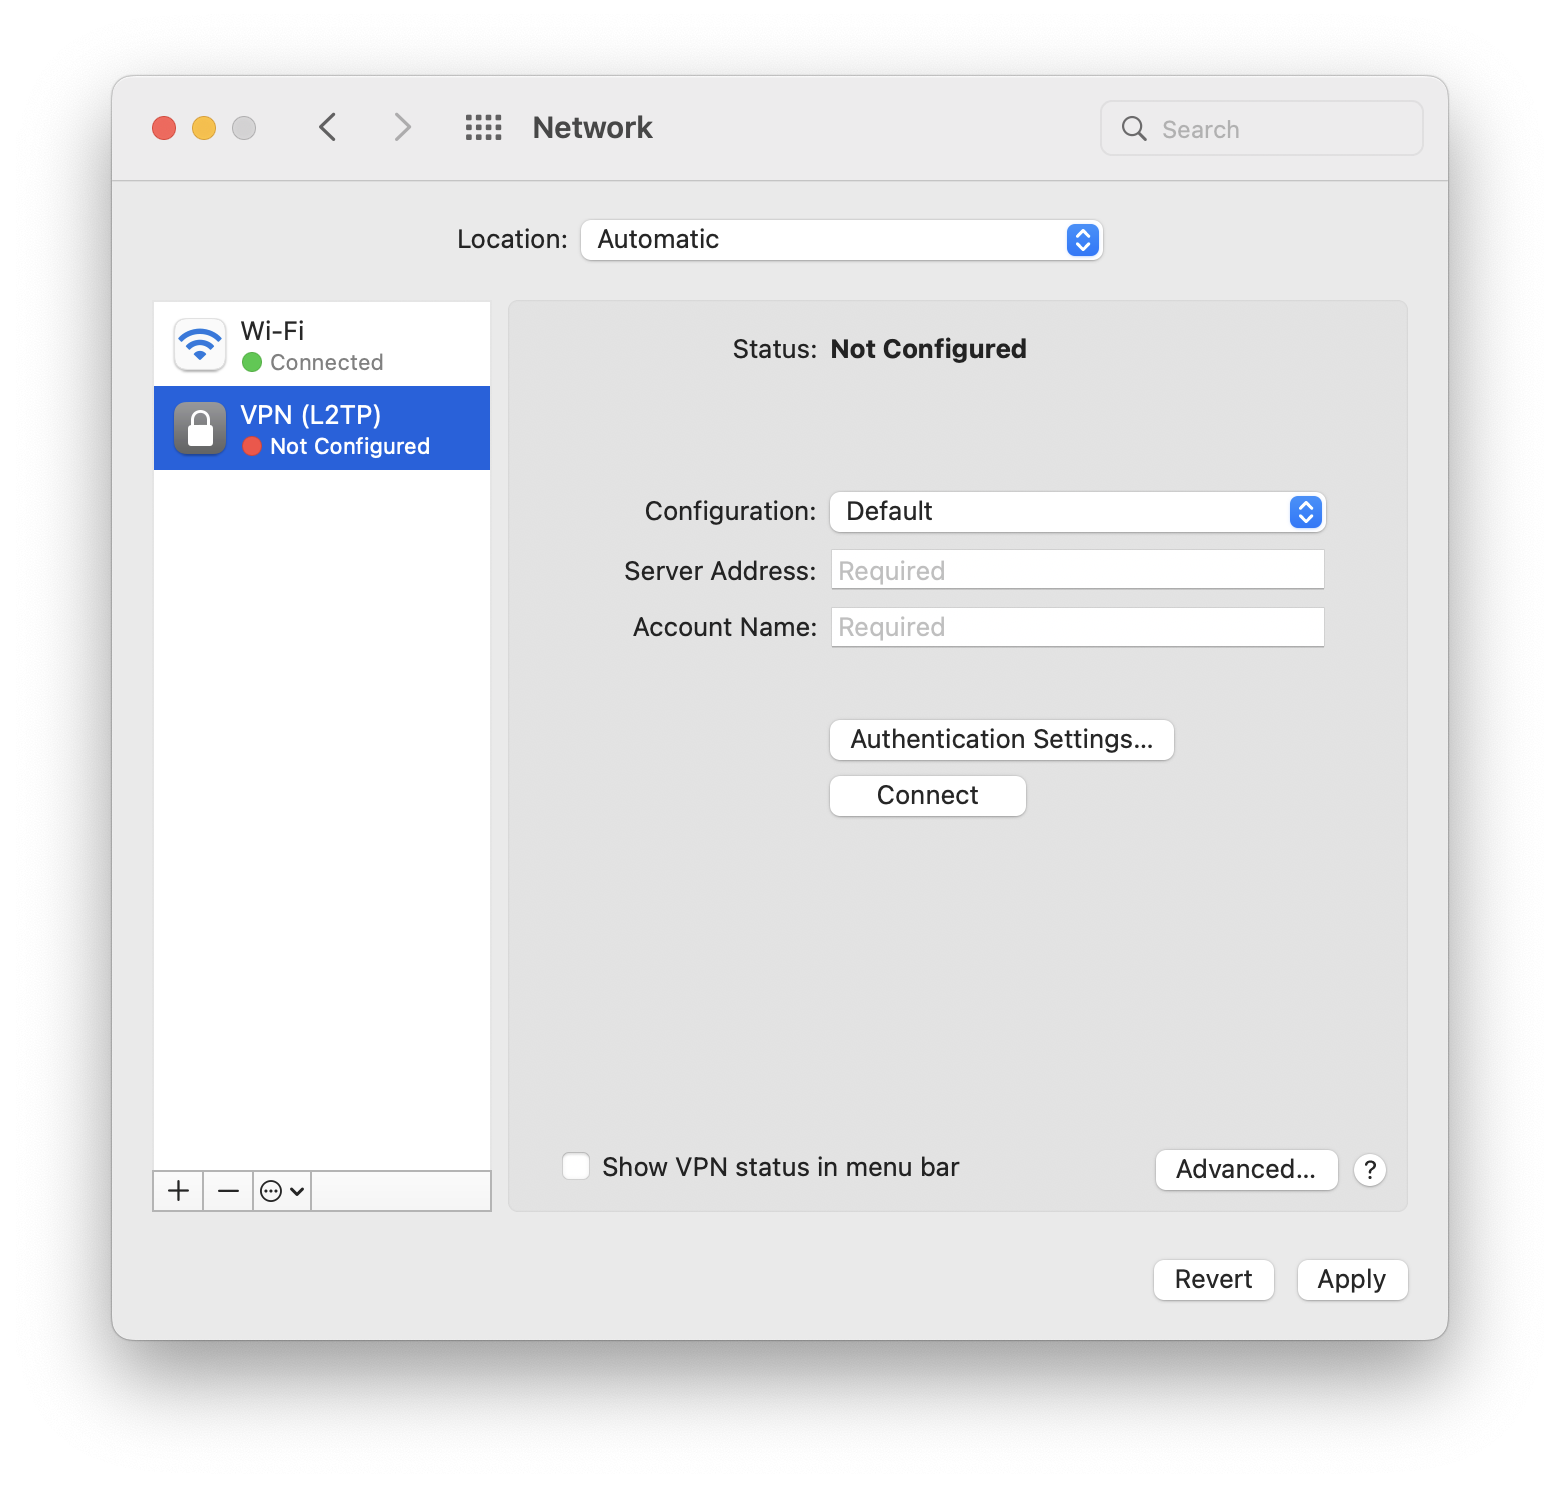
**Creating a connection in Mac OS**
1\. Go to **System Preferences -> Network:
[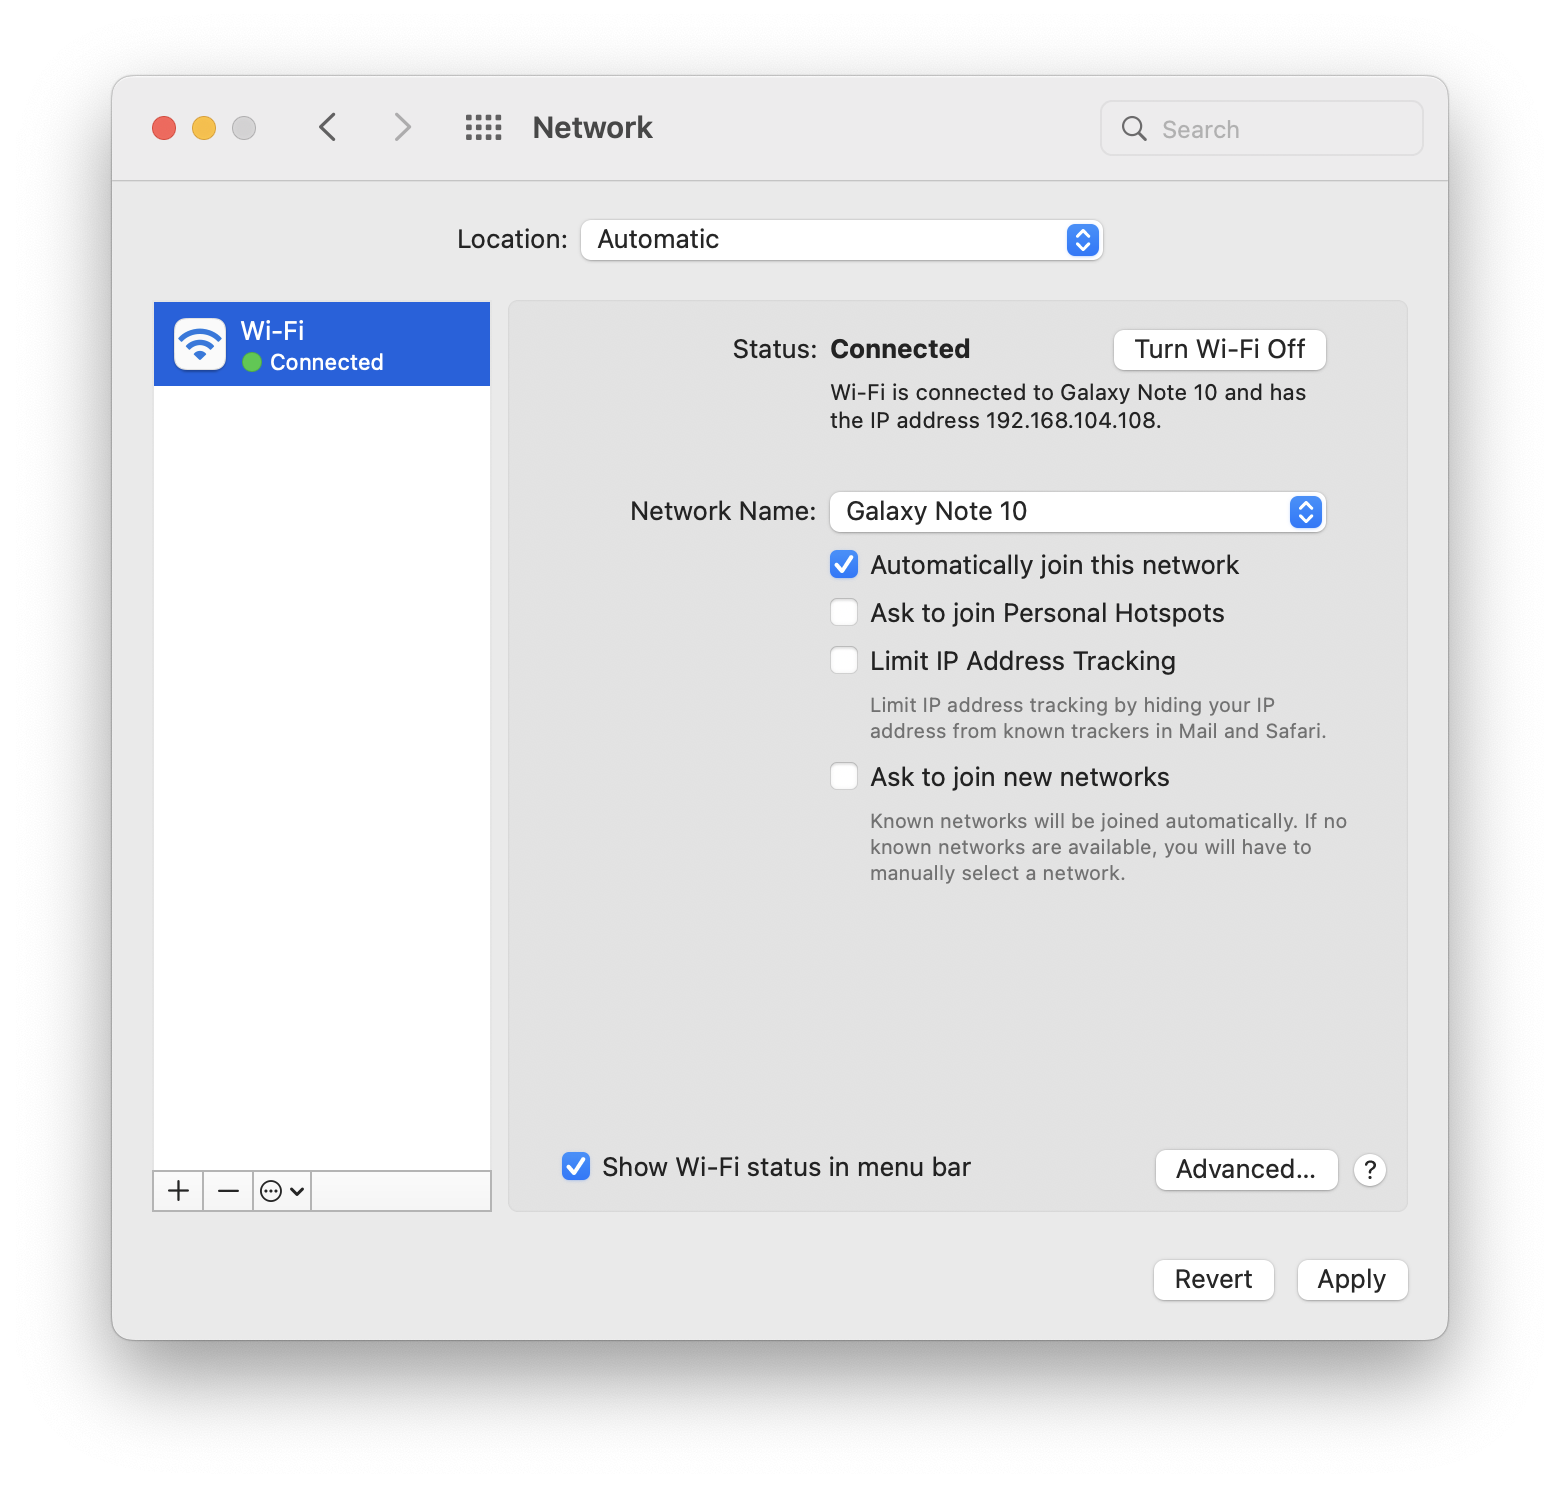](https://docs.safedns.com/uploads/images/gallery/2022-09/5xkPugFGcYLAY6us-10-instructions-for-creating-a-connection-in-mac-os.png)** 2. Click **Add** in the lower left corner (icon +).
3\. In the window that appears, fill in:
- **Interface –**
- **VPN type** **–** L2TP via IPsec.
- **Service name** **–** connection name.
[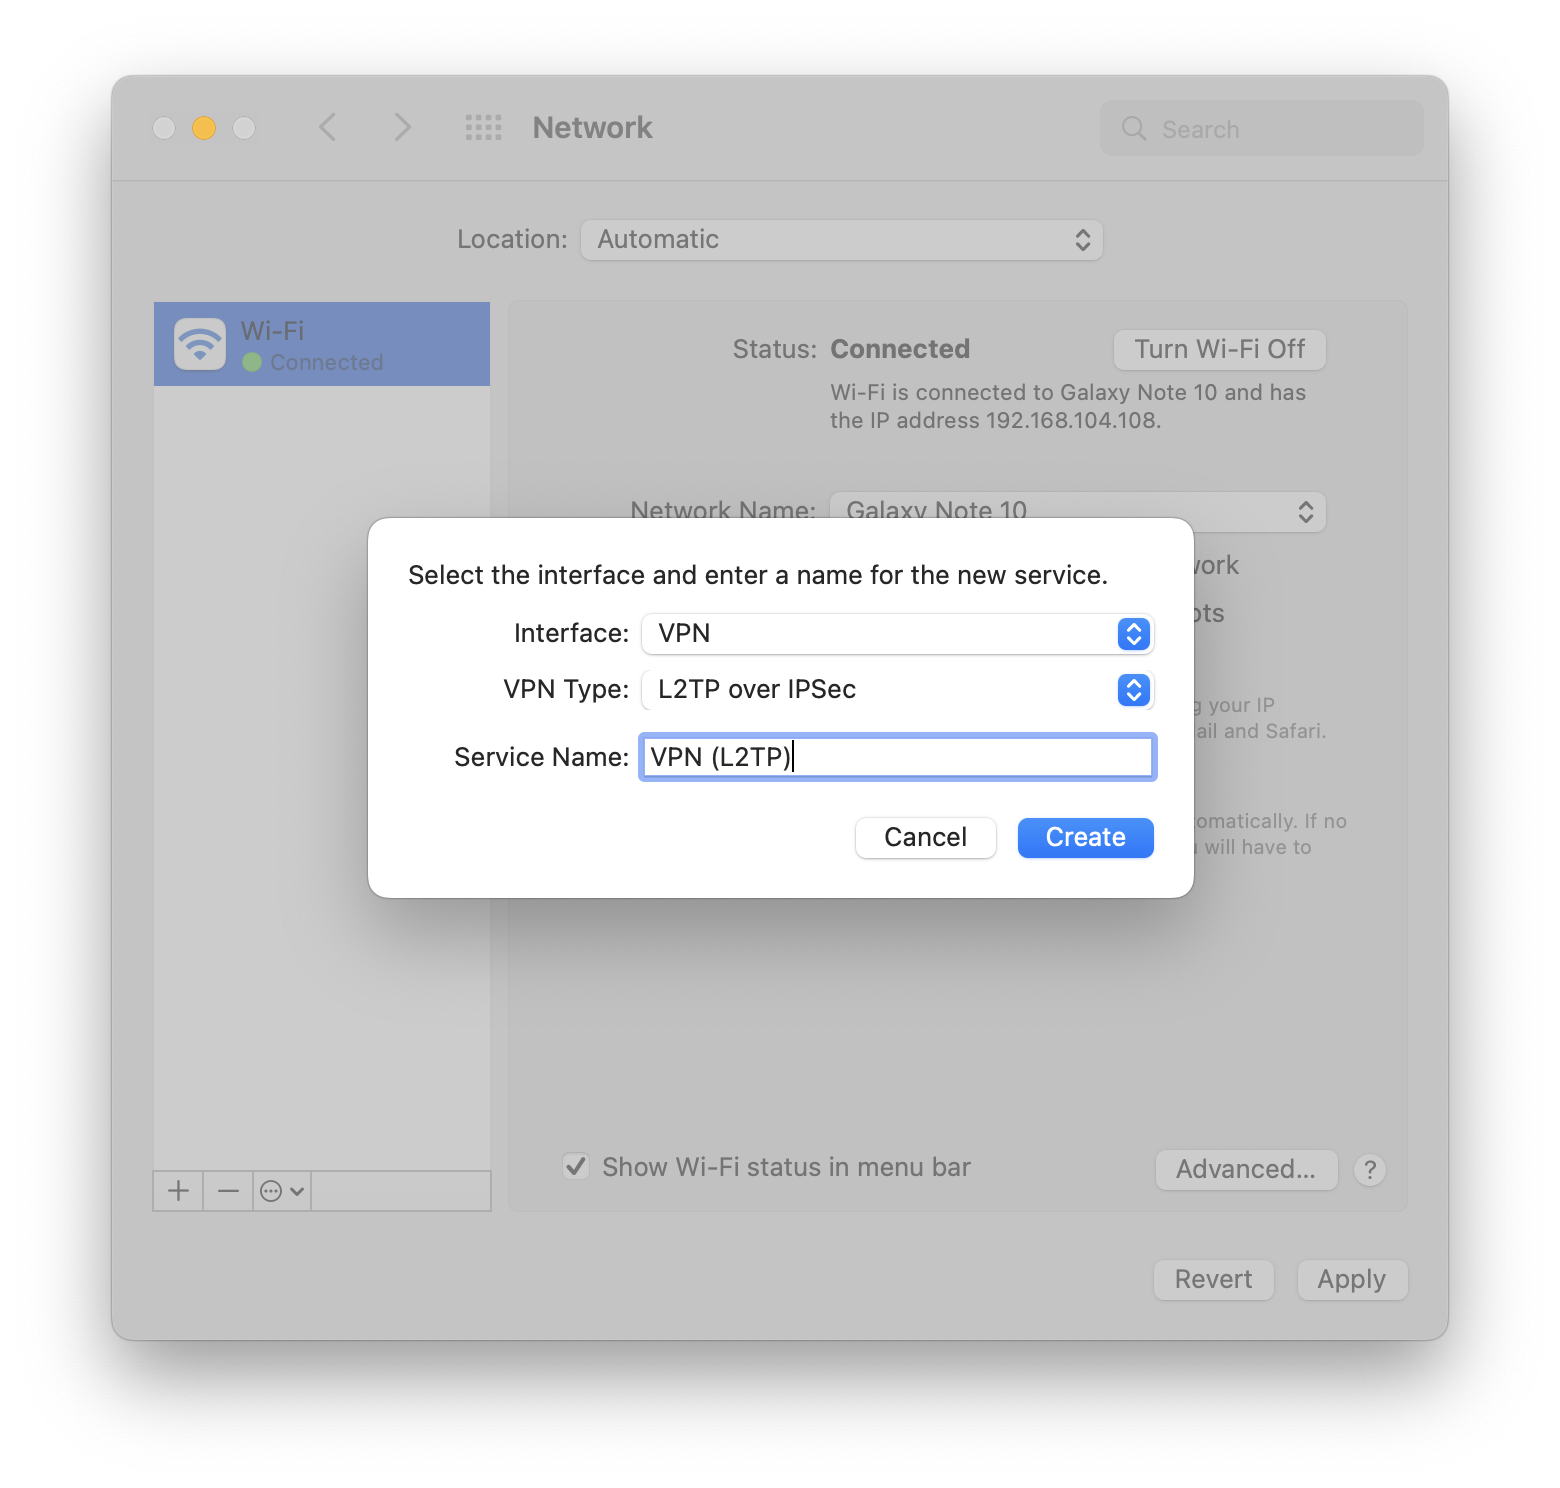](https://docs.safedns.com/uploads/images/gallery/2022-09/dP9nQvEQRV1F4F4y-11-instructions-for-creating-a-connection-in-mac-os.png)
4\. Click **Create**.
5\. Fill in the **Server address** and **Account name:
[](https://docs.safedns.com/uploads/images/gallery/2022-09/6XD7BXkEqVB1Gr7M-12-instructions-for-creating-a-connection-in-mac-os.png)**
6\. Check the box **Show VPN status in the menu bar** and select **Authentication settings.** 7. In **User authentication** fill in **Password** and in **Computer Authentication** fill in **Shared Key (Shared Secret).
[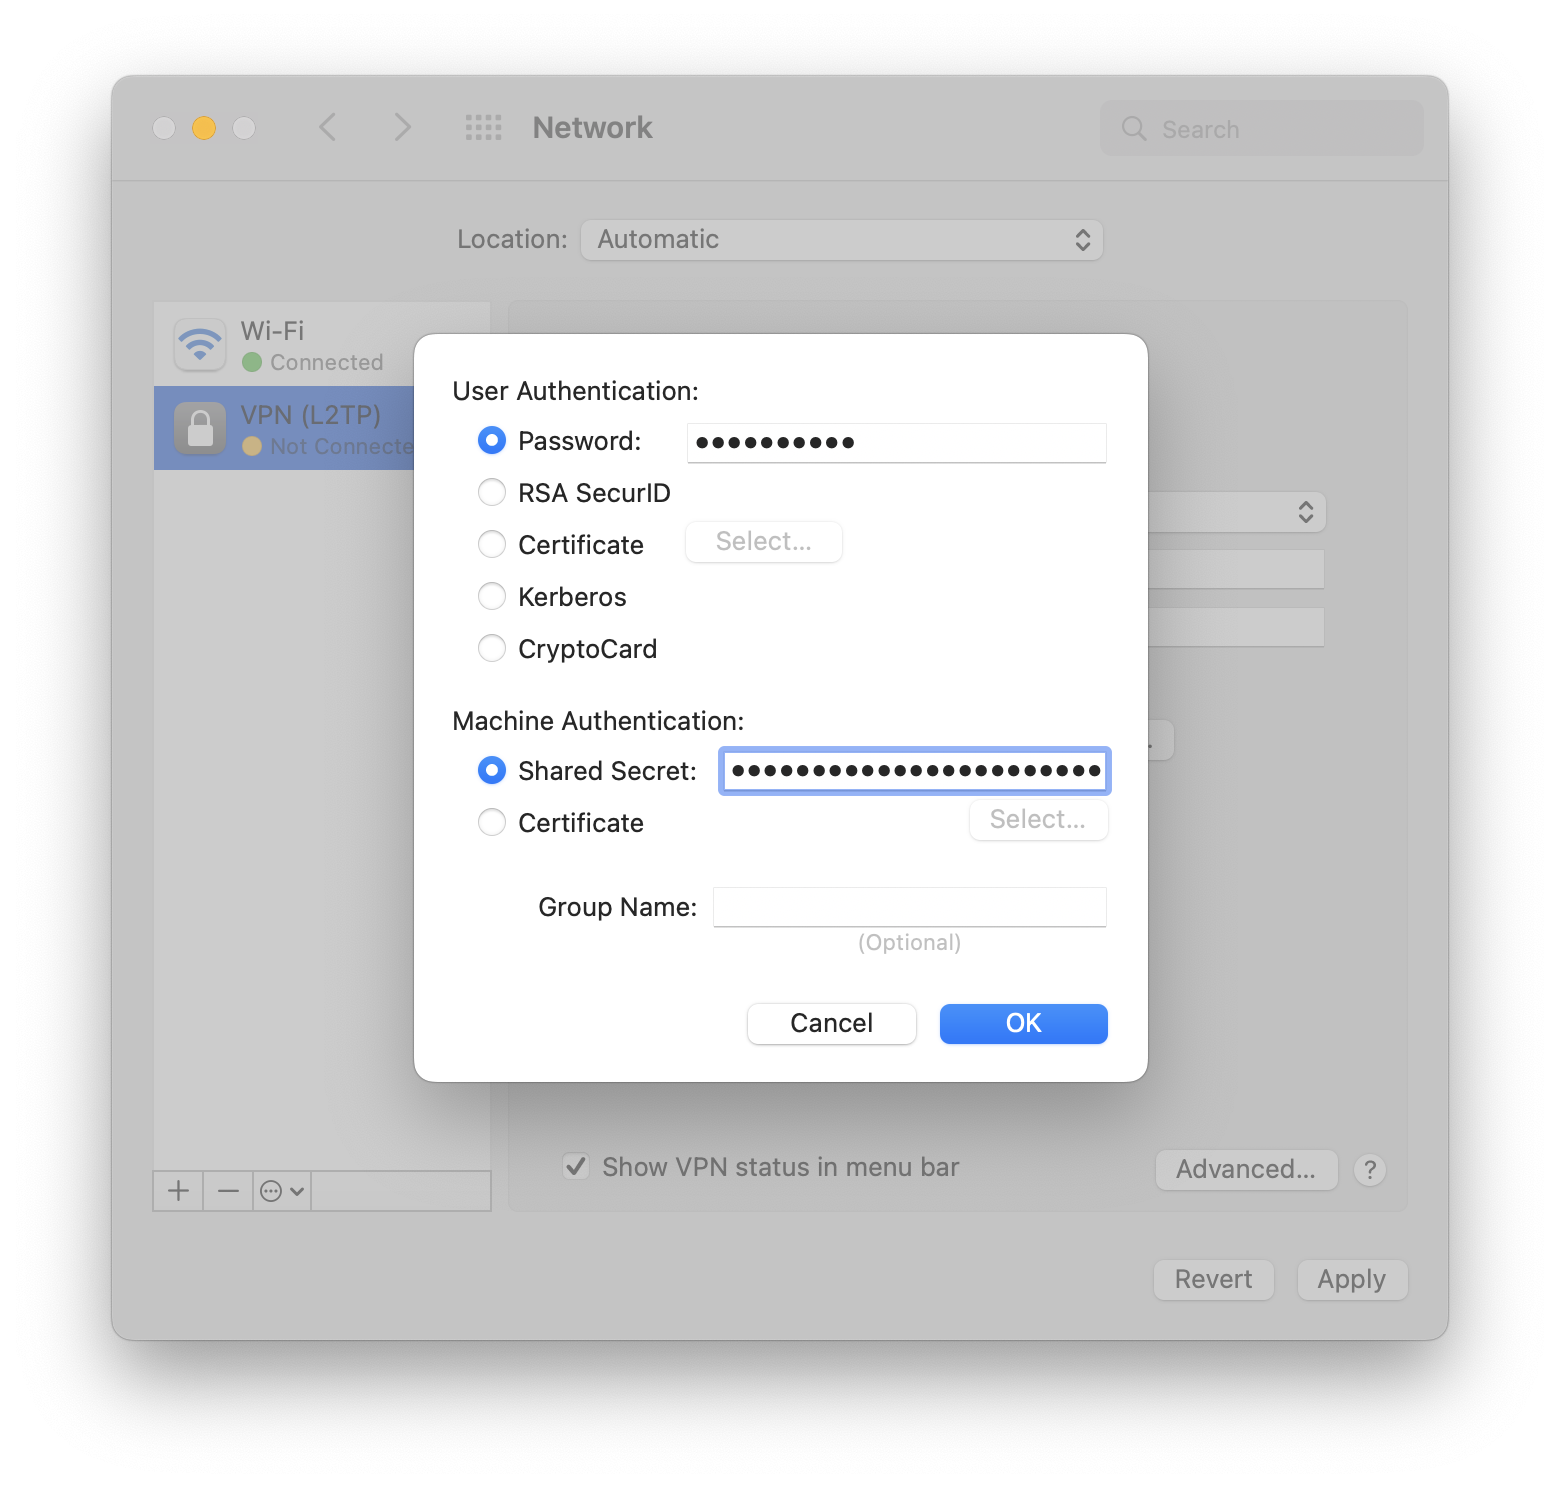](https://docs.safedns.com/uploads/images/gallery/2022-09/aDX4f7xXs061mGrc-13-instructions-for-creating-a-connection-in-mac-os.png)**
8\. Click **OK -> Apply**.
Turn on the VPN connection:
- In the upper-left part of the screen, click on the VPN connection.
- Select *Connect (service name specified in step 3)*:
[](https://docs.safedns.com/uploads/images/gallery/2022-09/LLe0ZKhbQhxaEq3y-14-instructions-for-creating-a-connection-in-mac-os.png)