# 6. Instructions and Troubleshooting
# Instructions for Creating VPN Connections
# Instructions for Creating VPN connection in Ubuntu
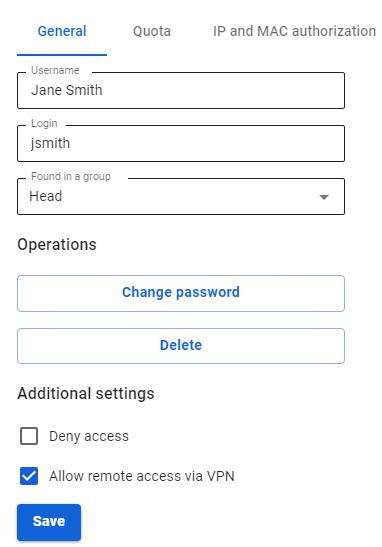
Before setting up a VPN connection, in the user tree in the desired user’s card, check the box **Allow remote access via VPN.** To do this, go to **Users -> User & Group**:
[](https://docs.safedns.com/uploads/images/gallery/2022-09/nPAzmWJwbZNorTN4-1-instructions-for-creating-vpn-connection-in-ubuntu.png)
---
PPTP Protocol
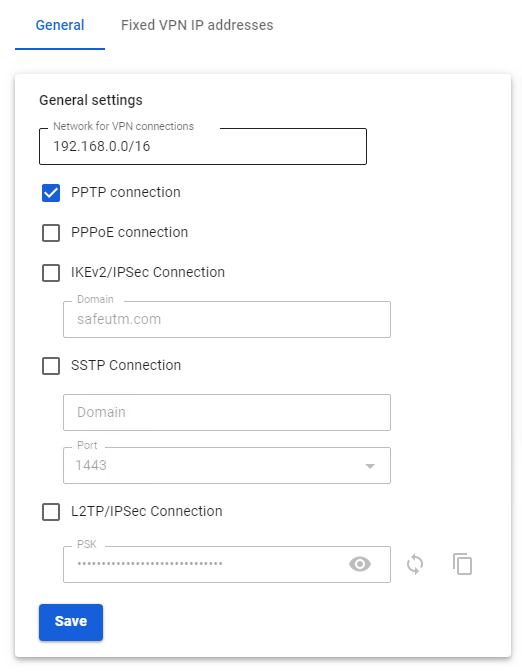
Before creating a connection in Ubuntu, go to SafeUTM, **Users -> VPN connections,** and check the box **PPTP Connection**:
[](https://docs.safedns.com/uploads/images/gallery/2022-09/jameUxXzfpFg6QqQ-2-instructions-for-creating-vpn-connection-in-ubuntu.png)
**Creating a connection in Ubuntu**
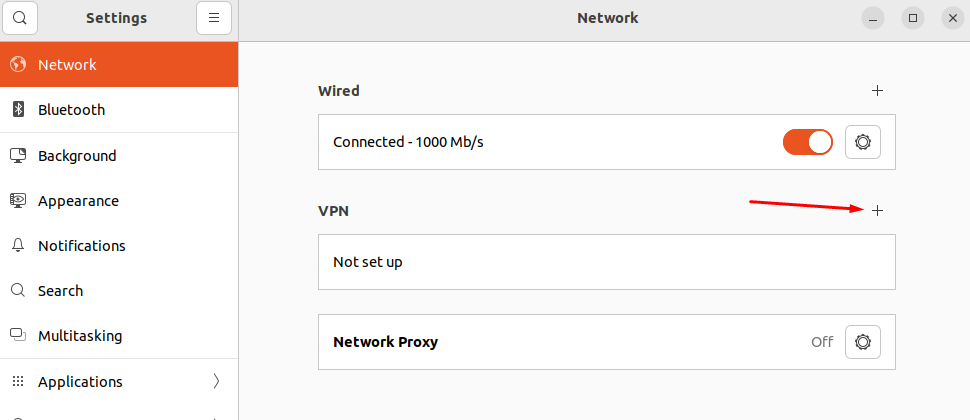
1\. Go to **Settings -> Networks** and in the **VPN** line**,** click **(+)**:
[](https://docs.safedns.com/uploads/images/gallery/2022-09/LobD8ntHfpCdpcJn-3-instructions-for-creating-vpn-connection-in-ubuntu.png)
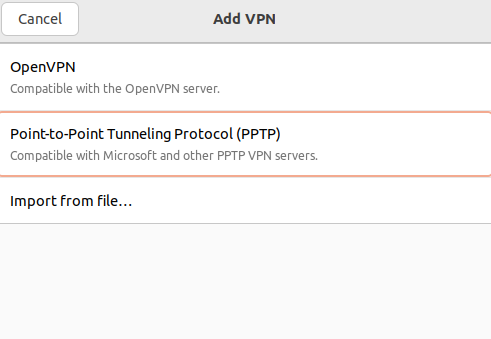
2\. In the connection creation window, select **Point-to-Point Tunnel Protocol (PPTP)**:
[](https://docs.safedns.com/uploads/images/gallery/2022-09/McWjRc8VlWWOBEda-4-instructions-for-creating-vpn-connection-in-ubuntu.png)
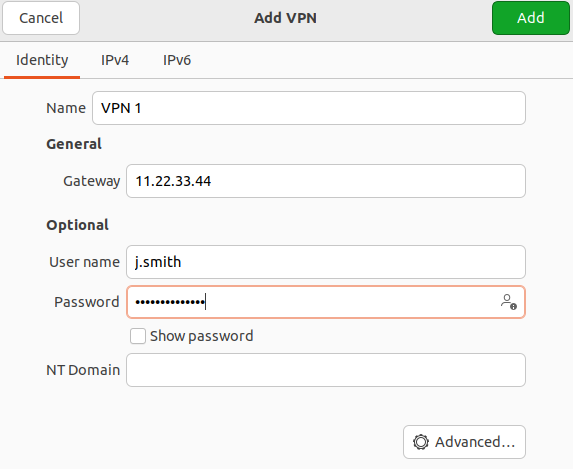
3\. In the **Identification** section fill in the following fields:
- **Name** – the connection name.
- **Gateway** – the domain name or IP address of the UTM interface.
- **Username** – the name of the user allowed to connect via VPN.
- **Password** – the user's password. In the right part of the field, select the storage option for the VPN connection password.
- **NT domain** – leave the field empty.
[](https://docs.safedns.com/uploads/images/gallery/2022-09/ymyUevrAgq5z5HKB-5-instructions-for-creating-vpn-connection-in-ubuntu.png)
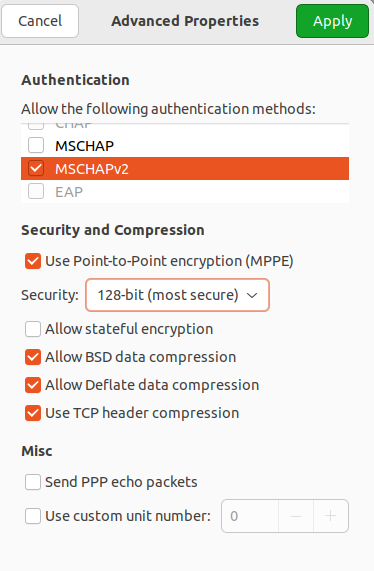
We recommend that you click **Advanced** and check the following:
- **Allow the following authentication methods** – check the item
- **Use MPPE encryption** – in the Encryption line, select 128-bit (the most protected).
- **Use BSD compression for data** – using the BSD-compress algorithm.
- **Use Deflate compression for data** – using Deflate algorithm.
- **Use TCP Header Compression** – using Van Jacobson's TCP/IP header compression method.
[](https://docs.safedns.com/uploads/images/gallery/2022-09/nmjlFvQUeVzulhEh-6-instructions-for-creating-vpn-connection-in-ubuntu.png)
4\. Click **OK** and **Add**.
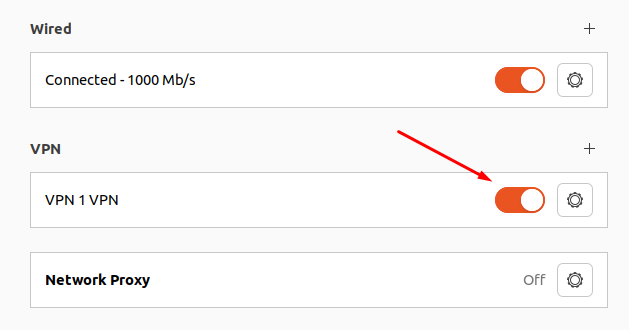
5\. Set the switch of the created VPN connection to the Enabled position:
[](https://docs.safedns.com/uploads/images/gallery/2022-09/ztAsaMuvyk2C5yOx-7-instructions-for-creating-vpn-connection-in-ubuntu.png)
IKEv2/IPsec Protocol
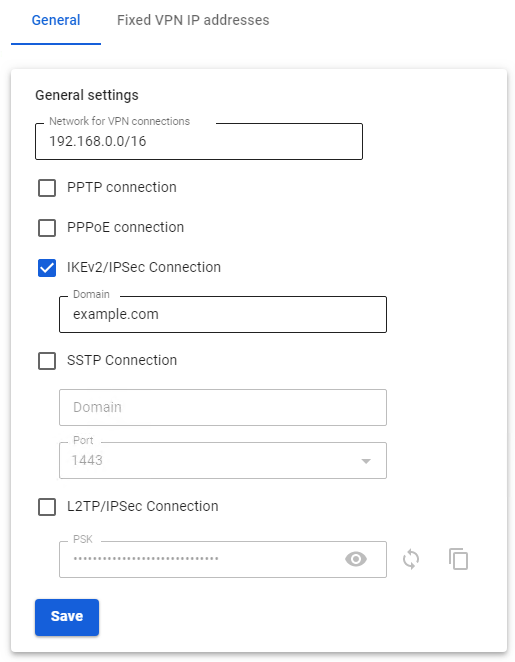
Before creating a connection in Ubuntu, configure SafeUTM:
1\. Go to **Users -> VPN connections**.
2\. Check the box **IKEv2/IPsec** **Connection** and fill in the **Domain** fields:
[](https://docs.safedns.com/uploads/images/gallery/2022-09/6lFZ5wZvaqbC3gkO-8-instructions-for-creating-vpn-connection-in-ubuntu.png)
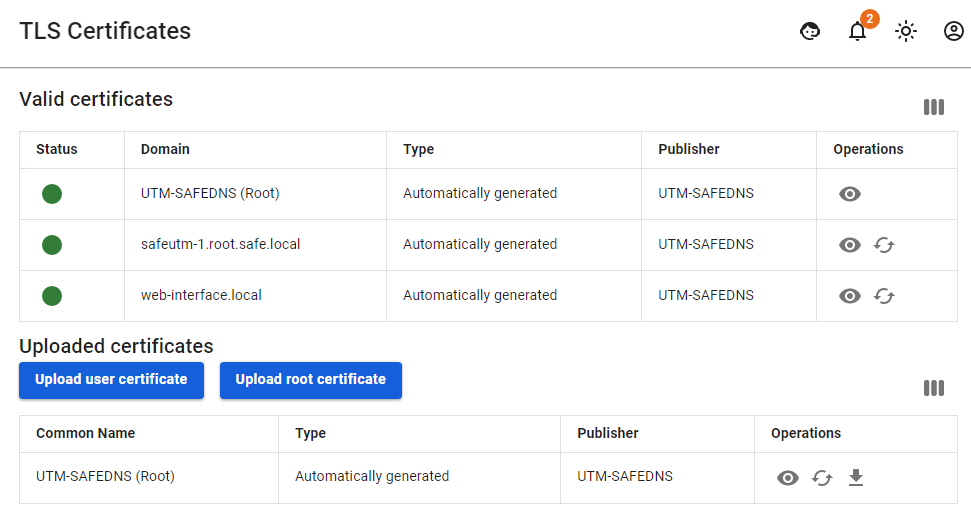
3\. Download the root certificate from **Services -> TLS Certificates**:
[](https://docs.safedns.com/uploads/images/gallery/2022-09/dapxaPqnQuoilSZR-9-instructions-for-creating-vpn-connection-in-ubuntu.png)
The root certificate will be required to configure the connection of the user's workstation if the root certificate was not obtained via Let’s Encrypt. If necessary, transfer the certificate file to the workstation.
If a certificate issued by Let's Encrypt is used for a VPN connection, then installing a root certificate on the device is not required.
##### Creating a connection in Ubuntu
1\. Open the terminal with the keyboard shortcut Ctrl+Alt+F1 and run the command: `sudo apt install -y network-manager-strongswan libcharon-extra-plugins libstrongswan-extra-plugins`
2\. After the installation is complete, restart the computer: `sudo reboot`
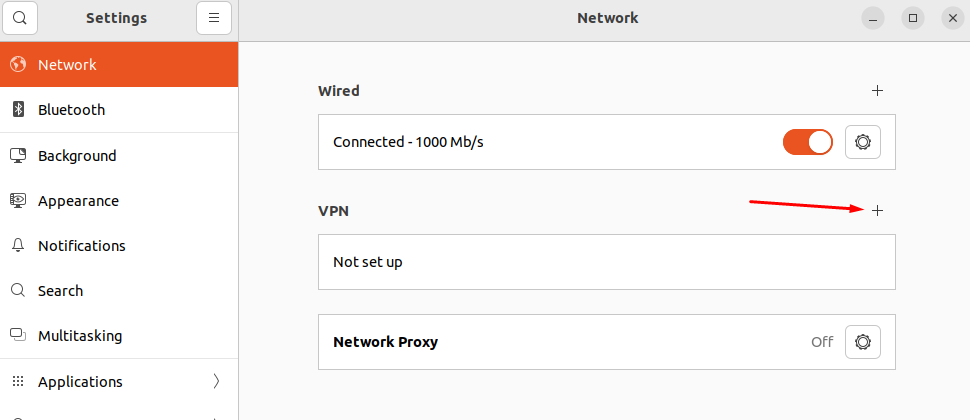
3\. Go to **Settings -> Networks** and in the **VPN** line, click (+):
[](https://docs.safedns.com/uploads/images/gallery/2022-09/DLwICOx18DtouT96-10-instructions-for-creating-vpn-connection-in-ubuntu.png)
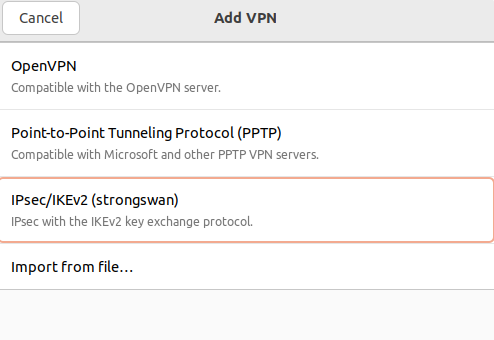
4\. In the window that opens, select **IPsec\\IKEv2 (strongswan)**:
[](https://docs.safedns.com/uploads/images/gallery/2022-09/lUuzniPFCEbcg1j6-11-instructions-for-creating-vpn-connection-in-ubuntu.png)
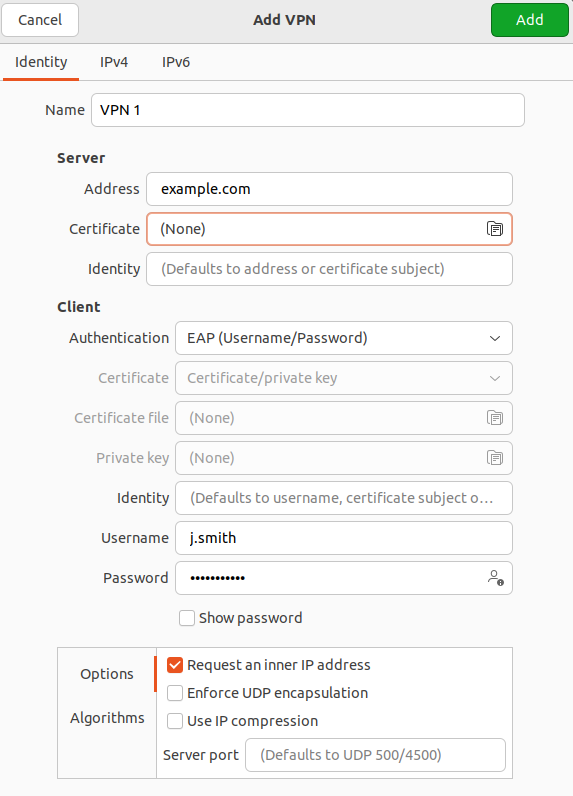
5\. In **Identification** fill in the following fields:
- **Name** – connection name.
- **Address** – enter the domain specified in **Users -> Authorization -> VPN Connection -> IKEv2/IPsec Connection.**
- **Certificate** – select the previously saved root certificate (if it was not issued by Let's Encrypt).
- **Authentication** – we recommend choosing EAP.
**Username** – the name of the user allowed to connect via VPN.
- **Password** – the user's password. In the right part of the field, select the storage option for the VPN connection password.
Check the box **Request an inner IP address** and click **Add:
[](https://docs.safedns.com/uploads/images/gallery/2022-09/66nzuFa2zN9VqO6p-12-instructions-for-creating-vpn-connection-in-ubuntu.png)**
6. Set the switch of the created VPN connection to the Enabled position.
SSTP Protocol
Before creating a connection in Ubuntu, configure SafeUTM:
1\. Go to **Users -> VPN connections**.
2\. Check the box **SSTP Connection** and fill in **Domain** and **Port** fields:
[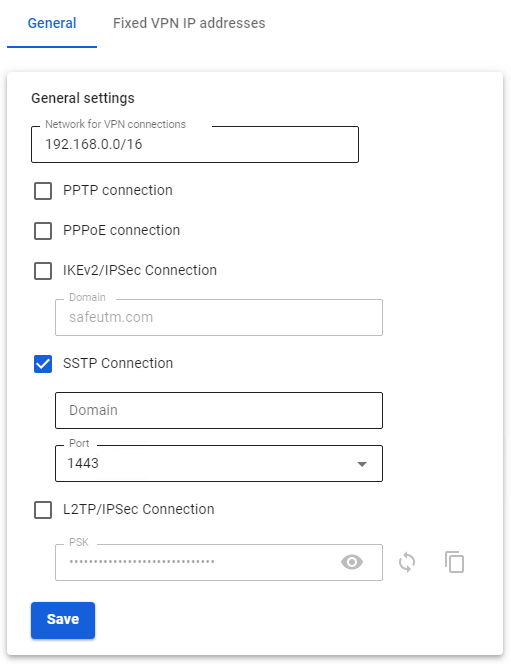](https://docs.safedns.com/uploads/images/gallery/2022-09/xjaRWQEoShCAur0O-13-instructions-for-creating-vpn-connection-in-ubuntu.png)
##### Creating a connection in Ubuntu
1\. Open the terminal with the keyboard shortcut Ctrl+Alt+F1 and run two commands:
```
sudo apt-add-repository ppa:eivnaes/network-manager-sstp
sudo apt install -y network-manager-sstp sstp-client
```
2\. After the installation is complete, restart the computer: `sudo reboot`
3\. Having installed the packages, go to **Settings -> Networks,** and in the **VPN** line, click (+):
[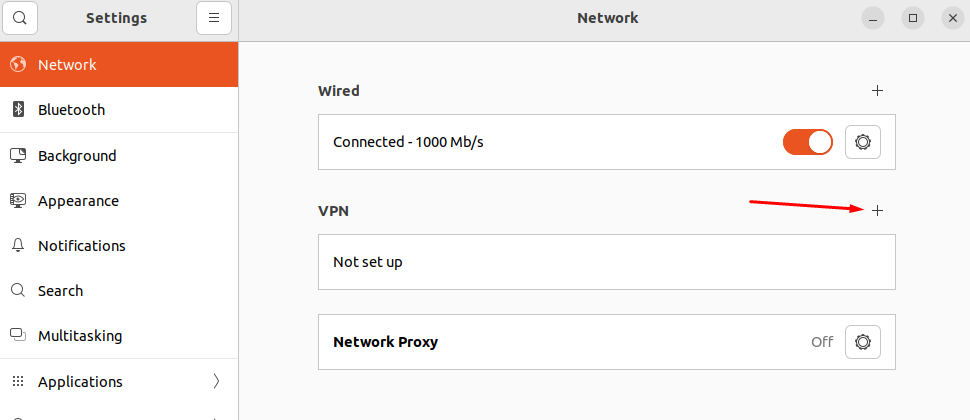](https://docs.safedns.com/uploads/images/gallery/2022-09/KQCWsVAWtyAfrrmt-14-instructions-for-creating-vpn-connection-in-ubuntu.png)
4\. In the window that opens, select **Point-to-Point Tunnel Protocol (SSTP)**:
[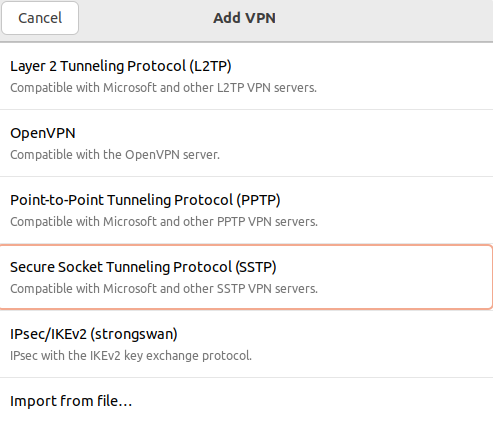](https://docs.safedns.com/uploads/images/gallery/2022-09/VPsR8Jtv2NTXq0Yt-15-instructions-for-creating-vpn-connection-in-ubuntu.png)
5\. In **Identification** fill in the following fields:
- **Name** – connection name.
- **Gateway** – specify in the format *domain:\[port selected on UTM\].*
- **Username** – the name of the user allowed to connect via VPN.
- **Password** – the user's password. In the right part of the field, select the storage option for the VPN connection password.
- **NT domain** – leave the field empty.
[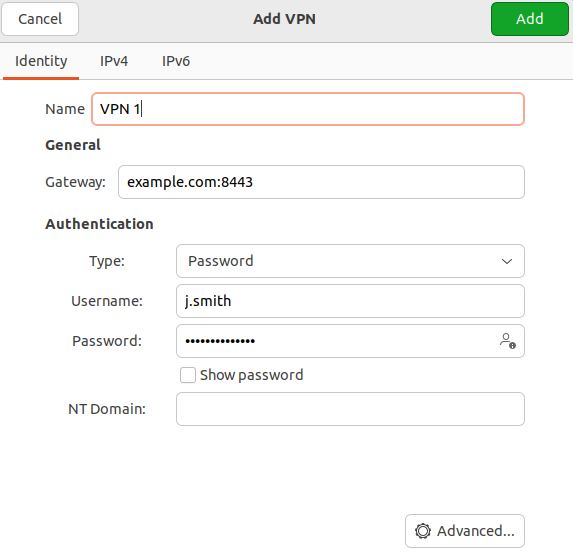](https://docs.safedns.com/uploads/images/gallery/2022-09/hadL9k0sWW6pExR9-16-instructions-for-creating-vpn-connection-in-ubuntu.png)
We recommend that you click **Advanced** and check the following:
- **Allow the following authentication methods** – check the item
- **Use MPPE encryption** – in the Encryption line, select 128-bit (the most protected).
- **Use BSD compression for data** – using the BSD-compress algorithm.
- **Use Deflate compression for data** – using Deflate algorithm.
- **Use TCP Header Compression** – using Van Jacobson's TCP/IP header compression method.
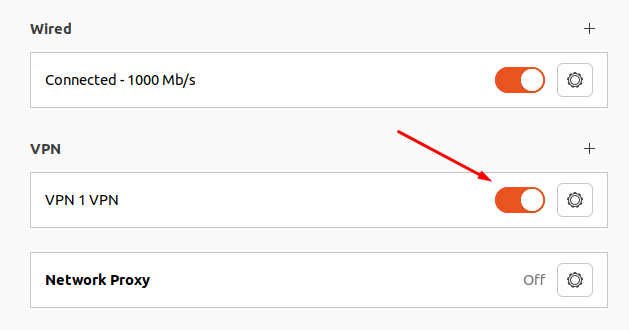
6\. Click **Add** and set the switch of the created VPN connection to the Enabled position:
[](https://docs.safedns.com/uploads/images/gallery/2022-09/4hIOMVgmWdEHEaKE-17-instructions-for-creating-vpn-connection-in-ubuntu.png)
L2TP/IPsec Protocol
**Important**: L2TP IPsec clients behind the same NAT may experience connectivity issues if there is more than one. We recommend using IKEv2 IPSec instead of L2TP IPsec.
Before creating a connection, configure SafeUTM:
1\. Go to **Users -> VPN connections**.
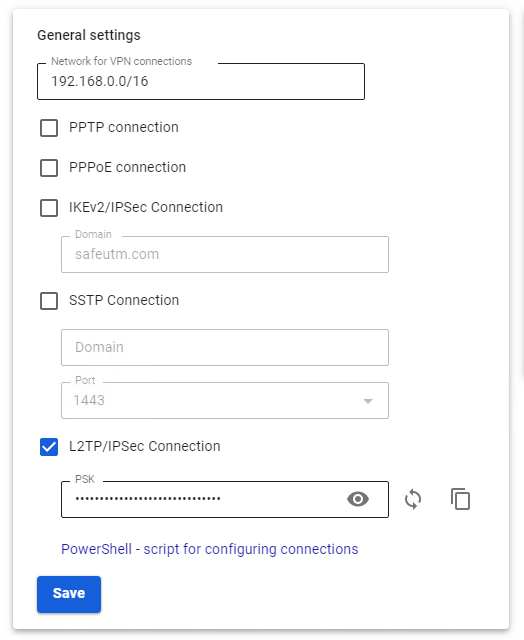
2\. Check the box **L2TP/IPsec Connection** and copy the **PSK** key:
[](https://docs.safedns.com/uploads/images/gallery/2022-09/h8WhsFe46xVApxPT-18-instructions-for-creating-vpn-connection-in-ubuntu.png)
##### Creating a connection in Ubuntu
1\. Connect the repository that contains the necessary packages to create an L2TP VPN connection, and then update the information about the repositories. To do this, run the following commands:
```
sudo add-apt-repository ppa:nm-l2tp/network-manager-l2tp
sudo apt update
```
2\. Install the add-on to the standard NetworkManager using two packages: `sudo apt install -y network-manager-l2tp network-manager-l2tp-gnome`
3\. After the installation is complete, restart the computer: `sudo reboot`
4\. Having installed the packages, go to **Settings -> Networks** and in the **VPN** line, click (+):
[](https://docs.safedns.com/uploads/images/gallery/2022-09/4hIOMVgmWdEHEaKE-17-instructions-for-creating-vpn-connection-in-ubuntu.png)
5\. In the VPN connection creation window, select **Layer** **2 Tunneling Protocol (L2TP)**:
[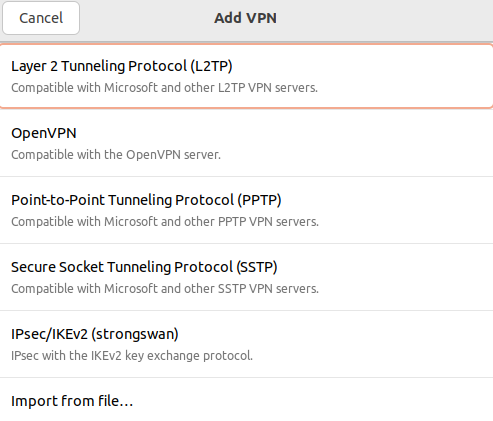](https://docs.safedns.com/uploads/images/gallery/2022-09/5ZIxGecn3tfHTJ2a-19-instructions-for-creating-vpn-connection-in-ubuntu.png)
6 . In the tab **Identification** fill in the following fields:
- **Name** – connection name.
- **Gateway** – the domain name or IP address of the UTM interface.
- **Type** – user authentication by a password.
- **Username** – the name of the user allowed to connect via VPN.
- **Password** – the user's password. In the right part of the field, select the storage option for the VPN connection password.
- **NT domain** – leave the field empty.
[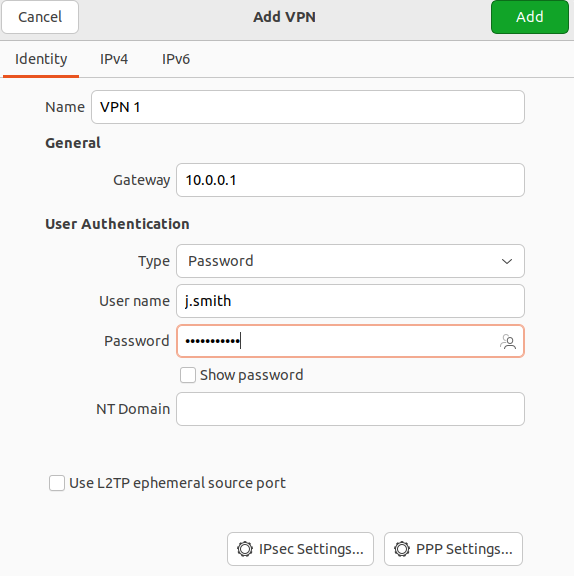](https://docs.safedns.com/uploads/images/gallery/2022-09/ZFvr5lriBbiDyeNr-20-instructions-for-creating-vpn-connection-in-ubuntu.png)
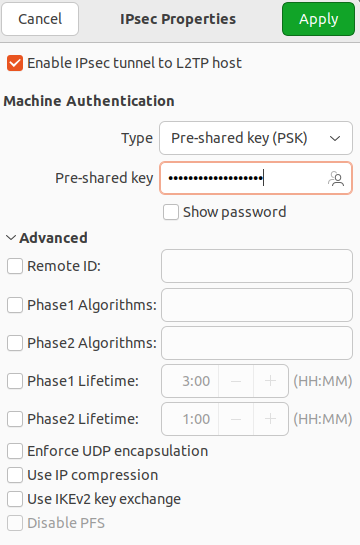
7\. Go to **IPsec settings** and enable **IPsec tunnel to L2TP host** to activate the ability to configure other parameters:
- **Type: Pre-shared key (PSK)** – public key authentication.
- **Pre-shared key** - the key that needs to be copied along the path **Users -> Authorization -> VPN connection** from the field **PSK.**
The section **Advanced** is optional.
[](https://docs.safedns.com/uploads/images/gallery/2022-09/jBbkOoQpwC2BaIRF-21-instructions-for-creating-vpn-connection-in-ubuntu.png)
Having finished configuring L2TP **IPsec Options,** click **OK.**
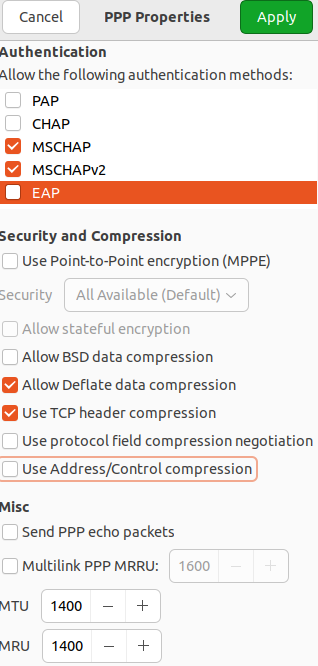
8\. If necessary, go to **PPR settings** and configure **Authentication**, **Encryption and Compression,** and **Other**:
[](https://docs.safedns.com/uploads/images/gallery/2022-09/LnYYcco0xqGM6rnv-22-instructions-for-creating-vpn-connection-in-ubuntu.png)
After setting up **PPR parameters** click OK** and **Apply**.
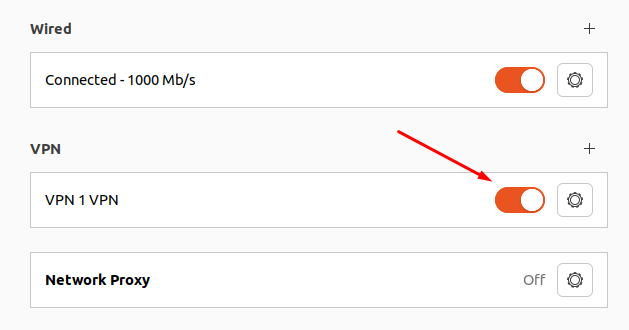
9\. Set the switch of the created VPN connection to the Enabled position:
[](https://docs.safedns.com/uploads/images/gallery/2022-09/7h9Urvdl67djkbne-23-instructions-for-creating-vpn-connection-in-ubuntu.png)
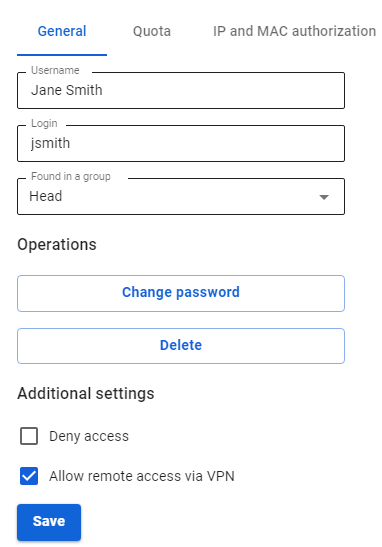
Before configuring a VPN connection, in the user tree, open the card of the required user and set the **Allow remote access via VPN** flag. To do this, go to the **Users -> User & Group** section:
[](https://docs.safedns.com/uploads/images/gallery/2022-09/5uJN0lFrLEyeDs2k-1-automatic-connection-creation.png)
---
L2TP/IPsec Protocol
**Important**: L2TP IPsec clients behind the same NAT may experience connectivity issues if there is more than one. [**Instructions**](https://docs.microsoft.com/en-us/troubleshoot/windows-server/networking/configure-l2tp-ipsec-server-behind-nat-t-device) can help solve the problem. We recommend using IKEv2 IPSec instead of L2TP IPsec.
You can run the following PowerShell script to automatically create a connection on users' computers running Windows 8.1 and 10. To do this, download the ready-made scripts for connecting your server from **Users -> VPN connections**.
The connection will be created with the following parameters:
1. **L2TP/IPsec** protocol using a PSK key.
2. The parameter **Use the primary gateway in the remote network** is disabled.
LANs of the same class that was obtained for a VPN connection by default in Windows 7 and 10 will be accessed via a VPN connection, so you do not need to create additional routes (unless you use different network classes in the office LAN).
Create a file named **safe\_utm\_l2tp.ps1** (in Notepad or Windows PowerShell ISE Editor) and copy the following text into it:
```Powershell
param([switch]$Elevated)
$currentUser = New-Object Security.Principal.WindowsPrincipal $([Security.Principal.WindowsIdentity]::GetCurrent())
if (!$currentUser.IsInRole([Security.Principal.WindowsBuiltinRole]::Administrator)) {
if (!$elevated) {
Start-Process `
powershell.exe `
-Verb RunAs `
-ArgumentList ('-noprofile -noexit -file "{0}" -elevated' -f ( $myinvocation.MyCommand.Definition ))
}
exit
}
Enable-NetFirewallRule -Group "@FirewallAPI.dll,-28502"
Add-VpnConnection `
-Force `
-Name "SafeUTM L2TP VPN" `
-TunnelType L2TP `
-ServerAddress my.domain.com `
-L2tpPsk "XXXXXXXXXXXXXXXXXXXXXXXXXXXXXXXX" `
-EncryptionLevel "Required" `
-AuthenticationMethod MSChapV2 `
-SplitTunneling $False `
-DnsSuffix activedirectory.domain `
-RememberCredential
```
**Change the necessary parameters in it to match your settings:**
- **SafeUTM L2TP VPN** – the connection name in the system (can be arbitrary).
- **domain.com** – the domain or IP address of the main external interface of SafeUTM.
- **XXXXXXXXXXXXXXXXXXXXXXXXXXXXXX** – your server's PSK key.
- **domain** – your Active Directory domain (if there is one if not, you need to delete this line from the script).
**You can run the script on the user's computer from the file context menu "Run with PowerShell". Click OK in the elevation dialog (the rights are required to allow access to shared files and printers).**
After that, a connection will be created in the system and shared access to files and printers for all networks will be enabled (otherwise access to file resources in the local network may not be possible).
The user must enter their username/password at the first authorization.
**Possible errors when executing the script**
If the error "Script execution is disabled on this system" appears, you need to enable script execution by running the following command in PowerShell: `Set-ExecutionPolicy Unrestricted`
SSTP Protocol
You can run the following PowerShell script to automatically create a connection on users' computers running Windows 8.1 and 10. To do this, download the ready-made script from **Users -> VPN connections**.
**The connection will be created with the following parameters:**
1. **SSTP** protocol using the PSK key.
2. The parameter **Use the primary gateway in the remote network** is disabled.
LANs of the same class that was obtained for VPN connections by default in Windows 7 and 10 will be accessed via a VPN connection, so you do not need to create additional routes (unless you use different network classes in the office LAN).
Create a text file named **safe\_utm\_sstp.ps1** (in Notepad or Windows PowerShell ISE editor) and copy the following text there:
```Powershell
param([switch]$Elevated)
$currentUser = New-Object Security.Principal.WindowsPrincipal $([Security.Principal.WindowsIdentity]::GetCurrent())
if (!$currentUser.IsInRole([Security.Principal.WindowsBuiltinRole]::Administrator)) {
if (!$elevated) {
Start-Process `
powershell.exe `
-Verb RunAs `
-ArgumentList ('-noprofile -noexit -file "{0}" -elevated' -f ( $myinvocation.MyCommand.Definition ))
}
exit
}
Enable-NetFirewallRule -Group "@FirewallAPI.dll,-28502"
Add-VpnConnection `
-Force `
-Name "SafeUTM SSTP VPN" `
-TunnelType SSTP `
-ServerAddress my.domain.com:4443 `
-EncryptionLevel "Required" `
-AuthenticationMethod MSChapV2 `
-SplitTunneling $False `
-DnsSuffix activedirectory.domain `
-RememberCredential
```
**Change the necessary parameters in it to match your settings:**
1. **SafeUTM SSTP VPN** – the connection name in the system (can be arbitrary).
2. **my.domain. com:4443** – SafeUTM external interface domain and the port on which you enabled SSTP.
3. **activedirectory.domain** – your Active Directory domain (if there is no domain, you need to delete this line from the script).
**You can run the script on the user's computer from the file context menu "Run with PowerShell". Click OK in the elevation dialog (the rights are required to allow access to shared files and printers).**
After that, a connection will be created in the system and shared access to files and printers for all networks will be enabled (otherwise access to file resources in the local network may not be possible).
The user must enter their username/password at the first authorization.
**Possible errors when executing the script**
If the error "Script execution is disabled on this system" appears, you need to enable script execution by running the following command in PowerShell: `Set-ExecutionPolicy Unrestricted`
IPsec IKEv2 Protocol
You can run a PowerShell script to automatically create a connection on users' computers running Windows 8.1 and 10. To do this, download the ready-made script from **Users -> VPN connections**.
**The connection using the script will be created with the following parameters:**
1. IKEv2/IPsec Protocol
2. The parameter **Use the primary gateway in the remote network** is disabled. LANs of the same class that was obtained for the default VPN connection in Windows 7 and 10 will be accessed via a VPN connection, so you do not need to create additional routes (unless you use different network classes in the office LAN).
Create a text file named **safe\_utm\_ikev2.ps1** (in Notepad or Windows PowerShell ISE editor) and copy the following text there:
```Powershell
param([switch]$Elevated)
$currentUser = New-Object Security.Principal.WindowsPrincipal $([Security.Principal.WindowsIdentity]::GetCurrent())
if (!$currentUser.IsInRole([Security.Principal.WindowsBuiltinRole]::Administrator)) {
if (!$elevated) {
Start-Process \`
powershell.exe `
-Verb RunAs `
-ArgumentList ('-noprofile -noexit -file "{0}" -elevated' -f ( $myinvocation.MyCommand.Definition ))
}
exit
}
Enable-NetFirewallRule -Group "@FirewallAPI.dll,-28502"
Add-VpnConnection `
-Force `
-Name "SafeUTM IKEv2 VPN" `
-TunnelType IKEv2 `
-ServerAddress my.domain.com `
-EncryptionLevel "Required" `
-AuthenticationMethod EAP `
-SplitTunneling $False `
-DnsSuffix activedirectory.domain `
-RememberCredential
```
**Change the necessary parameters in it to match your settings:**
1. **SafeUTM IKEv2 VPN** – the connection name in the system (can be arbitrary).
2. **my.domain.com** – the domain of SafeUTM external interface (A-record for the domain must refer to the IP address of SafeUTM external interface).
3. **activedirectory.domain** – your Active Directory domain (if there is one if not, you need to delete this line from the script).
You can run the script on the user's computer from the file context menu "Run with PowerShell". Click OK in the elevation dialog (the rights are required to allow access to shared files and printers).
After that, a connection will be created in the system, and file and printer sharing will be enabled for all networks (otherwise access to shared folders in the local network will not be possible).
During the first authorization, it is necessary to enter the username/password.
**Possible errors when executing the script**
If the error "Script execution is disabled on this system" appears, you need to enable script execution by running the following command in PowerShell: `Set-ExecutionPolicy Unrestricted`
If a VPN connection using IPsec protocols in Windows is automatically terminated after 7 hours and 45 minutes and a "Group policy mapping" error or error 13868 occurs when connecting via IKEv2.
To restore the connection, the following actions are suitable:
1\. Reconnect. In this case, the connection will be restored, but after 7 hours and 45 minutes, it will be automatically disconnected again. If you do not want the connection to be terminated automatically, follow the steps from the following paragraph.
2\. Make changes to the registry:
- Open the **Registry editor**.
- Follow the path `HKEY_LOCAL_MACHINE\SYSTEM\CurrentControlSet\Services\RasMan\Parameters`
- Right-click on the parameter **NegotiateDH2048\_AES256** and click **Change**.
- In the **Value** line, specify value 1: [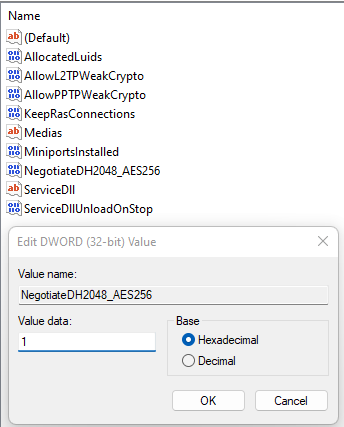](https://docs.safedns.com/uploads/images/gallery/2022-09/w3V4oh7EPXEl6NaA-2-automatic-connection-creation.png)
- Click **OK**.
- Restart Windows.
If there is no parameter named **NegotiateDH2048\_AES256**, then create it. To do this:
- Right-click on the free registry space in **Parameters** and select **Create -> DWORD**:
- Set the name **NegotiateDH2048\_AES256.**
- Right-click on the created file and select **Change**:
- In the **Value** line, specify value 1:
- Click **OK**.
3\. Restart Windows.
Before configuring a VPN connection, in the user tree, open the card of the required user and set the **Allow remote access via VPN** flag. To do this, go to the **Users -> User & Group** section:
[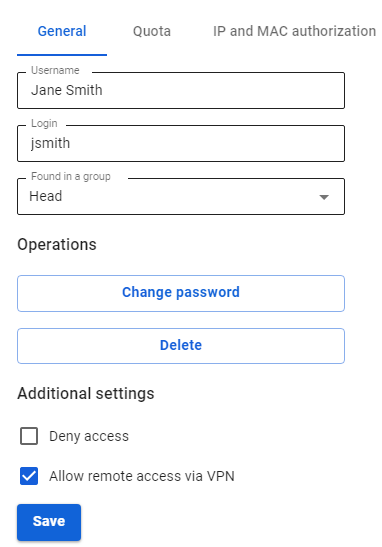](https://docs.safedns.com/uploads/images/gallery/2022-09/dOVT5oIc6sOWd11n-1-creating-a-vpn-connection-in-windows-10.png)
---
#### Creating a VPN connection in Windows 10
1\. Click on the network connection icon in the system tray, and in the window that appears, select **Network & Internet settings**:
[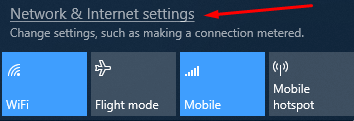](https://docs.safedns.com/uploads/images/gallery/2022-09/nzXDV9jQPXABLZnW-2-creating-a-vpn-connection-in-windows-10.png)
2\. Go to **VPN** and click **Add a VPN connection**:
[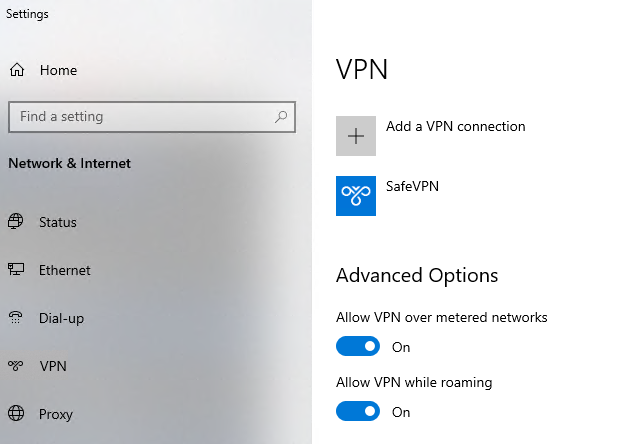](https://docs.safedns.com/uploads/images/gallery/2022-09/T5fho4aiqV8HXhz1-3-creating-a-vpn-connection-in-windows-10.png)
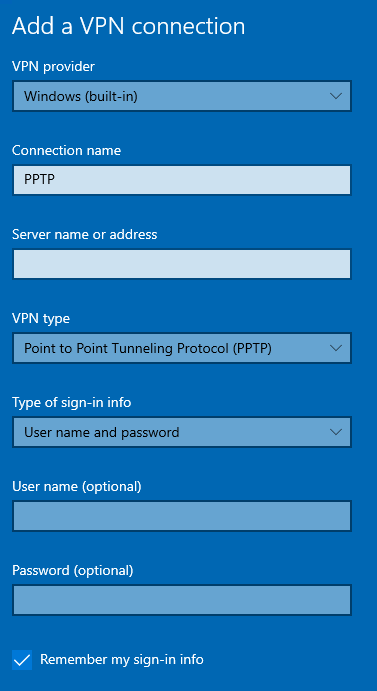
3\. Fill in the following fields and click **Save**:
For PPTP
- Connection name - the name of the connection being created;
- Server name or address - VPN server address;
- VPN type - PPTP protocol;
- Login data type - Username and password;
- Username - the name of the user who is allowed to connect via VPN;
- Password - user password.
[](https://docs.safedns.com/uploads/images/gallery/2022-09/vmM7Lqdzo9ZgLfLg-4-creating-a-vpn-connection-in-windows-10.png)
When setting up a VPN connection from the Internet, the following parameters must be specified in the VPN connection properties:
- Go to **Settings of adapter parameters.**
- Right-click on the created connection and select **Properties**.
- Go to the tab **Security** and install:
- **Data encryption** – mandatory (disable if there is no encryption).
- **Extensible Authentication Protocol (EAP)** – Microsoft Protected Password (EAP MSCHAPV2).
For L2TP/IPsec with the shared key
**Important**: L2TP IPsec clients behind the same NAT may experience connectivity issues if there is more than one. Instructions can help solve the problem. We recommend using IKEv2 IPSec instead of L2TP IPsec.
- Connection name - the name of the connection being created;
- Server name or address - VPN server address;
- VPN type - L2TP/IPSec protocol with shared key;
- Shared key - the value of the **PSK** string in the **Users -> VPN connections -> L2TP/IPSec Connection** section;
- Login data type - Username and password;
- Username - the name of the user who is allowed to connect via VPN;
- Password - user password.
[](https://docs.safedns.com/uploads/images/gallery/2022-09/vmM7Lqdzo9ZgLfLg-4-creating-a-vpn-connection-in-windows-10.png)
When setting up a VPN connection from the Internet, you need to specify the following parameters in the VPN connection properties:
- Go to Adapter Options Settings;
- Right-click on the created connection and select Properties;
- Go to the Security tab and set:
- Data encryption - mandatory (disable if no encryption)
- Extensible Authentication Protocol (EAP) - Microsoft Secure Password (EAP MSCHAPV2)
If you are creating a VPN connection to UTM via port forwarding, we recommend following these steps:
1. Open **Registry editor**.
2. Go to `HKEY_LOCAL_MACHINE\SYSTEM\CurrentControlSet\Services\PolicyAgent` and create a DWORD parameter named AssumeUDPEncapsulationContextOnSendRule and set it to 2.
3. Restart Windows.
**Possible problems**
1. The user's username or password is incorrect. Often, when reconnecting, it is suggested to specify the domain. Try to create alphanumeric passwords, preferably in Latin letters, for your accounts. If there are doubts, temporarily set the username and password as "user" and "123456".
2. In order for the packets to go through the VPN tunnel, you need to make sure that in the settings of this connection the box **Use primary gateway in remote network** is checked in **Configuring adapter settings -> Right-click on the connection -> Properties -> Network -> Properties of the option "Internet Protocol version 4 (TCP/IPv4)" -> Advanced.** If it is not necessary to route all packets to this interface, then the route must be written manually.
3. The connection takes place via DNAT, i.e. the external interface of SafeUTM does not have a "white" IP address, and the ports necessary for operation (500 and 4500) are "forwarded" to the external interface of the device located in front of SafeUTM and having a "white" IP address. In this case, the VPN connection will either not be established at all, or there will be periodic interruptions. The solution is to exclude the device before SafeUTM and specify a "white" IP address on the external interface of SafeUTM, to which L2TP/IPsec connections will eventually be made. Otherwise, use the SSTP protocol, because it is easier to publish it using port forwarding.
4. If you reconnect via L2TP in Windows 10 OS, but use the **invalid** PSK key (by entering it in the advanced parameters \[screenshot below\]), the connection will still be established successfully. This is due to the features of the OS.
Make sure that the local network (or address on the network card) on the remote machine does not overlap with your organization's LAN. If it does, there will be no access to your organization's network (traffic through the routing table will go to the physical interface, not to the VPN). The address needs to be changed.
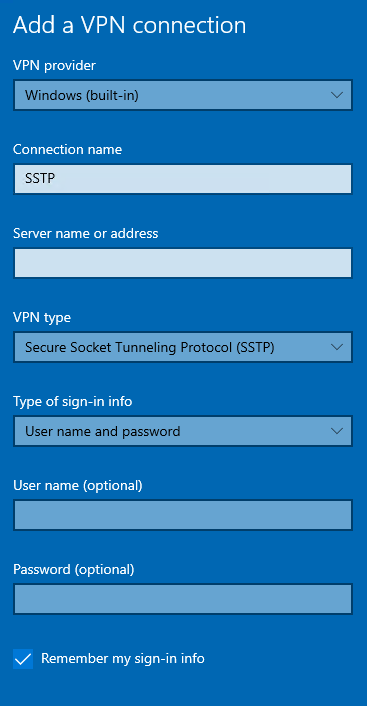
For SSTP
- Connection name - the name of the connection being created;
- Server name or address - VPN server address in the format VPN\_server\_address:port;
- VPN type - SSTP protocol;
- Login data type - Username and password;
- Username - the name of the user who is allowed to connect via VPN;
- Password - user password.
[](https://docs.safedns.com/uploads/images/gallery/2022-09/Mwe1LclYVeWG6Ou6-6-creating-a-vpn-connection-in-windows-10.png)
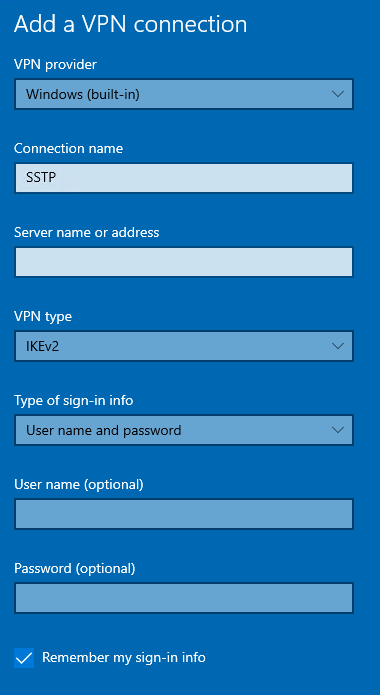
For IKEv2
- Connection name - the name of the connection being created;
- Server name or address - VPN server address;
- VPN type - IKEv2 protocol;
- Login data type - Username and password;
- Username - the name of the user who is allowed to connect via VPN;
- Password - user password.
[](https://docs.safedns.com/uploads/images/gallery/2022-09/5Cjv2XW1mDHGtCjE-7-creating-a-vpn-connection-in-windows-10.png)
When setting up a VPN connection from the Internet, you need to specify the following parameters in the VPN connection properties:
- Go to Adapter Options Settings;
- Right-click on the created connection and select Properties;
- Go to the Security tab and set:
- Data encryption - mandatory (disable if no encryption)
- Extensible Authentication Protocol (EAP) - Microsoft Secure Password (EAP MSCHAPV2)
If a VPN connection using IPsec protocols in Windows is automatically terminated after 7 hours and 45 minutes and a "Group policy mapping" error or error 13868 occurs when connecting via IKEv2.
To restore the connection, the following actions are suitable:
1\. Reconnect. In this case, the connection will be restored, but after 7 hours and 45 minutes, it will be automatically disconnected again. If you do not want the connection to be terminated automatically, follow the steps from the following paragraph.
2\. Make changes to the registry:
- Open the **Registry editor**.
- Follow the path `HKEY_LOCAL_MACHINE\SYSTEM\CurrentControlSet\Services\RasMan\Parameters`
- Right-click on the parameter **NegotiateDH2048\_AES256** and click **Change**.
- In the **Value** line, specify value 1: [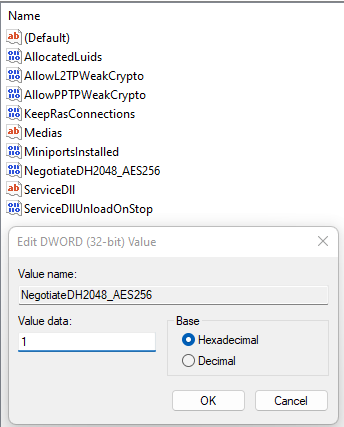](https://docs.safedns.com/uploads/images/gallery/2022-09/Su8brsrGBFFL76L0-10-creating-a-vpn-connection-in-windows-10.png)
- Click **OK**.
- Restart Windows.
If there is no parameter named **NegotiateDH2048\_AES256**, then create it. To do this:
- Right-click on the free registry space in **Parameters** and select **Create -> DWORD**
- Set the name **NegotiateDH2048\_AES256.**
- Right-click on the created file and select **Change**
- In the **Value** line, specify value 1
- Click **OK**.
3\. Restart Windows.
If you do not want Internet traffic to go to external resources through SafeUTM after connecting via VPN, then in the properties of the VPN connection Network / Internet Protocol TCP / IP version 4 / Advanced, uncheck Use the default gateway on the remote network. Next, to access computers behind SafeUTM, manually enter routes.
# Creating a VPN connection in Windows 7
Before configuring a VPN connection, in the user tree, open the card of the required user and set the **Allow remote access via VPN** flag. To do this, go to the **Users -> User & Group** section.
[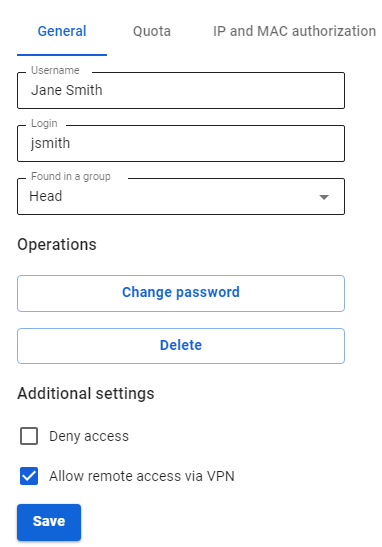](https://docs.safedns.com/uploads/images/gallery/2022-09/FY6K7TDIEPEpl9ir-1-creating-a-vpn-connection-in-windows-7.png)
---
#### Creating a VPN connection in Windows 7
L2TP IPsec clients behind the same NAT may experience connectivity issues if there is more than one. [**Instructions**](https://docs.microsoft.com/en-us/troubleshoot/windows-server/networking/configure-l2tp-ipsec-server-behind-nat-t-device) can help solve the problem. We recommend using IKEv2 IPSec instead of L2TP IPsec.
Before creating a VPN connection for SSTP, L2TP, and IKEv2 protocols, you must install the root certificate locally on the computer:
1\. Download the Let's Encrypt root certificate from [**https://letsencrypt.org/certs/isrgrootx1.pem**](https://letsencrypt.org/certs/isrgrootx1.pem);
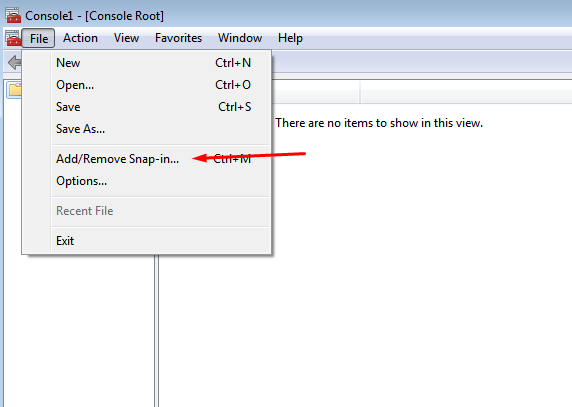
2\. Click **Start**, find and run mmc.exe;
3\. Click **File -> Add or Remove Snap-in**:
[](https://docs.safedns.com/uploads/images/gallery/2022-09/ij2ATLhVqbh9jN8T-2-creating-a-vpn-connection-in-windows-7.png)
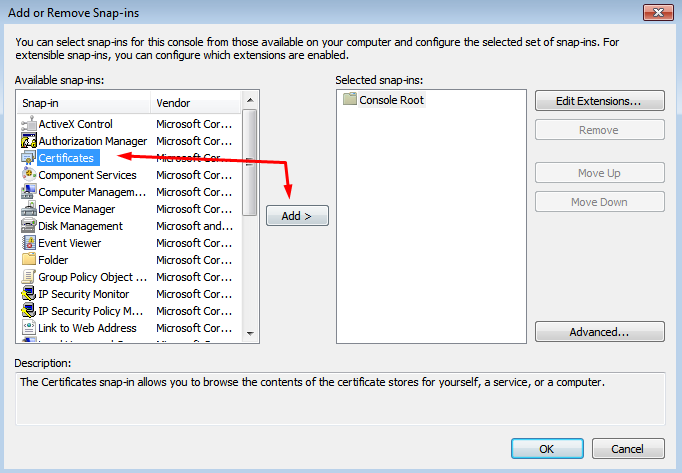
4\. Select **Certificates** and click **Add**:
[](https://docs.safedns.com/uploads/images/gallery/2022-09/Cc8RSBnFqR9MVAul-3-creating-a-vpn-connection-in-windows-7.png)
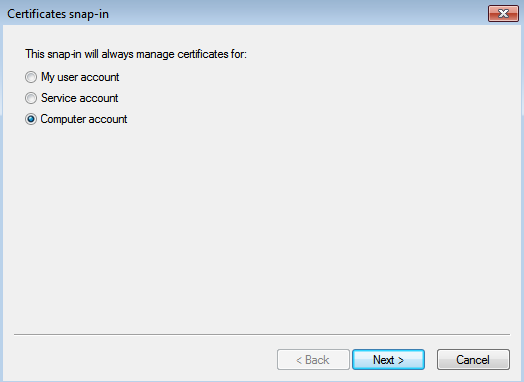
5\. Set the flag in the **computer account** line, click **Next -> Finish -> OK**:
[](https://docs.safedns.com/uploads/images/gallery/2022-09/yuweAc5Fvdmzvte6-4-creating-a-vpn-connection-in-windows-7.png)
6\. The **Certificates (local computer)** item will appear in the Console window:
- Select it and right-click on **Trusted Root Certification Authorities**;
- Next **All tasks -> Import**
- In the **Certificate Import Wizard** window, click **Next -> Browse -> Select the one you downloaded in step 1 -> Next -> Next -> Finish**.
##### Create a VPN connection
1\. Select **Network -> Network and Sharing Center**:
[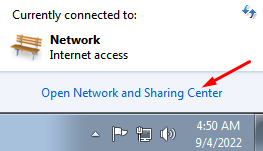](https://docs.safedns.com/uploads/images/gallery/2022-09/wXaZnPSs8QSVzDja-5-creating-a-vpn-connection-in-windows-7.png)
2\. Click **Set up a new connection or network**:
[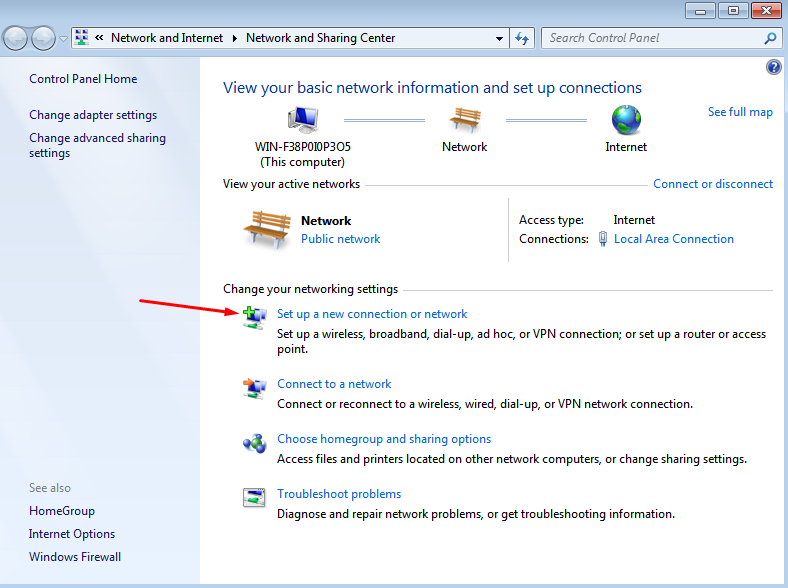](https://docs.safedns.com/uploads/images/gallery/2022-09/KNKhE5l8t6eNhlJd-6-creating-a-vpn-connection-in-windows-7.png)
3\. Select **Connect to a workplace** and **Next**:
[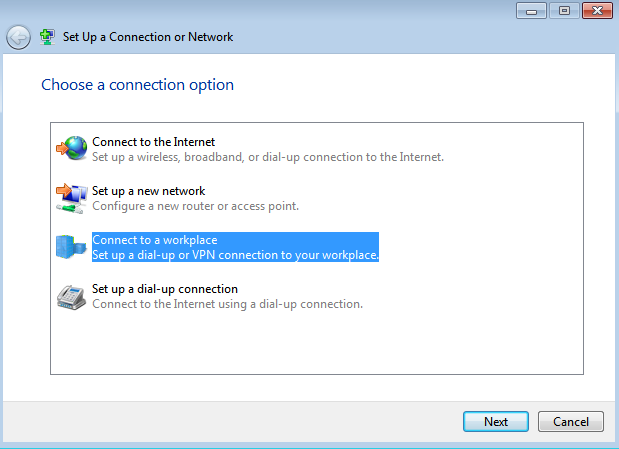](https://docs.safedns.com/uploads/images/gallery/2022-09/VAHLO0JUvZeXgkSX-7-creating-a-vpn-connection-in-windows-7.png)
4\. Click **Use my internet connection (VPN)** and fill in the following fields:
- **Internet address** - enter the name of the VPN server, for example, vpn.test.com
- **Destination name** - write an arbitrary name for the connection
Set the checkbox to **Do not connect now, only install to connect in the future
[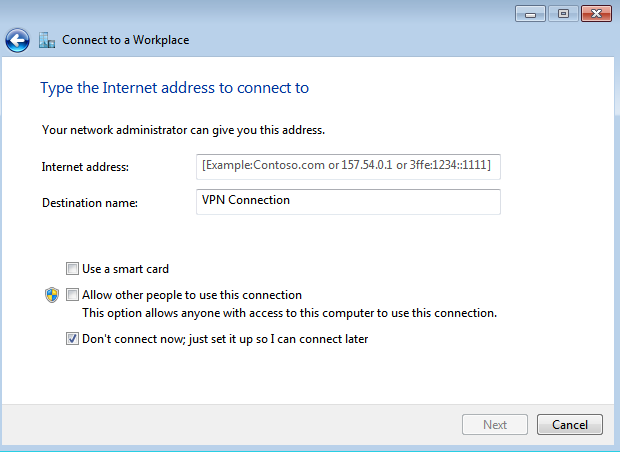](https://docs.safedns.com/uploads/images/gallery/2022-09/Ikpjeev7CWstuc6j-8-creating-a-vpn-connection-in-windows-7.png)**
5\. In the **Enter username and password** window, fill in the appropriate fields;
6\. Click **Create**, then **Close**;
7\. In the **Network and Sharing Center** window, select **Change adapter settings** in the upper left corner:
[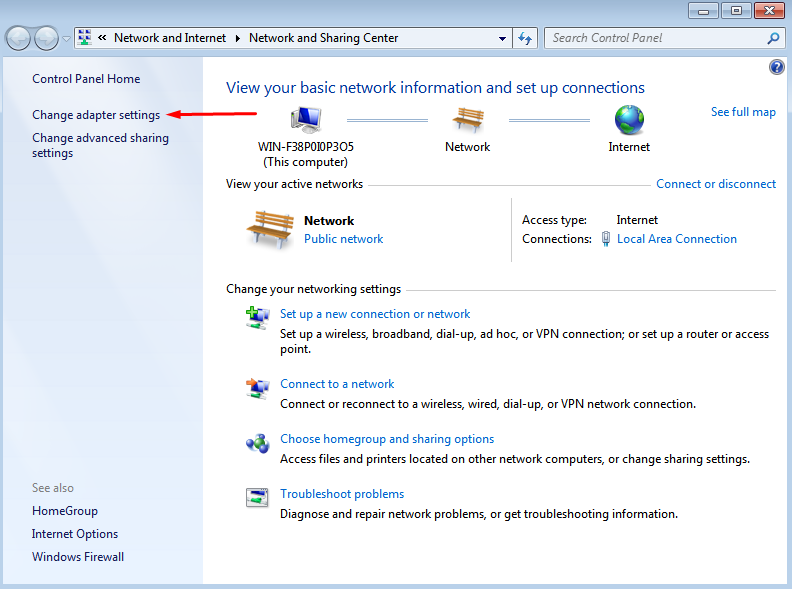](https://docs.safedns.com/uploads/images/gallery/2022-09/Z2yAr7WBWc1syxzf-9-creating-a-vpn-connection-in-windows-7.png)
8\. Right-click on the created connection, and select **Properties**:
[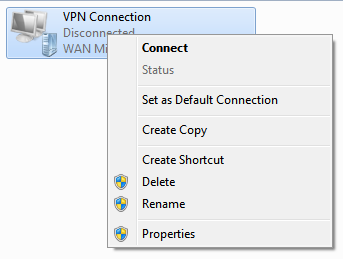](https://docs.safedns.com/uploads/images/gallery/2022-09/u9I6m1qU3ASsEILW-10-creating-a-vpn-connection-in-windows-7.png)
9\. In the window that opens, do the following:
- On the Network tab, uncheck all items except Internet Protocol Version 4
- On the Security tab:
- in the VPN type line, select the desired connection type
- in the Data encryption line, select mandatory (turn off if there is no encryption)
- in the Authentication line, select Allow the following protocols
- leave the flag only in the Microsoft CHAP protocol version 2 (MS-CHAP v2)
If necessary, fill in **Additional properties**
10\. Click **OK** and close the **Network and Sharing Center**;
11\. In the tray, click **Network**. A window will open with the created VPN connection;
12\. Right-click on the connection and select **Connect**.
---
#### VPN connection errors
If a VPN connection using IPsec protocols in Windows is automatically terminated after 7 hours and 45 minutes and a "Group policy mapping" error or error 13868 occurs when connecting via IKEv2.
To restore the connection, the following actions are suitable:
1\. Reconnect. In this case, the connection will be restored, but after 7 hours and 45 minutes, it will be automatically disconnected again. If you do not want the connection to be terminated automatically, follow the steps from the following paragraph.
2\. Make changes to the registry:
- Open the **Registry editor**.
- Follow the path `HKEY_LOCAL_MACHINE\SYSTEM\CurrentControlSet\Services\RasMan\Parameters`
- Right-click on the parameter **NegotiateDH2048\_AES256** and click **Change**.
- In the **Value** line, specify value 1: [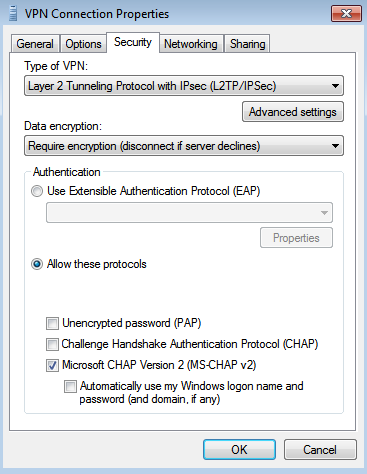](https://docs.safedns.com/uploads/images/gallery/2022-09/ejdltjDXEc2ljjuB-11-creating-a-vpn-connection-in-windows-7.png)
- Click **OK**.
- Restart Windows.
If there is no parameter named **NegotiateDH2048\_AES256**, then create it. To do this:
- Right-click on the free registry space in **Parameters** and select **Create -> DWORD**
- Set the name **NegotiateDH2048\_AES256.**
- Right-click on the created file and select **Change**
- In the **Value** line, specify value 1
- Click **OK**.
3\. Restart Windows.
If you do not want Internet traffic to go to external resources through SafeUTM after connecting via VPN, then in the properties of the VPN connection **Network / Internet Protocol TCP / IP version 4 / Advanced**, uncheck **Use the default gateway on the remote network**. Next, to access computers behind SafeUTM, manually enter routes.
# Instructions for Creating VPN Connection on Mobile Devices
Before configuring a VPN connection, in the user tree, open the card of the required user and set the **Allow remote access via VPN** flag. To do this, go to the **Users -> User & Group** section:
[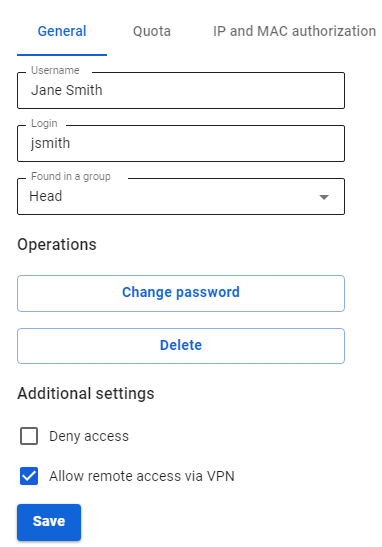](https://docs.safedns.com/uploads/images/gallery/2022-09/wrpo4a4WgzzWvDsB-1-instructions-for-creating-vpn-connection-on-mobile-devices.png)
---
Connecting via the StrongSwan app
1\. Click **Add a VPN profile**:
[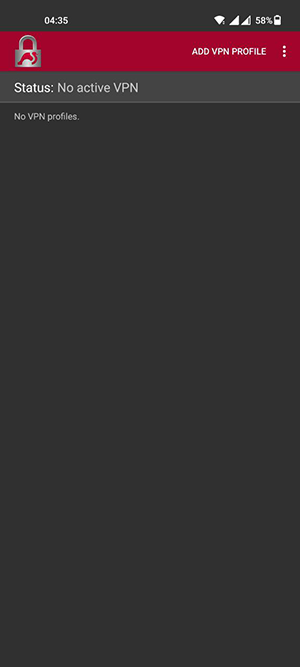](https://docs.safedns.com/uploads/images/gallery/2022-09/YbtgYQVs380VOJtj-2-instructions-for-creating-vpn-connection-on-mobile-devices.png)
2 . Fill in the fields:
- Server – the domain specified in SafeUTM in **Users -> VPN connections -> IKEv2/IPsec Connection**;
- VPN type – IKEv2 EAP (Login/Password).
- Login – the name of the user allowed to connect via VPN.
- Password – the user's password.
[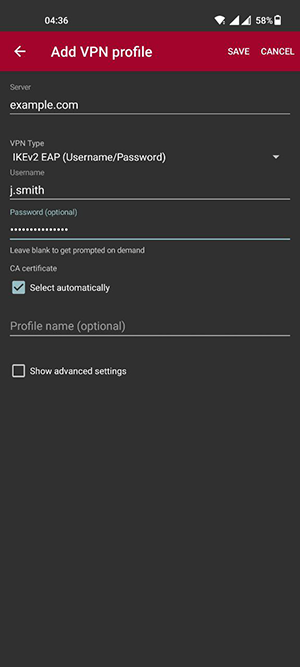](https://docs.safedns.com/uploads/images/gallery/2022-09/MCUDM3c1wjYUeq9G-3-instructions-for-creating-vpn-connection-on-mobile-devices.png)
3\. Click **Save** and then click on the created connection.
Connecting on Android
1\. Go to VPN in **Settings -> Connections -> Other settings.** If necessary, use the settings search bar.
2\. Select the connection type and fill in the following fields:
**For PPTP:**
- Name – connection name.
- Server address – the address of the VPN server.
- Username – the name of the user allowed to connect via VPN.
- Password – the user's password.
**For IKEv2/IPsec MSCHAPv2:**
- Name – connection name.
- Server address – the address of the VPN server.
- IPsec ID – user's login.
- Server Certificate – received from the server.
- IPsec CA Certificate – do not check the server.
- User name – the name of the user allowed to connect via VPN.
- Password – the user's password.
[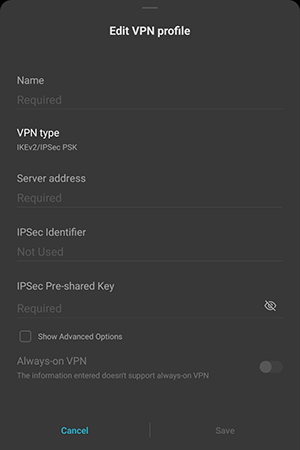](https://docs.safedns.com/uploads/images/gallery/2022-09/ptGDZ3vnRwi5vu3Y-4-instructions-for-creating-vpn-connection-on-mobile-devices.png)
**For L2TP/IPsec PSK:**
- Name – connection name.
- Server address – the address of the VPN server.
- IPsec shared key – the value of the **PSK** line in **Users -> VPN Connections -> L2TP/IPsec Connection**
4\. Click **Save** and activate the connection.
Connecting on iOS
1\. Go to **Settings -> General -> VPN:
[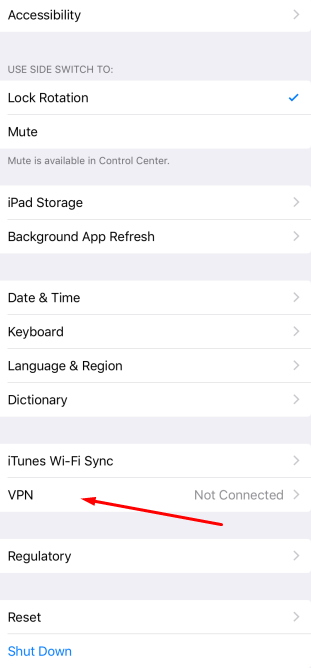](https://docs.safedns.com/uploads/images/gallery/2022-09/X2eNxerFgxMYSntH-5-instructions-for-creating-vpn-connection-on-mobile-devices-png.png)**
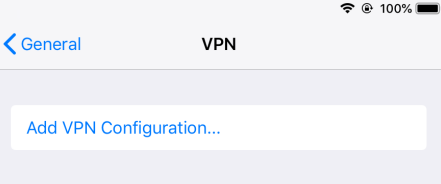
2\. Click **Add VPN configuration**:
[](https://docs.safedns.com/uploads/images/gallery/2022-09/KIjfdzVXdfJeTQkZ-6-instructions-for-creating-vpn-connection-on-mobile-devices-png.png)
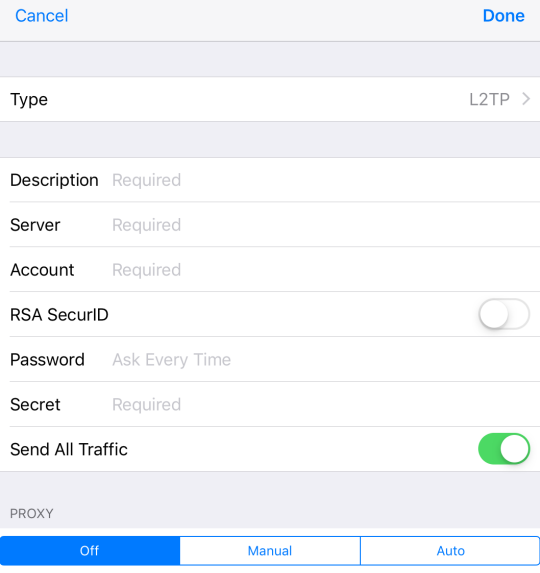
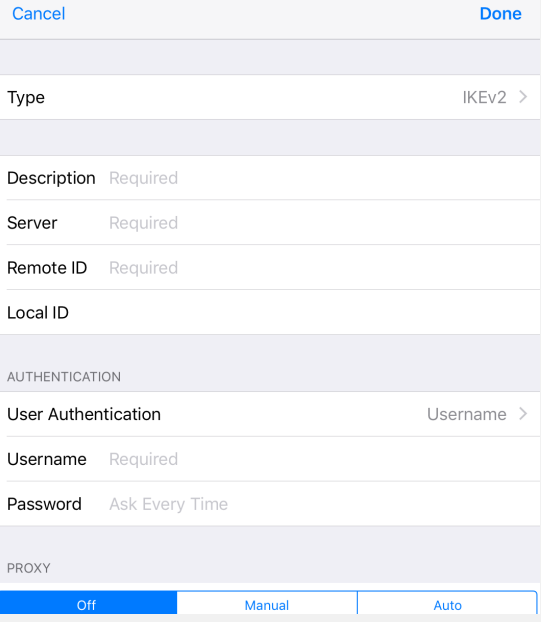
3\. Select **Type** and fill in the corresponding fields:
**For PPTP:** Starting with iOS 10, Apple has removed support for the PPTP protocol.
- Description – connection name.
- Server – VPN server address.
- Account – the name of the user allowed to connect via VPN.
- Password – the user's password
**For L2TP:**
- Description – connection name.
- Server – VPN server address.
- Account – the name of the user allowed to connect via VPN.
- Password – the user's password.
- The shared key – the value of the **PSK** line in **Users -> VPN connections -> L2TP/IPsec Connection**.
[](https://docs.safedns.com/uploads/images/gallery/2022-09/wsSwFKCIy5DVnk2x-7-instructions-for-creating-vpn-connection-on-mobile-devices-png.png)
**For IKEv2:**
- Description – connection name.
- Server – VPN server address.
- Remote ID – VPN server address.
- User name – the name of the user allowed to connect via VPN.
- Password – the user's password.
[](https://docs.safedns.com/uploads/images/gallery/2022-09/kT3i2EAzPC33fCLb-8-instructions-for-creating-vpn-connection-on-mobile-devices-png.png)
4\. Click **Done**.
5\. To connect, slide the **Status** switch to the right.
PPPoE Protocol
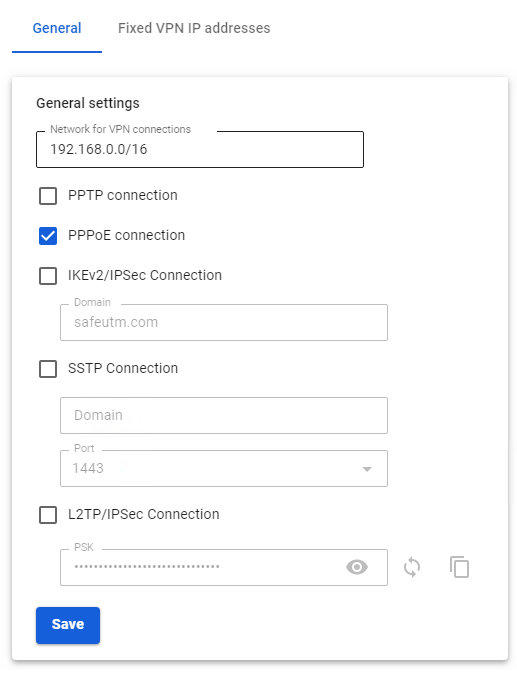
To configure SafeUTM, go to **Users -> VPN connections** and check the box **PPPoE Connection**:
[](https://docs.safedns.com/uploads/images/gallery/2022-09/agmS3WoA7R9zFPcd-2-instructions-for-creating-a-connection-in-mac-os.png)
**Creating a connection in Mac OS**
1\. Go to **System Preferences -> Network.** 2. Click **Add** in the lower left corner (icon +).
3\. In the window that appears, fill in:
- **Interface** – PPPoE
- **Ethernet** – for example, Wi-Fi.
- **Service name** – connection name.
[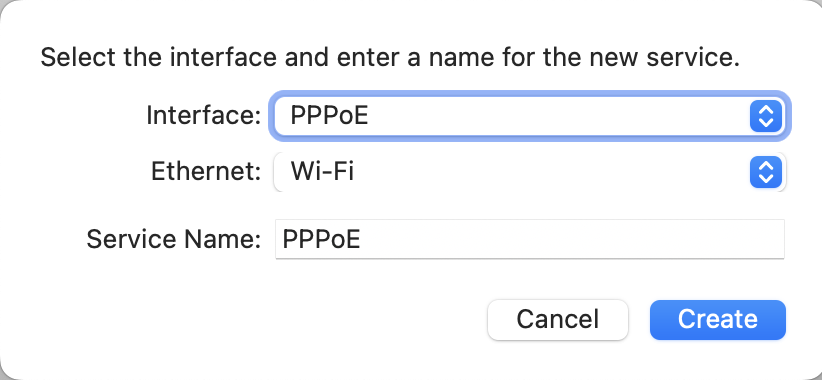](https://docs.safedns.com/uploads/images/gallery/2022-09/X5cQnygWyazt90Us-3-instructions-for-creating-a-connection-in-mac-os.png)
4\. Click **Create** and fill in:
- **PPPoE service name –** the name of the service.
- **Account name –**
- **Password** **–** the user's password.
[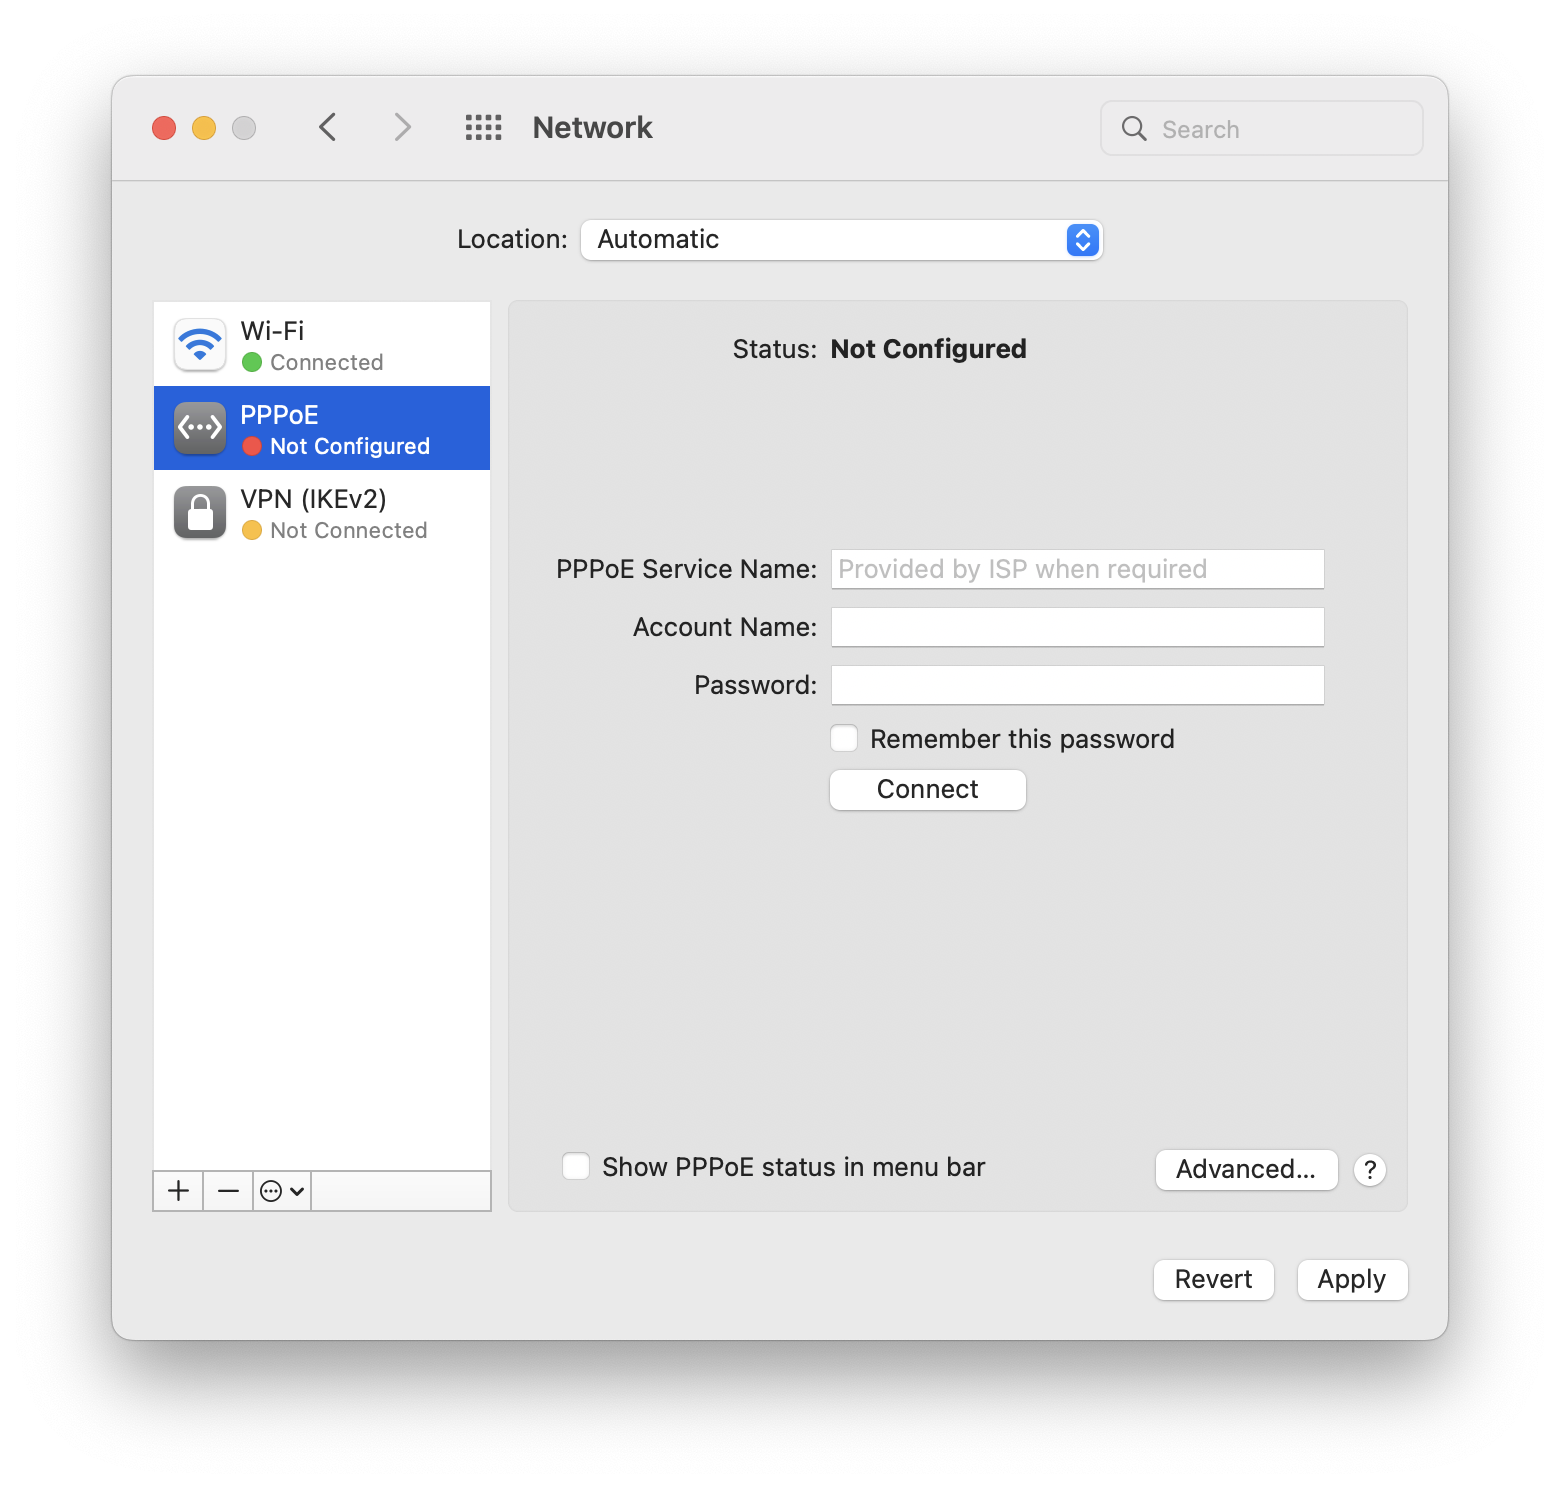](https://docs.safedns.com/uploads/images/gallery/2022-09/oBAMsKo1opQbKTDs-4-instructions-for-creating-a-connection-in-mac-os.png)
5\. Click **Connect**.
IKEv2/IPsec Protocol
Configure SafeUTM:
1\. Go to **Users -> VPN connections**.
2\. Check the box **IKEv2/IPsec** **Connection** and fill in the **Domain** fields:
[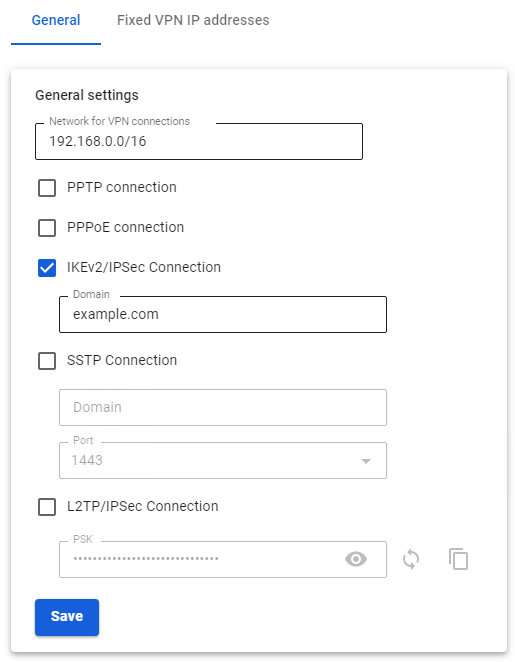](https://docs.safedns.com/uploads/images/gallery/2022-09/BZoHz8HxnhJExEgi-5-instructions-for-creating-vpn-connection-in-ubuntu.png)
**Creating a connection in Mac OS**
1\. Go to **System Preferences -> Network:** 2. Click **Add** in the lower left corner (icon +).
3\. In the window that appears, fill in the fields:
- **Interface** – VPN
- **VPN type** – IKEv2
- **Service name** – connection name.
[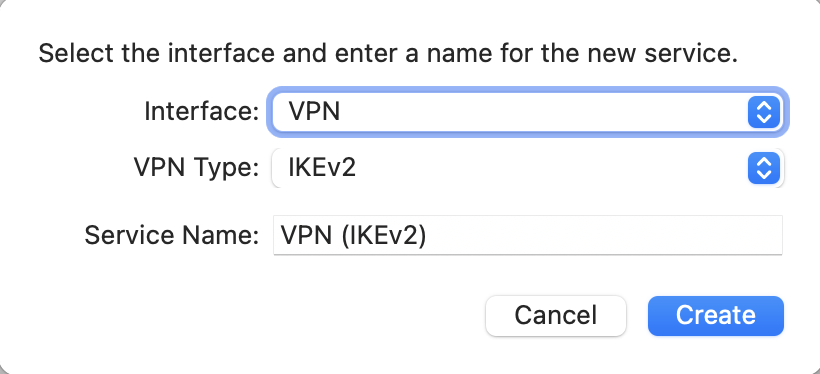](https://docs.safedns.com/uploads/images/gallery/2022-09/4TUsOixIB3hYKBxt-6-instructions-for-creating-a-connection-in-mac-os.png)
4\. Click **Create**.
5\. Configure the connection parameters:
- **Server address –** the address of the VPN server.
- **Remote ID –** duplicate the address of the VPN server.
[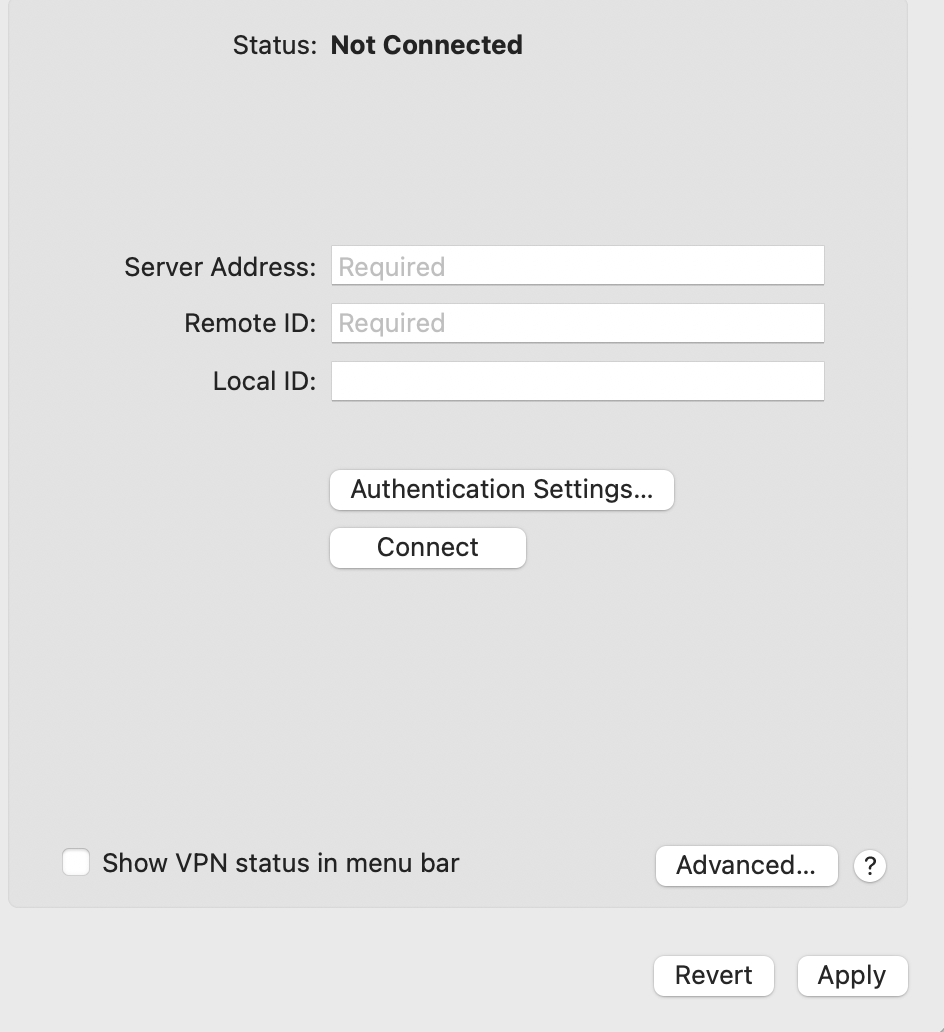](https://docs.safedns.com/uploads/images/gallery/2022-09/SHbY5FVhkLzZADJ9-7-instructions-for-creating-a-connection-in-mac-os.png)
6\. Select **Authentication settings.** 7. Enter the identification data and click **OK**:
- **Username** **–** the name of the user allowed to connect via VPN.
- **Password** **–** the user's password.
[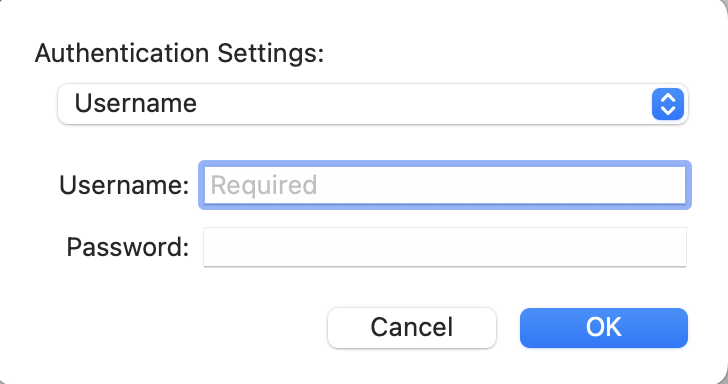](https://docs.safedns.com/uploads/images/gallery/2022-09/N9s2w8pE0K90Ia0K-8-instructions-for-creating-a-connection-in-mac-os.png)
8\. Click **OK**.
9\. Check the box **Show VPN status in the menu bar** and click **Apply**.
L2TP/IPsec Protocol
**Important**: L2TP IPsec clients behind the same NAT may experience connectivity issues if there is more than one. We recommend using IKEv2 IPSec instead of L2TP IPsec.
Before creating a connection, configure SafeUTM:
1\. Go to **Users -> VPN connections**.
2\. Check **L2TP/IPsec Connection** and copy the **PSK** key:
[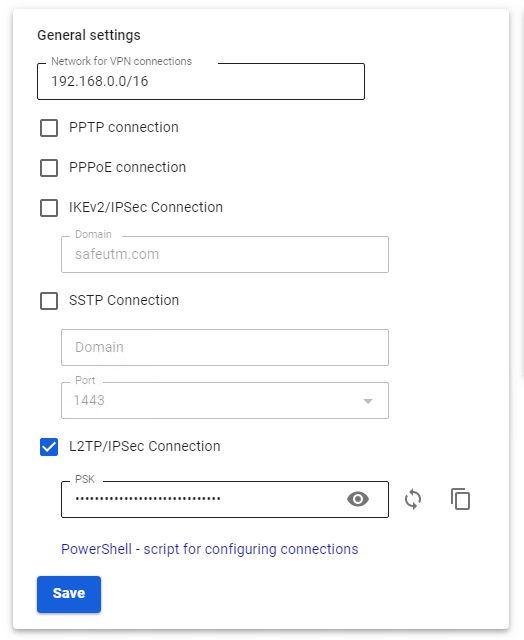](https://docs.safedns.com/uploads/images/gallery/2022-09/a5YZIoFlMP39D0f4-9-instructions-for-creating-vpn-connection-in-ubuntu.png)
**Creating a connection in Mac OS**
1\. Go to **System Preferences -> Network:
[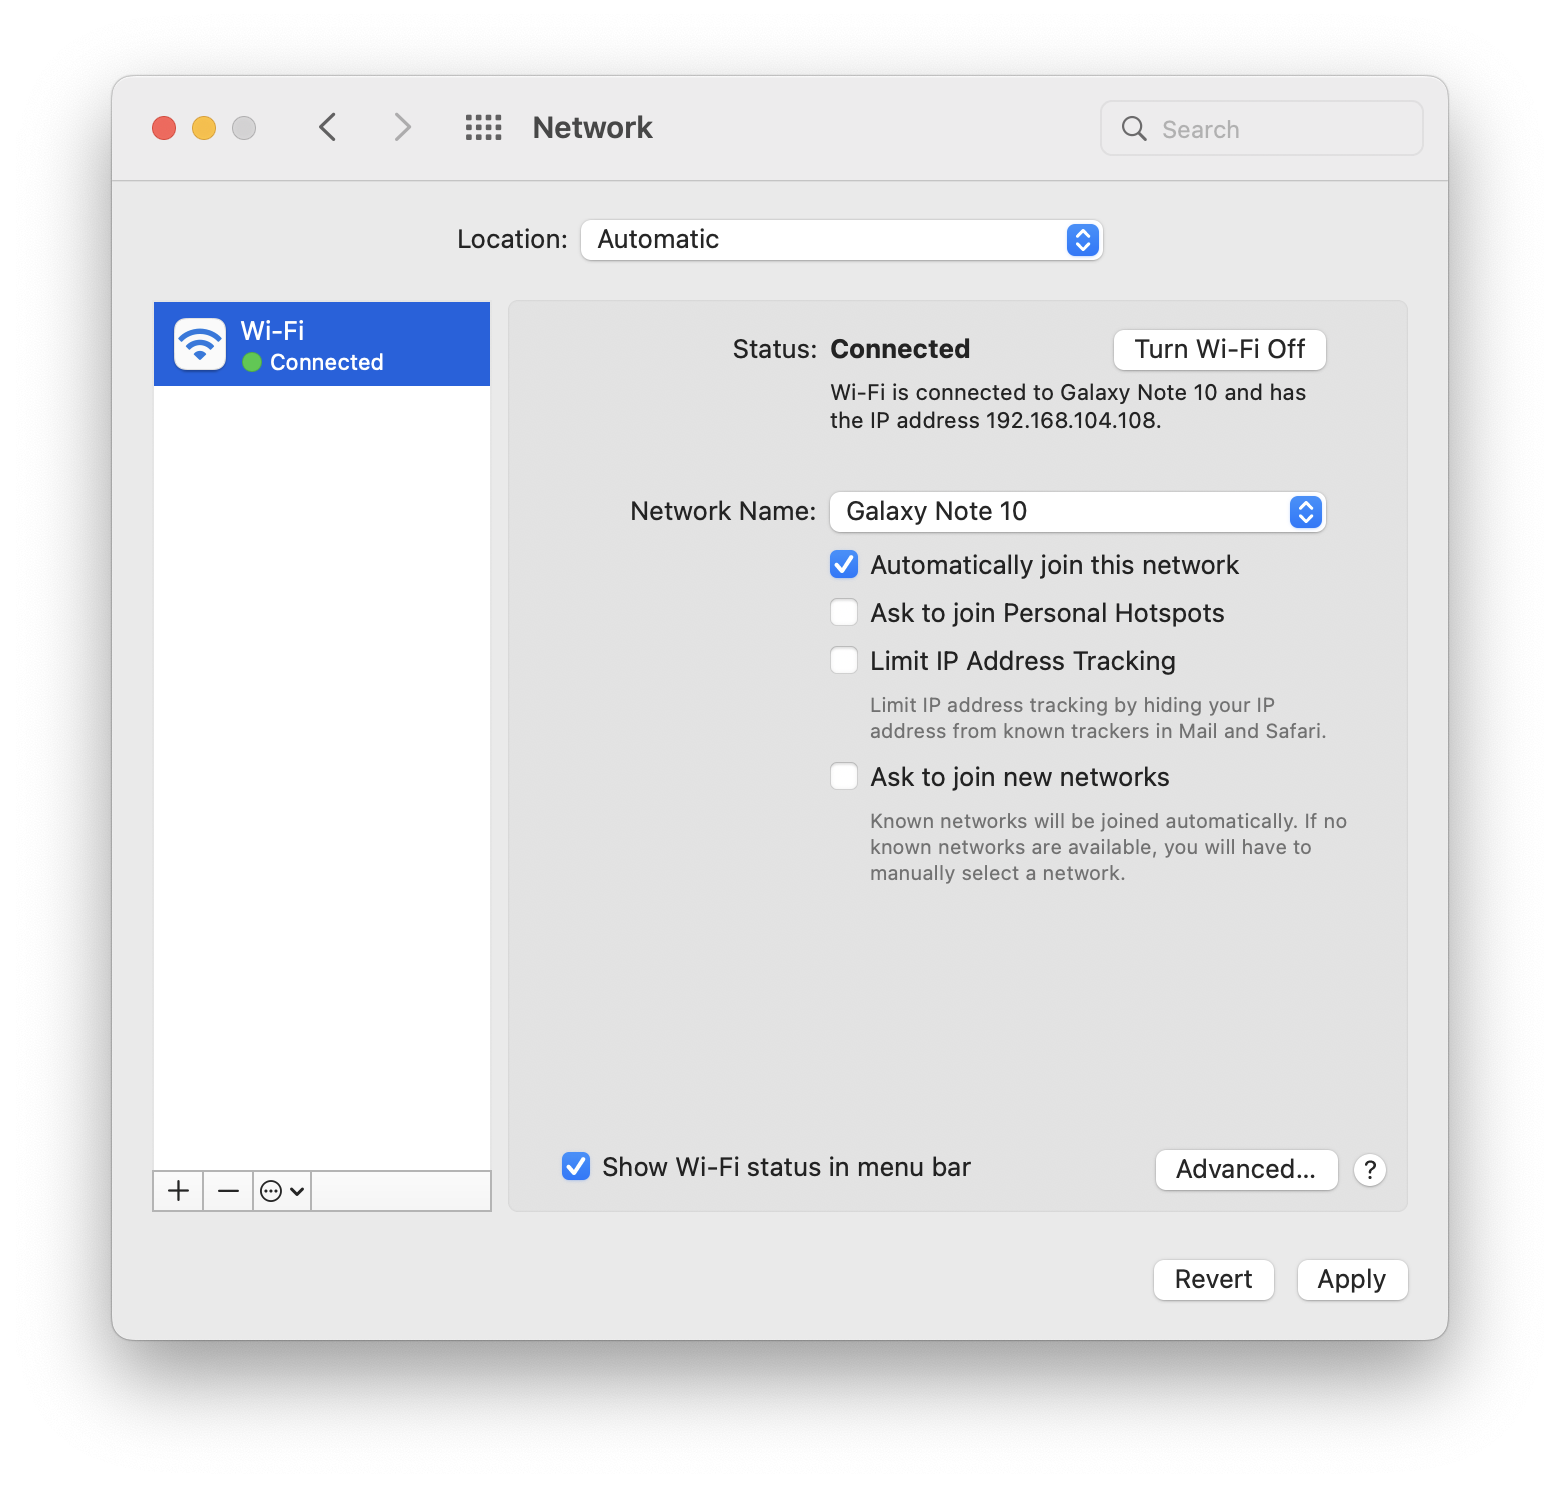](https://docs.safedns.com/uploads/images/gallery/2022-09/5xkPugFGcYLAY6us-10-instructions-for-creating-a-connection-in-mac-os.png)** 2. Click **Add** in the lower left corner (icon +).
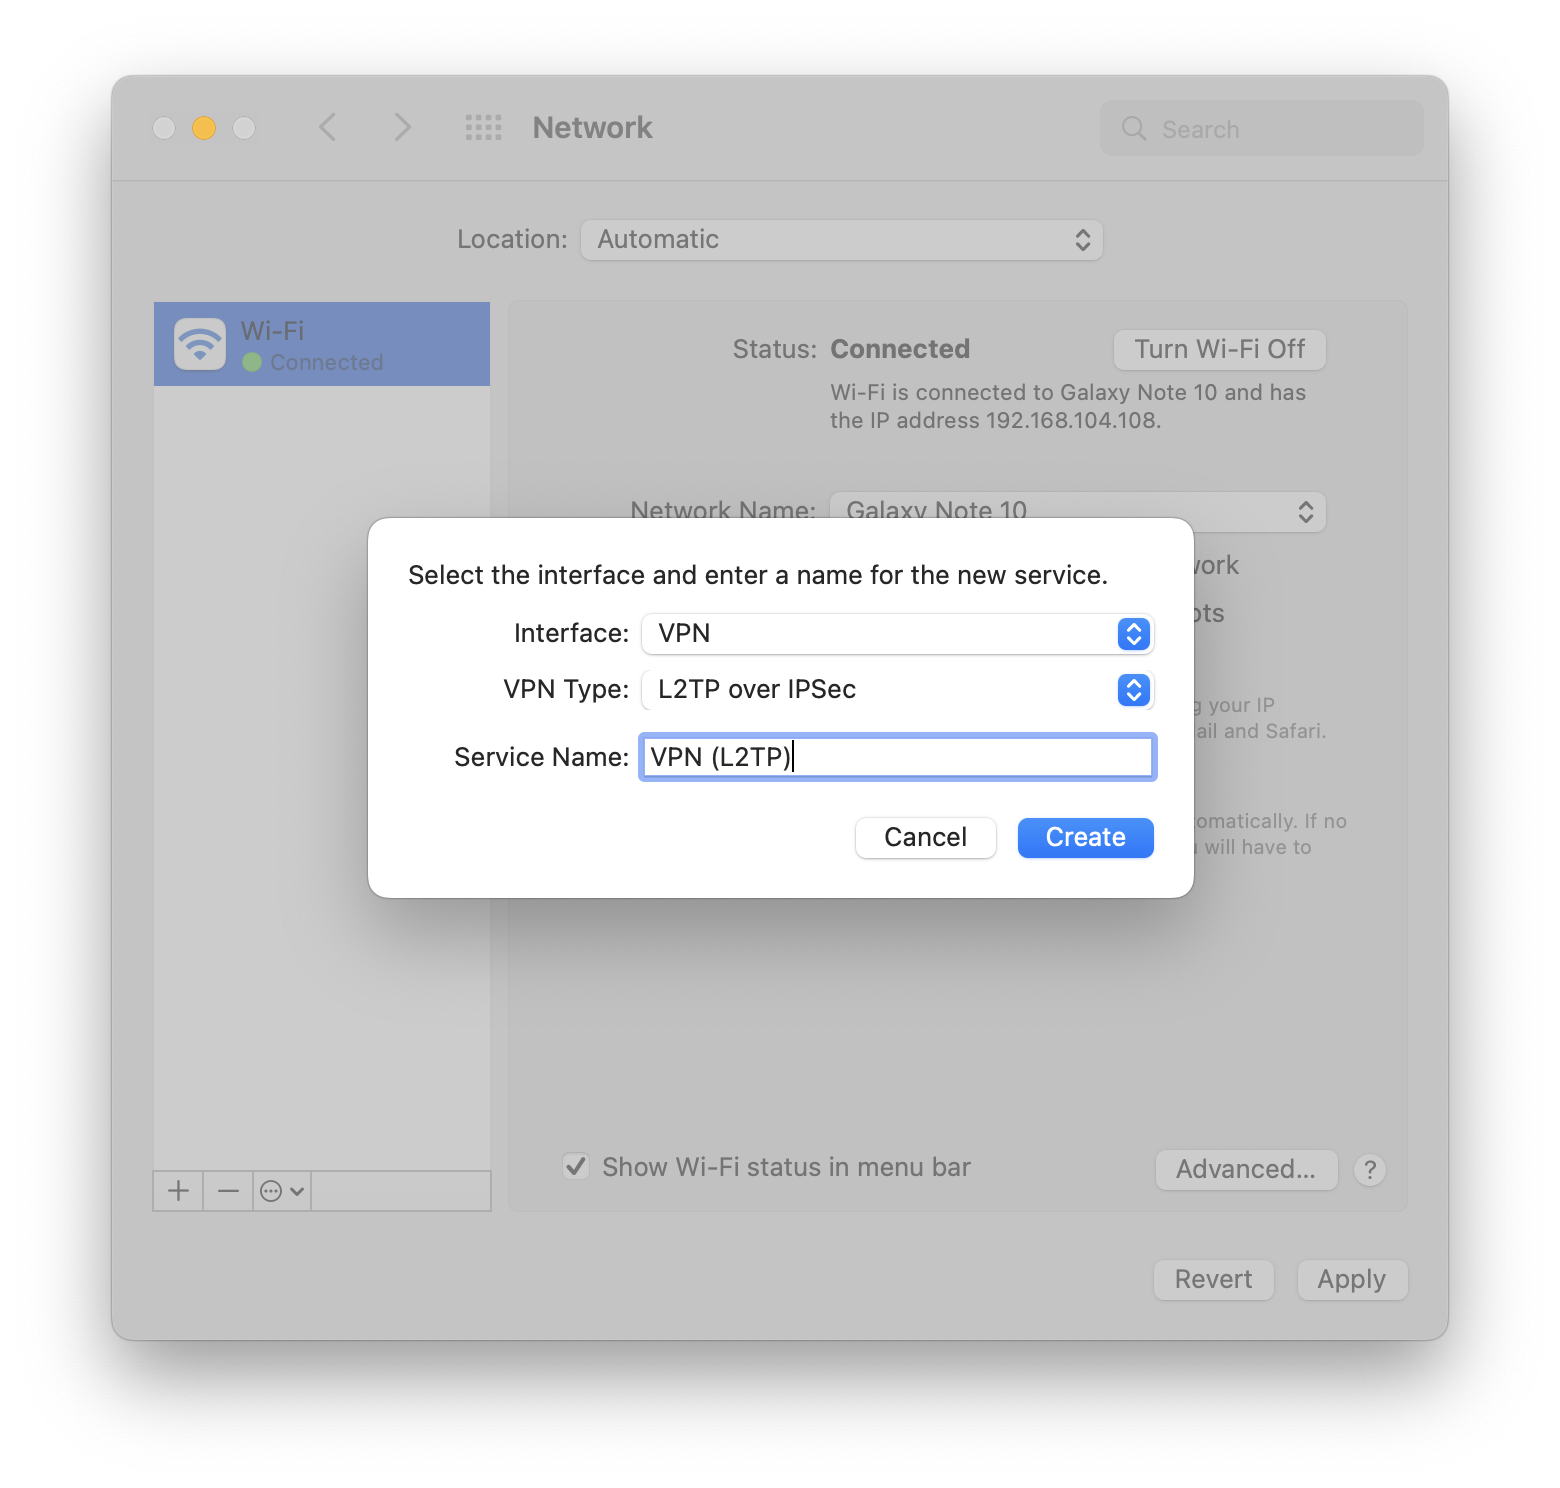
3\. In the window that appears, fill in:
- **Interface –**
- **VPN type** **–** L2TP via IPsec.
- **Service name** **–** connection name.
[](https://docs.safedns.com/uploads/images/gallery/2022-09/dP9nQvEQRV1F4F4y-11-instructions-for-creating-a-connection-in-mac-os.png)
4\. Click **Create**.
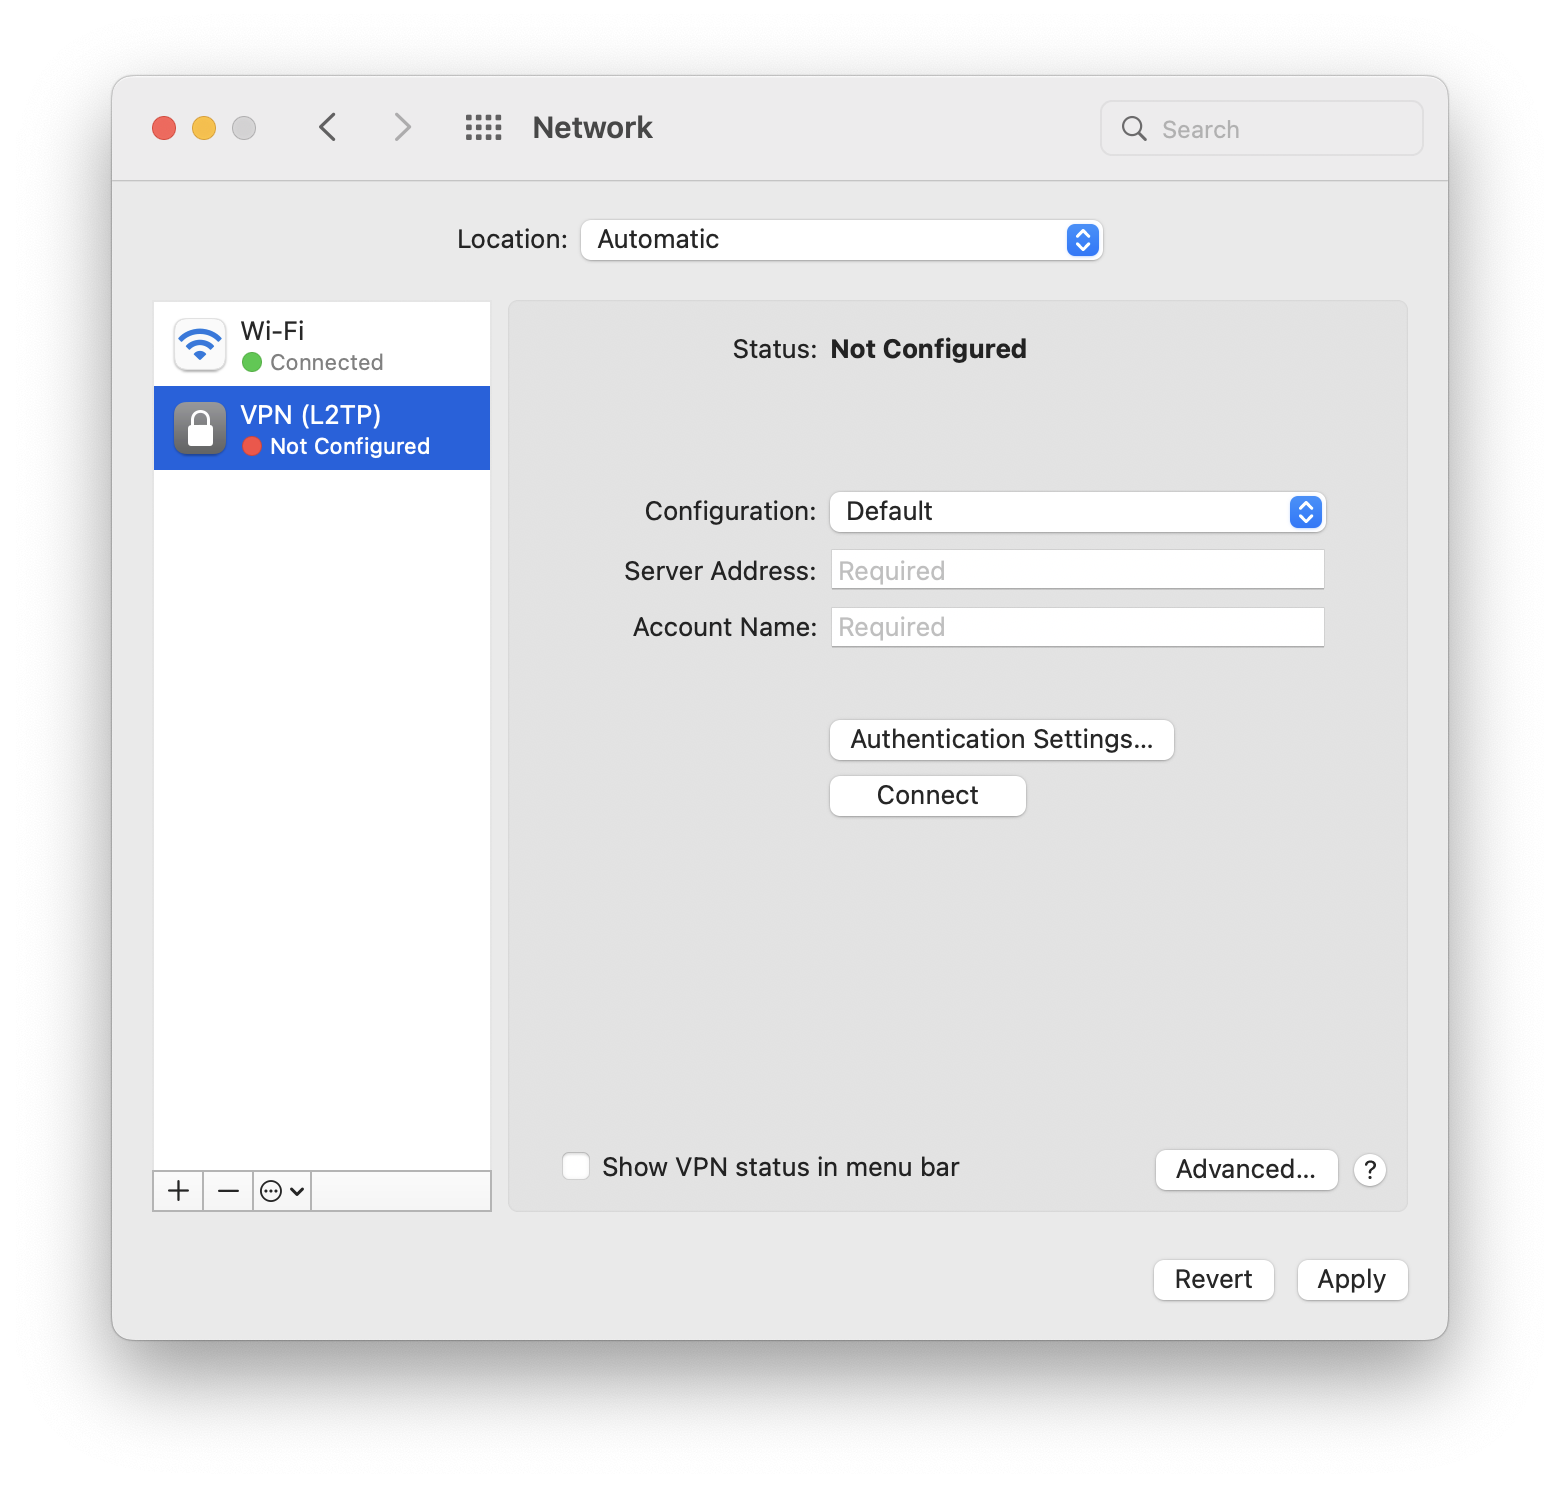
5\. Fill in the **Server address** and **Account name:
[](https://docs.safedns.com/uploads/images/gallery/2022-09/6XD7BXkEqVB1Gr7M-12-instructions-for-creating-a-connection-in-mac-os.png)**
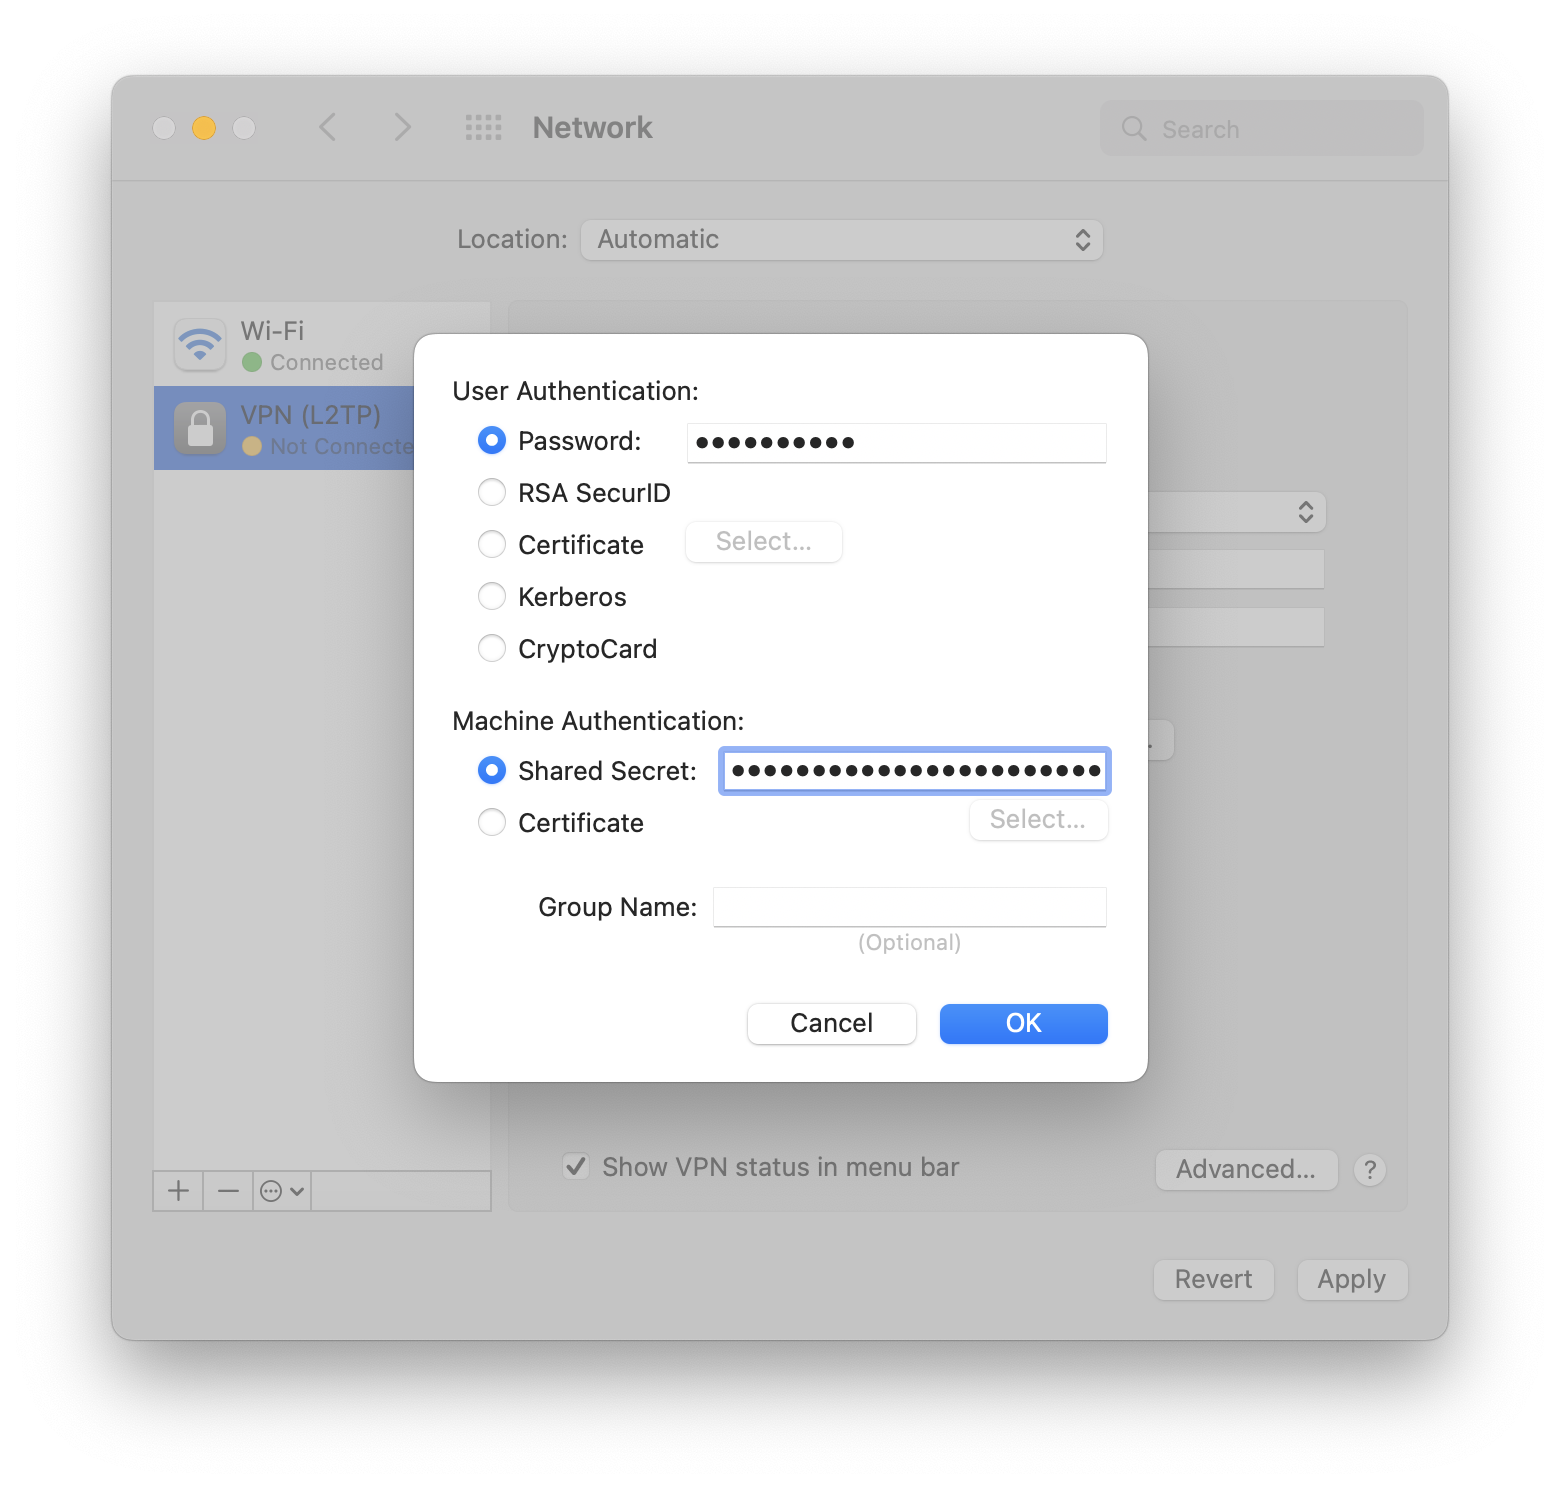
6\. Check the box **Show VPN status in the menu bar** and select **Authentication settings.** 7. In **User authentication** fill in **Password** and in **Computer Authentication** fill in **Shared Key (Shared Secret).
[](https://docs.safedns.com/uploads/images/gallery/2022-09/aDX4f7xXs061mGrc-13-instructions-for-creating-a-connection-in-mac-os.png)**
8\. Click **OK -> Apply**.
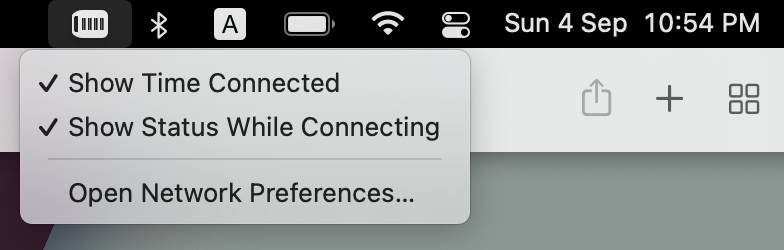
Turn on the VPN connection:
- In the upper-left part of the screen, click on the VPN connection.
- Select *Connect (service name specified in step 3)*:
[](https://docs.safedns.com/uploads/images/gallery/2022-09/LLe0ZKhbQhxaEq3y-14-instructions-for-creating-a-connection-in-mac-os.png)
Always avoid specifying the 0.0.0.0/0 network in routes.
---
#### Settings on Client Machines
Hosts of the networks that the UTM now serves (`10.80.1.0/24` and `10.90.1.0/24`) are physically included in one ethernet segment. The gateway and DNS server for the hosts of these networks is the address corresponding to the network on the local UTM interface. For example, for a host with the address `10.80.1.10`, the gateway and DNS will be `10.80.1.1`, and for a host with the address `10.90.1.15`, the gateway and DNS will be `10.90.1.1` .
# What to Do if Your IP is Blacklisted by DNSBL
---
If you are using a public static IP address, then an IP address being in the blacklists may mean that bot activity, participation in DDoS attacks, or spam mailing has been recorded in your network.
The presence of a dynamic IP address from the "home" IP address ranges of providers in blacklists is generally normal, because malicious activity in this case may not be coming from your network.
---
#### Steps to Follow When on Blacklist
1. Find out the reason for getting into the DNSBL list. Often the service names a specific virus or network worm and its features - the ports used, and protocols. Follow the service recommendations.
2. Activate the intrusion prevention system on your gateway. Analyze the logs and the presence of requests to the botnet command centers.
3. Check all computers in your network with an antivirus. Make sure that the antivirus protection is activated, the databases are updated (as a rule, viruses interfere with updating databases or the work of antivirus software).
4. After treating infected computers, send a message to the DNSBL service with a request to exclude your IP from the blacklist.
---
#### SafeUTM
Our solution has all the functionality that provides maximum protection from spam bots, and botnet clients, and the prevention of viral activity in your network.
A 40-day trial version is available for up to 10,000 users.
[**Get SafeUTM**](https://www.promo.safedns.com/safeutm)
# How to Restore Access to SafeUTM
If you lose the Administrator’s password, you can reset it if you have physical access to the server.
---
To do this, follow these steps:
1. Reboot the server. When the GRUB bootloader menu appears with the choice of the Linux kernel to boot the system, press **E** on the keyboard. [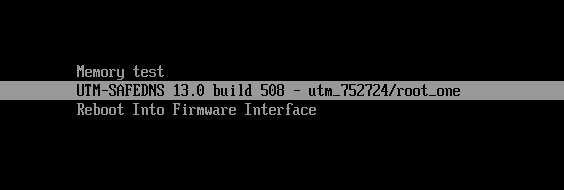](https://docs.safedns.com/uploads/images/gallery/2022-08/G0PoD1xJES8klpa6-1-how-to-restore-access-to-safeutm.png)
2. The kernel parameters window opens with the possibility of editing. Add the text p=1 as in the screenshot below: [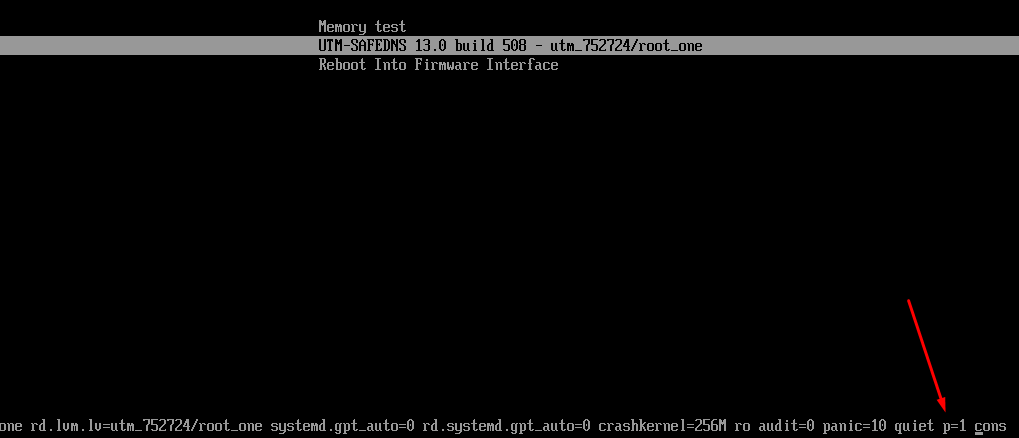](https://docs.safedns.com/uploads/images/gallery/2022-08/XNsb3k3KFPZYGccg-2-how-to-restore-access-to-safeutm.png)
3. Press the **Enter**.
4. After reloading the system again, a window for creating an administrator’s account will appear. Set a new administrator’s username and password. [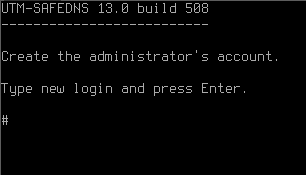](https://docs.safedns.com/uploads/images/gallery/2022-08/QY0SseJrS6wzmuT3-3-how-to-restore-access-to-safeutm.png)
Requirements for creating an administrator’s password:
- The minimum password length is 12 characters.
- Lowercase and uppercase Latin characters.
- Digits
- Special characters (! # $ % & ' \* +, etc.).
If the password does not meet the requirements of the security policy, an error window will open. You need to click "OK" and enter a new password, taking into account the requirements for creating passwords.
[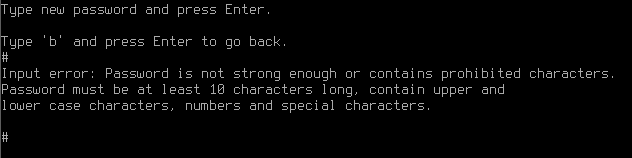](https://docs.safedns.com/uploads/images/gallery/2022-08/iSTDT7N59PrCXx5b-4-how-to-restore-access-to-safeutm.png)
If, when creating a new administrator’s username, it matches the previous one, an error window will open. Create a different administrator’s username.
[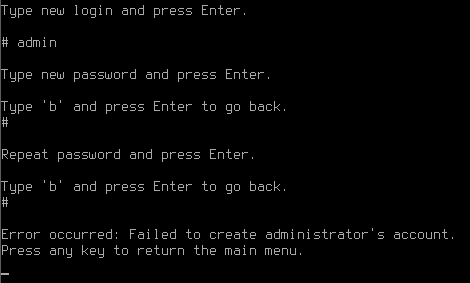](https://docs.safedns.com/uploads/images/gallery/2022-08/lwuoV3UW5jKFYVGV-5-how-to-restore-access-to-safeutm.png)
# How to Restore to Previous Version after Updating SafeUTM
---
We recommend using this feature if SafeUTM does not work correctly after an update.
It is possible to restore to the previous version after updating SafeUTM from version 13.0.
When updating UTM to version 13.0 and higher, all the information of the version you are updating from will be saved on the UTM disk. To restore, follow these steps:
1\. Go to SafeUTM local menu.
2\. Enter the administrator’s username and password.
3\. Enter **15** and press **Enter**:
[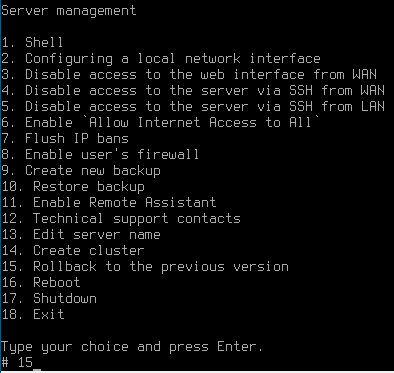](https://docs.safedns.com/uploads/images/gallery/2022-09/LzQpiJCrQ64eJeo4-1-how-to-restore-to-previous-version-after-updating-safeutm.png)
A window will appear with a warning and a description of the version to which it will restore.
4\. Confirm your choice by typing **y** and pressing **Enter.** 5. After rebooting, SafeUTM will restore to the previous version.
The previous version will be restored with the settings and logs that were in SafeUTM at the time of the update.
When restoring the previous version, settings and logs from the updated version are not transferred to the previous version.
# Choosing Hardware Platform for SafeUTM
---
#### Information about Software Platform
SafeUTM is a Linux operating system installed on a server or virtual machine. SafeUTM is based on Fedora 31 and contains a Linux kernel with a set of drivers from this OS with minor changes on our part. Thus, SafeUTM supports most of the hardware supported by Fedora 31.
---
#### General Recommendations for Chipsets and Manufacturers
**Having worked for years with client servers, we can identify several patterns:**
- Chipsets and controllers from Intel and Broadcom have proven themselves better than others, especially network cards and logic sets used in motherboards.
- It is not recommended to use embedded network cards, especially interfaces on cheap/rare/outdated/no-name chipsets. UTM works with the network, and often cheap network adapters for desktops cannot cope with the gateway tasks. Intel is also the quality leader here.
- We do not recommend using RAID controllers in the network gateway operation. Software and semi-hardware RAID controllers built into motherboards are not officially supported by our product.
- Both server and desktop motherboards can be used. It is preferable to use Intel processors.
- Low-cost, energy-efficient platforms for desktops and semi-thin clients based on Intel Atom are not suitable for SafeUTM and do not meet the minimum **[system requirements](https://docs.safedns.com/books/3-installation/page/installation-process)** for the product.
---
#### Hardware Platform Power Selection
The number of GHz of the processor and the amount of RAM of the server strongly depend on the load imposed on SafeUTM. When calculating the load, it is necessary to consider three factors:
- The number of simultaneously authorized UTM users.
- The UTM components involved (proxy with its services, checking traffic for spam/viruses, the extensiveness of the configuration of the content filtering module or firewall).
- Intrusion prevention system – when connected via a high-speed connection to a provider, this service may require significant processor and memory resources. It is recommended to use multi-core processors (4 or more cores with a frequency of more than 3 GHz) and at least 8 GB of RAM.
The minimum [**system requirements**](https://docs.safedns.com/books/3-installation/page/installation-process) satisfy the low involvement of UTM services serving a small number of authorized users. With a larger number of users (50 and more) and services served on SafeUTM, pay attention to the recommended and maximum system requirements of the server.
---
#### Disk Subsystem
RAID arrays are not required for typical UTM usage schemes. One modern 200 GB SATA hard drive is sufficient in most configurations. In the case of a heavily used mail server on SafeUTM, we recommend connecting a separate hard drive to store mail correspondence. We recommend using Western Digital brand devices. We do not recommend using disk devices of the Green or Eco series, since their speed and energy indications are artificially understated and they are not suitable for use on servers. Using SSD drives is also possible and recommended. We recommend using Micron brand devices.
# Support of Outdated Encryption Algorithms
SafeUTM is based on Fedora operating system. In Fedora 33, which was used in the previous SafeUTM version, the current system-wide encryption policy has been updated to further disable outdated cryptographic protocols (TLS 1.0 and TLS 1.1), weak Diffie-Hellman key exchange sizes (1024 bits), and the use of SHA-1 hash in signatures. You can read more about changes in the algorithm policy in the [**article**](https://fedoraproject.org/wiki/Changes/StrongCryptoSettings2#Detailed_Description).
Outdated algorithms, like (cryptographic) hashing and encryption, usually have a lifetime after which they are considered either too risky or even unsafe to use.
You may have problems related to HTTPS, for example, when running OWA (web interface for accessing Microsoft Exchange). If you encounter this, follow these steps to switch to the encryption policy levels compatibility mode:
1. Log in to the SafeUTM console. This can be done from the local menu, SSH, or SafeUTM web interface.
2. Enter `update-crypto-policies --set DEFAULT:FEDORA32` the command in the terminal.
3. Reboot SafeUTM.
We strongly do not recommend using this setting, since after the next update of SafeUTM compatibility mode settings will be reset. And in newer versions, this feature will be disabled.
# Configuring Proxifier for Direct Connections to Proxy Server
---
When using direct connections to a proxy server, access to the Internet will be supported by all programs that have proxy server settings, or by programs that use proxy system settings (from Internet Explorer).
However, some software does not have proxy server settings, which is why it is necessary to use specialized software on end workstations to output such programs to the Internet.
The most popular program for configuring a proxy server is Proxifier. You can download it from the **[developer's website](http://www.proxifier.com/)**.
---
#### Setup
Perform standard browser settings for direct connections to the proxy server, and then configure the program to redirect the rest of the traffic to the proxy server.
In the proxy server settings in Proxifier, enter the IP address of the local SafeUTM interface and the port specified in the proxy settings for direct connections (see the [**proxy server**](https://docs.safedns.com/books/45-setup-services/page/proxy) documentation). Protocol type: HTTPS. Authorization settings are optional.
[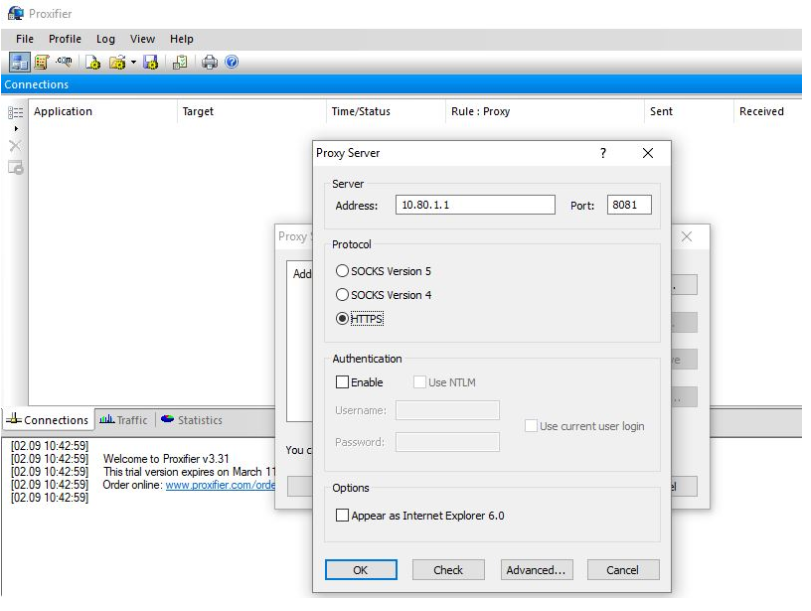](https://docs.safedns.com/uploads/images/gallery/2022-08/RGxjka21lFRTcHvZ-image-1661639814075.png)
After adding a proxy server, answer yes to questions about creating rules for redirecting traffic to it.
You can also edit these settings later:
[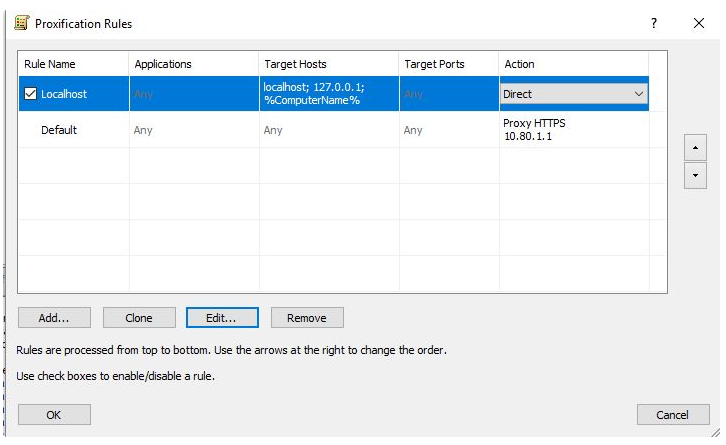](https://docs.safedns.com/uploads/images/gallery/2022-08/RXtspXuPxRE60Zet-image-1661639836174.png)
The setup is finished, and the programs will access the Internet through the specified proxy server.
# Blocking Popular Resources
---
#### Blocking Remote Access Programs
##### TeamViewer
TeamViewer can be blocked using the [**Application control**](https://docs.safedns.com/books/44-setup-traffic-rules/page/application-control) module. To do this, select the protocol of the same name in the rule for users or groups.
[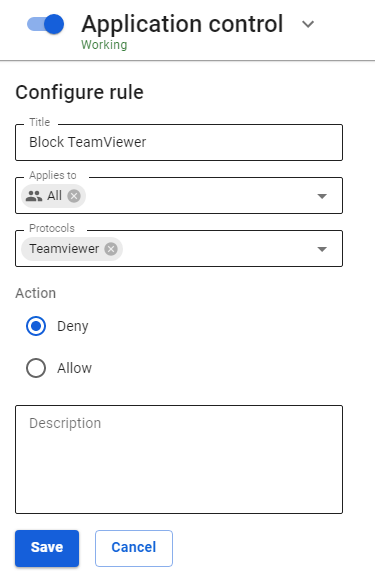](https://docs.safedns.com/uploads/images/gallery/2022-09/iJ3QM0ao7tMZEnUa-1-blocking-popular-resources.png)
---
#### Blocking Anonymizers
You can block anonymizers in **Traffic rules** in three ways:
1. Anonymizers working over HTTP(S) can be blocked using the **[Content Filter](https://docs.safedns.com/books/44-setup-traffic-rules/page/content-filter)** module (**Anonymizers** category). [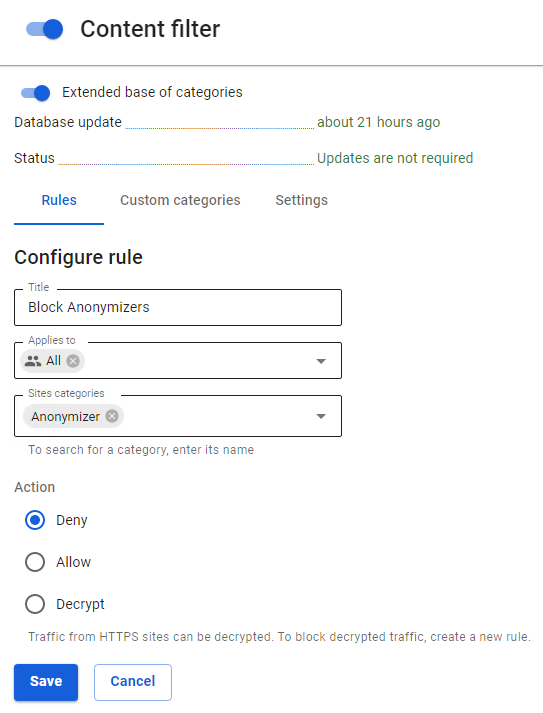](https://docs.safedns.com/uploads/images/gallery/2022-09/aHNJY8k75f1RGYIz-2-blocking-popular-resources.png)
2. To block VPN anonymizers using the PPTP protocol, as a rule, it is enough to block the GRE protocol in the **[Firewall](https://docs.safedns.com/books/44-setup-traffic-rules/page/firewall)** rules. [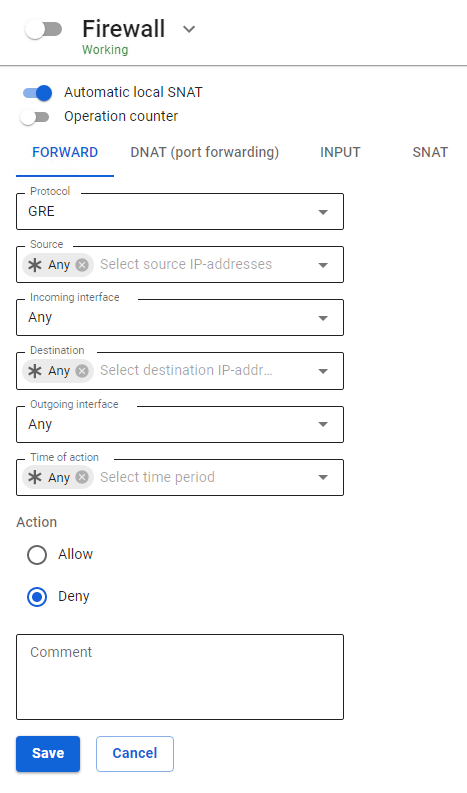](https://docs.safedns.com/uploads/images/gallery/2022-09/QkNC2C7eMVLDBxAr-3-blocking-popular-resources.png)
3. To prohibit circumvention of the content filter, we recommend creating a rule prohibiting direct requests to IP addresses in the [**Content Filter**](https://docs.safedns.com/books/44-setup-traffic-rules/page/content-filter). [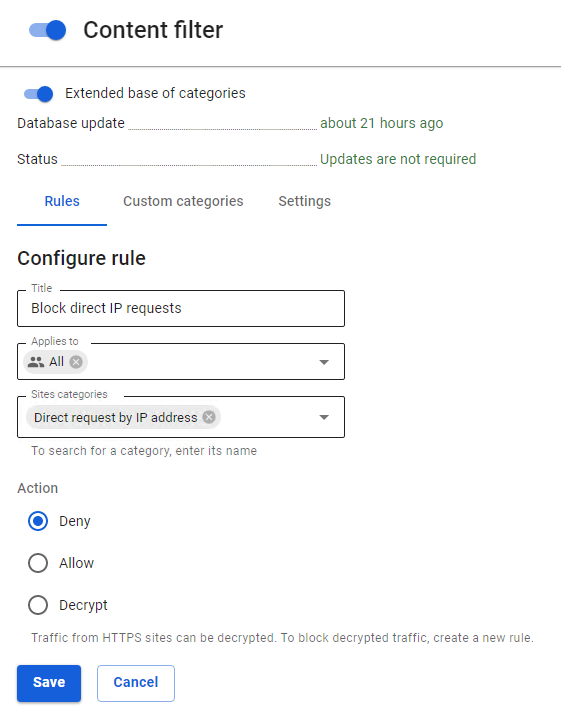](https://docs.safedns.com/uploads/images/gallery/2022-09/PX3OsrcfyVz0pHyi-4-blocking-popular-resources.png)
---
#### Blocking Opera Turbo, Opera VPN, friGate, Anonymox, Browsec
You can block data and some other plugins (anonymizers) and browser functions that are often used to bypass content filtering using the [**Intrusion Prevention**](https://docs.safedns.com/books/44-setup-traffic-rules/page/intrusion-prevention-system) module. To do this, in the tab **Rules** activate the **Anonymizers** rules group and a separate group of **Opera** **VPN** rules to block the service of the same name.
Attempts to bypass content filtering using this software will be recorded in the intrusion prevention system log, after which they will be blocked. An example of the output of information displayed in the intrusion prevention system log is presented below:
- `07/20/2017-15:06:04.056815 [Drop] [**] [1:1001697:1] Opera VPN [**] [Classification: Opera VPN] [Priority: 2] {TCP} 10.80.1.74:64784 -> 169.254.254.254:443`
- `07/20/2017-15:09:20.531169 [Drop] [**] [1:1001675:0] Anonymox HTTP [**] [Classification: Anonymizers] [Priority: 2] {TCP} 10.80.20.95:35576 -> 207.244.89.90:88`
---
#### Blocking TOR
**Tor** is a proxy server system that allows you to establish an anonymous network connection to bypass content filtering.
**Tor** is a specially developed software and proxy server environment designed to bypass various kinds of blocks, which is why it is currently not possible to completely block it.
To counter the use of the Tor network, as well as to log attempts to connect to it and use it, you need to do the following:
1\. Enable the **[Intrusion Prevention](https://docs.safedns.com/books/44-setup-traffic-rules/page/intrusion-prevention-system)** system and activate the **Blocking attacks** category in it, which allows you to block connections to the input nodes of the Tor network.
2\. Enable **[Application Control](https://docs.safedns.com/books/44-setup-traffic-rules/page/application-control)** and add a Tor application prohibiting rules to a specific group or all users:
[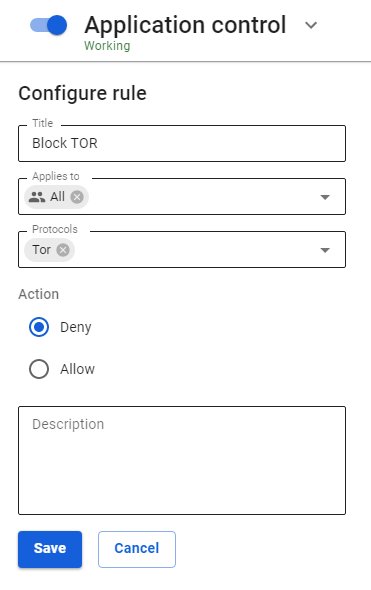](https://docs.safedns.com/uploads/images/gallery/2022-09/9gBnUBgcHTBQVDgW-6-blocking-popular-resources.png)
---
#### Blocking Torrents
BitTorrent is a P2P protocol designed for file sharing over the Internet.
To significantly limit the possibility of using torrents, you need to perform the following settings:
1\. Prohibit BitTorrent protocol using a rule in the [**Application Control**](https://docs.safedns.com/books/44-setup-traffic-rules/page/application-control) module.
[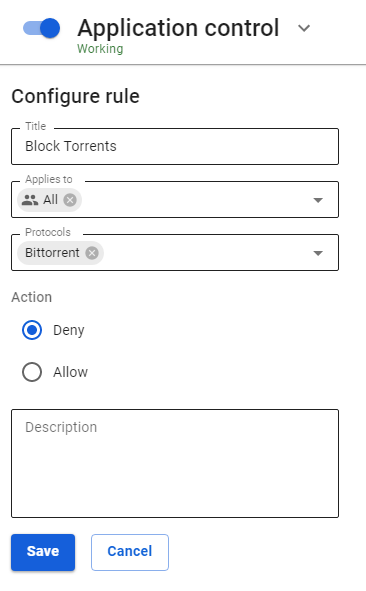](https://docs.safedns.com/uploads/images/gallery/2022-09/vzNtzUTpunoqcEMC-7-blocking-popular-resources.png)
2\. Use the policy **Prohibit all except what is allowed** when configuring the firewall. Allow the necessary TCP and UDP ports to users by making the last rule prohibiting.
3\. Prohibit torrent file directory sites using the [**Content Filter**](https://docs.safedns.com/books/44-setup-traffic-rules/page/content-filter) module by prohibiting the Torrent Trackers category. And prohibit downloading files with the extension .torrent.
[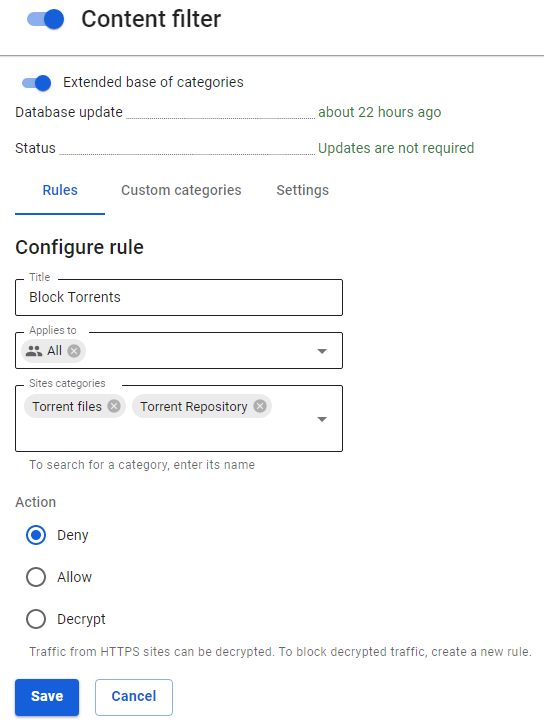](https://docs.safedns.com/uploads/images/gallery/2022-09/2SDtV8qM5aZZloeD-8-blocking-popular-resources.png)
4\. Enable the **[Intrusion Prevention](https://docs.safedns.com/books/44-setup-traffic-rules/page/intrusion-prevention-system)** system and activate the category **Requests** **to compromised resources** in it**,** which allows you to block the activity of P2P programs.
# Transferring Data and Settings to Another Server
---
In order to transfer the installed SafeUTM from one server to another with all the settings saved, follow these steps:
##### Step 1: Copying backups from the server
Go to **Server Management -> Backup** **->** create a backup of the server settings. Download the created copy to your computer by clicking **Download** in the column **Operations**.
##### Step 2. Installing SafeUTM on a new server
Installation instructions: [**Installation Process**](https://docs.safedns.com/books/3-installation/page/installation-process).
##### Step 3: Transfer backups to a new server
Go to **Server Management -> Backup** of the server web interface, click on the *Add backup* button **-> Download** **from file,** and select the backup downloaded at the first stage.
##### Step 4: Restoring the database from backups
Click **Apply** in the column **Operations**. The system will be rebooted to apply the server settings.
---
#### Transferring Mail Server Data
To transfer data with the transfer of mail to a separate disk, follow these steps:
1\. Download all mail from `/var/mail/` folder to external storage. This can be done using various programs for copying files between a local computer and a remote server (for example: rsync, WinSCP, ssh scp, etc.).
2\. Install the latest version of SafeUTM from the boot image to the physical disk.
3\. Connect the second physical disk that will be used for storing mail.
4\. In the SafeUTM web interface, go to **Mail Relay -> General Settings,** select a disk for storing mail, and format it.
5\. Allow SSH access from local networks in **Server Management -> Administrators**.
6\. Connect to UTM, for example, using the WinSCP program, and copy all the mail along the path `/var/mail/` .
7\. After copying the mail files, you need to run the command `chown -R mail-backend:mail-backend /var/spool/mail/`. This command changes the owner and group for mail files so that the dovecot mail daemon can have access to these files.
**If the mail has already been moved to a separate disk, connect it to UTM and jump to step 7.**
# Troubleshooting
# Error ERR_CONNECTION_TIMED_OUT When Opening Site or Site Does Not Open
---
##### Step 1. Check if the site opens in *Allow Internet to all* mode:
- Click on the technical support icon in the upper right part of the window.
- Slide **Allow Internet to everyone** to the Enabled position: [](https://docs.safedns.com/uploads/images/gallery/2022-09/gk7B6BbMql99laFG-1-error-err-connection-timed-out-when-opening-site-or-site-does-not-open.png)
- Open the website.
If the site does not open, check if the site opens on another device from the same IP address:
1.1. If it doesn't, we recommend contacting your provider. Most likely, the provider blocks the IP address or website address.
1.2. If the site opens, contact technical support.
##### Step 2. Check if the site is blocked by the [**Intrusion Prevention**](https://docs.safedns.com/books/44-setup-traffic-rules/page/intrusion-prevention-system) system.
- Go to **Traffic Rules -> IPS.**
- Move the **IPS** section **slider** to the Disabled position for a few minutes: [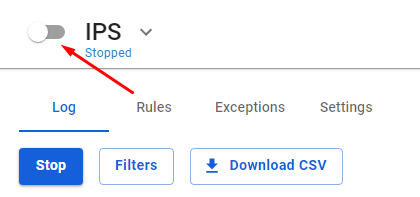](https://docs.safedns.com/uploads/images/gallery/2022-09/fPqLycwG6UNoZ8Ec-2-error-err-connection-timed-out-when-opening-site-or-site-does-not-open.png)
- Try going on the site again.
If the site has opened, find the number of the blocking rule in the logs and add the rule number to **IPS -> Exceptions.**
##### Step 3. If the previous paragraph did not help, check whether the site is blocked by a [**Content Filter**](https://docs.safedns.com/books/44-setup-traffic-rules/page/content-filter) rule. To do this:
- Create a test rule for the tested user in **Traffic Rules -> Content Filter**:
- **Title** - any name.
- **Applies to** - select a test user.
- **Sites Categories -** all requests.
- **Action** – allow [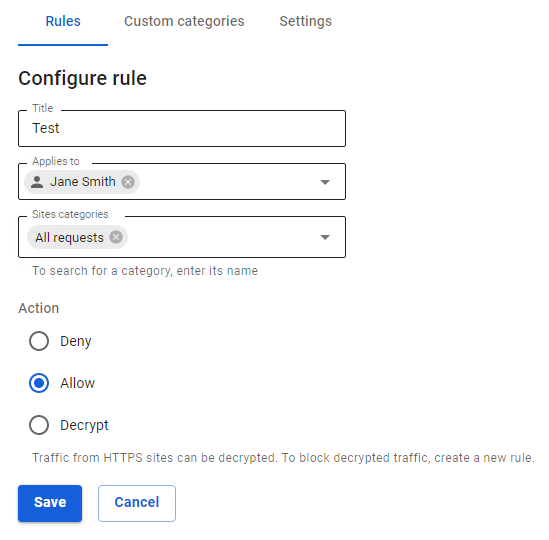](https://docs.safedns.com/uploads/images/gallery/2022-09/jQFRuqs6FymuZoU1-3-error-err-connection-timed-out-when-opening-site-or-site-does-not-open.png)
- Click *Save*.
- Place the created rule at the top of the list by clicking the arrow up icon.
- Open the website.
If the site opens, you can find the blocking rule by dropping the test rule down the list.
If the blocking rule has not been found, proceed to the next step.
##### Step 4. Determine the blocked domain or IP address (let's take Firefox as an example):
- Open the desired site in the browser.
- Press F12.
- Select the "Network" tab.
- Refresh the page.
- Sort the column *Status* with the left mouse button.
Pay attention to the status codes 4xx and 5xx; it is these requests that are blocked either by UTM or by higher-level services.
Determine which category of the content filter a particular name belongs to. To do this, go to **Traffic Rules -> Content Filter -> URL for categorization**:
[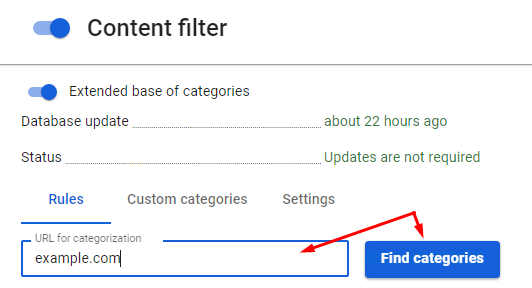](https://docs.safedns.com/uploads/images/gallery/2022-09/h9MvVba4ht3oAhdE-4-error-err-connection-timed-out-when-opening-site-or-site-does-not-open.png)
**If you failed to solve the problem, please send the following to technical support:**
1\. Screenshot of the error in the browser.
2\. Screenshot of sorted errors from Firefox so that problematic domains or IP addresses can be seen (changed).
Obviously reliable services can be added to **Services -> Proxy -> Exceptions** in the tab **Destination networks**.
It is not recommended to add the addresses of your network's clients to the exceptions, since in this case their web traffic will not be filtered by the content filter rules and will not be included in reports.
# What to Do If Internet Does Not Work
---
##### Step 1. Check user parameters
Make sure that the user being checked is logged in to the server. Possible user statuses are described in the chapter **[User Tree](https://docs.safedns.com/books/42-setup-users/page/user-tree)**.
##### Step 2. Checking the user's computer
Run `ping` command from the user's computer to address `8.8.8.8`: **Start -> Run**, enter the command `cmd`, in the window that appears enter `ping 8.8.8.8`.
- If address `8.8.8.8` responds to echo requests, check `ping google.com` .
- If address `8.8.8.8` does not respond to echo requests, go to Step 3.
- If address `google.com` responds to echo requests, go to Step 5.
- If the message **'failed to detect node google.com'** appears, the DNS provider may not be working, check with the command `nslookup google,com 222.222.222.222` , instead of `222.222.222.222` specify the DNS address of the provider:
- If there is no response, contact your provider.
- If there is a response, check the primary DNS address on your computer (the local SafeUTM address must be specified); also check that the DNS server is running on SafeUTM in **Services -> DNS**.
##### Step 3. Checking Internet access on the server
Go to **Terminal** in the web interface: run the command `ping 8.8.8.8`, to stop `ctrl+c`.
**If the ping fails:**
- Check the server settings, addresses, and interface masks.
- Make sure that the network equipment you are using is in good condition, the network cables are properly embossed and do not have fractures and breaks; check the signal indicator on the network card (you can see it in **Services -> Network Interfaces)**, restart the switch and modem (if used).
- If you are using an Ethernet connection, you need to run the command `arp -an | grep `. If the MAC address of the provider's gateway has not been determined, then it makes sense to try rebooting the Server by reconnecting the network cable. After that, check for the MAC address of the provider's gateway. This solution helps if the provider's switch port "freezes". If after the specified measure the MAC of the provider's gateway does not appear in the MAC address table, contact the provider. It should be noted that when changing network equipment, no access to the Internet may be due to the fact that your Internet provider uses binding to the MAC address.
**If the ping passes, go to Step 4.**
##### Step 4. Checking the firewall
- Disable the **Firewall** module in the web interface section **Traffic Rules -> Firewall.** If the web interface is not available, the firewall can be turned off using the local menu.
- If access to the Internet has appeared, find the rule prohibiting access to the network in the firewall, alternately enabling the rules.
##### Step 5. Checking web traffic
If the user receives responses to echo requests with the command `ping` both by domain name and IP address, but there is no web traffic:
- Make sure that all proxy settings are not used in the browser.
- Temporarily turn off the Windows firewall and antivirus software.
**If you failed to solve the problem, please send the following to technical support:**
1\. Take screenshots of the user’s tab **General** in an expanded form and contact us via the [**support portal**](https://www.safedns.com/resource/support-ticket) or email us at support@safedns.com.
2 . Enable [**Remote Assistant mode**](https://docs.safedns.com/books/5-maintenance/page/remote-assistant-mode) and contact technical support: **[https://www.safedns.com/resource/support-ticket](https://www.safedns.com/resource/support-ticket)**.
# Authorization error "The browser is outdated"
If you are using a browser that does not support UTM, then the error **Your browser is outdated will appear during authorization. This version of the browser is not secure and unsupported by modern web technologies. Please install the latest version of one of the listed browsers.**
Supported Browsers:
- Google Chrome version >= 90;
- Firefox version >= 78;
- Safari version >= 14.
We recommend updating your browser to the minimum supported version.
To continue authorization despite the risks, you will need to click **I understand the risks and wish to continue**.