# Automatic Connection Creation
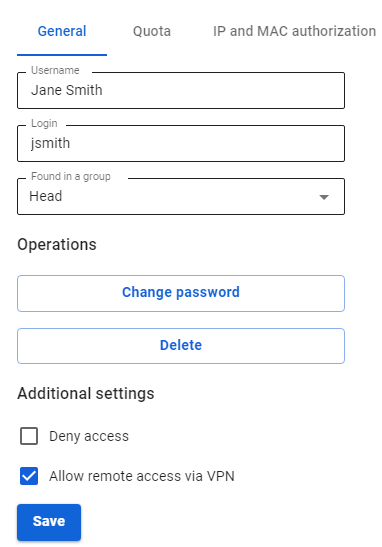
Before configuring a VPN connection, in the user tree, open the card of the required user and set the **Allow remote access via VPN** flag. To do this, go to the **Users -> User & Group** section:
[](https://docs.safedns.com/uploads/images/gallery/2022-09/5uJN0lFrLEyeDs2k-1-automatic-connection-creation.png)
---
L2TP/IPsec Protocol
**Important**: L2TP IPsec clients behind the same NAT may experience connectivity issues if there is more than one. [**Instructions**](https://docs.microsoft.com/en-us/troubleshoot/windows-server/networking/configure-l2tp-ipsec-server-behind-nat-t-device) can help solve the problem. We recommend using IKEv2 IPSec instead of L2TP IPsec.
You can run the following PowerShell script to automatically create a connection on users' computers running Windows 8.1 and 10. To do this, download the ready-made scripts for connecting your server from **Users -> VPN connections**.
The connection will be created with the following parameters:
1. **L2TP/IPsec** protocol using a PSK key.
2. The parameter **Use the primary gateway in the remote network** is disabled.
LANs of the same class that was obtained for a VPN connection by default in Windows 7 and 10 will be accessed via a VPN connection, so you do not need to create additional routes (unless you use different network classes in the office LAN).
Create a file named **safe\_utm\_l2tp.ps1** (in Notepad or Windows PowerShell ISE Editor) and copy the following text into it:
```Powershell
param([switch]$Elevated)
$currentUser = New-Object Security.Principal.WindowsPrincipal $([Security.Principal.WindowsIdentity]::GetCurrent())
if (!$currentUser.IsInRole([Security.Principal.WindowsBuiltinRole]::Administrator)) {
if (!$elevated) {
Start-Process `
powershell.exe `
-Verb RunAs `
-ArgumentList ('-noprofile -noexit -file "{0}" -elevated' -f ( $myinvocation.MyCommand.Definition ))
}
exit
}
Enable-NetFirewallRule -Group "@FirewallAPI.dll,-28502"
Add-VpnConnection `
-Force `
-Name "SafeUTM L2TP VPN" `
-TunnelType L2TP `
-ServerAddress my.domain.com `
-L2tpPsk "XXXXXXXXXXXXXXXXXXXXXXXXXXXXXXXX" `
-EncryptionLevel "Required" `
-AuthenticationMethod MSChapV2 `
-SplitTunneling $False `
-DnsSuffix activedirectory.domain `
-RememberCredential
```
**Change the necessary parameters in it to match your settings:**
- **SafeUTM L2TP VPN** – the connection name in the system (can be arbitrary).
- **domain.com** – the domain or IP address of the main external interface of SafeUTM.
- **XXXXXXXXXXXXXXXXXXXXXXXXXXXXXX** – your server's PSK key.
- **domain** – your Active Directory domain (if there is one if not, you need to delete this line from the script).
**You can run the script on the user's computer from the file context menu "Run with PowerShell". Click OK in the elevation dialog (the rights are required to allow access to shared files and printers).**
After that, a connection will be created in the system and shared access to files and printers for all networks will be enabled (otherwise access to file resources in the local network may not be possible).
The user must enter their username/password at the first authorization.
**Possible errors when executing the script**
If the error "Script execution is disabled on this system" appears, you need to enable script execution by running the following command in PowerShell: `Set-ExecutionPolicy Unrestricted`
SSTP Protocol
You can run the following PowerShell script to automatically create a connection on users' computers running Windows 8.1 and 10. To do this, download the ready-made script from **Users -> VPN connections**.
**The connection will be created with the following parameters:**
1. **SSTP** protocol using the PSK key.
2. The parameter **Use the primary gateway in the remote network** is disabled.
LANs of the same class that was obtained for VPN connections by default in Windows 7 and 10 will be accessed via a VPN connection, so you do not need to create additional routes (unless you use different network classes in the office LAN).
Create a text file named **safe\_utm\_sstp.ps1** (in Notepad or Windows PowerShell ISE editor) and copy the following text there:
```Powershell
param([switch]$Elevated)
$currentUser = New-Object Security.Principal.WindowsPrincipal $([Security.Principal.WindowsIdentity]::GetCurrent())
if (!$currentUser.IsInRole([Security.Principal.WindowsBuiltinRole]::Administrator)) {
if (!$elevated) {
Start-Process `
powershell.exe `
-Verb RunAs `
-ArgumentList ('-noprofile -noexit -file "{0}" -elevated' -f ( $myinvocation.MyCommand.Definition ))
}
exit
}
Enable-NetFirewallRule -Group "@FirewallAPI.dll,-28502"
Add-VpnConnection `
-Force `
-Name "SafeUTM SSTP VPN" `
-TunnelType SSTP `
-ServerAddress my.domain.com:4443 `
-EncryptionLevel "Required" `
-AuthenticationMethod MSChapV2 `
-SplitTunneling $False `
-DnsSuffix activedirectory.domain `
-RememberCredential
```
**Change the necessary parameters in it to match your settings:**
1. **SafeUTM SSTP VPN** – the connection name in the system (can be arbitrary).
2. **my.domain. com:4443** – SafeUTM external interface domain and the port on which you enabled SSTP.
3. **activedirectory.domain** – your Active Directory domain (if there is no domain, you need to delete this line from the script).
**You can run the script on the user's computer from the file context menu "Run with PowerShell". Click OK in the elevation dialog (the rights are required to allow access to shared files and printers).**
After that, a connection will be created in the system and shared access to files and printers for all networks will be enabled (otherwise access to file resources in the local network may not be possible).
The user must enter their username/password at the first authorization.
**Possible errors when executing the script**
If the error "Script execution is disabled on this system" appears, you need to enable script execution by running the following command in PowerShell: `Set-ExecutionPolicy Unrestricted`
IPsec IKEv2 Protocol
You can run a PowerShell script to automatically create a connection on users' computers running Windows 8.1 and 10. To do this, download the ready-made script from **Users -> VPN connections**.
**The connection using the script will be created with the following parameters:**
1. IKEv2/IPsec Protocol
2. The parameter **Use the primary gateway in the remote network** is disabled. LANs of the same class that was obtained for the default VPN connection in Windows 7 and 10 will be accessed via a VPN connection, so you do not need to create additional routes (unless you use different network classes in the office LAN).
Create a text file named **safe\_utm\_ikev2.ps1** (in Notepad or Windows PowerShell ISE editor) and copy the following text there:
```Powershell
param([switch]$Elevated)
$currentUser = New-Object Security.Principal.WindowsPrincipal $([Security.Principal.WindowsIdentity]::GetCurrent())
if (!$currentUser.IsInRole([Security.Principal.WindowsBuiltinRole]::Administrator)) {
if (!$elevated) {
Start-Process \`
powershell.exe `
-Verb RunAs `
-ArgumentList ('-noprofile -noexit -file "{0}" -elevated' -f ( $myinvocation.MyCommand.Definition ))
}
exit
}
Enable-NetFirewallRule -Group "@FirewallAPI.dll,-28502"
Add-VpnConnection `
-Force `
-Name "SafeUTM IKEv2 VPN" `
-TunnelType IKEv2 `
-ServerAddress my.domain.com `
-EncryptionLevel "Required" `
-AuthenticationMethod EAP `
-SplitTunneling $False `
-DnsSuffix activedirectory.domain `
-RememberCredential
```
**Change the necessary parameters in it to match your settings:**
1. **SafeUTM IKEv2 VPN** – the connection name in the system (can be arbitrary).
2. **my.domain.com** – the domain of SafeUTM external interface (A-record for the domain must refer to the IP address of SafeUTM external interface).
3. **activedirectory.domain** – your Active Directory domain (if there is one if not, you need to delete this line from the script).
You can run the script on the user's computer from the file context menu "Run with PowerShell". Click OK in the elevation dialog (the rights are required to allow access to shared files and printers).
After that, a connection will be created in the system, and file and printer sharing will be enabled for all networks (otherwise access to shared folders in the local network will not be possible).
During the first authorization, it is necessary to enter the username/password.
**Possible errors when executing the script**
If the error "Script execution is disabled on this system" appears, you need to enable script execution by running the following command in PowerShell: `Set-ExecutionPolicy Unrestricted`
If a VPN connection using IPsec protocols in Windows is automatically terminated after 7 hours and 45 minutes and a "Group policy mapping" error or error 13868 occurs when connecting via IKEv2.
To restore the connection, the following actions are suitable:
1\. Reconnect. In this case, the connection will be restored, but after 7 hours and 45 minutes, it will be automatically disconnected again. If you do not want the connection to be terminated automatically, follow the steps from the following paragraph.
2\. Make changes to the registry:
- Open the **Registry editor**.
- Follow the path `HKEY_LOCAL_MACHINE\SYSTEM\CurrentControlSet\Services\RasMan\Parameters`
- Right-click on the parameter **NegotiateDH2048\_AES256** and click **Change**.
- In the **Value** line, specify value 1: [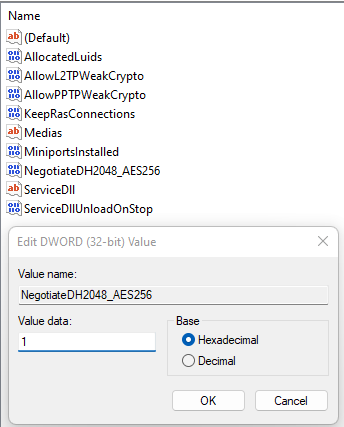](https://docs.safedns.com/uploads/images/gallery/2022-09/w3V4oh7EPXEl6NaA-2-automatic-connection-creation.png)
- Click **OK**.
- Restart Windows.
If there is no parameter named **NegotiateDH2048\_AES256**, then create it. To do this:
- Right-click on the free registry space in **Parameters** and select **Create -> DWORD**:
- Set the name **NegotiateDH2048\_AES256.**
- Right-click on the created file and select **Change**:
- In the **Value** line, specify value 1:
- Click **OK**.
3\. Restart Windows.