# Instructions for creating a connection in Mac OS
Before setting up a VPN connection, in the user tree in the desired users’ card check the box **Allow remote access via VPN.** To do this, go to **Users -> User & Group**:
[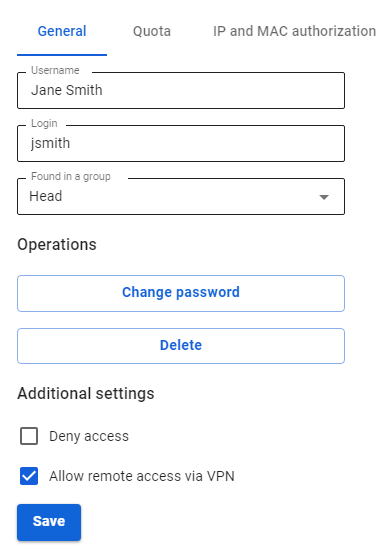](https://docs.safedns.com/uploads/images/gallery/2022-09/vIve5kGYlQIsNQ8T-1-instructions-for-creating-a-connection-in-mac-os.png)
---
PPPoE Protocol
To configure SafeUTM, go to **Users -> VPN connections** and check the box **PPPoE Connection**:
[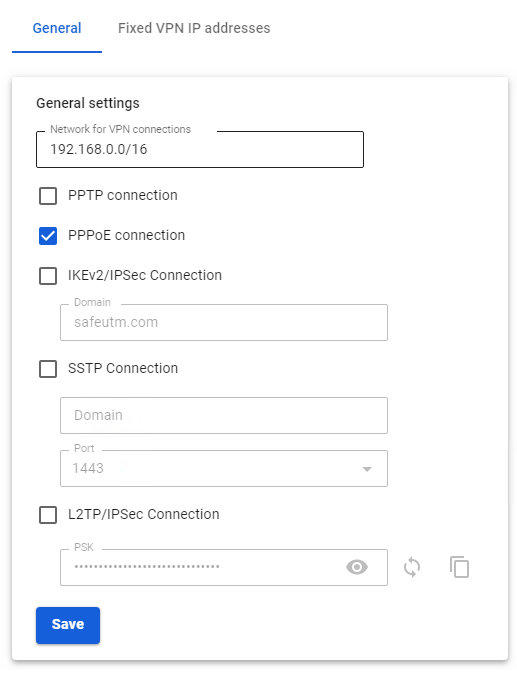](https://docs.safedns.com/uploads/images/gallery/2022-09/agmS3WoA7R9zFPcd-2-instructions-for-creating-a-connection-in-mac-os.png)
**Creating a connection in Mac OS**
1\. Go to **System Preferences -> Network.** 2. Click **Add** in the lower left corner (icon +).
3\. In the window that appears, fill in:
- **Interface** – PPPoE
- **Ethernet** – for example, Wi-Fi.
- **Service name** – connection name.
[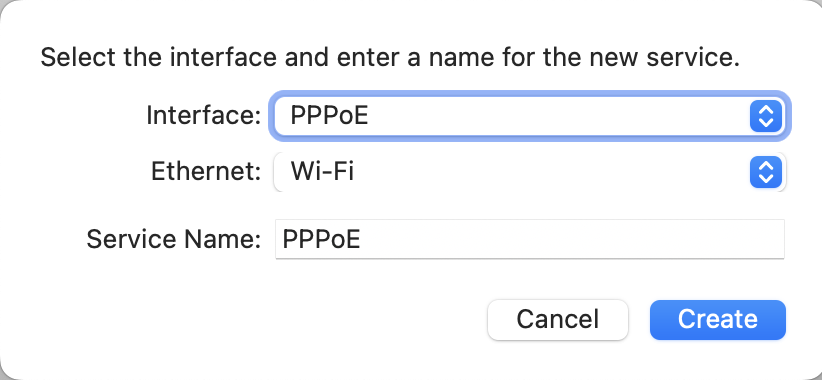](https://docs.safedns.com/uploads/images/gallery/2022-09/X5cQnygWyazt90Us-3-instructions-for-creating-a-connection-in-mac-os.png)
4\. Click **Create** and fill in:
- **PPPoE service name –** the name of the service.
- **Account name –**
- **Password** **–** the user's password.
[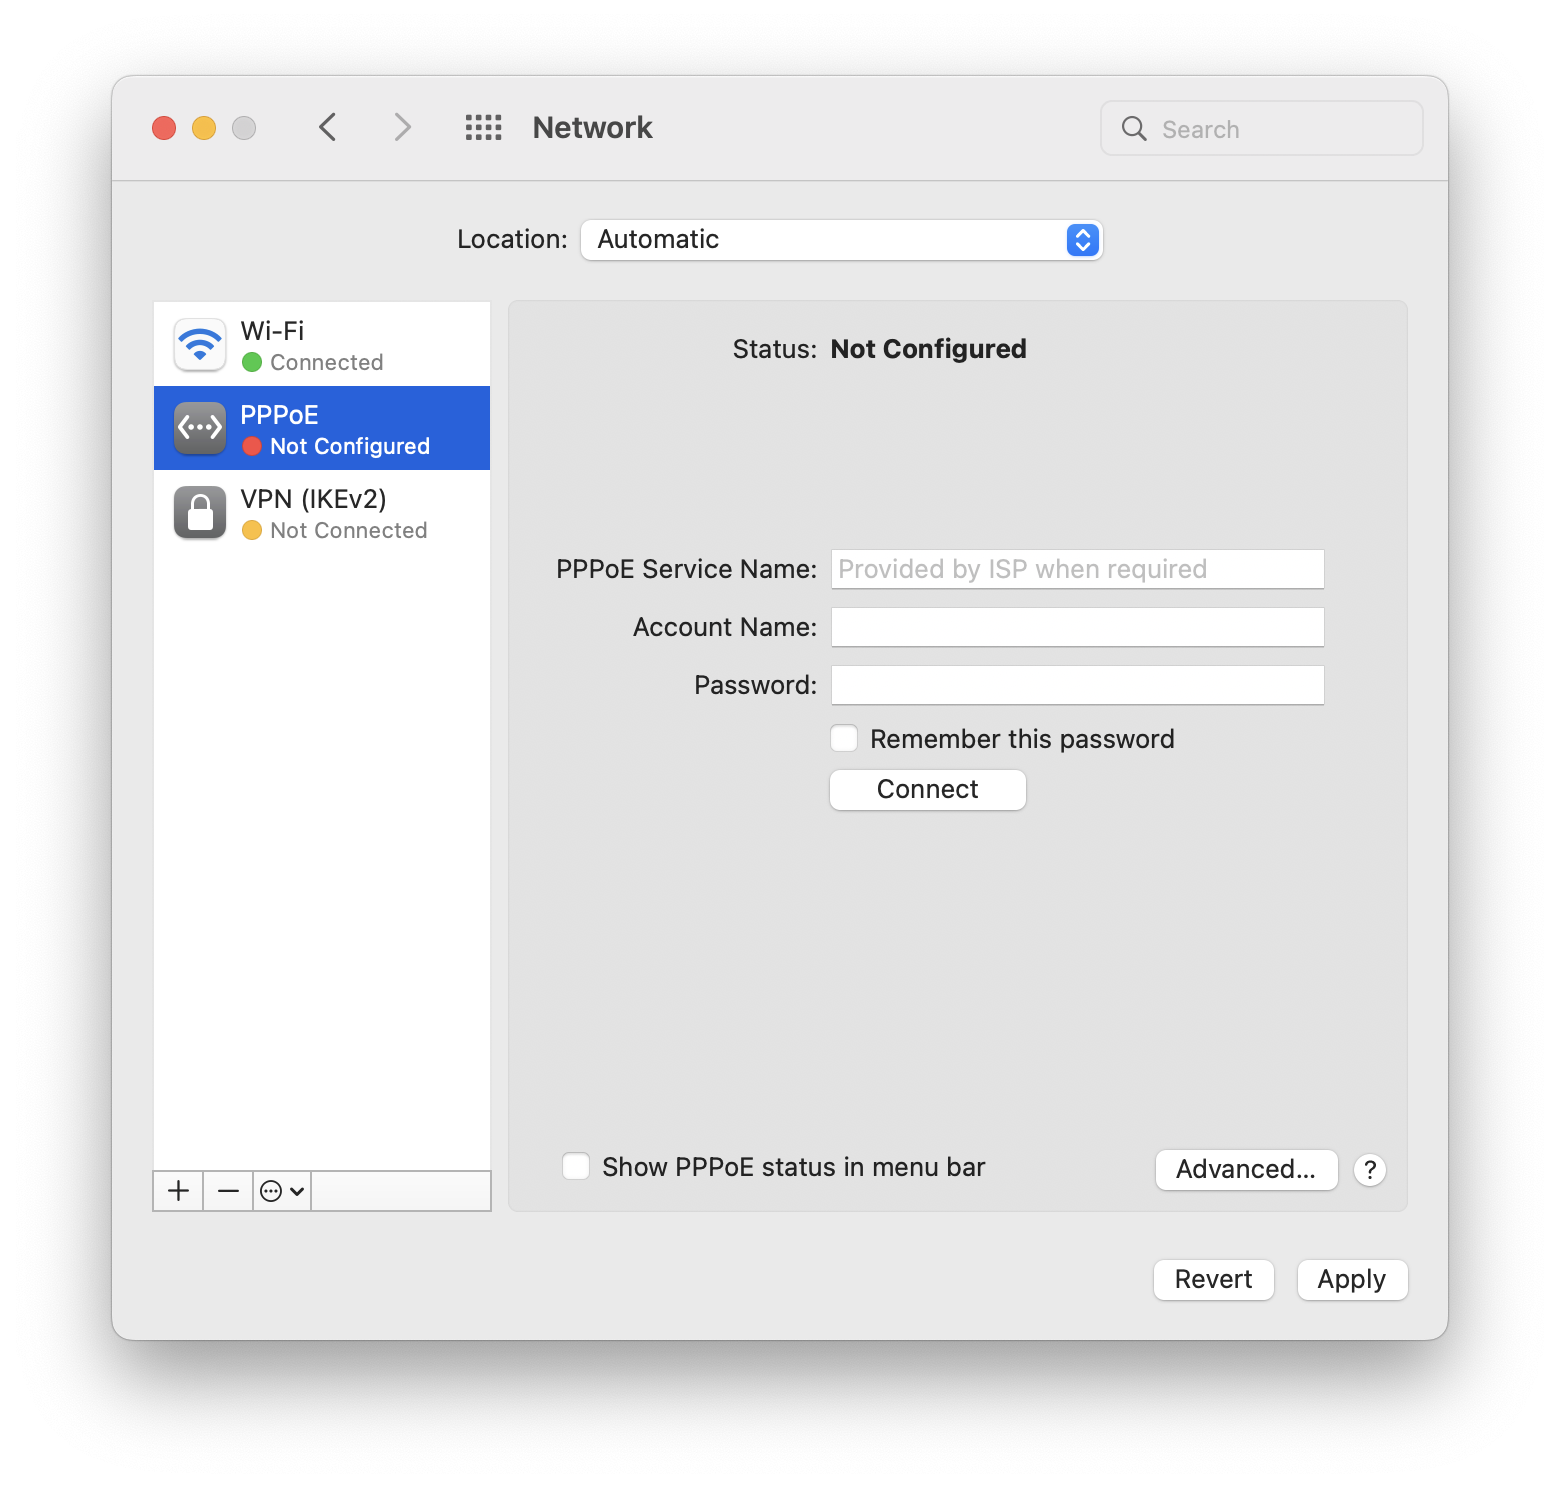](https://docs.safedns.com/uploads/images/gallery/2022-09/oBAMsKo1opQbKTDs-4-instructions-for-creating-a-connection-in-mac-os.png)
5\. Click **Connect**.
IKEv2/IPsec Protocol
Configure SafeUTM:
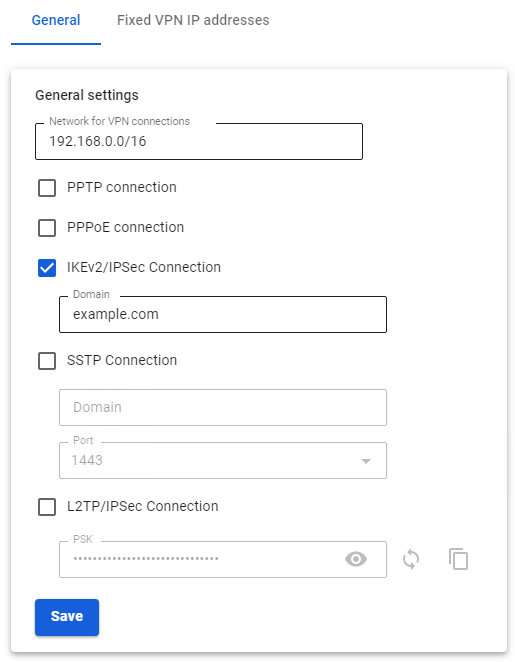
1\. Go to **Users -> VPN connections**.
2\. Check the box **IKEv2/IPsec** **Connection** and fill in the **Domain** fields:
[](https://docs.safedns.com/uploads/images/gallery/2022-09/BZoHz8HxnhJExEgi-5-instructions-for-creating-vpn-connection-in-ubuntu.png)
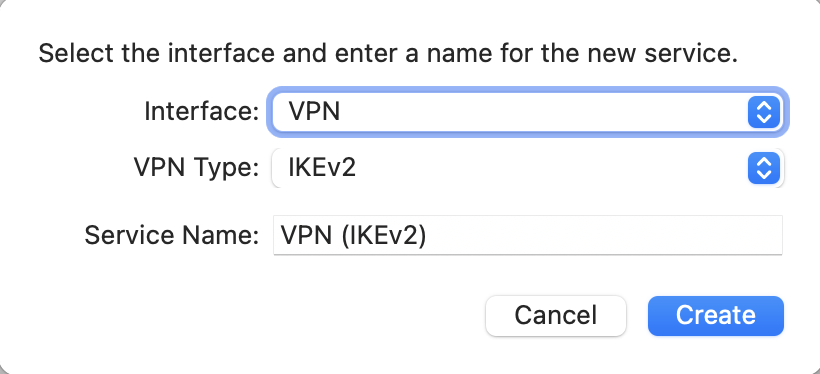
**Creating a connection in Mac OS**
1\. Go to **System Preferences -> Network:** 2. Click **Add** in the lower left corner (icon +).
3\. In the window that appears, fill in the fields:
- **Interface** – VPN
- **VPN type** – IKEv2
- **Service name** – connection name.
[](https://docs.safedns.com/uploads/images/gallery/2022-09/4TUsOixIB3hYKBxt-6-instructions-for-creating-a-connection-in-mac-os.png)
4\. Click **Create**.
5\. Configure the connection parameters:
- **Server address –** the address of the VPN server.
- **Remote ID –** duplicate the address of the VPN server.
[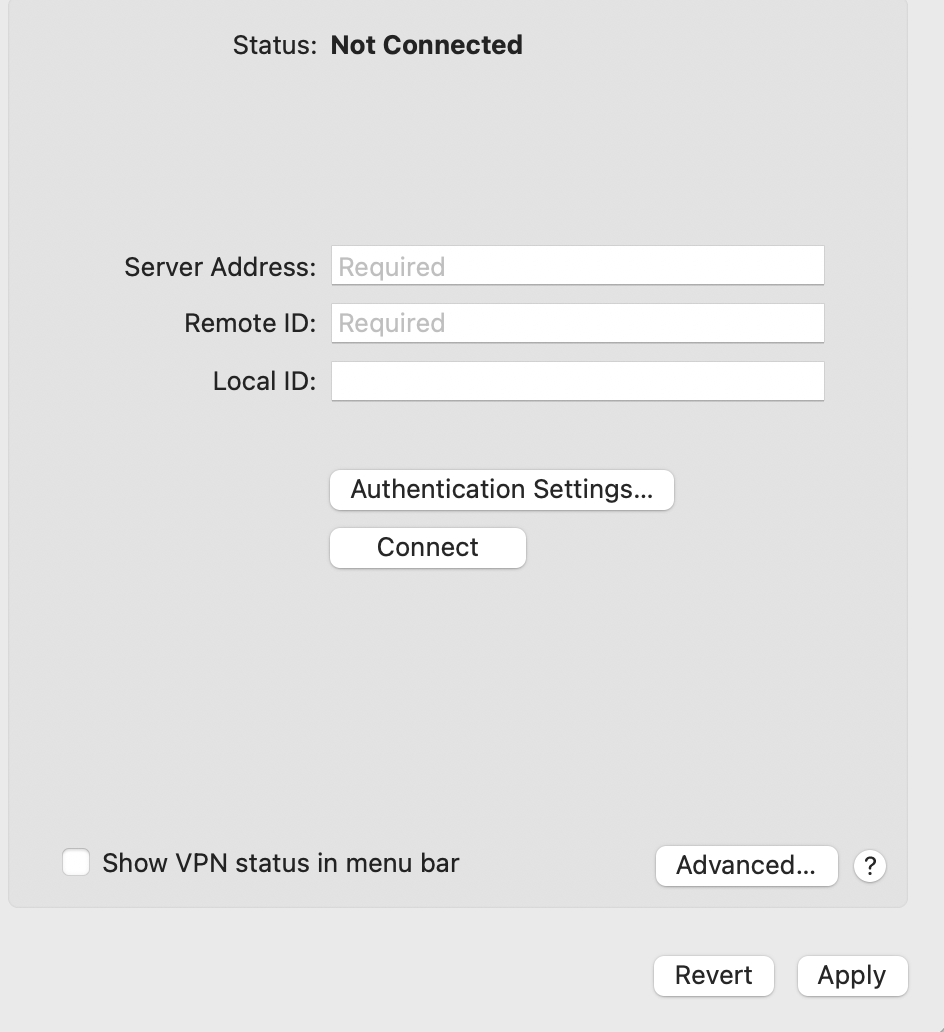](https://docs.safedns.com/uploads/images/gallery/2022-09/SHbY5FVhkLzZADJ9-7-instructions-for-creating-a-connection-in-mac-os.png)
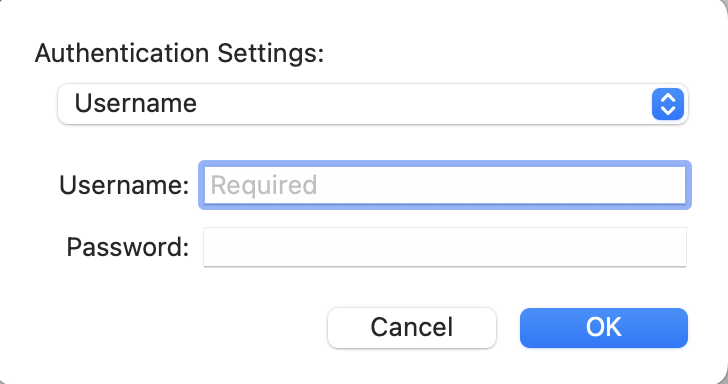
6\. Select **Authentication settings.** 7. Enter the identification data and click **OK**:
- **Username** **–** the name of the user allowed to connect via VPN.
- **Password** **–** the user's password.
[](https://docs.safedns.com/uploads/images/gallery/2022-09/N9s2w8pE0K90Ia0K-8-instructions-for-creating-a-connection-in-mac-os.png)
8\. Click **OK**.
9\. Check the box **Show VPN status in the menu bar** and click **Apply**.
L2TP/IPsec Protocol
**Important**: L2TP IPsec clients behind the same NAT may experience connectivity issues if there is more than one. We recommend using IKEv2 IPSec instead of L2TP IPsec.
Before creating a connection, configure SafeUTM:
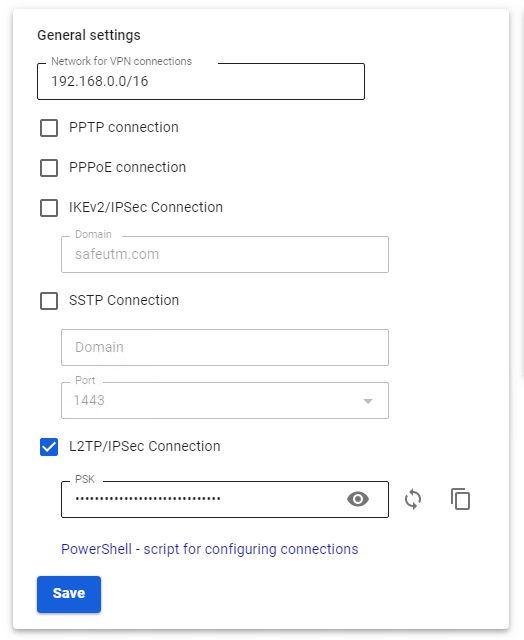
1\. Go to **Users -> VPN connections**.
2\. Check **L2TP/IPsec Connection** and copy the **PSK** key:
[](https://docs.safedns.com/uploads/images/gallery/2022-09/a5YZIoFlMP39D0f4-9-instructions-for-creating-vpn-connection-in-ubuntu.png)
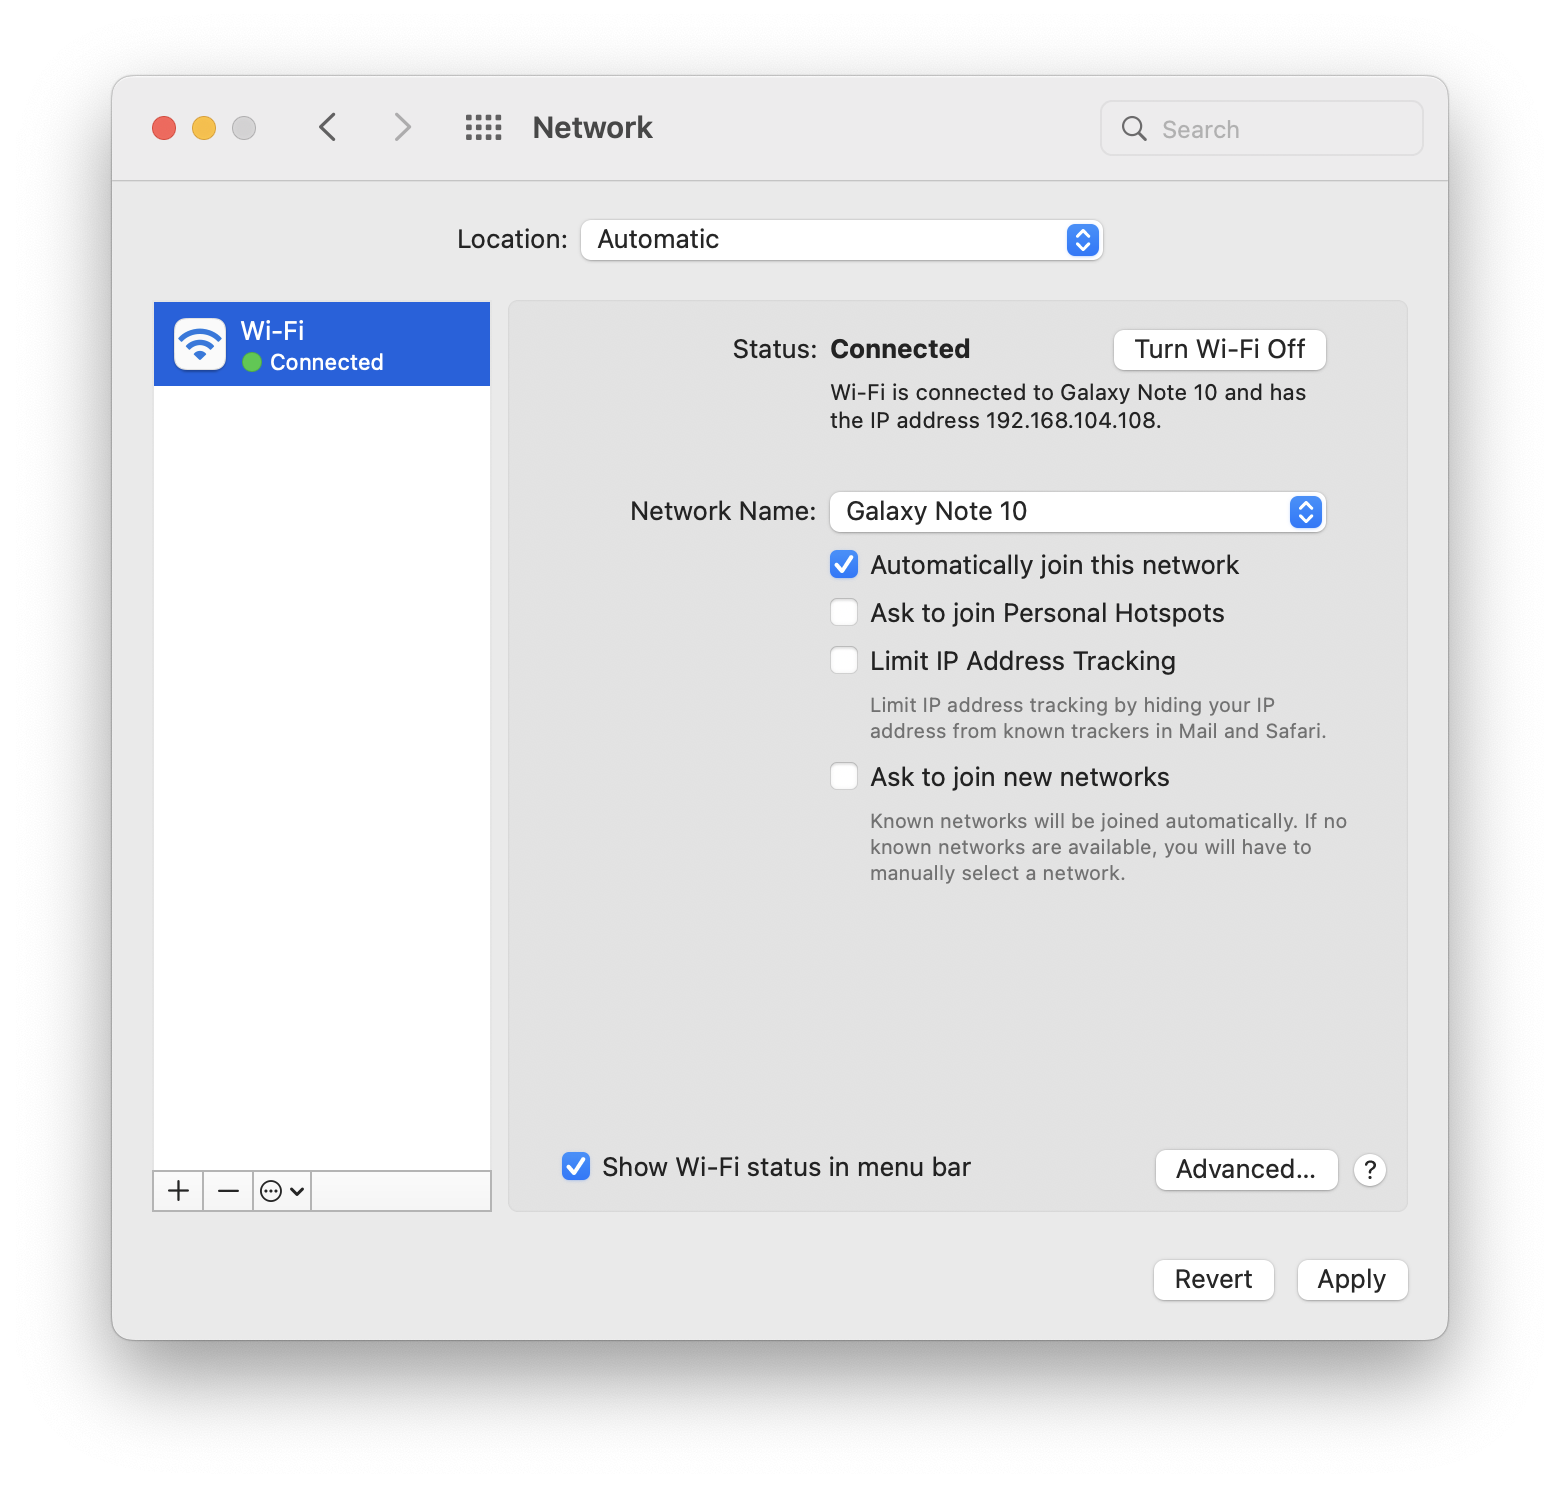
**Creating a connection in Mac OS**
1\. Go to **System Preferences -> Network:
[](https://docs.safedns.com/uploads/images/gallery/2022-09/5xkPugFGcYLAY6us-10-instructions-for-creating-a-connection-in-mac-os.png)** 2. Click **Add** in the lower left corner (icon +).
3\. In the window that appears, fill in:
- **Interface –**
- **VPN type** **–** L2TP via IPsec.
- **Service name** **–** connection name.
[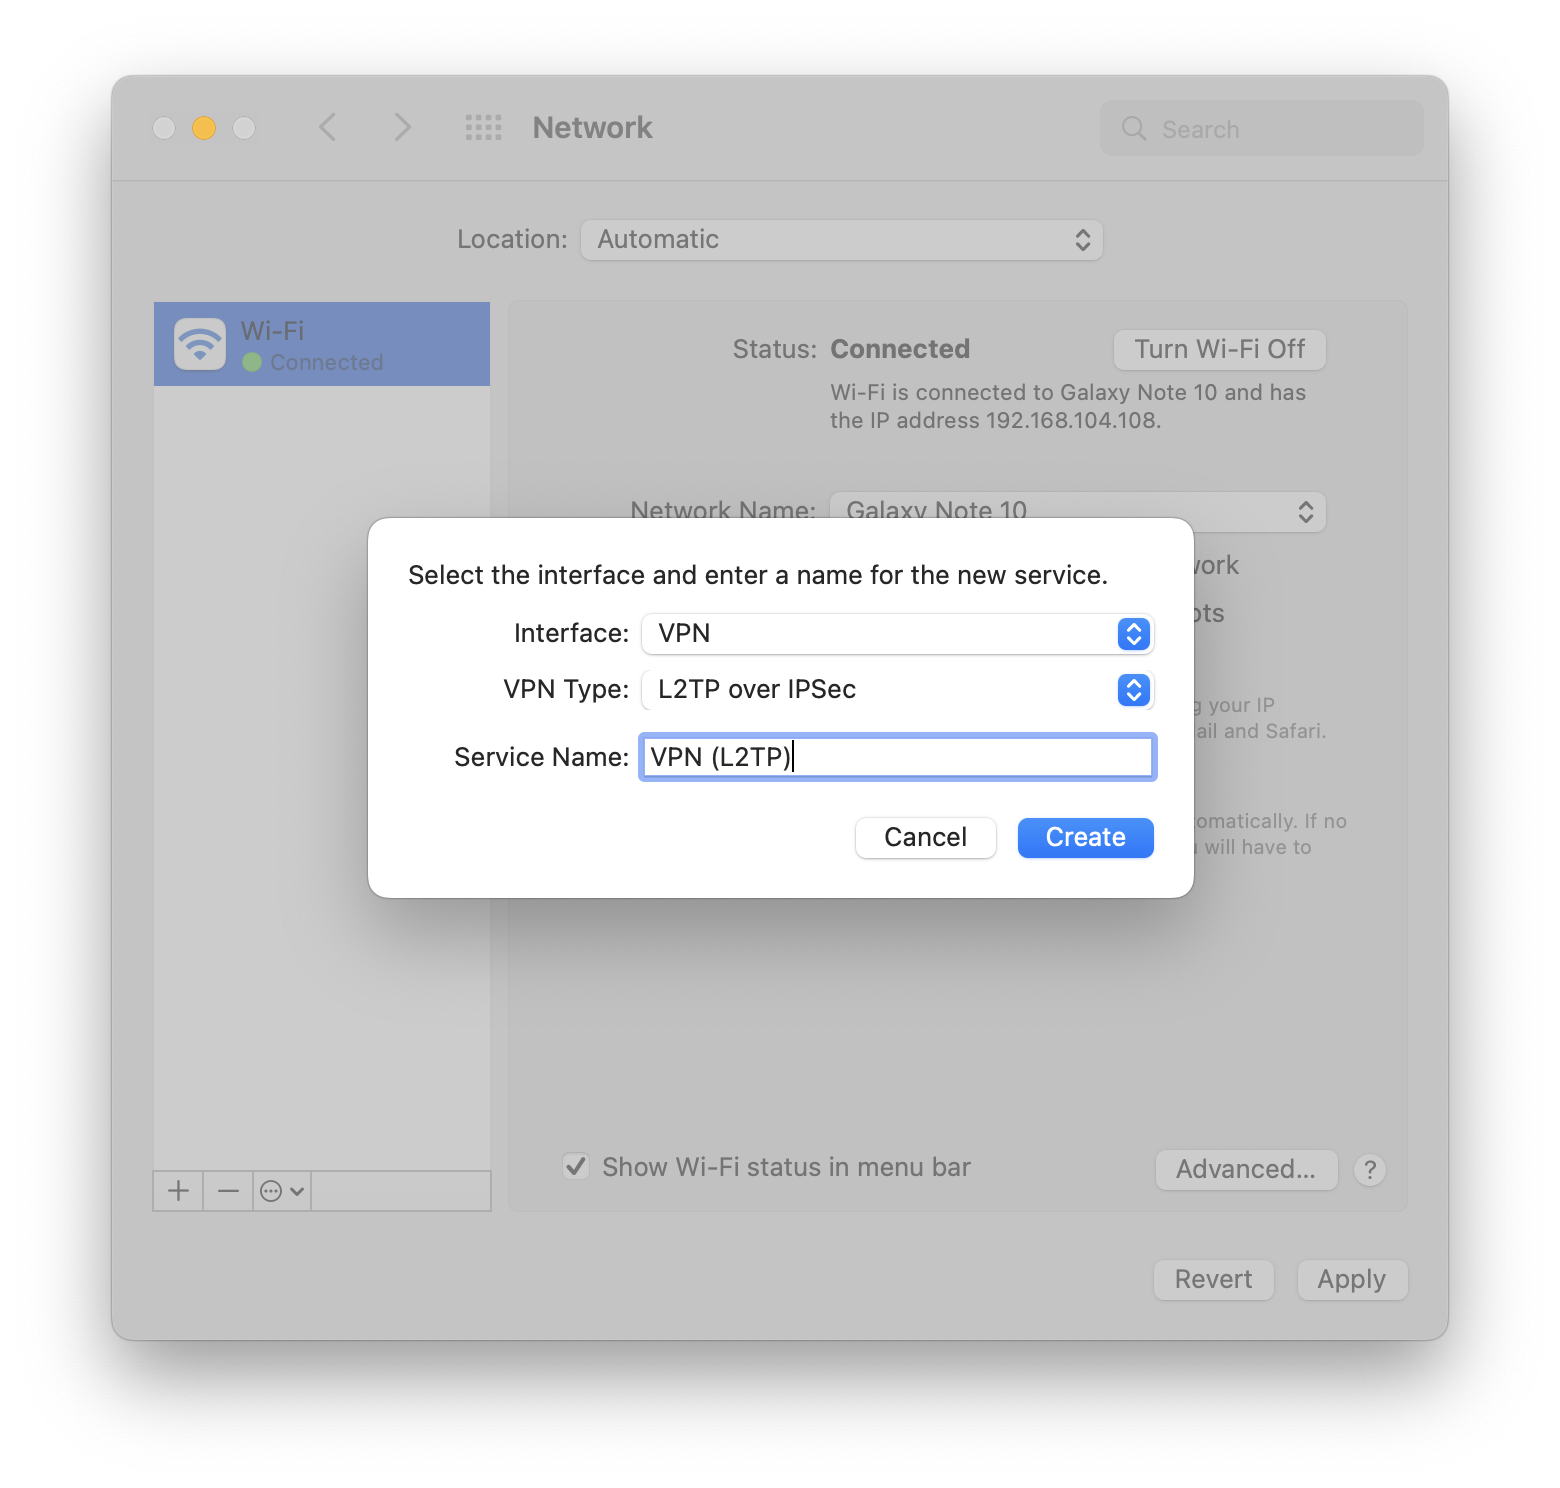](https://docs.safedns.com/uploads/images/gallery/2022-09/dP9nQvEQRV1F4F4y-11-instructions-for-creating-a-connection-in-mac-os.png)
4\. Click **Create**.
5\. Fill in the **Server address** and **Account name:
[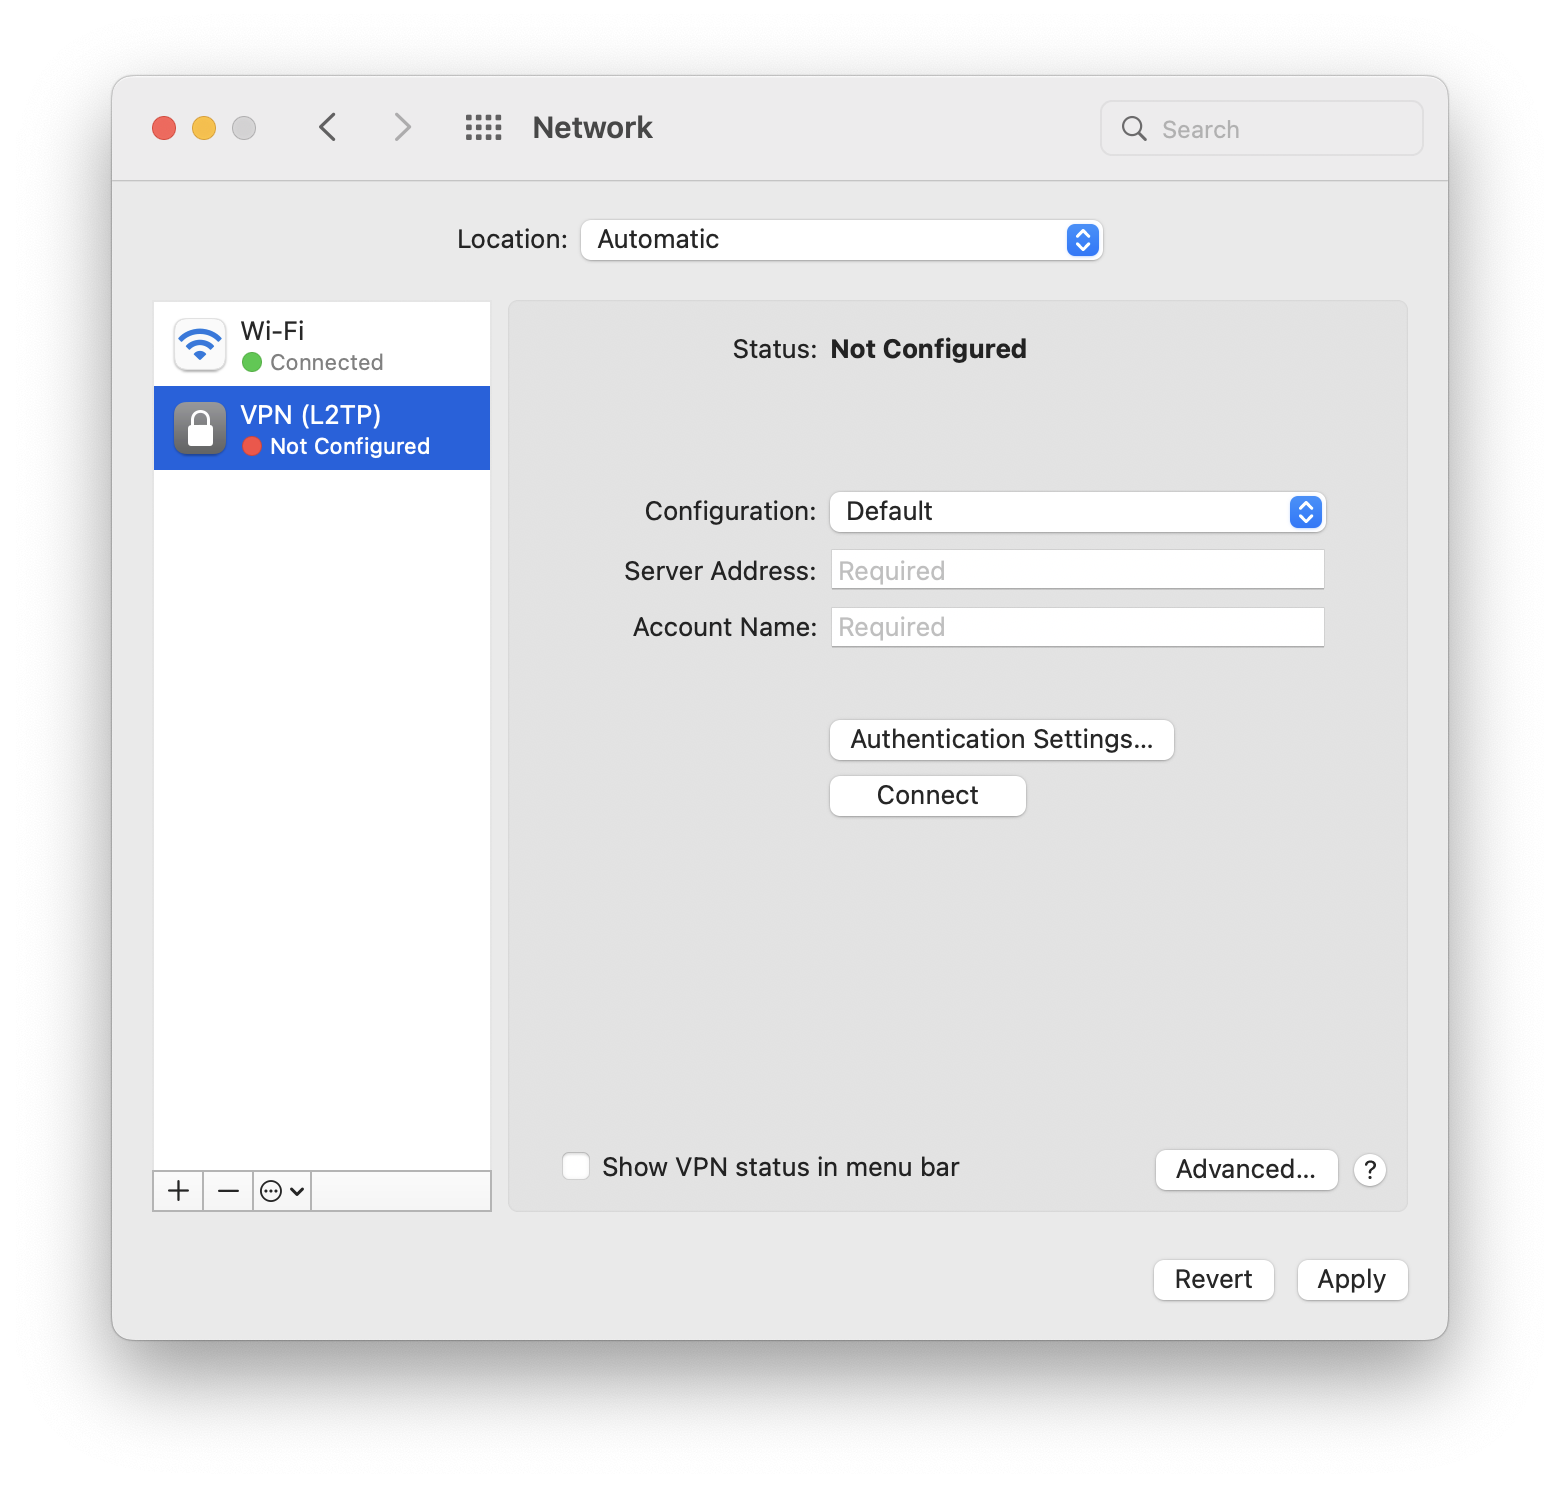](https://docs.safedns.com/uploads/images/gallery/2022-09/6XD7BXkEqVB1Gr7M-12-instructions-for-creating-a-connection-in-mac-os.png)**
6\. Check the box **Show VPN status in the menu bar** and select **Authentication settings.** 7. In **User authentication** fill in **Password** and in **Computer Authentication** fill in **Shared Key (Shared Secret).
[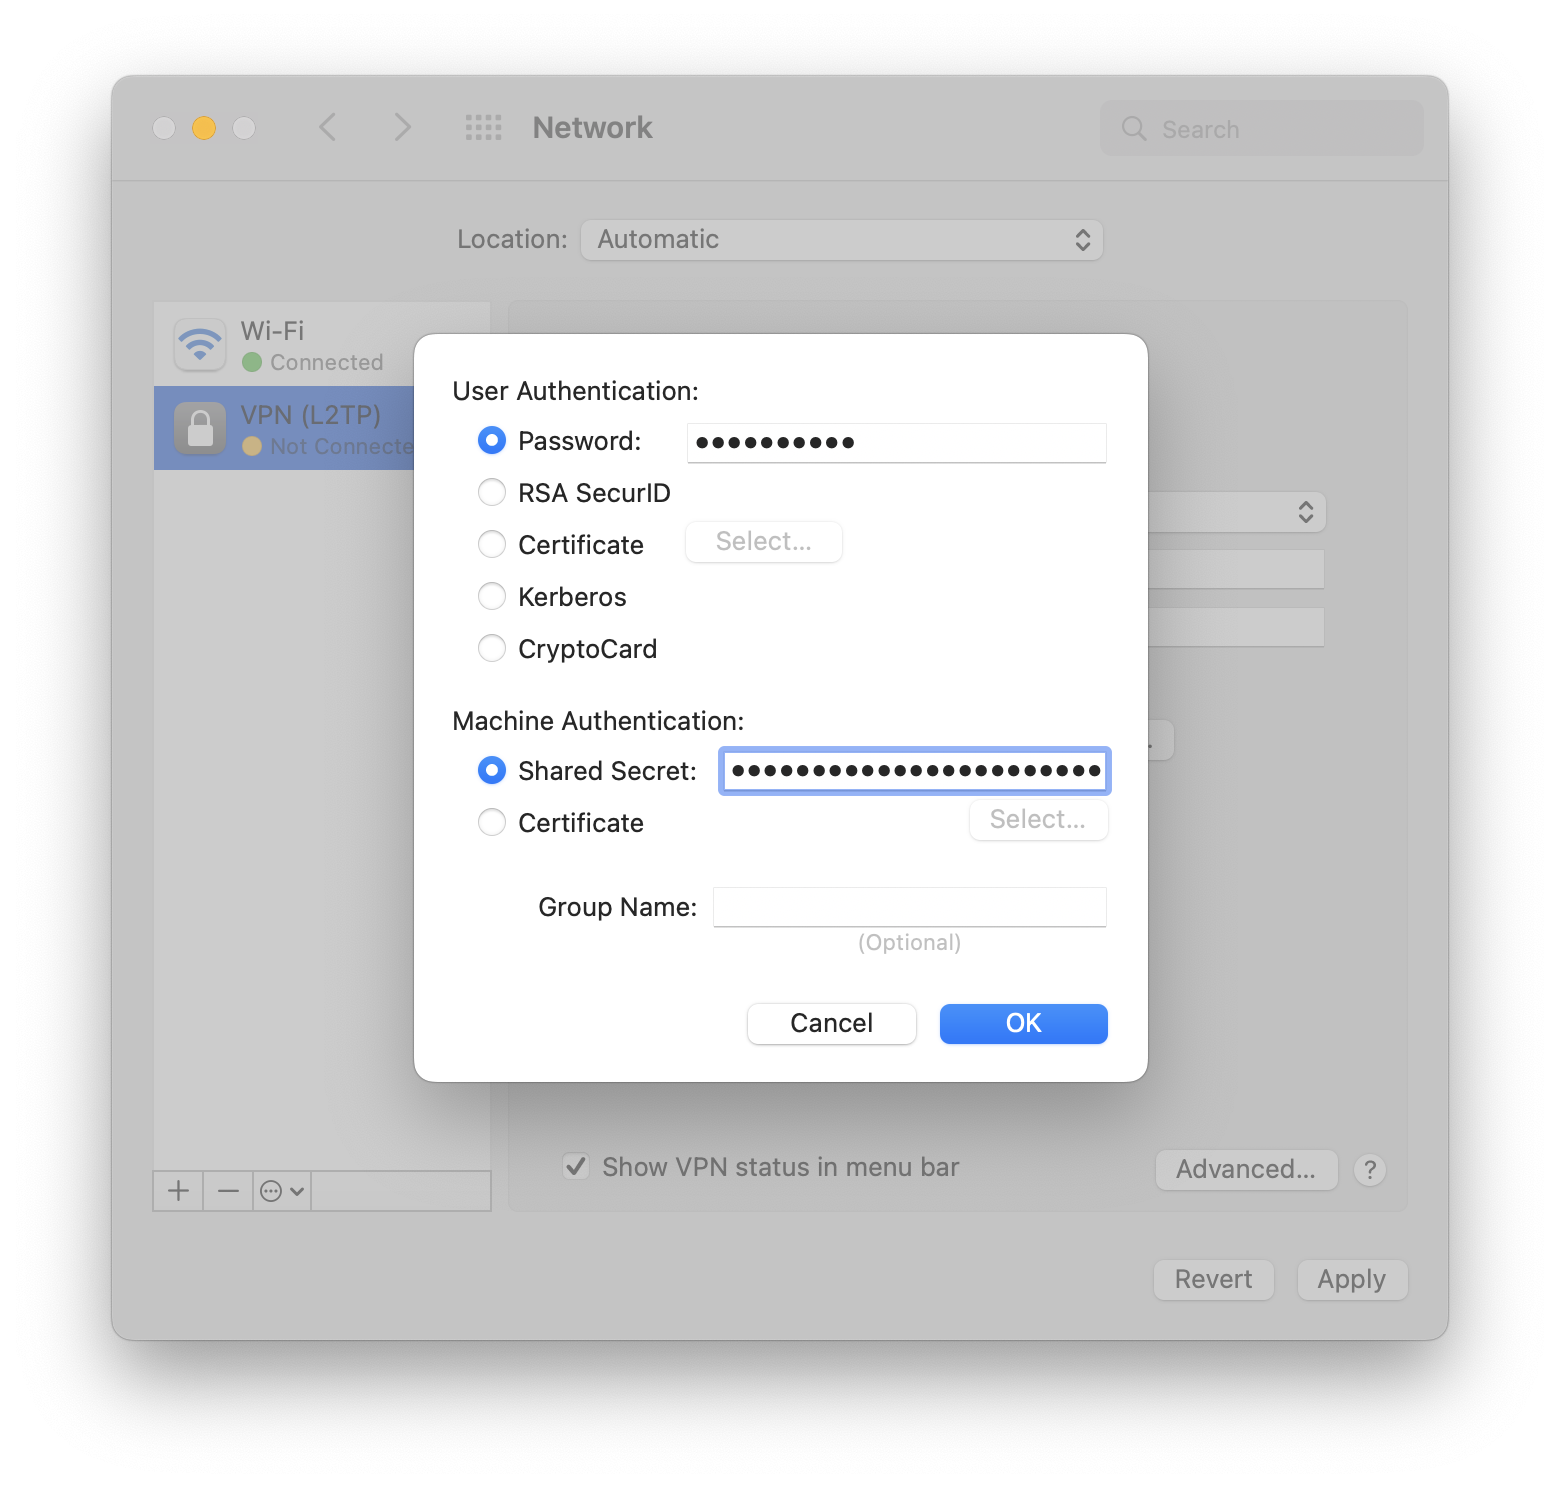](https://docs.safedns.com/uploads/images/gallery/2022-09/aDX4f7xXs061mGrc-13-instructions-for-creating-a-connection-in-mac-os.png)**
8\. Click **OK -> Apply**.
Turn on the VPN connection:
- In the upper-left part of the screen, click on the VPN connection.
- Select *Connect (service name specified in step 3)*:
[](https://docs.safedns.com/uploads/images/gallery/2022-09/LLe0ZKhbQhxaEq3y-14-instructions-for-creating-a-connection-in-mac-os.png)