# Instructions for Creating VPN connection in Ubuntu
Before setting up a VPN connection, in the user tree in the desired user’s card, check the box **Allow remote access via VPN.** To do this, go to **Users -> User & Group**:
[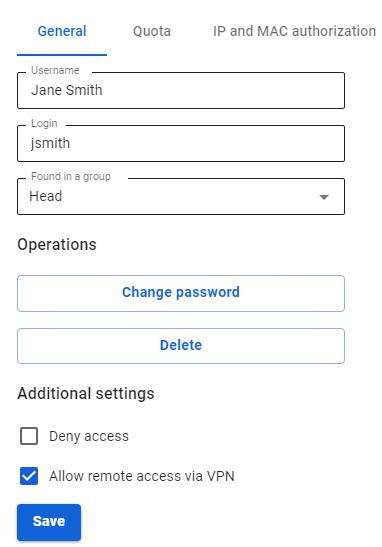](https://docs.safedns.com/uploads/images/gallery/2022-09/nPAzmWJwbZNorTN4-1-instructions-for-creating-vpn-connection-in-ubuntu.png)
---
PPTP Protocol
Before creating a connection in Ubuntu, go to SafeUTM, **Users -> VPN connections,** and check the box **PPTP Connection**:
[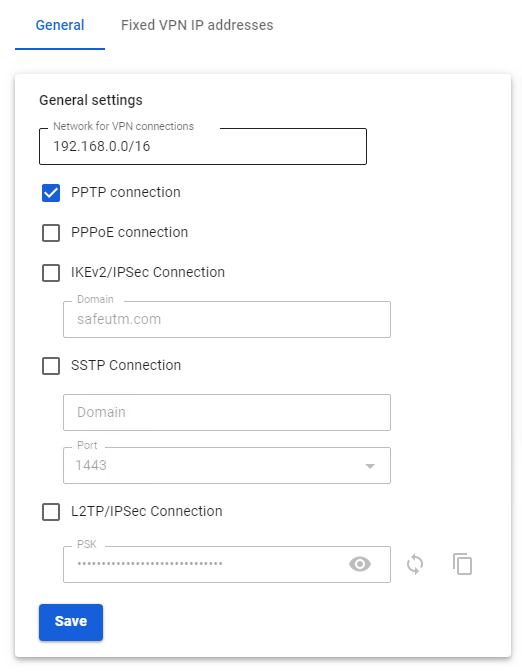](https://docs.safedns.com/uploads/images/gallery/2022-09/jameUxXzfpFg6QqQ-2-instructions-for-creating-vpn-connection-in-ubuntu.png)
**Creating a connection in Ubuntu**
1\. Go to **Settings -> Networks** and in the **VPN** line**,** click **(+)**:
[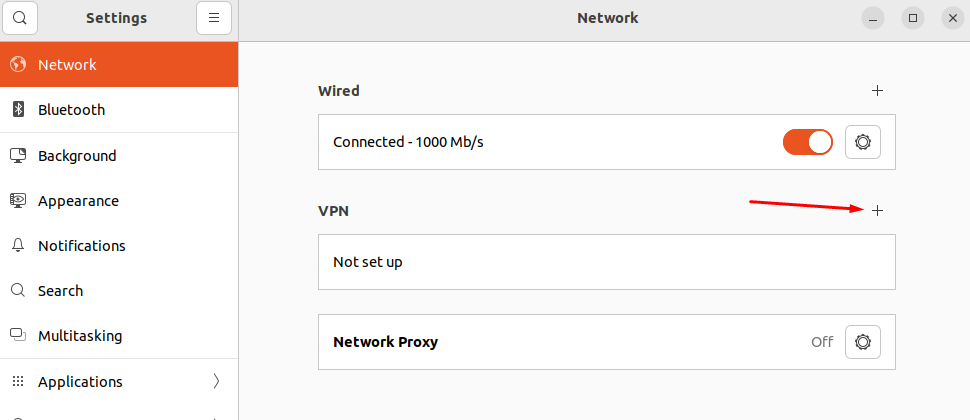](https://docs.safedns.com/uploads/images/gallery/2022-09/LobD8ntHfpCdpcJn-3-instructions-for-creating-vpn-connection-in-ubuntu.png)
2\. In the connection creation window, select **Point-to-Point Tunnel Protocol (PPTP)**:
[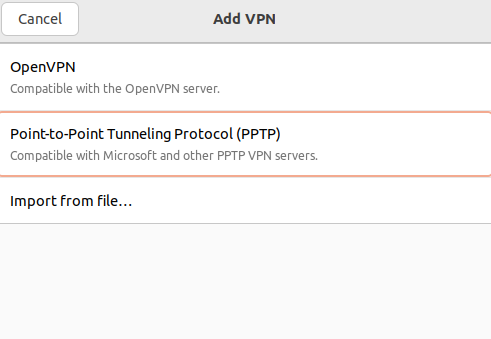](https://docs.safedns.com/uploads/images/gallery/2022-09/McWjRc8VlWWOBEda-4-instructions-for-creating-vpn-connection-in-ubuntu.png)
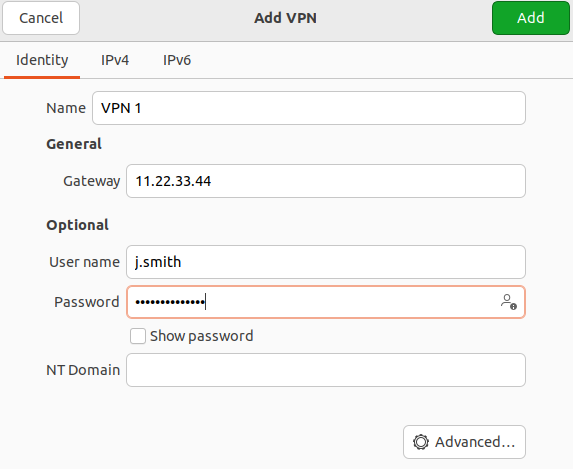
3\. In the **Identification** section fill in the following fields:
- **Name** – the connection name.
- **Gateway** – the domain name or IP address of the UTM interface.
- **Username** – the name of the user allowed to connect via VPN.
- **Password** – the user's password. In the right part of the field, select the storage option for the VPN connection password.
- **NT domain** – leave the field empty.
[](https://docs.safedns.com/uploads/images/gallery/2022-09/ymyUevrAgq5z5HKB-5-instructions-for-creating-vpn-connection-in-ubuntu.png)
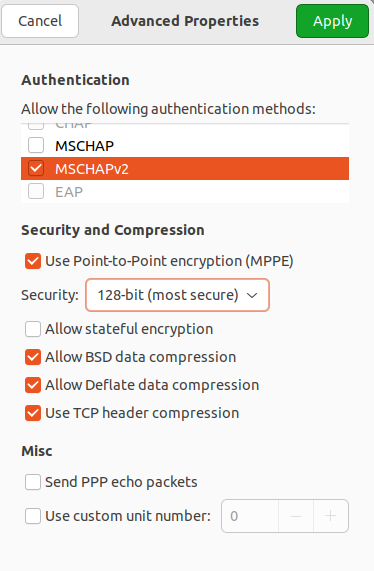
We recommend that you click **Advanced** and check the following:
- **Allow the following authentication methods** – check the item
- **Use MPPE encryption** – in the Encryption line, select 128-bit (the most protected).
- **Use BSD compression for data** – using the BSD-compress algorithm.
- **Use Deflate compression for data** – using Deflate algorithm.
- **Use TCP Header Compression** – using Van Jacobson's TCP/IP header compression method.
[](https://docs.safedns.com/uploads/images/gallery/2022-09/nmjlFvQUeVzulhEh-6-instructions-for-creating-vpn-connection-in-ubuntu.png)
4\. Click **OK** and **Add**.
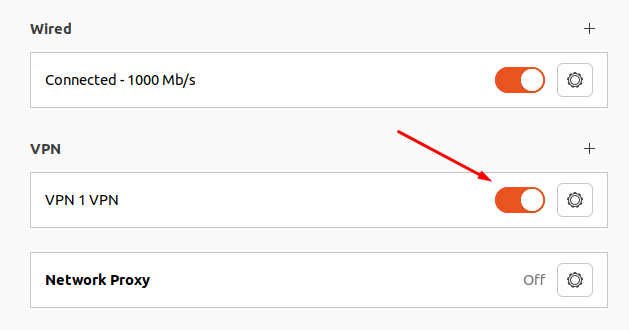
5\. Set the switch of the created VPN connection to the Enabled position:
[](https://docs.safedns.com/uploads/images/gallery/2022-09/ztAsaMuvyk2C5yOx-7-instructions-for-creating-vpn-connection-in-ubuntu.png)
IKEv2/IPsec Protocol
Before creating a connection in Ubuntu, configure SafeUTM:
1\. Go to **Users -> VPN connections**.
2\. Check the box **IKEv2/IPsec** **Connection** and fill in the **Domain** fields:
[](https://docs.safedns.com/uploads/images/gallery/2022-09/6lFZ5wZvaqbC3gkO-8-instructions-for-creating-vpn-connection-in-ubuntu.png)
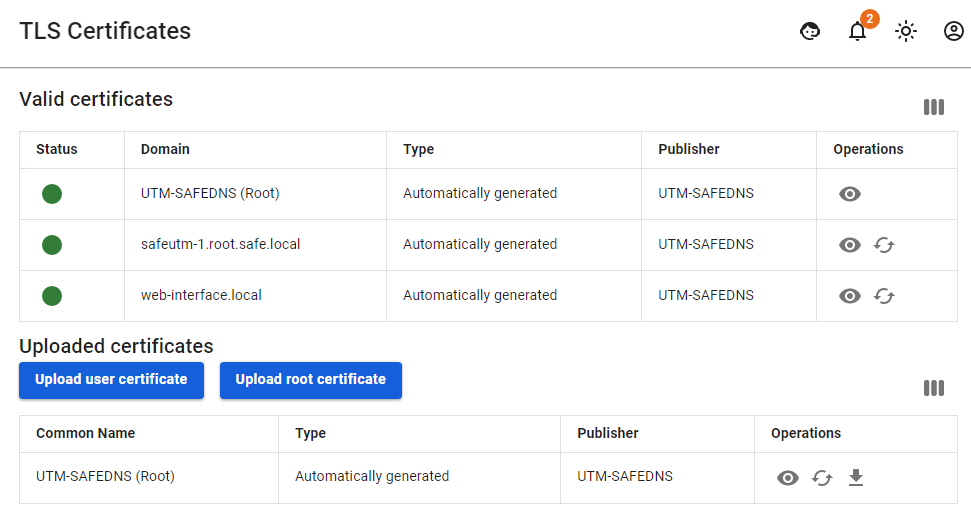
3\. Download the root certificate from **Services -> TLS Certificates**:
[](https://docs.safedns.com/uploads/images/gallery/2022-09/dapxaPqnQuoilSZR-9-instructions-for-creating-vpn-connection-in-ubuntu.png)
The root certificate will be required to configure the connection of the user's workstation if the root certificate was not obtained via Let’s Encrypt. If necessary, transfer the certificate file to the workstation.
If a certificate issued by Let's Encrypt is used for a VPN connection, then installing a root certificate on the device is not required.
##### Creating a connection in Ubuntu
1\. Open the terminal with the keyboard shortcut Ctrl+Alt+F1 and run the command: `sudo apt install -y network-manager-strongswan libcharon-extra-plugins libstrongswan-extra-plugins`
2\. After the installation is complete, restart the computer: `sudo reboot`
3\. Go to **Settings -> Networks** and in the **VPN** line, click (+):
[](https://docs.safedns.com/uploads/images/gallery/2022-09/DLwICOx18DtouT96-10-instructions-for-creating-vpn-connection-in-ubuntu.png)
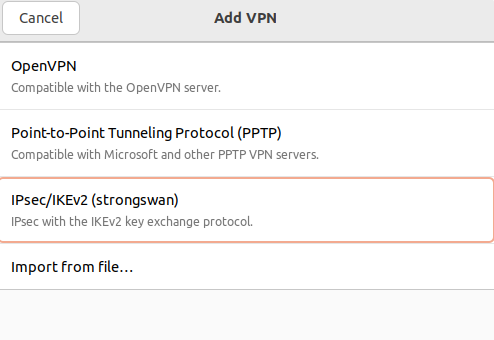
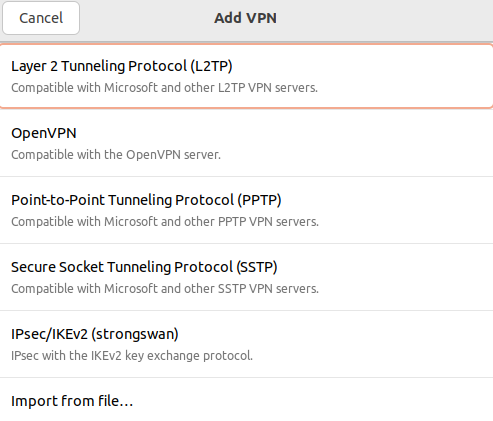
4\. In the window that opens, select **IPsec\\IKEv2 (strongswan)**:
[](https://docs.safedns.com/uploads/images/gallery/2022-09/lUuzniPFCEbcg1j6-11-instructions-for-creating-vpn-connection-in-ubuntu.png)
5\. In **Identification** fill in the following fields:
- **Name** – connection name.
- **Address** – enter the domain specified in **Users -> Authorization -> VPN Connection -> IKEv2/IPsec Connection.**
- **Certificate** – select the previously saved root certificate (if it was not issued by Let's Encrypt).
- **Authentication** – we recommend choosing EAP.
**Username** – the name of the user allowed to connect via VPN.
- **Password** – the user's password. In the right part of the field, select the storage option for the VPN connection password.
Check the box **Request an inner IP address** and click **Add:
[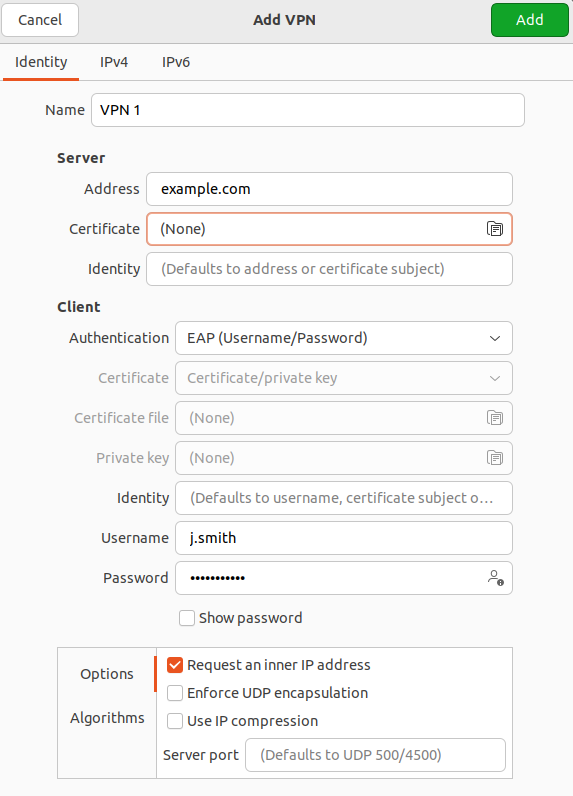](https://docs.safedns.com/uploads/images/gallery/2022-09/66nzuFa2zN9VqO6p-12-instructions-for-creating-vpn-connection-in-ubuntu.png)**
6. Set the switch of the created VPN connection to the Enabled position.
SSTP Protocol
Before creating a connection in Ubuntu, configure SafeUTM:
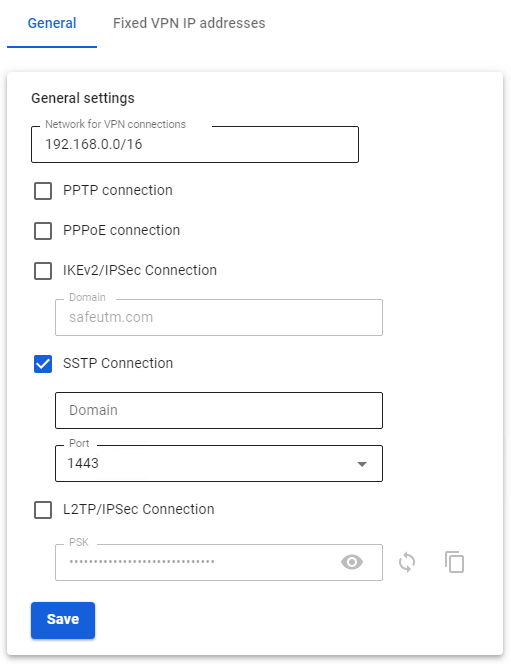
1\. Go to **Users -> VPN connections**.
2\. Check the box **SSTP Connection** and fill in **Domain** and **Port** fields:
[](https://docs.safedns.com/uploads/images/gallery/2022-09/xjaRWQEoShCAur0O-13-instructions-for-creating-vpn-connection-in-ubuntu.png)
##### Creating a connection in Ubuntu
1\. Open the terminal with the keyboard shortcut Ctrl+Alt+F1 and run two commands:
```
sudo apt-add-repository ppa:eivnaes/network-manager-sstp
sudo apt install -y network-manager-sstp sstp-client
```
2\. After the installation is complete, restart the computer: `sudo reboot`
3\. Having installed the packages, go to **Settings -> Networks,** and in the **VPN** line, click (+):
[](https://docs.safedns.com/uploads/images/gallery/2022-09/KQCWsVAWtyAfrrmt-14-instructions-for-creating-vpn-connection-in-ubuntu.png)
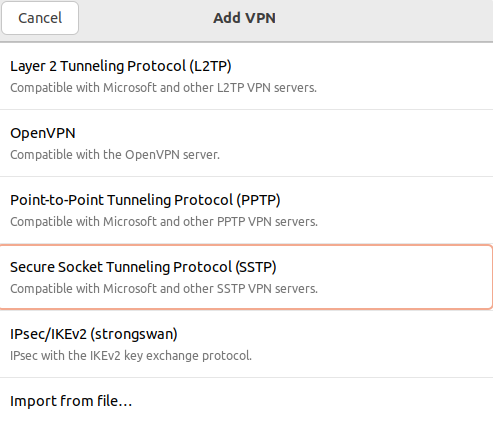
4\. In the window that opens, select **Point-to-Point Tunnel Protocol (SSTP)**:
[](https://docs.safedns.com/uploads/images/gallery/2022-09/VPsR8Jtv2NTXq0Yt-15-instructions-for-creating-vpn-connection-in-ubuntu.png)
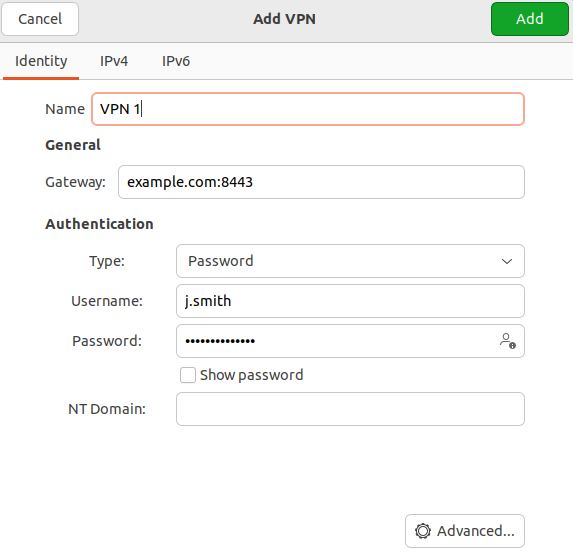
5\. In **Identification** fill in the following fields:
- **Name** – connection name.
- **Gateway** – specify in the format *domain:\[port selected on UTM\].*
- **Username** – the name of the user allowed to connect via VPN.
- **Password** – the user's password. In the right part of the field, select the storage option for the VPN connection password.
- **NT domain** – leave the field empty.
[](https://docs.safedns.com/uploads/images/gallery/2022-09/hadL9k0sWW6pExR9-16-instructions-for-creating-vpn-connection-in-ubuntu.png)
We recommend that you click **Advanced** and check the following:
- **Allow the following authentication methods** – check the item
- **Use MPPE encryption** – in the Encryption line, select 128-bit (the most protected).
- **Use BSD compression for data** – using the BSD-compress algorithm.
- **Use Deflate compression for data** – using Deflate algorithm.
- **Use TCP Header Compression** – using Van Jacobson's TCP/IP header compression method.
6\. Click **Add** and set the switch of the created VPN connection to the Enabled position:
[](https://docs.safedns.com/uploads/images/gallery/2022-09/4hIOMVgmWdEHEaKE-17-instructions-for-creating-vpn-connection-in-ubuntu.png)
L2TP/IPsec Protocol
**Important**: L2TP IPsec clients behind the same NAT may experience connectivity issues if there is more than one. We recommend using IKEv2 IPSec instead of L2TP IPsec.
Before creating a connection, configure SafeUTM:
1\. Go to **Users -> VPN connections**.
2\. Check the box **L2TP/IPsec Connection** and copy the **PSK** key:
[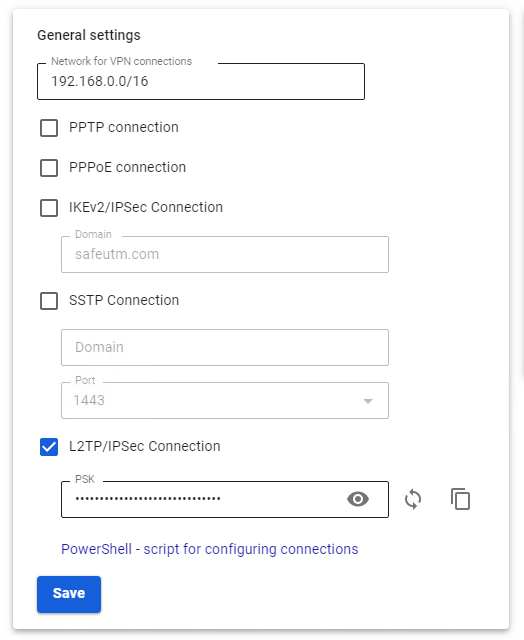](https://docs.safedns.com/uploads/images/gallery/2022-09/h8WhsFe46xVApxPT-18-instructions-for-creating-vpn-connection-in-ubuntu.png)
##### Creating a connection in Ubuntu
1\. Connect the repository that contains the necessary packages to create an L2TP VPN connection, and then update the information about the repositories. To do this, run the following commands:
```
sudo add-apt-repository ppa:nm-l2tp/network-manager-l2tp
sudo apt update
```
2\. Install the add-on to the standard NetworkManager using two packages: `sudo apt install -y network-manager-l2tp network-manager-l2tp-gnome`
3\. After the installation is complete, restart the computer: `sudo reboot`
4\. Having installed the packages, go to **Settings -> Networks** and in the **VPN** line, click (+):
[](https://docs.safedns.com/uploads/images/gallery/2022-09/4hIOMVgmWdEHEaKE-17-instructions-for-creating-vpn-connection-in-ubuntu.png)
5\. In the VPN connection creation window, select **Layer** **2 Tunneling Protocol (L2TP)**:
[](https://docs.safedns.com/uploads/images/gallery/2022-09/5ZIxGecn3tfHTJ2a-19-instructions-for-creating-vpn-connection-in-ubuntu.png)
6 . In the tab **Identification** fill in the following fields:
- **Name** – connection name.
- **Gateway** – the domain name or IP address of the UTM interface.
- **Type** – user authentication by a password.
- **Username** – the name of the user allowed to connect via VPN.
- **Password** – the user's password. In the right part of the field, select the storage option for the VPN connection password.
- **NT domain** – leave the field empty.
[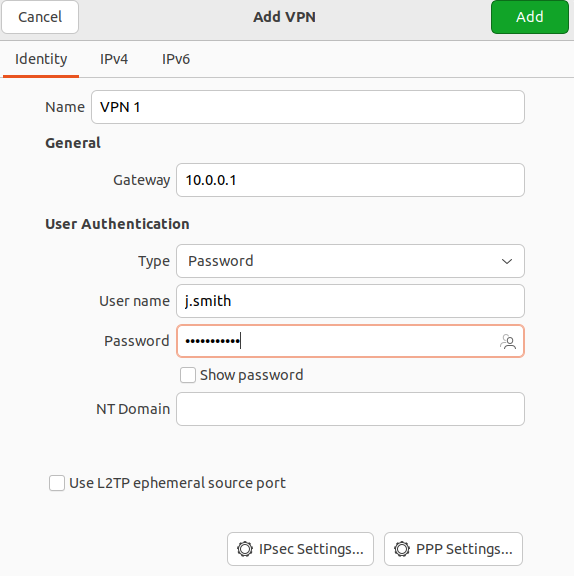](https://docs.safedns.com/uploads/images/gallery/2022-09/ZFvr5lriBbiDyeNr-20-instructions-for-creating-vpn-connection-in-ubuntu.png)
7\. Go to **IPsec settings** and enable **IPsec tunnel to L2TP host** to activate the ability to configure other parameters:
- **Type: Pre-shared key (PSK)** – public key authentication.
- **Pre-shared key** - the key that needs to be copied along the path **Users -> Authorization -> VPN connection** from the field **PSK.**
The section **Advanced** is optional.
[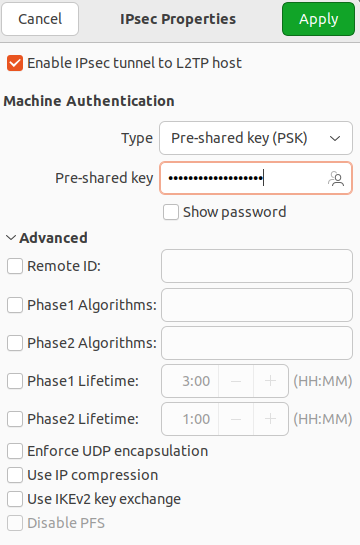](https://docs.safedns.com/uploads/images/gallery/2022-09/jBbkOoQpwC2BaIRF-21-instructions-for-creating-vpn-connection-in-ubuntu.png)
Having finished configuring L2TP **IPsec Options,** click **OK.**
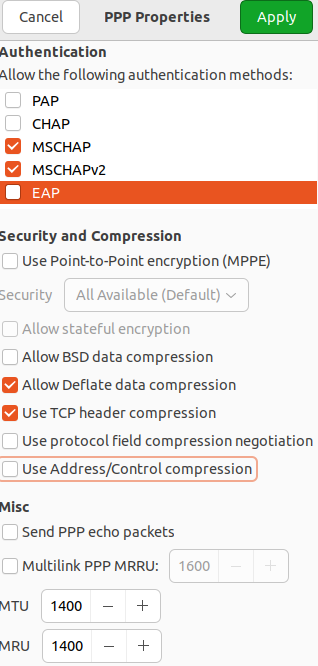
8\. If necessary, go to **PPR settings** and configure **Authentication**, **Encryption and Compression,** and **Other**:
[](https://docs.safedns.com/uploads/images/gallery/2022-09/LnYYcco0xqGM6rnv-22-instructions-for-creating-vpn-connection-in-ubuntu.png)
After setting up **PPR parameters** click OK** and **Apply**.
9\. Set the switch of the created VPN connection to the Enabled position:
[](https://docs.safedns.com/uploads/images/gallery/2022-09/7h9Urvdl67djkbne-23-instructions-for-creating-vpn-connection-in-ubuntu.png)