# Active Directory


# Active Directory setup: SafeDNS Dashboard configuration.

##### 1. Create the domain on the SafeDNS Dashboard.  


After receiving the SafeDNS AD Agent from SafeDNS support, you need to add the name of your local domain controller to the dashboard. This is necessary to authorize your AD environment on the SafeDNS dashboard. Before adding, please make sure your subscription plan is one of the business plans and not the Reseller one.

Filtering rules of AD users can be managed under the “Active Directory" tab:

[https://ad.safedns.com/users](https://ad.safedns.com/users)

[![image-1722110364688.png](https://docs.safedns.com/uploads/images/gallery/2024-07/scaled-1680-/tguukSWEH1wonUeh-image-1722110364688.png)](https://docs.safedns.com/uploads/images/gallery/2024-07/tguukSWEH1wonUeh-image-1722110364688.png)

Please go to the Domains Tab and create a domain. Please note that the domain name should be the real one used on the AD server. We are using the domain name SafeDNS.local as an example.

Enter the domain name and press the "Create" button:

[![image-1722110669310.png](https://docs.safedns.com/uploads/images/gallery/2024-07/scaled-1680-/CvsPOEX3RT03QKuK-image-1722110669310.png)](https://docs.safedns.com/uploads/images/gallery/2024-07/CvsPOEX3RT03QKuK-image-1722110669310.png)

After adding the DC to the list, please install the Agent application file.

The agent is a signed MSI file with added user authorization credentials.

<p class="callout info">The credentials can either be an identification token for installation with AD functionality, or a login and password if you are installing the agent without AD functionality. If you install the agent without the credentials, you will need to log into each agent manually.</p>

The client installs the package via GPO for the required number of users.

<p class="callout info">The guide below shows the process of the Agent application installation on the Active Directory environment:</p>

##### [https://docs.safedns.com/books/installation-guides/page/safedns-ad-agent-environment-configuration](https://docs.safedns.com/books/installation-guides/page/safedns-ad-agent-environment-configuration)

##### 2. SafeDNS Dashboard configuration (continue)  


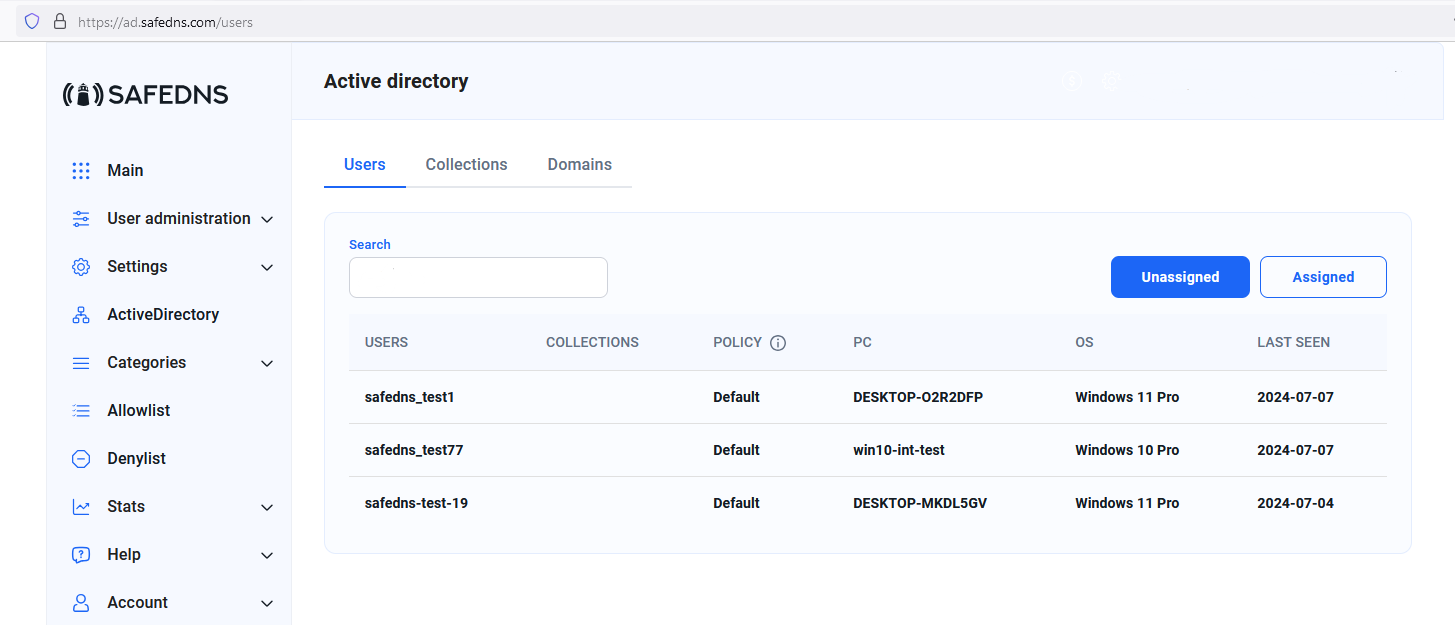
After the Agent`s installation is complete, the agent starts automatically when the user logs in and transmits information about the user to the Dashboard on the "ActiveDirectory" page, "Users" submenu. Once the User appears on the list, he is not associated with any filtering profile. To allocate the user with the filtering profile please go to the Collections tab.

[![image-1722110978059.png](https://docs.safedns.com/uploads/images/gallery/2024-07/scaled-1680-/FhmGEGT33lzOPEsL-image-1722110978059.png)](https://docs.safedns.com/uploads/images/gallery/2024-07/FhmGEGT33lzOPEsL-image-1722110978059.png)
##### 3. Allocating users with the filtering Policy.  


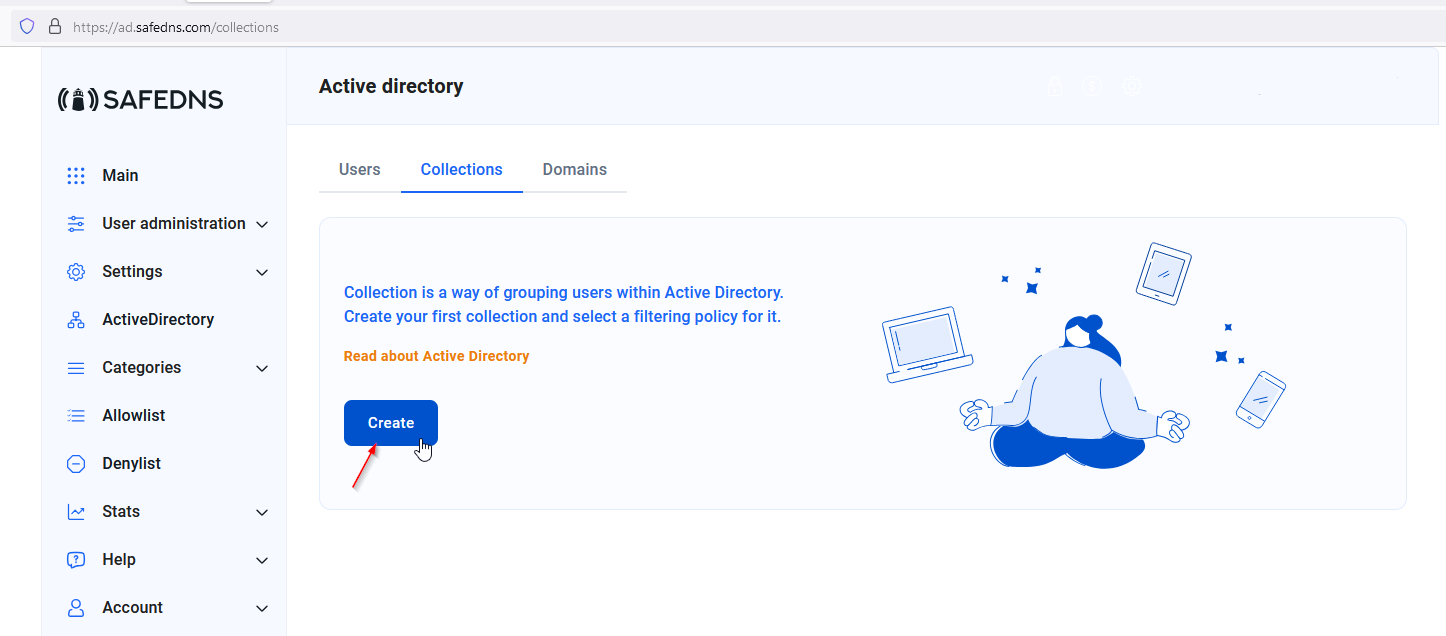
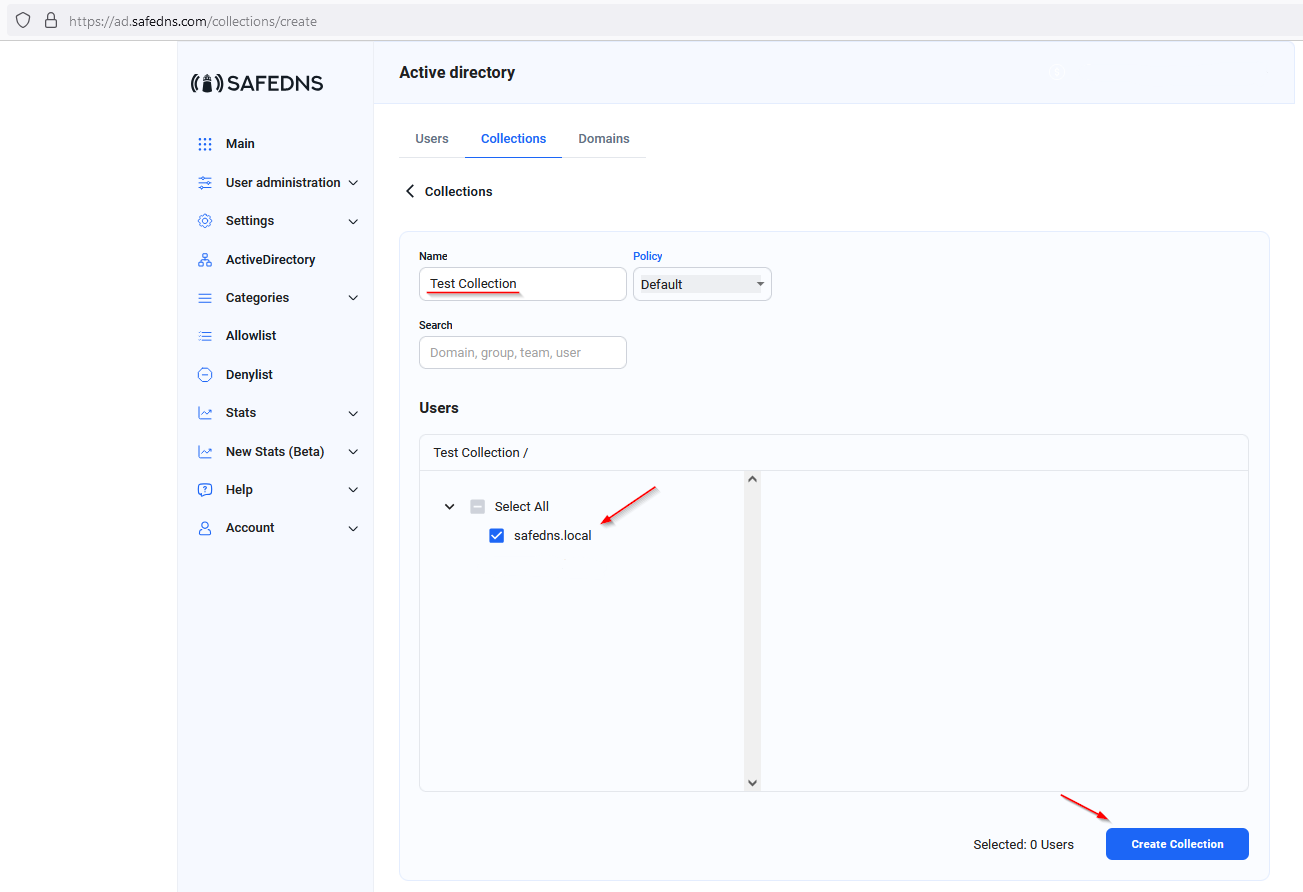
To start filtering create a Collection in the "Collections" tab:

[![image-1722111108970.png](https://docs.safedns.com/uploads/images/gallery/2024-07/scaled-1680-/3xvYzF98sD3mc2OW-image-1722111108970.png)](https://docs.safedns.com/uploads/images/gallery/2024-07/3xvYzF98sD3mc2OW-image-1722111108970.png)
1\. Enter the name of the Collection;

2\. Choose the domain name;

3\. Press the "Save Collection" button;

[![image-1722115683684.png](https://docs.safedns.com/uploads/images/gallery/2024-07/scaled-1680-/uPt4sAVTcFpCQSlt-image-1722115683684.png)](https://docs.safedns.com/uploads/images/gallery/2024-07/uPt4sAVTcFpCQSlt-image-1722115683684.png)
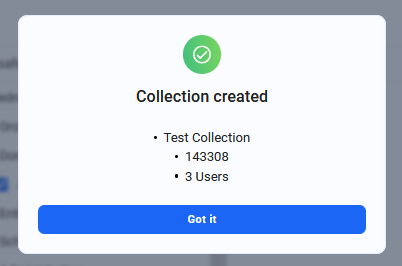
Once the collection is created, the following window will appear:

[![image-1722116750272.png](https://docs.safedns.com/uploads/images/gallery/2024-07/scaled-1680-/4O7F4FHEh1XlGBF4-image-1722116750272.png)](https://docs.safedns.com/uploads/images/gallery/2024-07/4O7F4FHEh1XlGBF4-image-1722116750272.png)
##### 4. Collection Overview

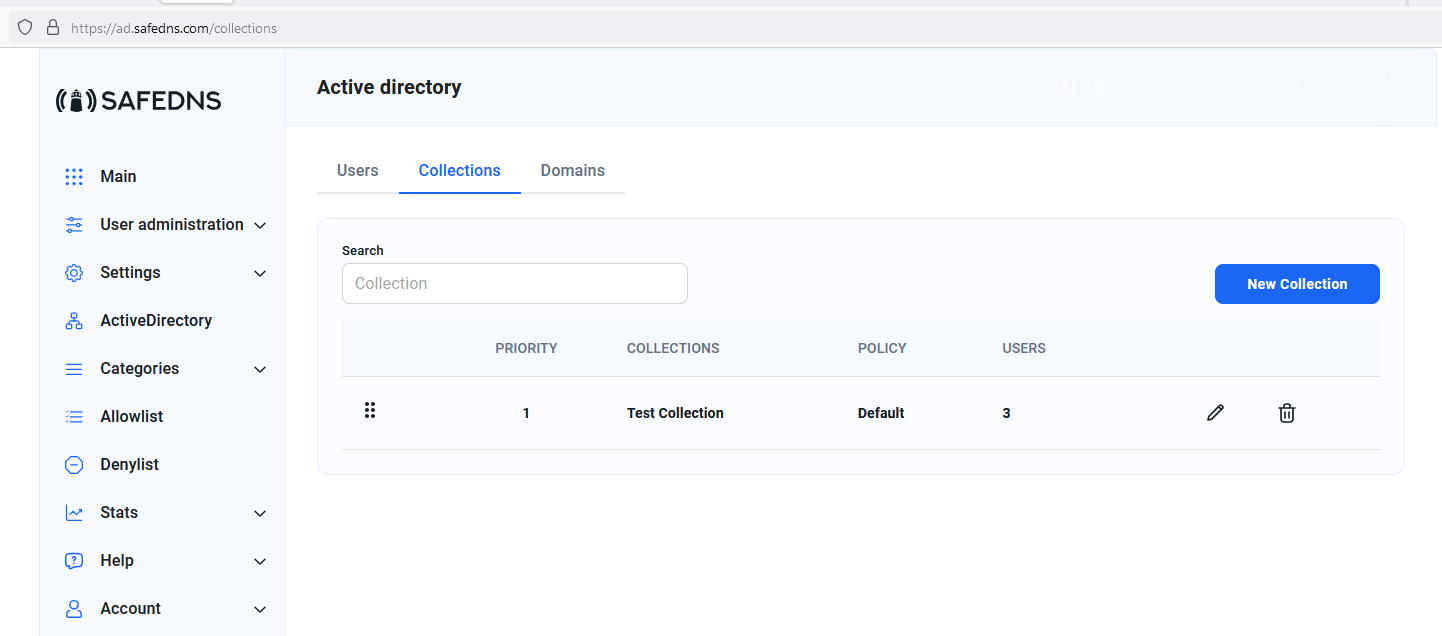
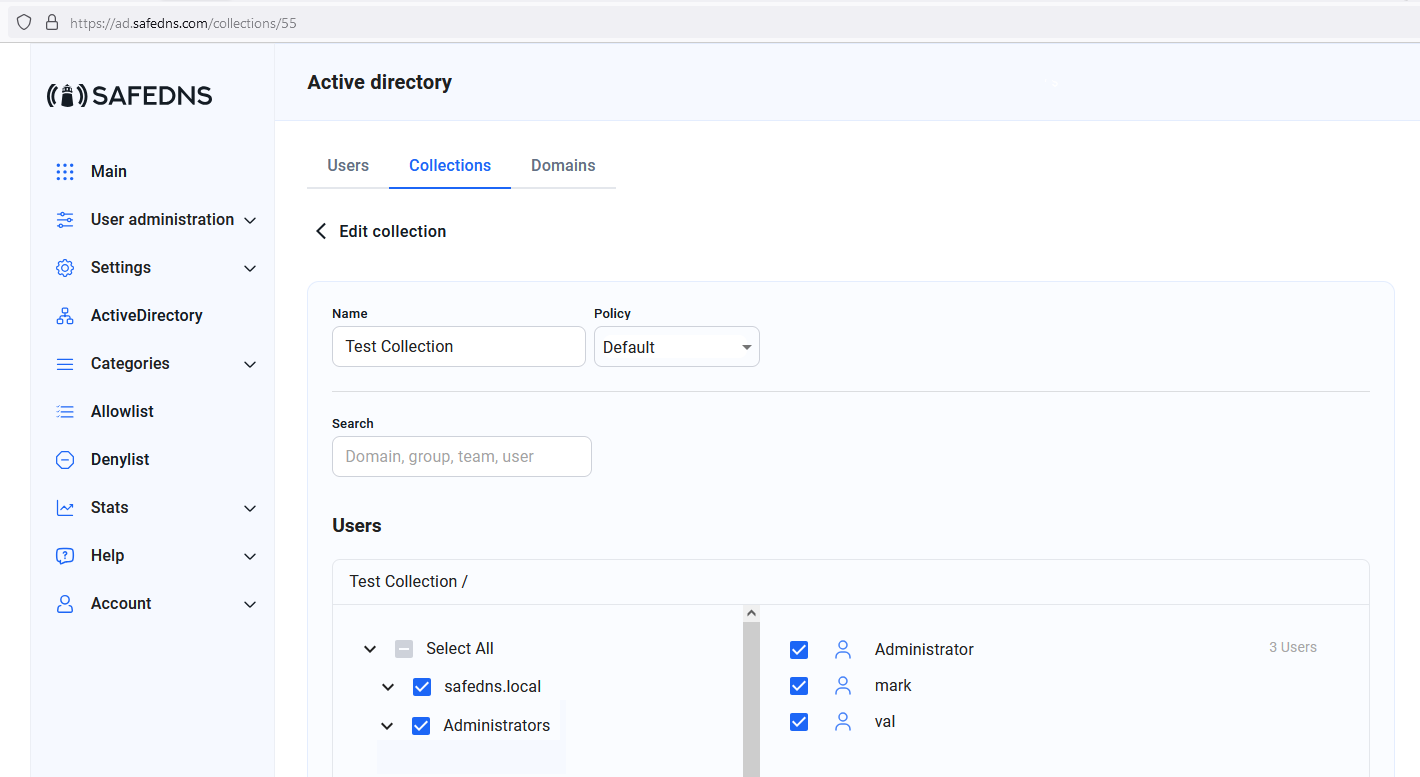
Once the Users are allocated with the Filtering policy, the Collection tab looks the following way:

[![image-1722116823435.png](https://docs.safedns.com/uploads/images/gallery/2024-07/scaled-1680-/0acAUb2gEyXIgjcG-image-1722116823435.png)](https://docs.safedns.com/uploads/images/gallery/2024-07/0acAUb2gEyXIgjcG-image-1722116823435.png)
[![image-1722117616284.png](https://docs.safedns.com/uploads/images/gallery/2024-07/scaled-1680-/zL4TPIgRPHB6zgAc-image-1722117616284.png)](https://docs.safedns.com/uploads/images/gallery/2024-07/zL4TPIgRPHB6zgAc-image-1722117616284.png)
##### 5. Users tab overview  


Once the Users are allocated with the Policies, the User tab shows the detailed information:

[![image-1722117823217.png](https://docs.safedns.com/uploads/images/gallery/2024-07/scaled-1680-/4iVJay5KJsc9TvgL-image-1722117823217.png)](https://docs.safedns.com/uploads/images/gallery/2024-07/4iVJay5KJsc9TvgL-image-1722117823217.png)
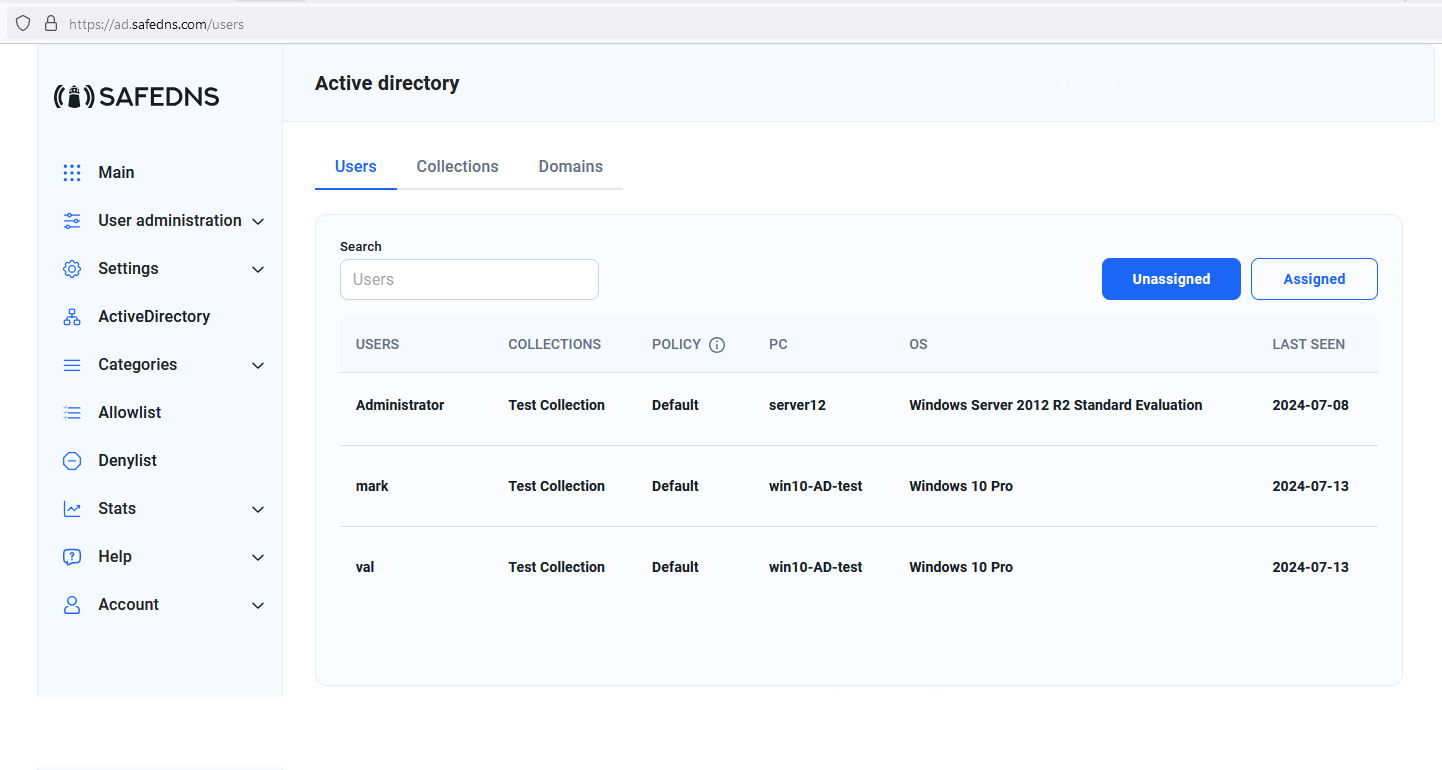
# SafeDNS and local resources

This guide explains how to set up the SafeDNS service in the Active Directory environment with the SafeDNS Dashboard.

#### Manual Setup in the Dashboard

One of the main ways to gain access to AD resources without using the safeDNS agent is to use special options available on Office/Enterprise plans.

You must add SafeDNS DNS-servers addresses - **195.46.39.39** and **195.46.39.40** - to the DNS forwarder on your Primary Domain Controller (and secondary, if applicable), so all devices in a filtered network receive SafeDNS IP addresses as the DNS. After this you need to add your external IP address to the dashboard.

Navigate to **Dashboard -&gt; Settings -&gt; Devices** and add your external IP in the section "IP addresses/DynDNS".

[![1. SafeDNS and Active Directory.png](https://docs.safedns.com/uploads/images/gallery/2024-08/scaled-1680-/FIP0HKxn982piWKP-1-safedns-and-active-directory.png)](https://docs.safedns.com/uploads/images/gallery/2024-08/FIP0HKxn982piWKP-1-safedns-and-active-directory.png)
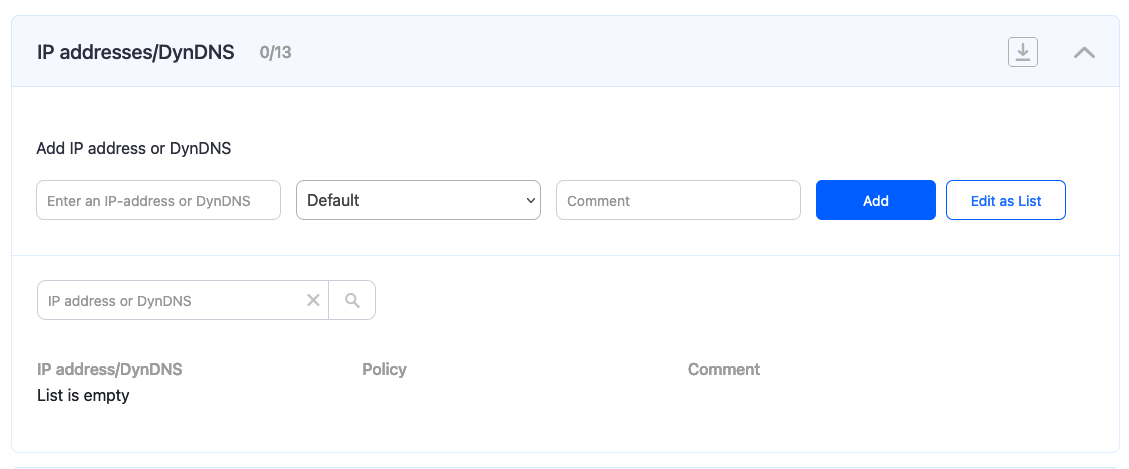
#### Grant access to local resources.

1\. Navigate to **Dashboard -&gt; Settings -&gt; Advanced -&gt; Active Directory**.

2\. Enter and add your AD **domain** in the form.

[![2. SafeDNS and Active Directory.png](https://docs.safedns.com/uploads/images/gallery/2024-08/scaled-1680-/Y113X9uER9P6bTlW-2-safedns-and-active-directory.png)](https://docs.safedns.com/uploads/images/gallery/2024-08/Y113X9uER9P6bTlW-2-safedns-and-active-directory.png)
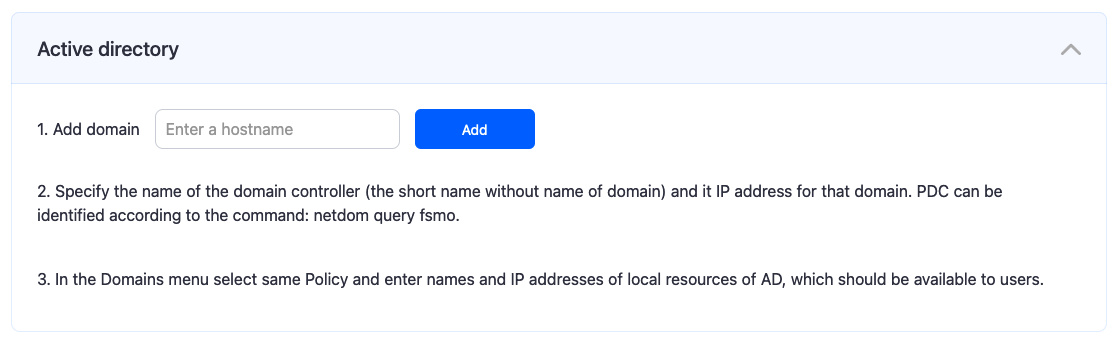
3\. Enter and add the **name** of the PDC (Primary Domain Controller) and its **IP address** in the local network.

[![3. SafeDNS and Active Directory.png](https://docs.safedns.com/uploads/images/gallery/2024-08/scaled-1680-/u5MYiddKxF8Wsm2D-3-safedns-and-active-directory.png)](https://docs.safedns.com/uploads/images/gallery/2024-08/u5MYiddKxF8Wsm2D-3-safedns-and-active-directory.png)
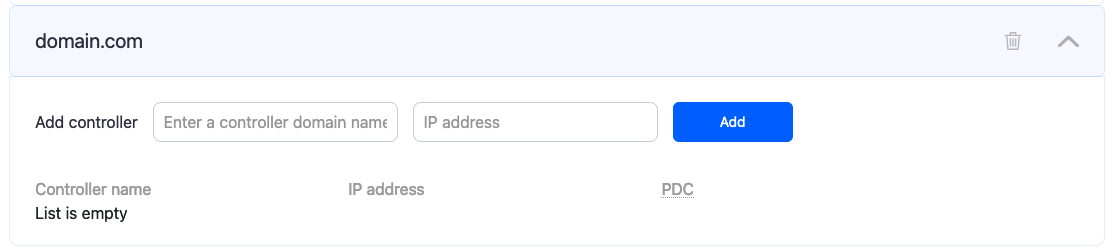
4\. Add **secondary** domain controllers, if applicable. You can change the **PDC** by clicking on the pencil icon on the right.

[![4. SafeDNS and Active Directory.png](https://docs.safedns.com/uploads/images/gallery/2024-08/scaled-1680-/Zf21sGriNmPyuBkP-4-safedns-and-active-directory.png)](https://docs.safedns.com/uploads/images/gallery/2024-08/Zf21sGriNmPyuBkP-4-safedns-and-active-directory.png)
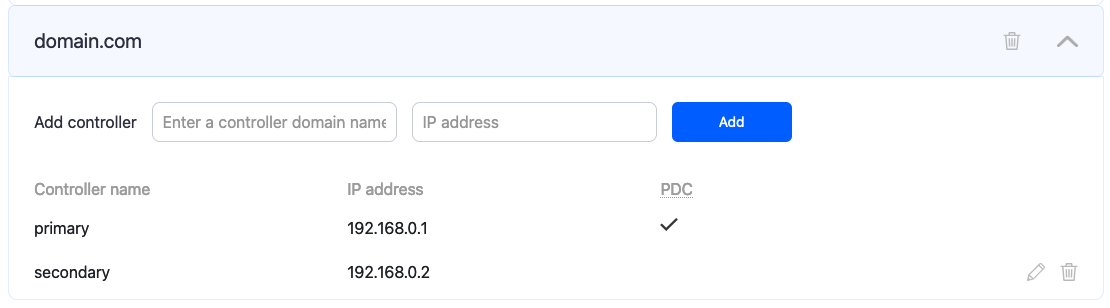
5\. Set aliases for all required local resources in the **Aliases** table below. Enter the **name of a local resource** and its **local IP address**.[![5. SafeDNS and Active Directory.png](https://docs.safedns.com/uploads/images/gallery/2024-08/scaled-1680-/3mlFsPYGtzJlYrw9-5-safedns-and-active-directory.png)](https://docs.safedns.com/uploads/images/gallery/2024-08/3mlFsPYGtzJlYrw9-5-safedns-and-active-directory.png)
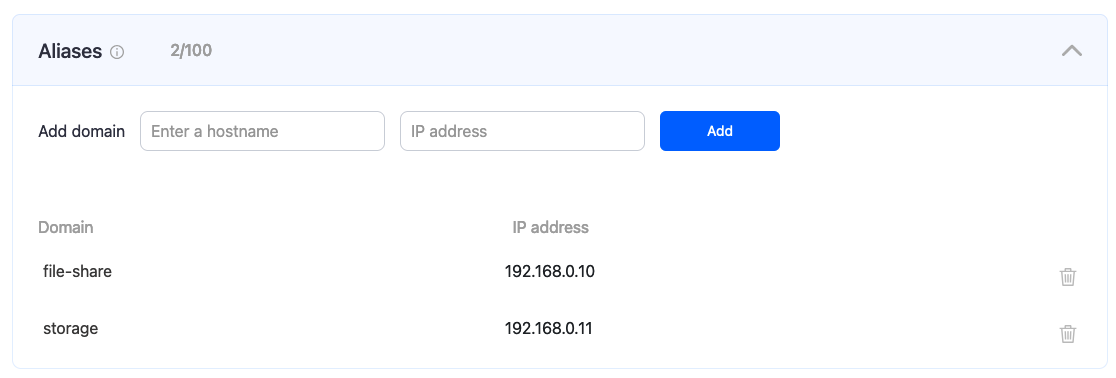
6\. Wait about **5-7 minutes** until all local resources become accessible.

<div class="pointer-container" id="bkmrk-%C2%A0"><div class="pointer anim is-page-editable"><svg class="svg-icon" data-icon="link" role="presentation" viewbox="0 0 24 24" xmlns="http://www.w3.org/2000/svg"></svg><div class="input-group inline block"> <button class="button outline icon" data-clipboard-target="#pointer-url" title="Copy Link" type="button"><svg class="svg-icon" data-icon="copy" role="presentation" viewbox="0 0 24 24" xmlns="http://www.w3.org/2000/svg"></svg></button></div><svg class="svg-icon" data-icon="edit" role="presentation" viewbox="0 0 24 24" xmlns="http://www.w3.org/2000/svg"></svg></div></div><p class="callout warning">Please note that settings take 5-7 minutes to apply.  
Stats and filtering status update every 10 minutes.  
</p>

# SafeDNS Agent Intune installation

#### 1. Setting up the Intune environment

Firstly, need to set up the user, and domain in the Intune panel, add the software, configure it, and then log in to the Microsoft/Intune account from the client's computer.

To install the SafeDNS agent, download the **.exe** installation file from the SafeDNS Dashboard. Then the installation file should be converted into a **.intunewin** file.

<p class="callout info">Before starting the installation ensure that the necessary licenses are active.  
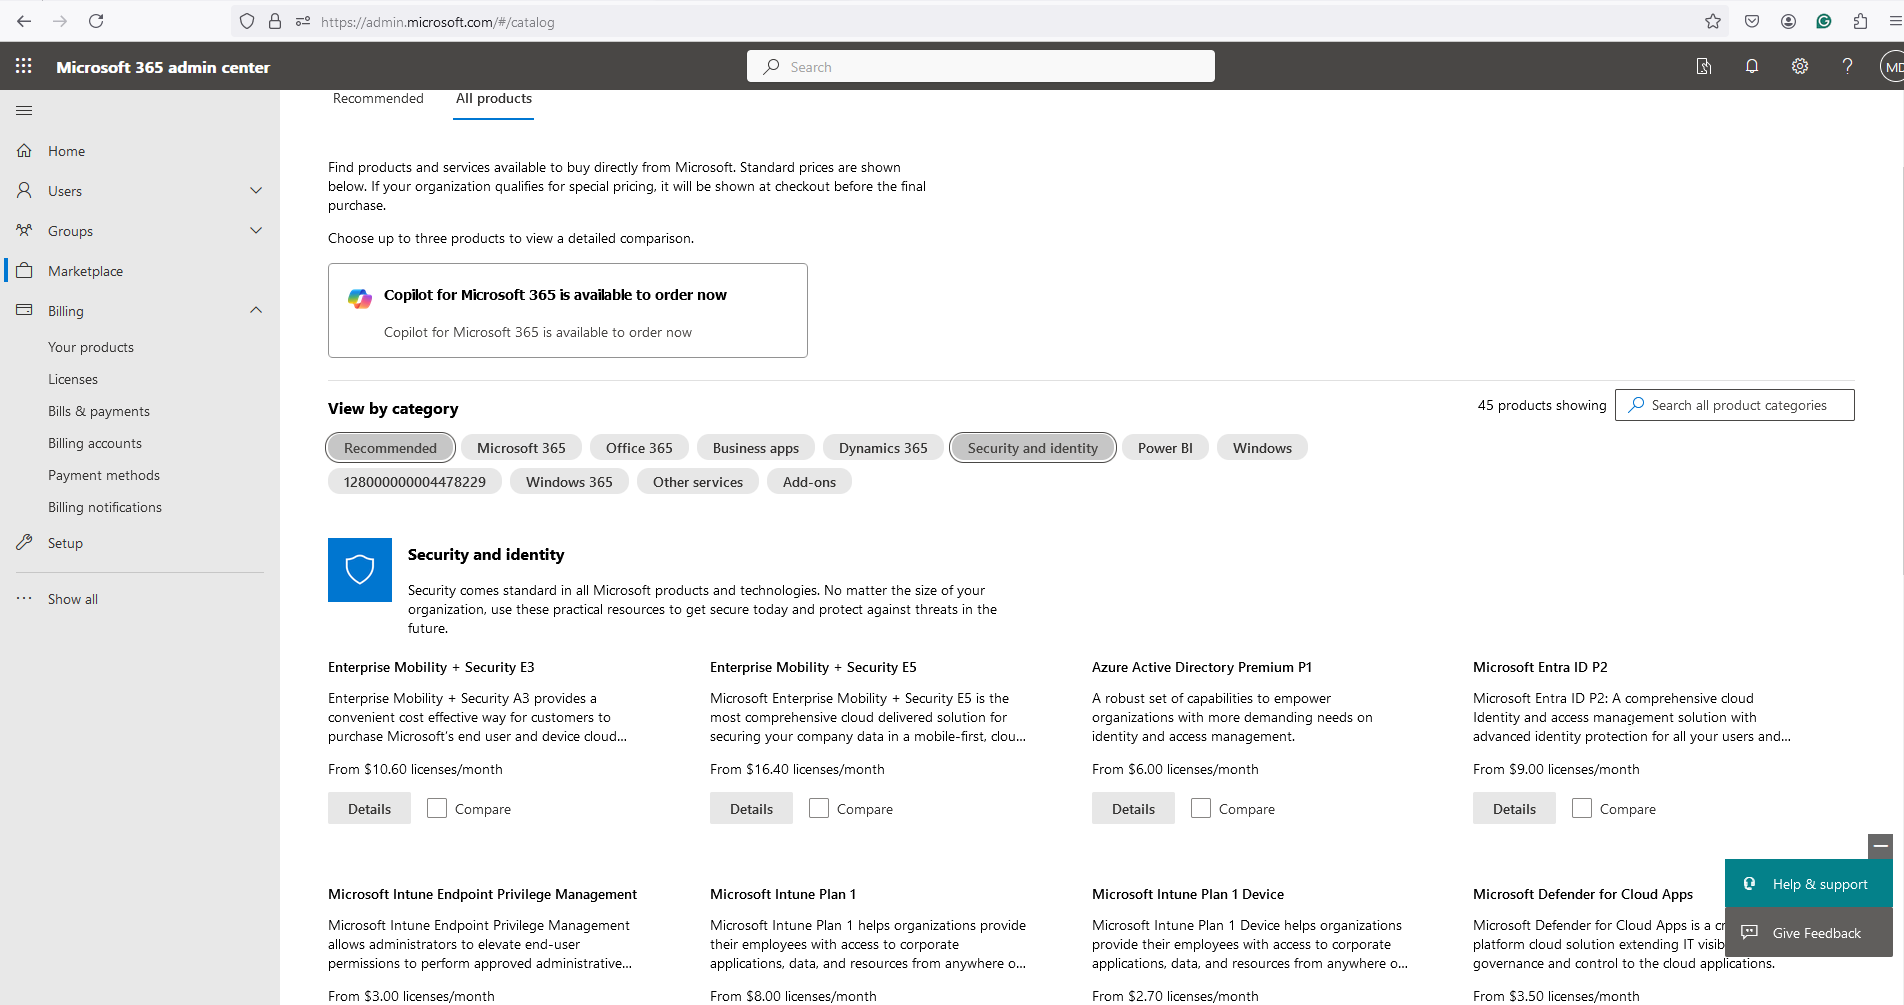
If there are no licenses, go to **Marketplace** &gt; **All Products** &gt; **Security and Identity** and select needed licences.</p>

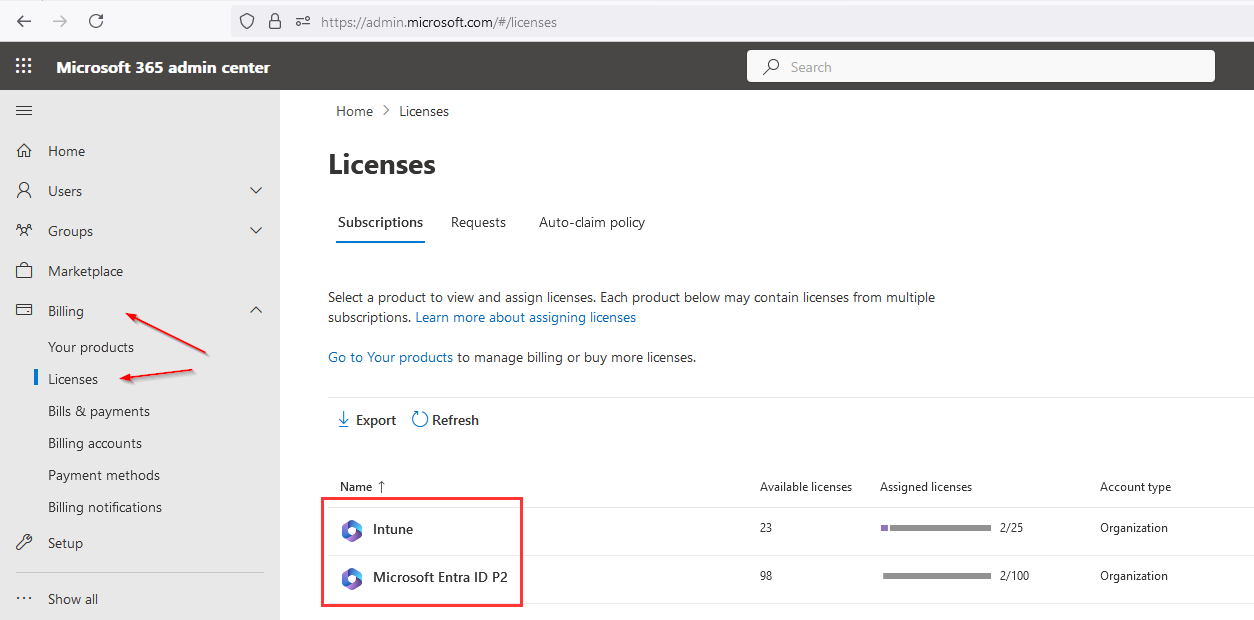
1\. Open Microsoft 365 Admin Center: [https://admin.microsoft.com.](https://admin.microsoft.com/) Select **Billing** &gt; **Licenses**  
Make sure that the following licenses are active:

1\. Intune  
2\. Microsoft Entra licenses ID P2

[![image-1719870095958.png](https://docs.safedns.com/uploads/images/gallery/2024-07/scaled-1680-/48IYhjbKDHAyP2CA-image-1719870095958.png)](https://docs.safedns.com/uploads/images/gallery/2024-07/48IYhjbKDHAyP2CA-image-1719870095958.png)
2\. If there are no licenses, go to **Marketplace** &gt; **All Products** &gt; **Security and Identity**, select the licenses listed above, and order them.

[![intune installation1.png](https://docs.safedns.com/uploads/images/gallery/2025-06/scaled-1680-/qvhHGZNbPCHQcfNH-intune-installation1.png)](https://docs.safedns.com/uploads/images/gallery/2025-06/qvhHGZNbPCHQcfNH-intune-installation1.png)
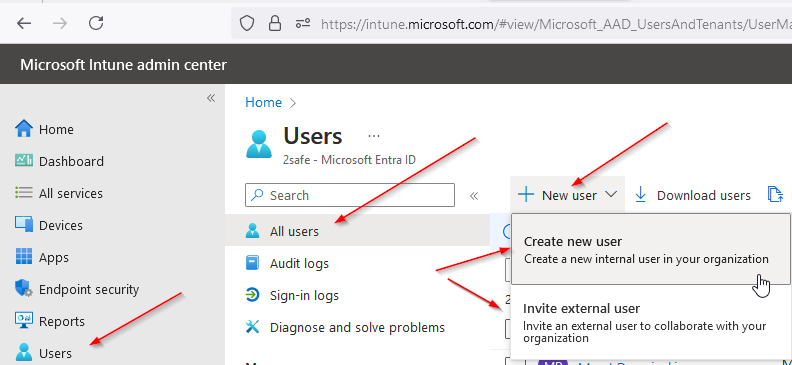
3\. The next step is creating/adding users to log in from client computers. New users can be created or invited to existing external users.

[![image-1719870128052.png](https://docs.safedns.com/uploads/images/gallery/2024-07/scaled-1680-/m6zFpqjEV7eFMyXB-image-1719870128052.png)](https://docs.safedns.com/uploads/images/gallery/2024-07/m6zFpqjEV7eFMyXB-image-1719870128052.png)
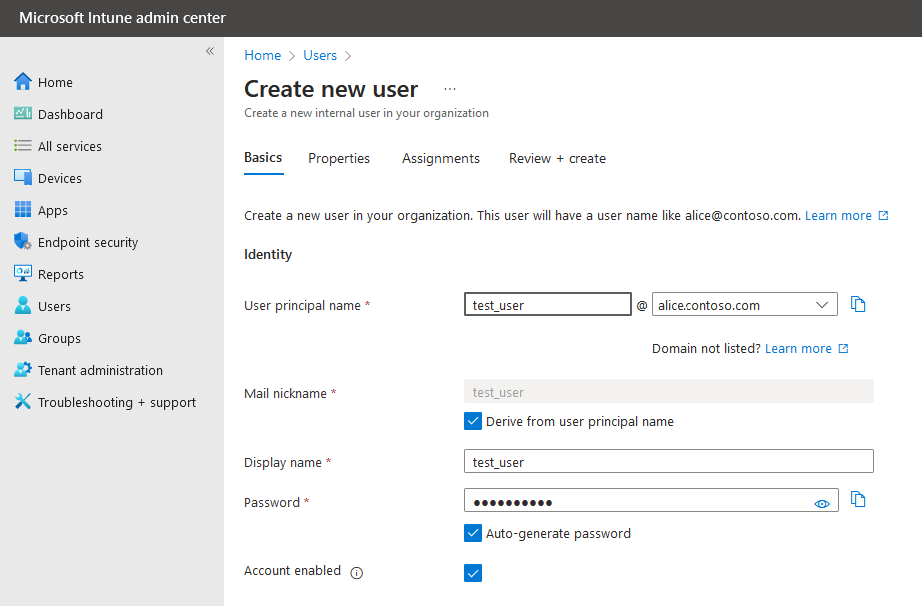
4\. Creating the username, nickname, display name, and password:

[![image-1719870156017.png](https://docs.safedns.com/uploads/images/gallery/2024-07/scaled-1680-/5KJkNlKmggYvE4b3-image-1719870156017.png)](https://docs.safedns.com/uploads/images/gallery/2024-07/5KJkNlKmggYvE4b3-image-1719870156017.png)
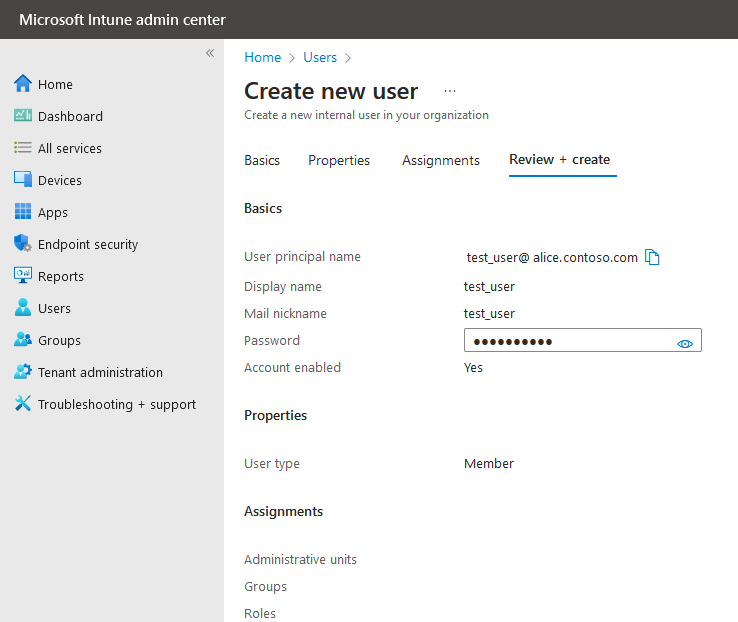
5\. Review and check the parameters, then finish the process of user creation:

[![image-1719870225845.png](https://docs.safedns.com/uploads/images/gallery/2024-07/scaled-1680-/rJN3nilchm3l0Ck9-image-1719870225845.png)](https://docs.safedns.com/uploads/images/gallery/2024-07/rJN3nilchm3l0Ck9-image-1719870225845.png)
6\. Go to the Intune admin panel: [https://intune.microsoft.com](https://intune.microsoft.com/)  
There might be a need to enter a password or use the Microsoft authenticator from the phone  
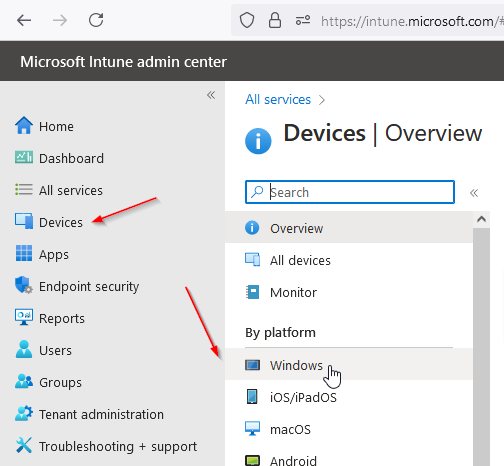
Go to **Devices** &gt; **Windows:**

[![image-1719870242916.png](https://docs.safedns.com/uploads/images/gallery/2024-07/scaled-1680-/nabGlgkbWmcTwvZs-image-1719870242916.png)](https://docs.safedns.com/uploads/images/gallery/2024-07/nabGlgkbWmcTwvZs-image-1719870242916.png)

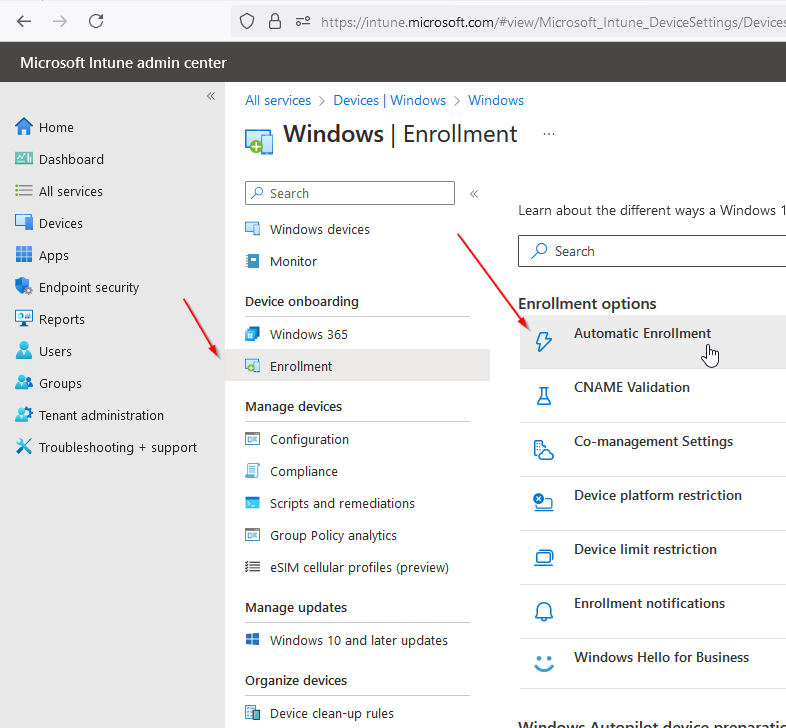
7\. Select **Enrollment** &gt; **Automatic Enrollment:**

[![image-1719870250730.png](https://docs.safedns.com/uploads/images/gallery/2024-07/scaled-1680-/LPQdvRZtQIF4TeVt-image-1719870250730.png)](https://docs.safedns.com/uploads/images/gallery/2024-07/LPQdvRZtQIF4TeVt-image-1719870250730.png)

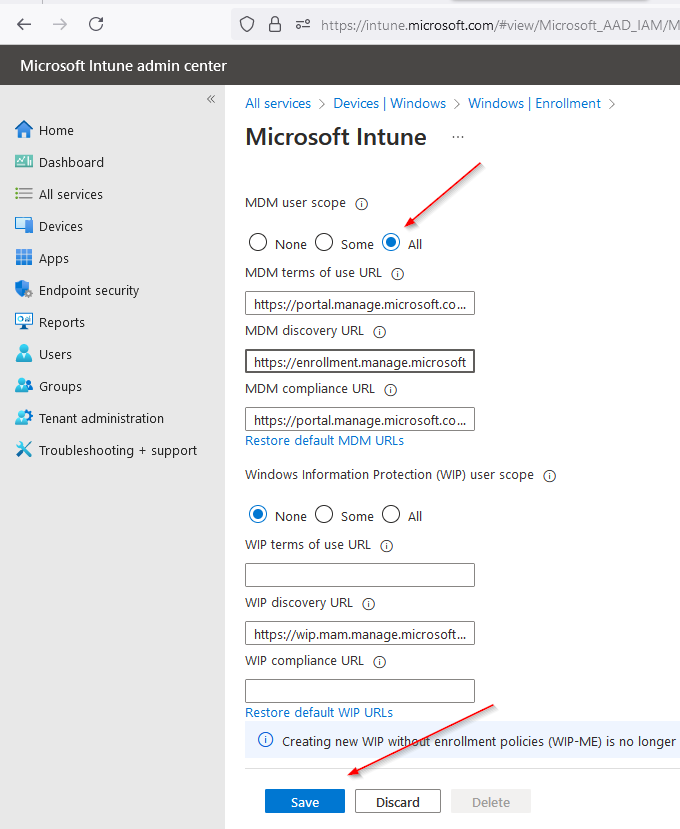
8\. Activate **MDM user Scope** &gt; **All** and **Save** the settings:

[![image-1719870265104.png](https://docs.safedns.com/uploads/images/gallery/2024-07/scaled-1680-/804T1LQepmucYIxQ-image-1719870265104.png)](https://docs.safedns.com/uploads/images/gallery/2024-07/804T1LQepmucYIxQ-image-1719870265104.png)

9\. Set the PIN code to unlock the device using the Windows Hello for Business feature:

[![image-1719870315636.png](https://docs.safedns.com/uploads/images/gallery/2024-07/scaled-1680-/4wHjc1rHpnfE71W9-image-1719870315636.png)](https://docs.safedns.com/uploads/images/gallery/2024-07/4wHjc1rHpnfE71W9-image-1719870315636.png)
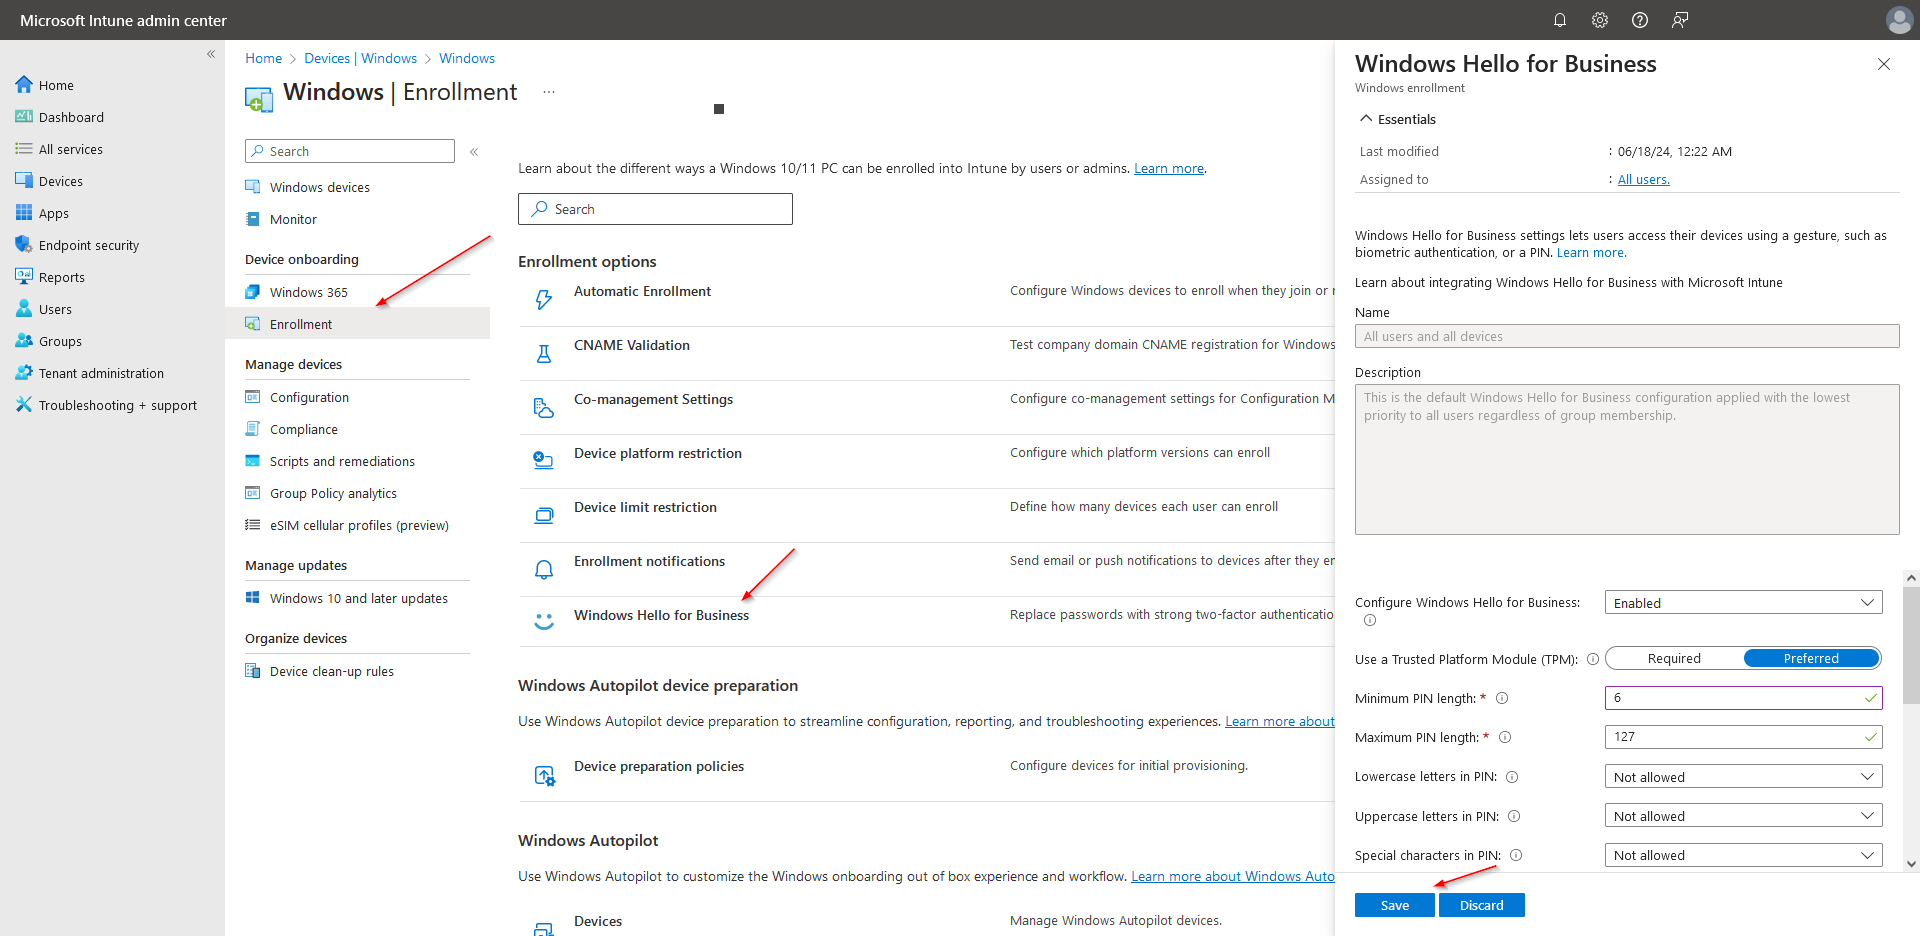
10\. The settings are on the right-side panel. Once the settings are configured, save the changes.

Now using the credentials created above user can log in to the Azure Active Directory

#### 2. Preparing application for Intune Portal  


<p class="callout info">Prepare the application to be loaded into the Intune Portal. The supported format of the application is the \***.intunewin** To create the application, use the tool `IntuneWinAppUtil.exe`   
  
For more information on how to prepare the \***.intunewin** application, follow the guide below:  
</p>

1\. Microsoft Win32 Content Prep Tool link: [https://go.microsoft.com/fwlink/?linkid=2065730](https://go.microsoft.com/fwlink/?linkid=2065730)  
The tool creates the \***.intunewin** application that is ready to upload into Intune. Here is the [link ](https://learn.microsoft.com/en-us/mem/intune/apps/apps-win32-prepare)on how to do it.

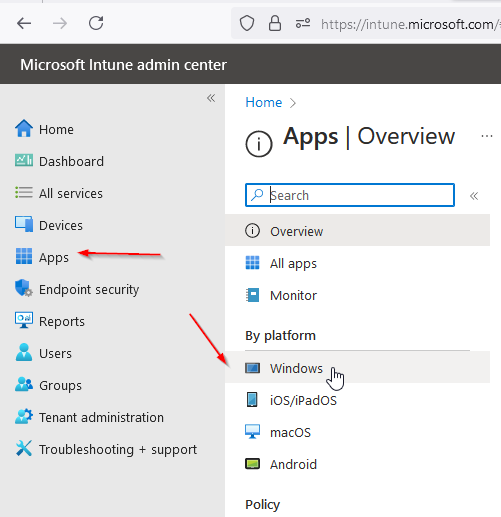
2\. The next step is to configure the application:  
Go to **Apps** &gt; **Windows**

[![image-1719870336808.png](https://docs.safedns.com/uploads/images/gallery/2024-07/scaled-1680-/srmf1L69SWVwNVia-image-1719870336808.png)](https://docs.safedns.com/uploads/images/gallery/2024-07/srmf1L69SWVwNVia-image-1719870336808.png)

3\. Add the newly created \***.intunewin** application:

[![image-1719870509233.png](https://docs.safedns.com/uploads/images/gallery/2024-07/scaled-1680-/PiokZv7SzJgUBqfQ-image-1719870509233.png)](https://docs.safedns.com/uploads/images/gallery/2024-07/PiokZv7SzJgUBqfQ-image-1719870509233.png)
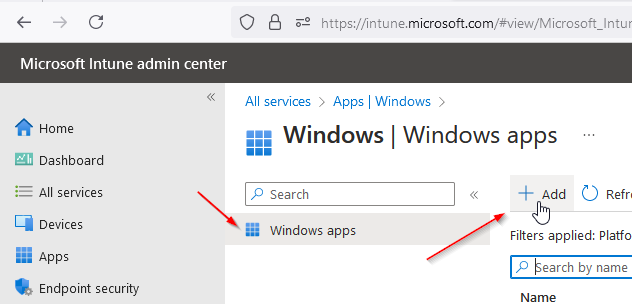
4\. Select from the list of Windows app **Win32**, and tap **Select**:

[![image-1719870523295.png](https://docs.safedns.com/uploads/images/gallery/2024-07/scaled-1680-/UTlWGBMnbdK9EK96-image-1719870523295.png)](https://docs.safedns.com/uploads/images/gallery/2024-07/UTlWGBMnbdK9EK96-image-1719870523295.png)
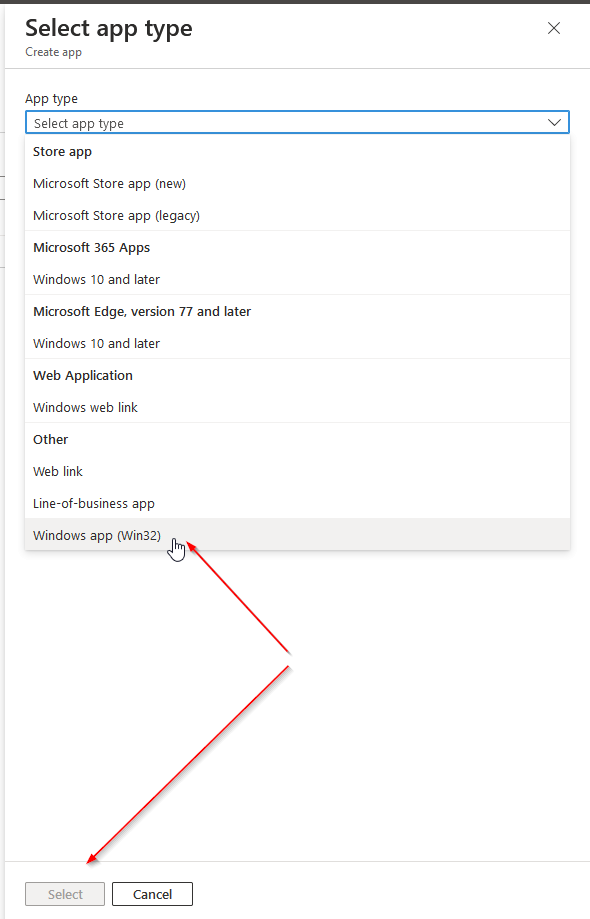
5\. Press the **Select app** package file button, select the recently created **.intunewin** file, and tap **OK**:

[![image-1719870722594.png](https://docs.safedns.com/uploads/images/gallery/2024-07/scaled-1680-/WVu7uc5kI4S8WJDN-image-1719870722594.png)](https://docs.safedns.com/uploads/images/gallery/2024-07/WVu7uc5kI4S8WJDN-image-1719870722594.png)
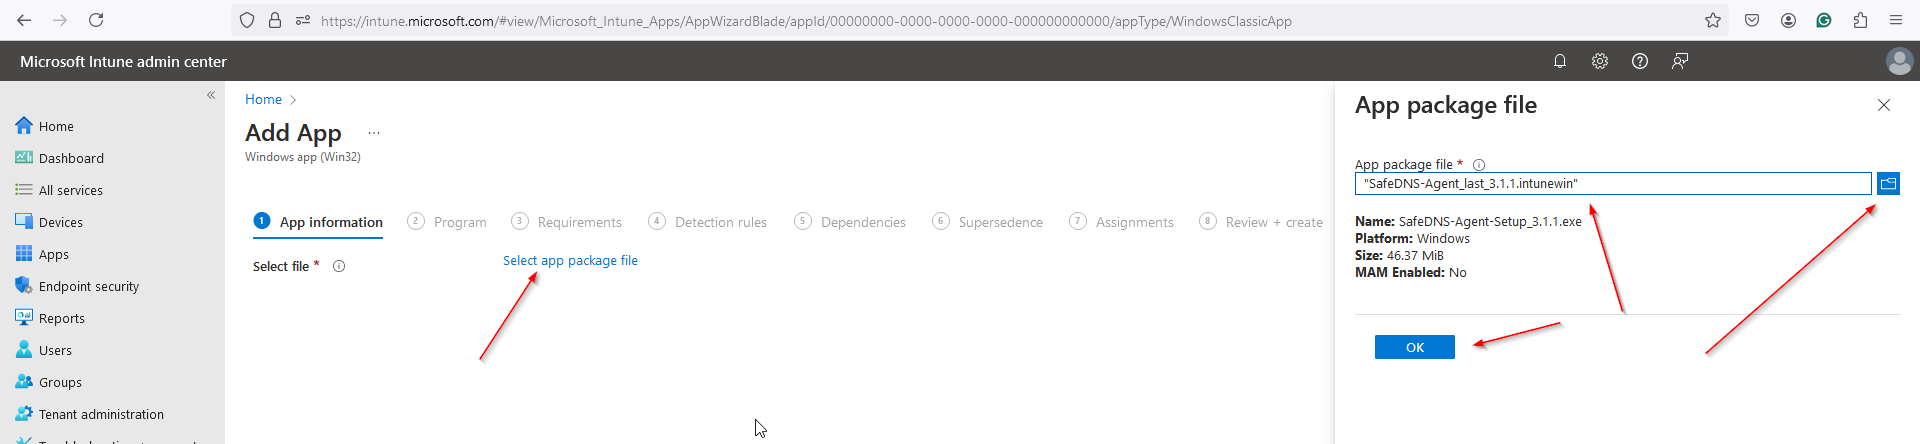
<div class="js-content-block content-block content-image level-0" data-key="9e68a75c-0e64-47b5-aeec-375d42cc704c" id="bkmrk-6.-please-fill-in-th"><div class="js-content-block content-block content-image level-0" data-key="9e68a75c-0e64-47b5-aeec-375d42cc704c"><div class="image-container" data-v-6f901876=""><div class="image-wrapper" data-v-6f901876=""><div class="image-preview-container" data-v-0d9bde58="" data-v-6f901876=""><div class="preview-image" data-v-0d9bde58=""><div class="image-previewer" data-v-0d9bde58="" data-v-6f901876=""><div class="image-mask" data-v-0d9bde58="" data-v-6f901876=""><div class="js-content-block content-block content-image level-0" data-key="89bfa8b8-35e0-4a6f-a6ad-75e21ead6280"><div class="image-container" data-v-6f901876=""><div class="image-wrapper" data-v-6f901876=""><div class="image-preview-container" data-v-0d9bde58="" data-v-6f901876=""><div class="preview-image" data-v-0d9bde58=""><div class="image-previewer" data-v-0d9bde58="" data-v-6f901876="">6. Please fill in the fields using the example below:  
  
</div><div class="image-previewer" data-v-0d9bde58="" data-v-6f901876="">**Example** Install command: SafeDNS-Agent-Setup_3.1.1.exe /verysilent /login=demo@safedns.com /password=safedns6789  
Uninstall command: "%ProgramFiles%\unins000.exe" /verysilent  
  
</div></div></div></div></div></div></div></div></div></div></div></div></div></div>[![image-1719870729665.png](https://docs.safedns.com/uploads/images/gallery/2024-07/scaled-1680-/TNpbpkBf2LjLLd9u-image-1719870729665.png)](https://docs.safedns.com/uploads/images/gallery/2024-07/TNpbpkBf2LjLLd9u-image-1719870729665.png)

7\. Install commands that are available in the following guide:  
[https://docs.safedns.com/books/installation-guides/page/agent-unattended-installation](https://docs.safedns.com/books/installation-guides/page/agent-unattended-installation)

8\. In the next tab select both ОS Operating system architecture **32-bit and 64-bit** and Minimum operating system - **Windows 10 1607**

[![image-1719870744119.png](https://docs.safedns.com/uploads/images/gallery/2024-07/scaled-1680-/orHsamFRIYM643Fw-image-1719870744119.png)](https://docs.safedns.com/uploads/images/gallery/2024-07/orHsamFRIYM643Fw-image-1719870744119.png)

9\. It is important to configure the Detection rule options:

[![Intune installation9.png](https://docs.safedns.com/uploads/images/gallery/2025-06/scaled-1680-/cKYQCKfFMkmtKxVf-intune-installation9.png)](https://docs.safedns.com/uploads/images/gallery/2025-06/cKYQCKfFMkmtKxVf-intune-installation9.png)

10\. Review and Save:

[![image-1719870814038.png](https://docs.safedns.com/uploads/images/gallery/2024-07/scaled-1680-/EkhUCzIaqghnNW8N-image-1719870814038.png)](https://docs.safedns.com/uploads/images/gallery/2024-07/EkhUCzIaqghnNW8N-image-1719870814038.png)

#### 3. Configuring Compliance Policy

1\. The policy is used to configure the hardware, and software setup of the computer joining Intune.

2\. Create a new policy and name it:

[![image-1719870840719.png](https://docs.safedns.com/uploads/images/gallery/2024-07/scaled-1680-/6XoYnKLc9nVrXxzE-image-1719870840719.png)](https://docs.safedns.com/uploads/images/gallery/2024-07/6XoYnKLc9nVrXxzE-image-1719870840719.png)

[![image-1719870846703.png](https://docs.safedns.com/uploads/images/gallery/2024-07/scaled-1680-/VtMpzO6KFVQW3Zt4-image-1719870846703.png)](https://docs.safedns.com/uploads/images/gallery/2024-07/VtMpzO6KFVQW3Zt4-image-1719870846703.png)

[![image-1719870870280.png](https://docs.safedns.com/uploads/images/gallery/2024-07/scaled-1680-/twjpTqXIq4Va5wLI-image-1719870870280.png)](https://docs.safedns.com/uploads/images/gallery/2024-07/twjpTqXIq4Va5wLI-image-1719870870280.png)

<div class="js-content-block content-block content-image level-0" data-key="39d0479d-3f80-4c88-b1bf-4268627016ba" id="bkmrk-the-example-below-sh"><div class="js-content-block content-block content-image level-0" data-key="39d0479d-3f80-4c88-b1bf-4268627016ba"><div class="image-container" data-v-6f901876=""><div class="image-wrapper" data-v-6f901876=""><div class="image-preview-container" data-v-0d9bde58="" data-v-6f901876=""><div class="preview-image" data-v-0d9bde58=""><div class="image-previewer" data-v-0d9bde58="" data-v-6f901876=""><div class="image-mask" data-v-0d9bde58="" data-v-6f901876="">The example below shows only the Minimum OS version: **10.0.17134.1**  
</div></div></div></div><div class="image-mask" data-v-0d9bde58="" data-v-6f901876="">  
</div></div></div></div></div>[![image-1719870921442.png](https://docs.safedns.com/uploads/images/gallery/2024-07/scaled-1680-/XvXEiUuW5PCxdOrt-image-1719870921442.png)](https://docs.safedns.com/uploads/images/gallery/2024-07/XvXEiUuW5PCxdOrt-image-1719870921442.png)

<div class="js-content-block content-block content-image level-0" data-key="39d0479d-3f80-4c88-b1bf-4268627016ba" id="bkmrk-there-might-be-addit"><div class="image-container" data-v-6f901876=""><div class="image-wrapper" data-v-6f901876=""><div class="image-mask" data-v-0d9bde58="" data-v-6f901876="">There might be additional OS or hardware requirements, that need to be configured accordingly.</div></div></div></div>  
3\. Once finished, apply the Policy to **All Devices**:

[![image-1719870939083.png](https://docs.safedns.com/uploads/images/gallery/2024-07/scaled-1680-/mMEl7MFlQUw3kyKJ-image-1719870939083.png)](https://docs.safedns.com/uploads/images/gallery/2024-07/mMEl7MFlQUw3kyKJ-image-1719870939083.png)

4\. The example of the Policy created above has the following summary:

[![image-1719870955247.png](https://docs.safedns.com/uploads/images/gallery/2024-07/scaled-1680-/IN4xCiF3hJ9nuVQp-image-1719870955247.png)](https://docs.safedns.com/uploads/images/gallery/2024-07/IN4xCiF3hJ9nuVQp-image-1719870955247.png)

#### 4. Login on the clients' computers  


1\. Switch on the computer and go to the **Settings** (the computer should be connected to the internet):

[![image-1719871032257.png](https://docs.safedns.com/uploads/images/gallery/2024-07/scaled-1680-/LtY7cYfYRKGG5hON-image-1719871032257.png)](https://docs.safedns.com/uploads/images/gallery/2024-07/LtY7cYfYRKGG5hON-image-1719871032257.png)

2\. Then **Accounts** &gt; **Access Work or School**

[![image-1719871041517.png](https://docs.safedns.com/uploads/images/gallery/2024-07/scaled-1680-/6rhSa1gZt8BGMsp6-image-1719871041517.png)](https://docs.safedns.com/uploads/images/gallery/2024-07/6rhSa1gZt8BGMsp6-image-1719871041517.png)

3\. The next step is to **Add a work or school account** &gt; **Connect**

<div class="js-content-block content-block content-image level-0" data-key="9e68a75c-0e64-47b5-aeec-375d42cc704c" id="bkmrk--26"><div class="js-content-block content-block content-image level-0" data-key="9e68a75c-0e64-47b5-aeec-375d42cc704c"><div class="image-container" data-v-6f901876=""><div class="image-wrapper" data-v-6f901876=""><div class="image-preview-container" data-v-0d9bde58="" data-v-6f901876=""><div class="preview-image" data-v-0d9bde58=""><div class="image-previewer" data-v-0d9bde58="" data-v-6f901876=""><div class="image-mask" data-v-0d9bde58="" data-v-6f901876=""><div class="js-content-block content-block content-image level-0" data-key="15ca40e2-41bf-4e2c-80b1-859109f7471f"><div class="image-container" data-v-6f901876=""><div class="image-wrapper" data-v-6f901876=""><div class="image-preview-container" data-v-0d9bde58="" data-v-6f901876=""><div class="preview-image" data-v-0d9bde58=""><div class="image-previewer" data-v-0d9bde58="" data-v-6f901876="">  
</div></div></div></div></div></div></div></div></div></div></div></div></div></div>[![image-1719871051905.png](https://docs.safedns.com/uploads/images/gallery/2024-07/scaled-1680-/fBOO5Rx0h0mVTfgP-image-1719871051905.png)](https://docs.safedns.com/uploads/images/gallery/2024-07/fBOO5Rx0h0mVTfgP-image-1719871051905.png)

4\. Add the user credentials of the user created in Intune:

[![image-1719871061248.png](https://docs.safedns.com/uploads/images/gallery/2024-07/scaled-1680-/0ieGzKcwRTQlq6WK-image-1719871061248.png)](https://docs.safedns.com/uploads/images/gallery/2024-07/0ieGzKcwRTQlq6WK-image-1719871061248.png)

5\. Add the password of the account and configure the PIN code of the Windows Hello feature. The system may ask to configure/use Microsoft Authenticator.

[![image-1719871076641.png](https://docs.safedns.com/uploads/images/gallery/2024-07/scaled-1680-/z1Fdi1ADw5BGQFBA-image-1719871076641.png)](https://docs.safedns.com/uploads/images/gallery/2024-07/z1Fdi1ADw5BGQFBA-image-1719871076641.png)

[![image-1719871086632.png](https://docs.safedns.com/uploads/images/gallery/2024-07/scaled-1680-/wJO4GYDBCaUCvIM3-image-1719871086632.png)](https://docs.safedns.com/uploads/images/gallery/2024-07/wJO4GYDBCaUCvIM3-image-1719871086632.png)

[![image-1719871113613.png](https://docs.safedns.com/uploads/images/gallery/2024-07/scaled-1680-/4qyz4gFDBB8z3bQJ-image-1719871113613.png)](https://docs.safedns.com/uploads/images/gallery/2024-07/4qyz4gFDBB8z3bQJ-image-1719871113613.png)

[![image-1719871119217.png](https://docs.safedns.com/uploads/images/gallery/2024-07/scaled-1680-/m7QlL4eoaThle4Mj-image-1719871119217.png)](https://docs.safedns.com/uploads/images/gallery/2024-07/m7QlL4eoaThle4Mj-image-1719871119217.png)

6\. Once the login process is finished, the menu **Accounts** &gt; **Access work or school** is looking the following way:

[![image-1719871138871.png](https://docs.safedns.com/uploads/images/gallery/2024-07/scaled-1680-/yXoq9t5oRH4C9Brl-image-1719871138871.png)](https://docs.safedns.com/uploads/images/gallery/2024-07/yXoq9t5oRH4C9Brl-image-1719871138871.png)

#### 5. Agent Installation

<article class="article-content-wrapper" data-v-1d18c12d="" data-v-ce0989e4="" id="bkmrk-the-installation-of-"><p class="callout info">The installation of the Agent starts immediately after the successful login to the local computer.</p>

<div class="blocks-container" data-v-ce0989e4=""><div class="blocks-container" data-v-ce0989e4=""><div class="js-content-block content-block content-image level-0" data-key="2ba91f08-ae91-4b3d-9aa4-bddec216987e"><div class="image-container" data-v-6f901876=""><div class="image-wrapper" data-v-6f901876=""><div class="image-preview-container" data-v-0d9bde58="" data-v-6f901876=""><div class="preview-image" data-v-0d9bde58=""><div class="image-previewer" data-v-0d9bde58="" data-v-6f901876="">  
</div></div></div></div></div></div></div></div>[![image-1719871147070.png](https://docs.safedns.com/uploads/images/gallery/2024-07/scaled-1680-/tqcc9jkPRNXIbpmW-image-1719871147070.png)](https://docs.safedns.com/uploads/images/gallery/2024-07/tqcc9jkPRNXIbpmW-image-1719871147070.png)

1\. The Agent is installed using the **silent mode**, and filtering is automatically enabled and started working:

[![image-1719871263868.png](https://docs.safedns.com/uploads/images/gallery/2024-07/scaled-1680-/pWc9Rnw27O9BteLs-image-1719871263868.png)](https://docs.safedns.com/uploads/images/gallery/2024-07/pWc9Rnw27O9BteLs-image-1719871263868.png)

2\. The installation finished successfully, to see the installation results, open **the Intune admin panel** &gt; **Apps** &gt; **Windows** and select the initially created app record:

[![image-1719871278311.png](https://docs.safedns.com/uploads/images/gallery/2024-07/scaled-1680-/8fz5aI2AYJVcIdPL-image-1719871278311.png)](https://docs.safedns.com/uploads/images/gallery/2024-07/8fz5aI2AYJVcIdPL-image-1719871278311.png)

</article>

# SafeDNS AD Agent environment configuration

The manual below describes the whole process of the preparation, configuration, and installation of the Agent under the Active Directory environment. The user operating system used is Windows 11 while the server version OS: Windows Server 2019 Standard.

Prerequisites: fresh installed Windows Server 2019 Standard, fresh installed Windows 11

<p class="callout success">Important Notice:</p>

<p class="callout info">I: If the Active Directory is already installed and configured, while the Group Policy Management is not configured, please proceed with the installation of the Group Policy Management.</p>

<p class="callout info">II: If the Active Directory and Group Policy Management are already installed and configured, please proceed to step 3 - Creating Users/Groups.</p>

<p class="callout info">III: If the Active Directory and Group Policy Management are already installed and configured and Users/Groups exist, please proceed to step 4 - MSI File Preparation on the Server</p>

<details id="bkmrk-installing-agent-in-"><summary>Installing Agent in the AD environment without AD functionality</summary>

If you need to set up the Agent in the AD environment without using the AD functionality (e.g. adding AD users to SafeDNS Dashboard), you need the special build of the .msi file.

To get the special .msi build, please follow these steps:

1. Send the request for the .msi file to the Support (<support@safedns.com>) or your SafeDNS Manager.  
    The request should contain username, password and PIN code.  
    PIN code is required to enter the Agent GUI. If PIN is not provided, it will be generated randomly.
2. Wait until the .msi file is created and sent to you.
3. Upload the .msi file to the server and hosted in the folder that is available on the network to the end-user computer - we recommend setting the access level to Everyone.
4. Add the .msi file to the following path using the Group Policy Management console:  
    **Computer Configuration &gt; Policies &gt; Software Settings &gt; Software Installation**

The .msi file installation will start after the end-user computer restart.  
The installation can be forced by running the following command on the end-user computer: gpupdate /force

</details><p class="callout info">This process for the NOAD agent installation follows exactly the same steps as described below. The only difference is that the NOAD agent uses credentials instead of an AD key and has the AD module disabled using the /noad key.</p>

#### 1. Server installation Part. Installation of the Roles and Features.

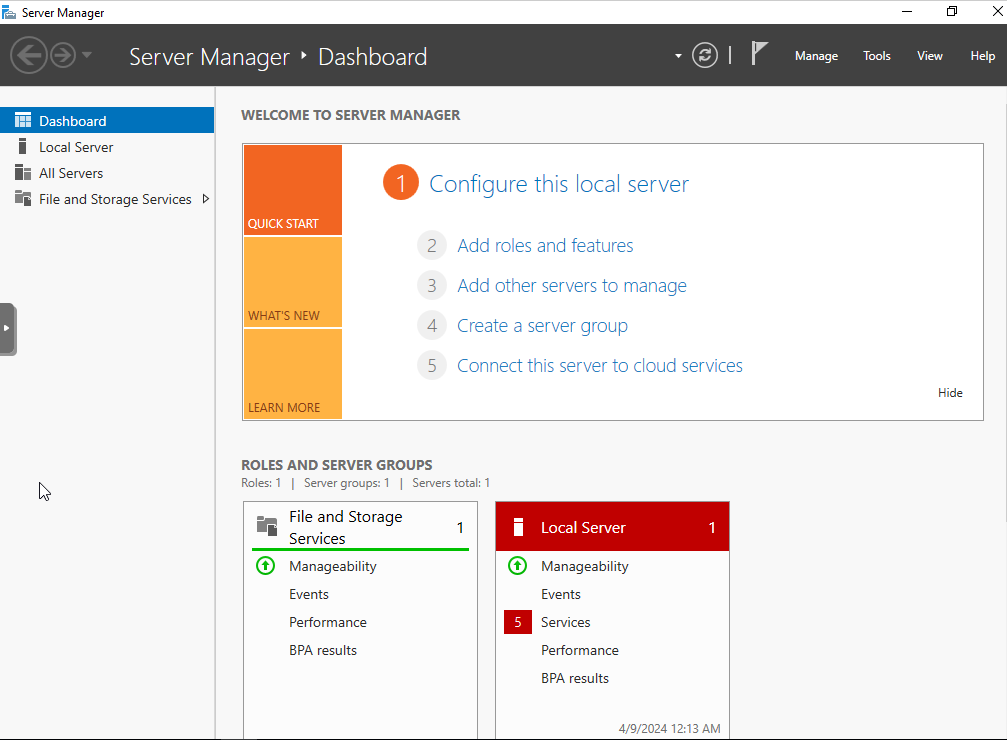
Start the Server Manager and initiate the installation of the Roles:

[![image-1719873513183.png](https://docs.safedns.com/uploads/images/gallery/2024-07/scaled-1680-/fpeMuWymNxnDmtvG-image-1719873513183.png)](https://docs.safedns.com/uploads/images/gallery/2024-07/fpeMuWymNxnDmtvG-image-1719873513183.png)
[![image-1719873557001.png](https://docs.safedns.com/uploads/images/gallery/2024-07/scaled-1680-/EfqtjYupHPZW2LJ8-image-1719873557001.png)](https://docs.safedns.com/uploads/images/gallery/2024-07/EfqtjYupHPZW2LJ8-image-1719873557001.png)
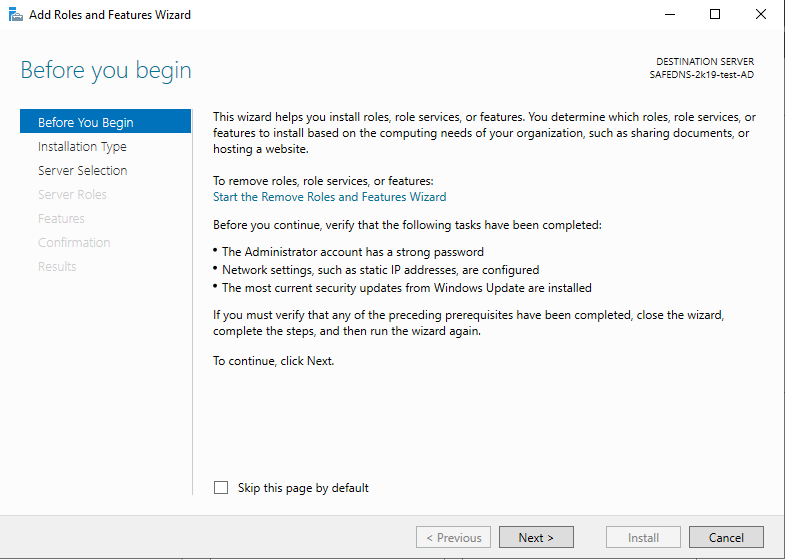
Selecting Role-based or feature-based installation:

[![image-1719873584888.png](https://docs.safedns.com/uploads/images/gallery/2024-07/scaled-1680-/NZaPRJDhOlIHVdWU-image-1719873584888.png)](https://docs.safedns.com/uploads/images/gallery/2024-07/NZaPRJDhOlIHVdWU-image-1719873584888.png)
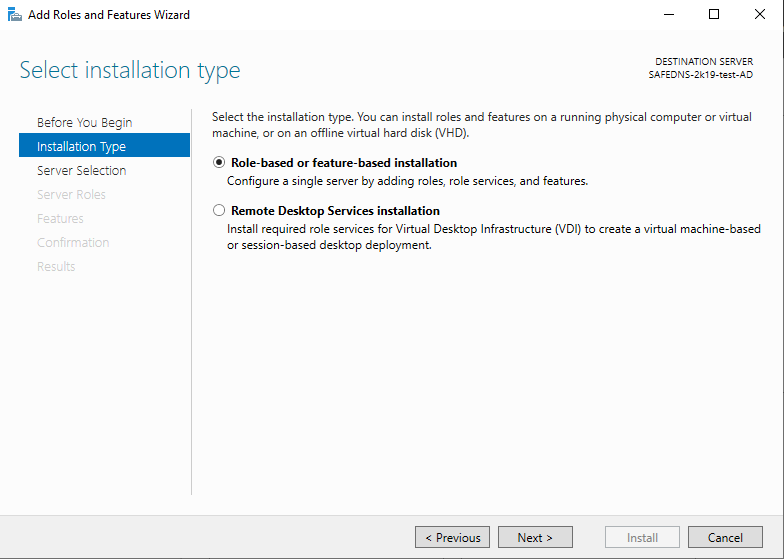
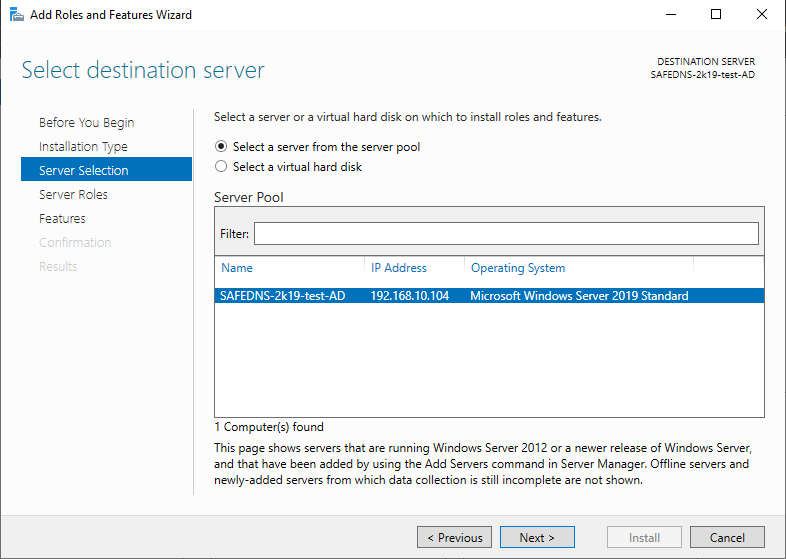
Selecting the local server from the Server Pool:

[![image-1719873617241.png](https://docs.safedns.com/uploads/images/gallery/2024-07/scaled-1680-/mwXzwdmtXlpzkKOc-image-1719873617241.png)](https://docs.safedns.com/uploads/images/gallery/2024-07/mwXzwdmtXlpzkKOc-image-1719873617241.png)
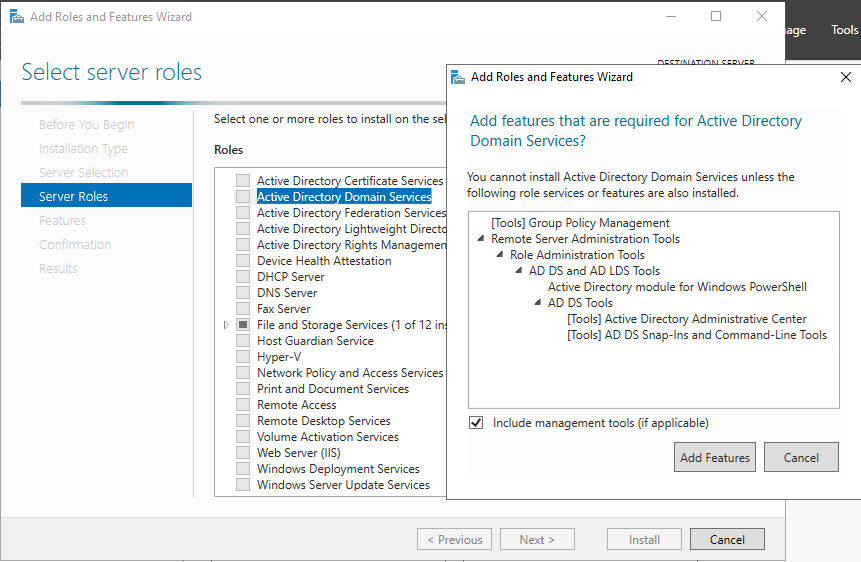
Selecting the Active Directory Domain Services role and in the small window taping the Add Features button:

[![image-1719873688795.png](https://docs.safedns.com/uploads/images/gallery/2024-07/scaled-1680-/jcatm5dCsvL2KF7B-image-1719873688795.png)](https://docs.safedns.com/uploads/images/gallery/2024-07/jcatm5dCsvL2KF7B-image-1719873688795.png)
The next step is to select the Role of the DNS Server, accepting the proposed Features list:

[![image-1719873785690.png](https://docs.safedns.com/uploads/images/gallery/2024-07/scaled-1680-/4r12SwKMJB7OZWrZ-image-1719873785690.png)](https://docs.safedns.com/uploads/images/gallery/2024-07/4r12SwKMJB7OZWrZ-image-1719873785690.png)
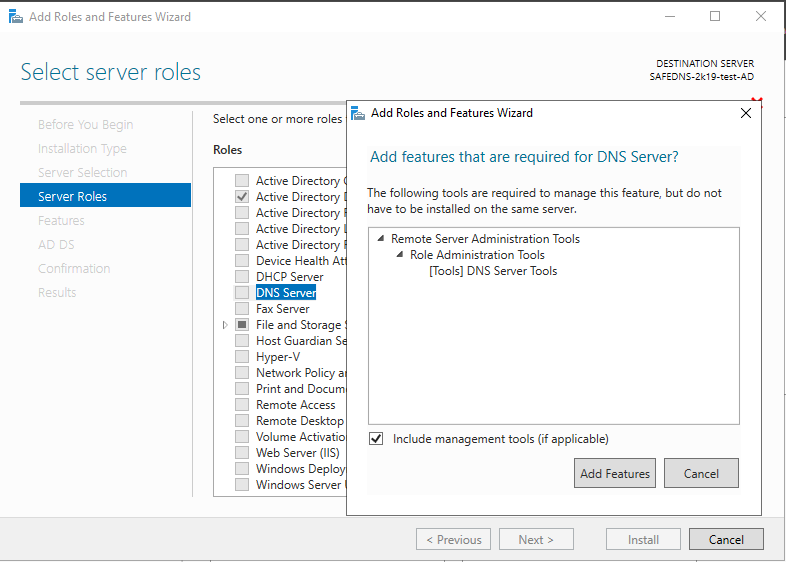
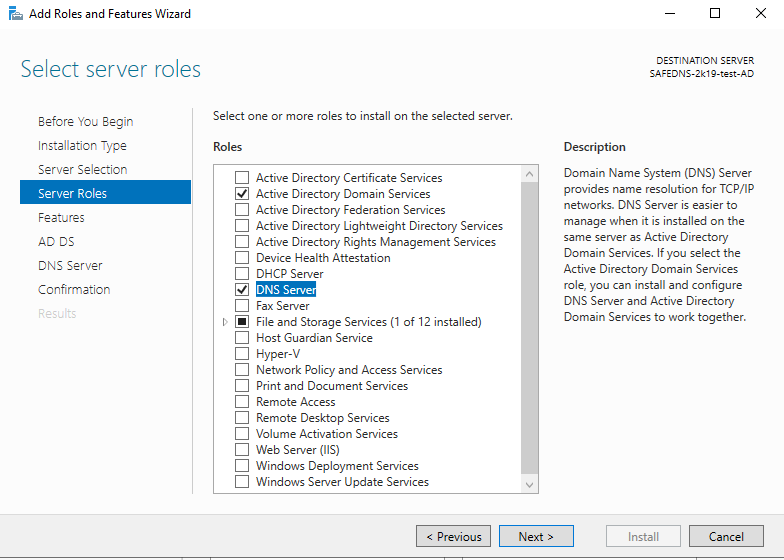
Accept the selected before Roles and tap the Next button:

[![image-1719873996913.png](https://docs.safedns.com/uploads/images/gallery/2024-07/scaled-1680-/9PS6JD1zXy3kYnmL-image-1719873996913.png)](https://docs.safedns.com/uploads/images/gallery/2024-07/9PS6JD1zXy3kYnmL-image-1719873996913.png)
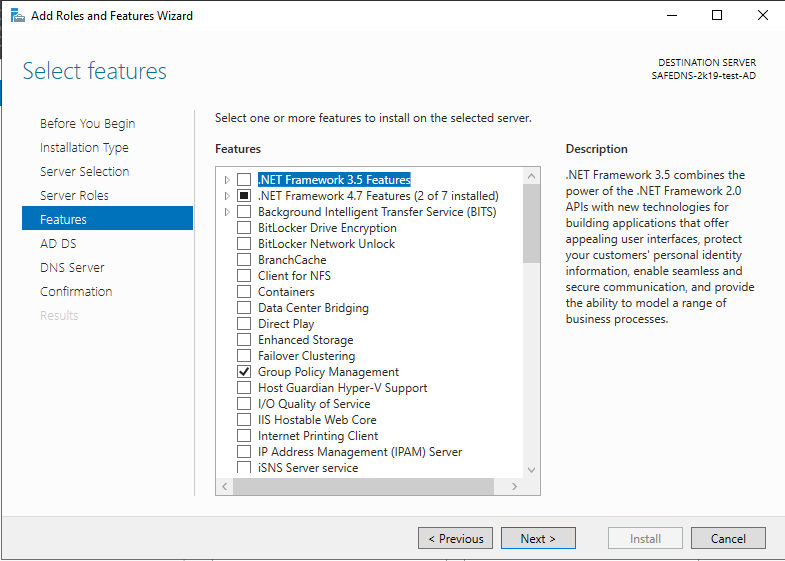
Select the Group Policy Management feature:

[![image-1719874023816.png](https://docs.safedns.com/uploads/images/gallery/2024-07/scaled-1680-/sKXFcyvJKcI9CLpV-image-1719874023816.png)](https://docs.safedns.com/uploads/images/gallery/2024-07/sKXFcyvJKcI9CLpV-image-1719874023816.png)
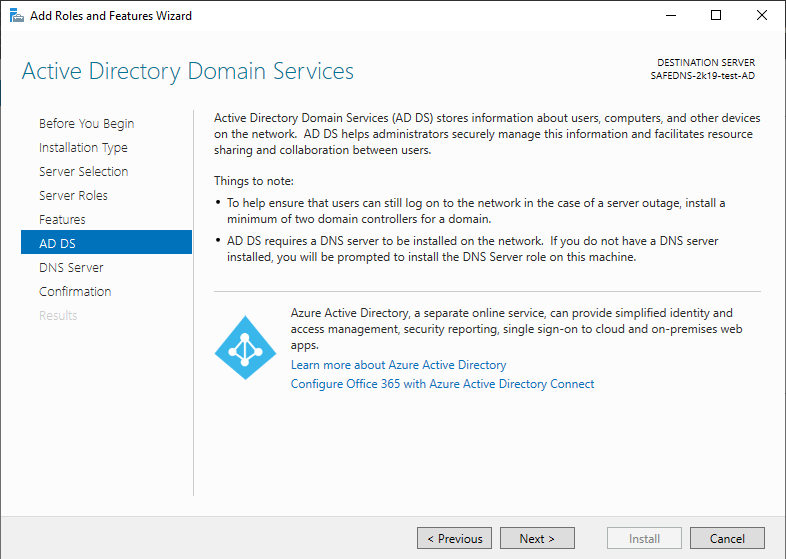
Brief information about Azure Active Directory Domain Services(promo):

[![image-1719874060407.png](https://docs.safedns.com/uploads/images/gallery/2024-07/scaled-1680-/iYaSkmOClSoYSQoz-image-1719874060407.png)](https://docs.safedns.com/uploads/images/gallery/2024-07/iYaSkmOClSoYSQoz-image-1719874060407.png)
Brief information about installing DNS server:

[![image-1719874123270.png](https://docs.safedns.com/uploads/images/gallery/2024-07/scaled-1680-/fNf1c3a3GhOlmLa6-image-1719874123270.png)](https://docs.safedns.com/uploads/images/gallery/2024-07/fNf1c3a3GhOlmLa6-image-1719874123270.png)
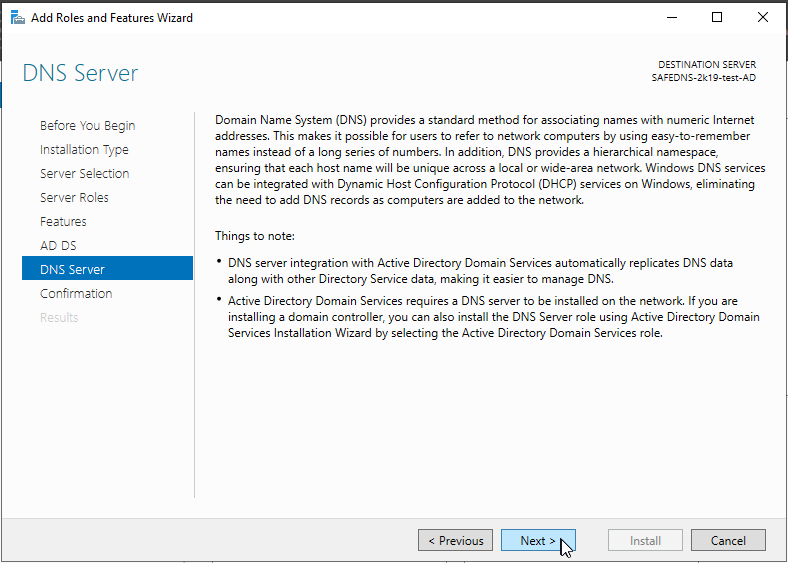
The summary with the list of installing Roles and Features:

[![image-1719874166388.png](https://docs.safedns.com/uploads/images/gallery/2024-07/scaled-1680-/4SSatQaKOjxOS9Dc-image-1719874166388.png)](https://docs.safedns.com/uploads/images/gallery/2024-07/4SSatQaKOjxOS9Dc-image-1719874166388.png)
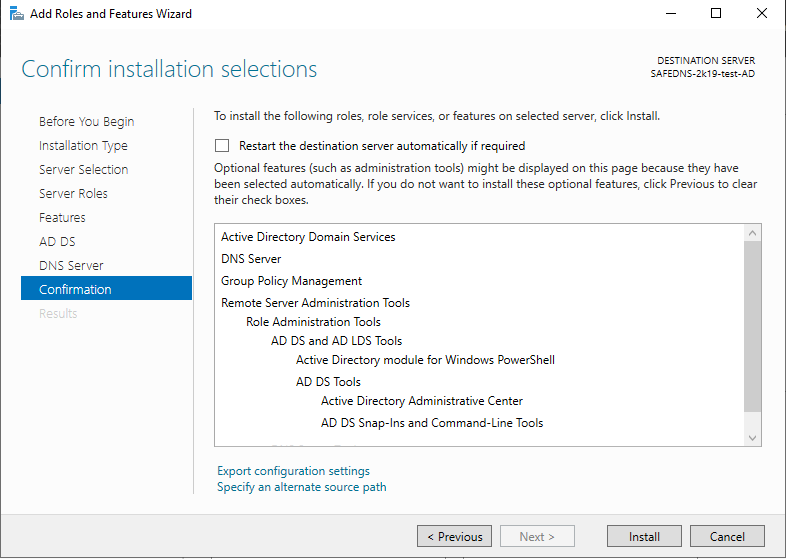
The installtion process begins:

[![image-1719874227531.png](https://docs.safedns.com/uploads/images/gallery/2024-07/scaled-1680-/CSR3qbOZm9wlfilj-image-1719874227531.png)](https://docs.safedns.com/uploads/images/gallery/2024-07/CSR3qbOZm9wlfilj-image-1719874227531.png)
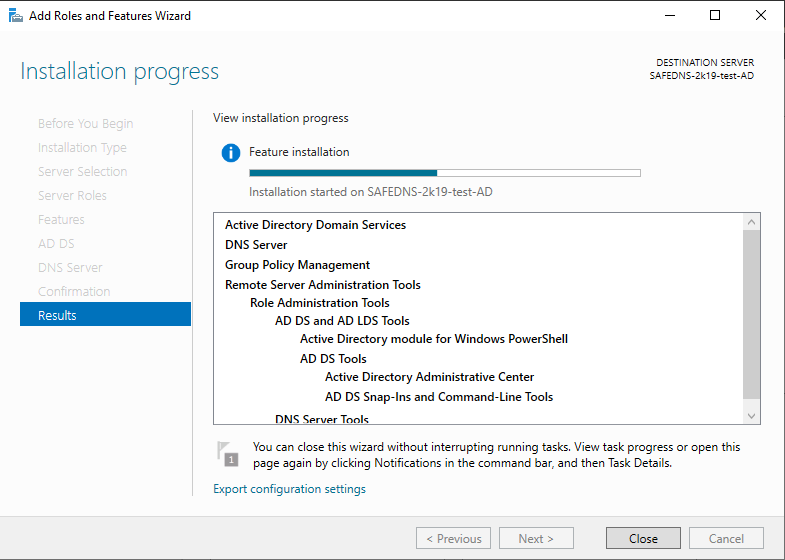
Once installed, the wizard shows the results of the installation:

[![image-1719875358686.png](https://docs.safedns.com/uploads/images/gallery/2024-07/scaled-1680-/0YvPjebw88vapdEu-image-1719875358686.png)](https://docs.safedns.com/uploads/images/gallery/2024-07/0YvPjebw88vapdEu-image-1719875358686.png)
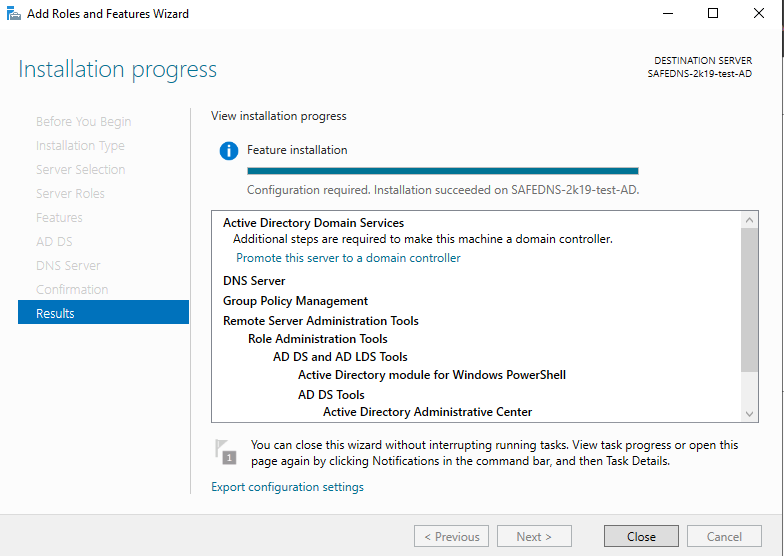
We are set with the installation of the Roles &amp; Features. Please close the window.

#### 2. Active Directory Configuration process.

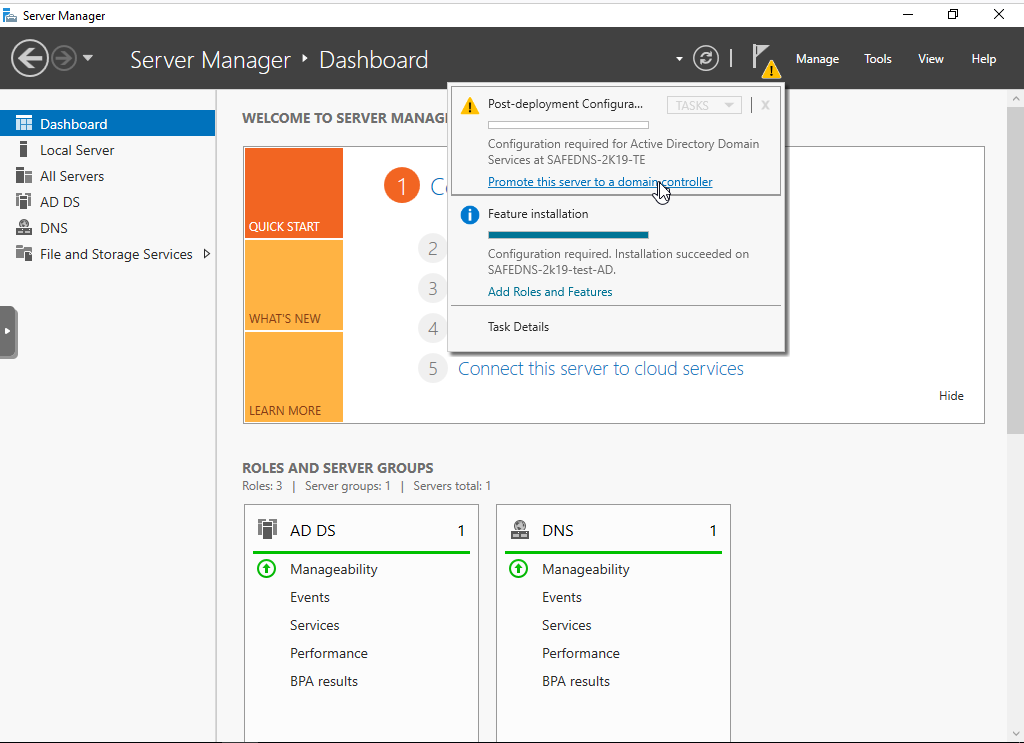
Start the Server Management and promote the server as a domain controller:

[![image-1719875481886.png](https://docs.safedns.com/uploads/images/gallery/2024-07/scaled-1680-/pzQmE0vTiGlegThW-image-1719875481886.png)](https://docs.safedns.com/uploads/images/gallery/2024-07/pzQmE0vTiGlegThW-image-1719875481886.png)
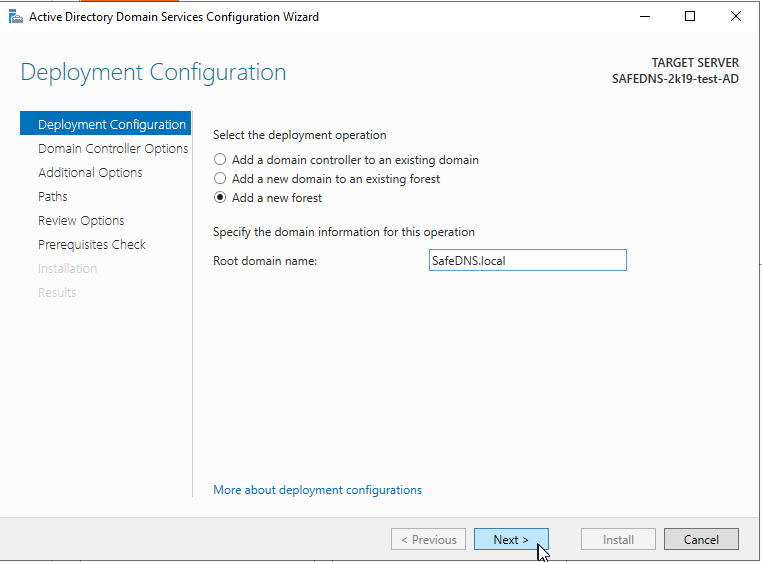
Creating a new forest and name it accordingly:

[![image-1719875665812.png](https://docs.safedns.com/uploads/images/gallery/2024-07/scaled-1680-/lbcZdskoYVHBfApm-image-1719875665812.png)](https://docs.safedns.com/uploads/images/gallery/2024-07/lbcZdskoYVHBfApm-image-1719875665812.png)
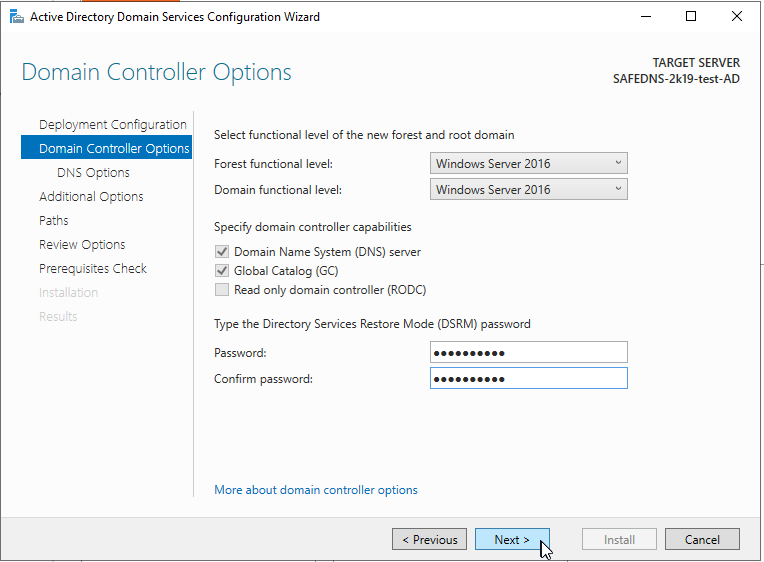
Leaving the options by default. Please set the DSRM password:

[![image-1719875707416.png](https://docs.safedns.com/uploads/images/gallery/2024-07/scaled-1680-/dnJrC5lzt7YDgImt-image-1719875707416.png)](https://docs.safedns.com/uploads/images/gallery/2024-07/dnJrC5lzt7YDgImt-image-1719875707416.png)
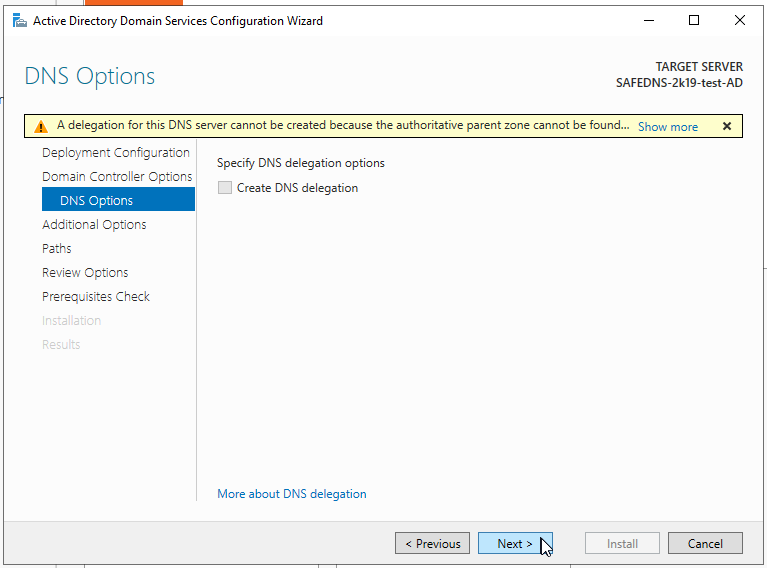
Configure the delegation options (if there is a need for that):

[![image-1719876092400.png](https://docs.safedns.com/uploads/images/gallery/2024-07/scaled-1680-/a0Ccc7AVXAjt53Ue-image-1719876092400.png)](https://docs.safedns.com/uploads/images/gallery/2024-07/a0Ccc7AVXAjt53Ue-image-1719876092400.png)
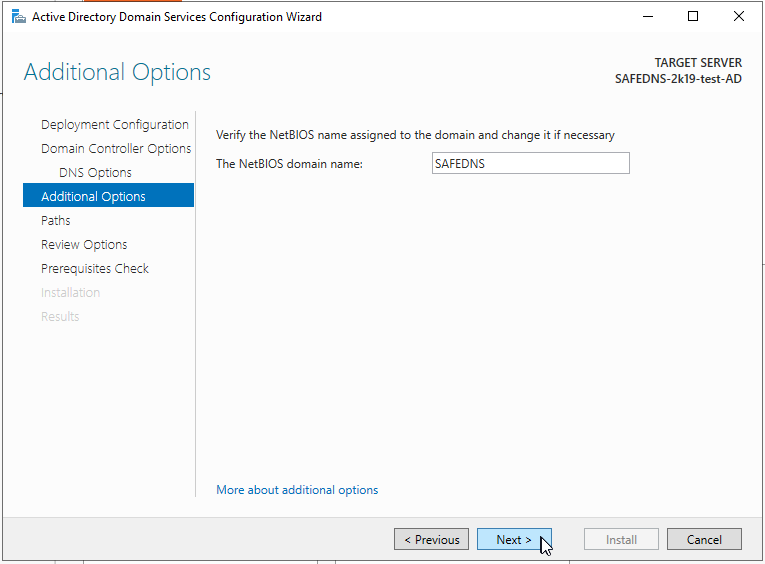
Configure the NETBIOS name:

[![image-1719876146683.png](https://docs.safedns.com/uploads/images/gallery/2024-07/scaled-1680-/JmRLtDbkHTaTXhNH-image-1719876146683.png)](https://docs.safedns.com/uploads/images/gallery/2024-07/JmRLtDbkHTaTXhNH-image-1719876146683.png)
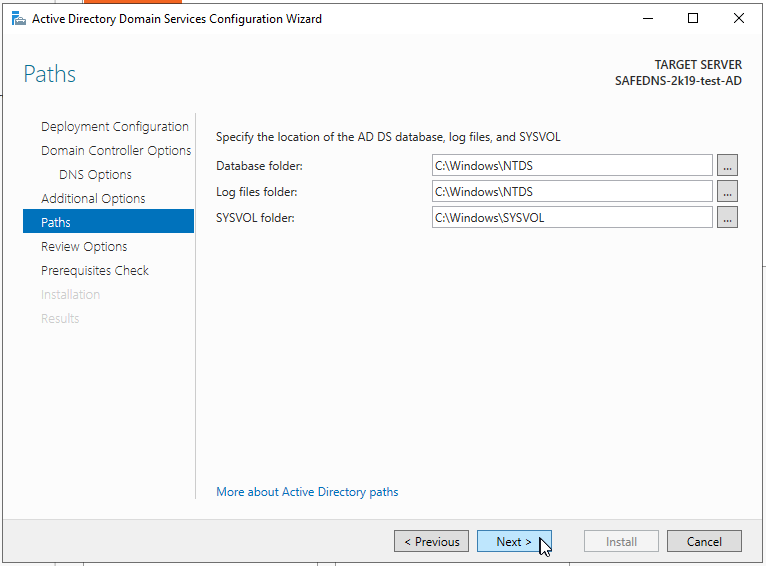
Configuring the system folders:

[![image-1719876165886.png](https://docs.safedns.com/uploads/images/gallery/2024-07/scaled-1680-/zsRtbf2hQRKLULUJ-image-1719876165886.png)](https://docs.safedns.com/uploads/images/gallery/2024-07/zsRtbf2hQRKLULUJ-image-1719876165886.png)
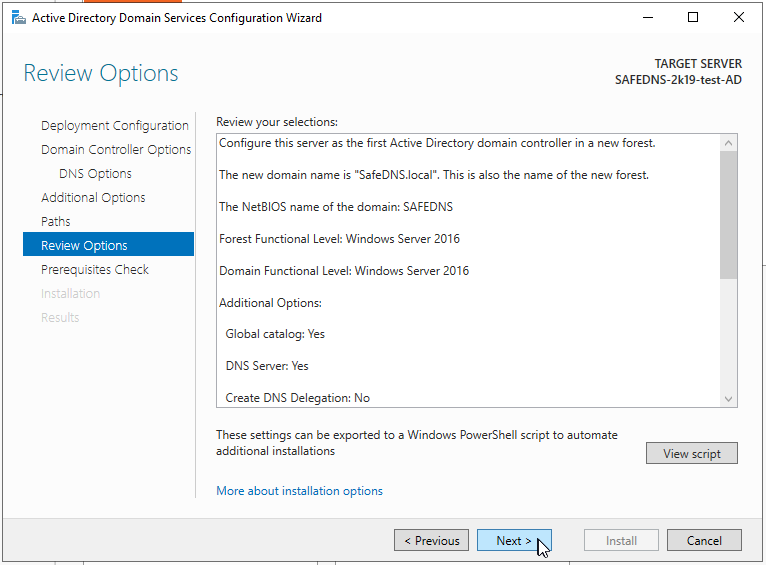
The preview of the installing options:

[![image-1719876207394.png](https://docs.safedns.com/uploads/images/gallery/2024-07/scaled-1680-/PR5xlNh44RCtEzmX-image-1719876207394.png)](https://docs.safedns.com/uploads/images/gallery/2024-07/PR5xlNh44RCtEzmX-image-1719876207394.png)
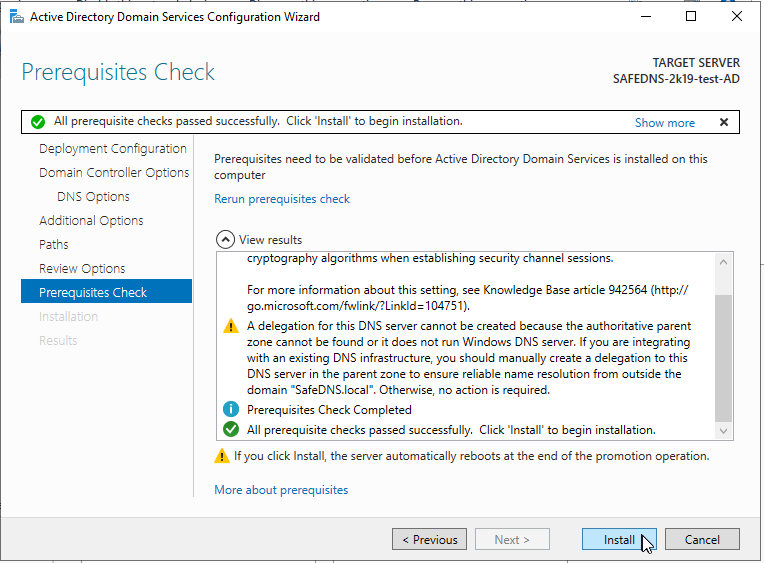
Prerequisites check and install:

[![image-1719876234499.png](https://docs.safedns.com/uploads/images/gallery/2024-07/scaled-1680-/9AYI8ZxAkLPuF2ia-image-1719876234499.png)](https://docs.safedns.com/uploads/images/gallery/2024-07/9AYI8ZxAkLPuF2ia-image-1719876234499.png)
#### 3. Creating User/Groups on the AD.

The new group and user should be created for the Agent Software delivery to the end-user computers. The application installation starts immediately after first user logon to the computer.

##### 3.1. Creating a new user.

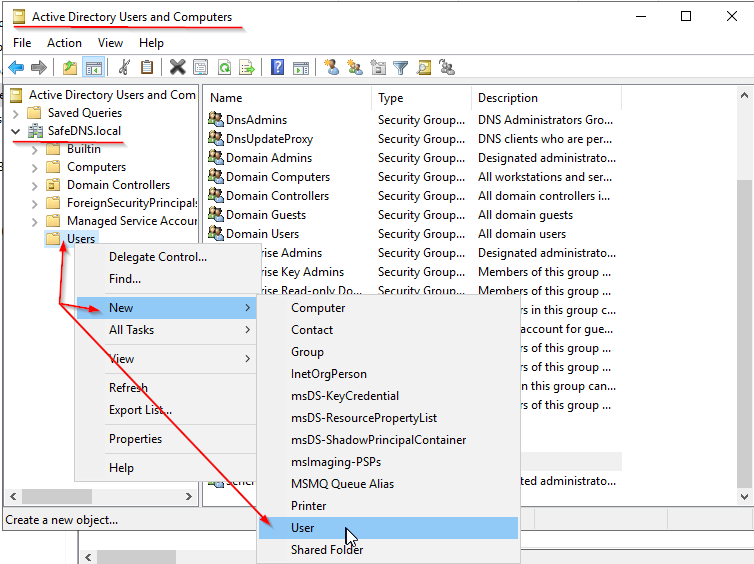
Open the Active Directory Users and Computers, select the recently created domain, then Users =&gt; New =&gt; User:

[![image-1719876407599.png](https://docs.safedns.com/uploads/images/gallery/2024-07/scaled-1680-/OWyGJA8HutQyRBRD-image-1719876407599.png)](https://docs.safedns.com/uploads/images/gallery/2024-07/OWyGJA8HutQyRBRD-image-1719876407599.png)

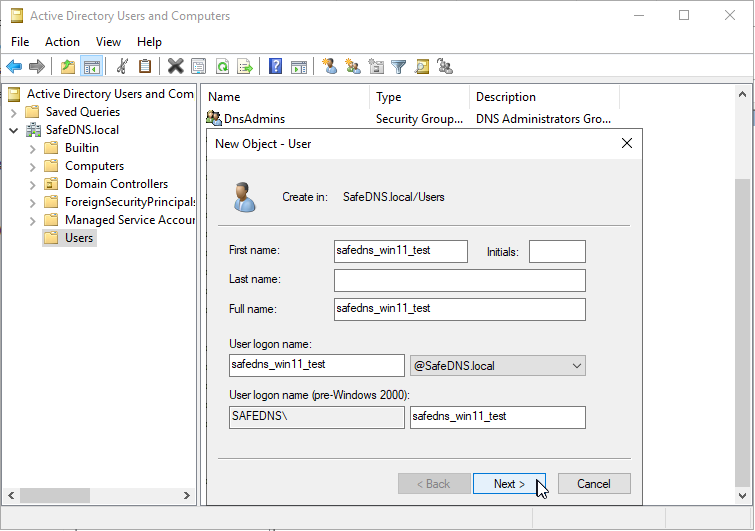
Setting the username:

[![image-1719876466036.png](https://docs.safedns.com/uploads/images/gallery/2024-07/scaled-1680-/9c9wpUT3XszoJAyv-image-1719876466036.png)](https://docs.safedns.com/uploads/images/gallery/2024-07/9c9wpUT3XszoJAyv-image-1719876466036.png)
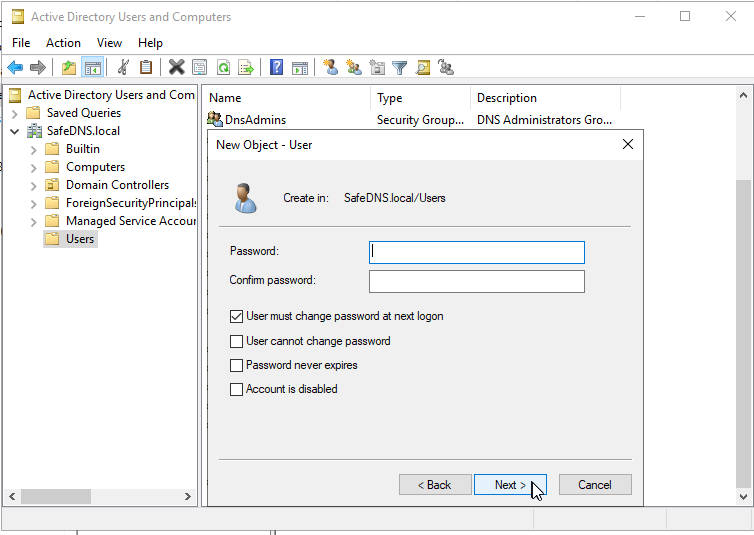
Password:

[![image-1719876540954.png](https://docs.safedns.com/uploads/images/gallery/2024-07/scaled-1680-/ARMWzVmE1HaW3QS5-image-1719876540954.png)](https://docs.safedns.com/uploads/images/gallery/2024-07/ARMWzVmE1HaW3QS5-image-1719876540954.png)
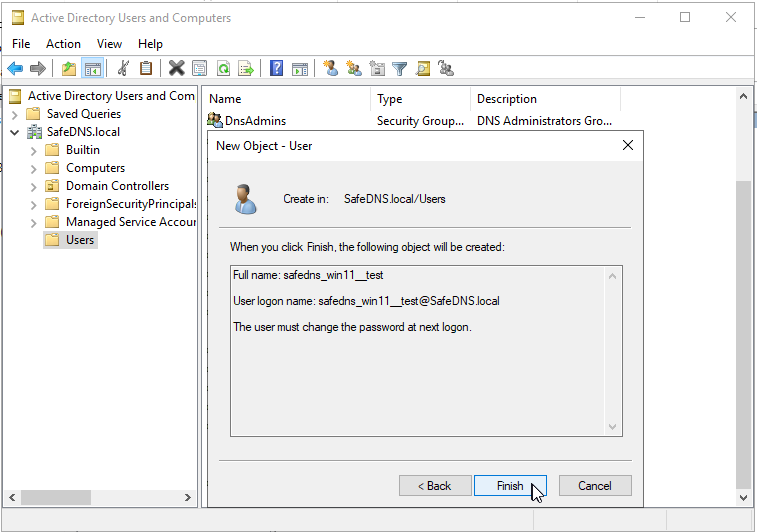
Reviewing the object(User) summary and finishing the process:

[![image-1719876563571.png](https://docs.safedns.com/uploads/images/gallery/2024-07/scaled-1680-/hEo8BBESpq15vzcE-image-1719876563571.png)](https://docs.safedns.com/uploads/images/gallery/2024-07/hEo8BBESpq15vzcE-image-1719876563571.png)
##### 3.2. Creating of the User Group.

Users can be part of one group within the AD environment. The application can be applied to a group of users optimizing the configuration and management of the Application Rollout.

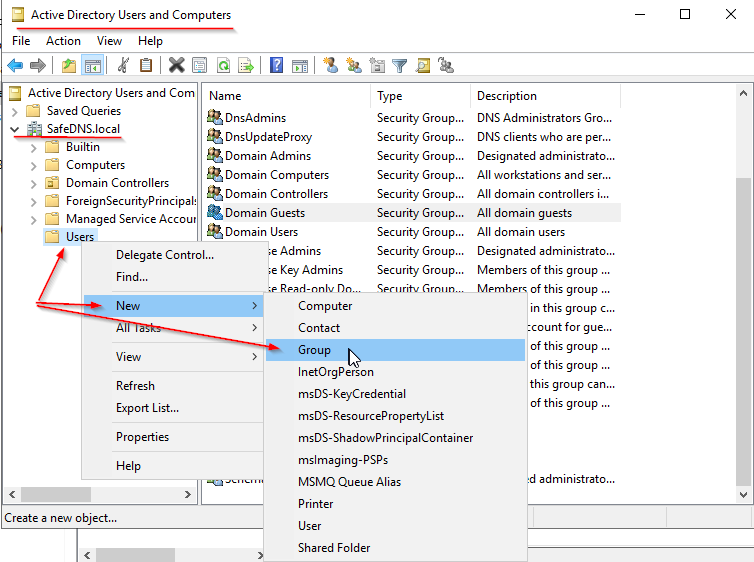
Active Directory Users and Computers, Selecting our domain, and then tap on the Users =&gt; New =&gt; Group:

[![image-1719876621028.png](https://docs.safedns.com/uploads/images/gallery/2024-07/scaled-1680-/LDtUAcgSefihSowG-image-1719876621028.png)](https://docs.safedns.com/uploads/images/gallery/2024-07/LDtUAcgSefihSowG-image-1719876621028.png)

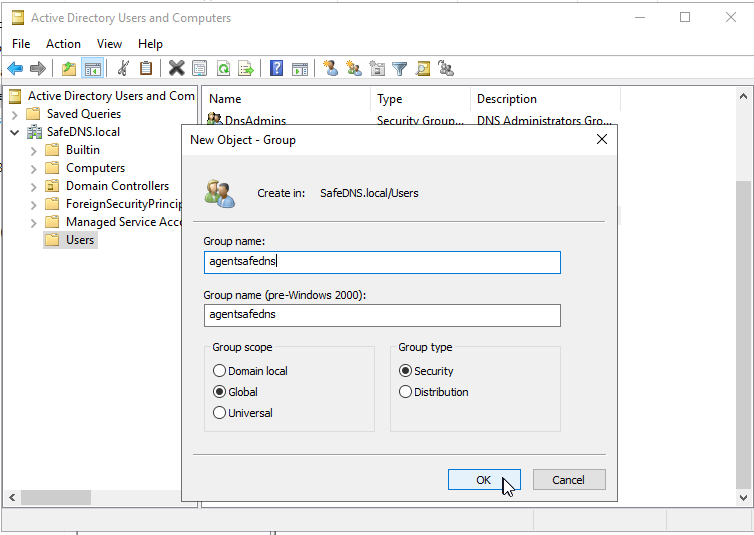
Entering the data of the Group and tap OK:

[![image-1719876851444.png](https://docs.safedns.com/uploads/images/gallery/2024-07/scaled-1680-/4C2uISBze4B0isC5-image-1719876851444.png)](https://docs.safedns.com/uploads/images/gallery/2024-07/4C2uISBze4B0isC5-image-1719876851444.png)
Please check that User and group has been created:

[![image-1719876932012.png](https://docs.safedns.com/uploads/images/gallery/2024-07/scaled-1680-/LBSU3zYSaxBADlnn-image-1719876932012.png)](https://docs.safedns.com/uploads/images/gallery/2024-07/LBSU3zYSaxBADlnn-image-1719876932012.png)
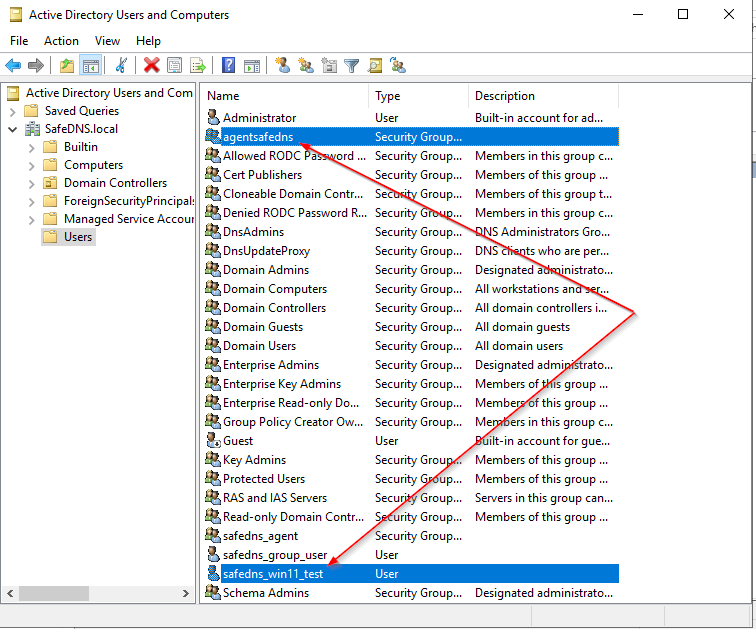
##### 3.3. User added to the group.

Select the group and in the context menu tap the Properties:

[![image-1719876972656.png](https://docs.safedns.com/uploads/images/gallery/2024-07/scaled-1680-/DBNkH9v9DEZSwFDi-image-1719876972656.png)](https://docs.safedns.com/uploads/images/gallery/2024-07/DBNkH9v9DEZSwFDi-image-1719876972656.png)
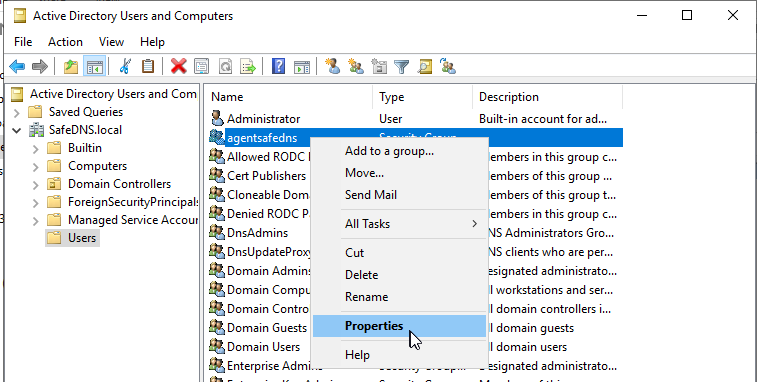
On the appeared window select Members and tap the Add button. Enter the username in the search field and press OK:

[![image-1719877100730.png](https://docs.safedns.com/uploads/images/gallery/2024-07/scaled-1680-/SsrQYSXGxmQ6Sa9c-image-1719877100730.png)](https://docs.safedns.com/uploads/images/gallery/2024-07/SsrQYSXGxmQ6Sa9c-image-1719877100730.png)
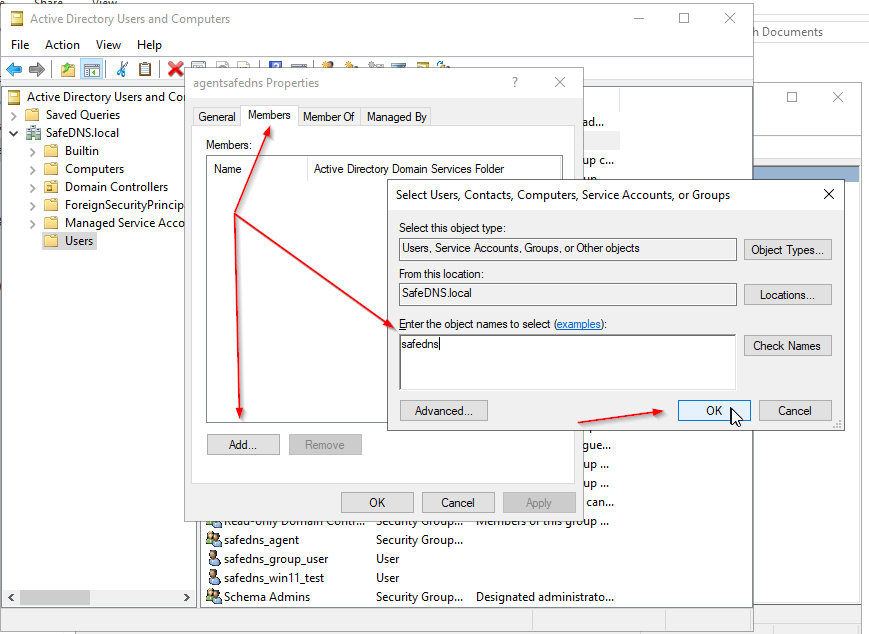
Select the user safedns\_win11\_test and tap OK button:

[![image-1719877211354.png](https://docs.safedns.com/uploads/images/gallery/2024-07/scaled-1680-/ha4q9uhlYv2PbKPs-image-1719877211354.png)](https://docs.safedns.com/uploads/images/gallery/2024-07/ha4q9uhlYv2PbKPs-image-1719877211354.png)
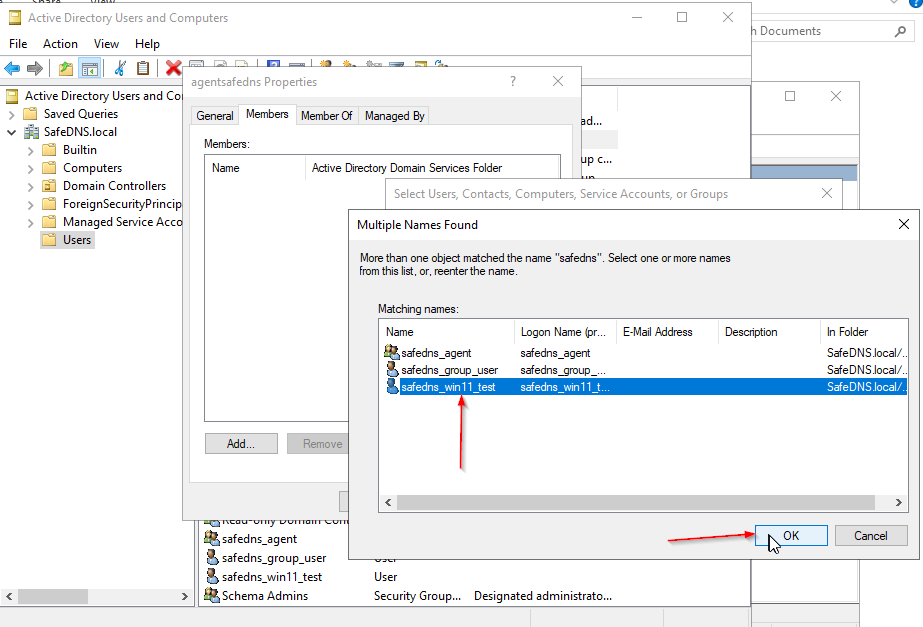
Check the result and press OK button:

[![image-1719877253089.png](https://docs.safedns.com/uploads/images/gallery/2024-07/scaled-1680-/fm9wQPjrx3C5A5ny-image-1719877253089.png)](https://docs.safedns.com/uploads/images/gallery/2024-07/fm9wQPjrx3C5A5ny-image-1719877253089.png)
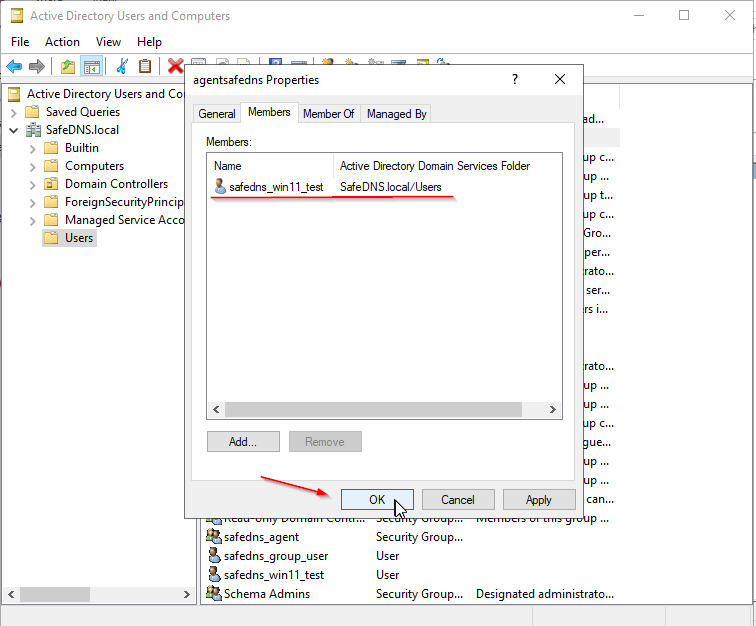
The user creation part is over, now we need to configure GPO.

#### 4. MSI file Preparation on the server.

The MSI Agent package should be prepared and copied to the folder on the Active Directory Server.

<p class="callout info">The MSI Agent package is prepared by SafeDNS. Our technical team generates and inserts your personal identification token into the package.  
</p>

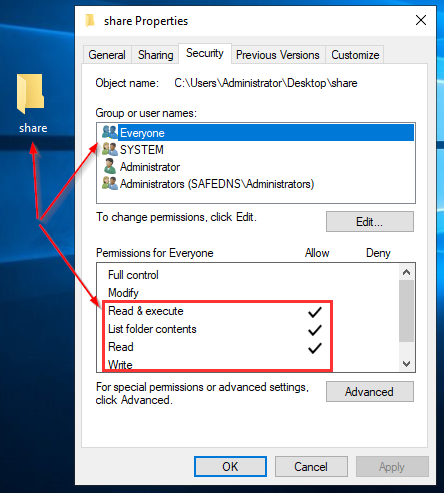
The folder with the Agent package should be avalable from the client's computer.

[![image-1719877376881.png](https://docs.safedns.com/uploads/images/gallery/2024-07/scaled-1680-/fTqbKW70mD2CHv1m-image-1719877376881.png)](https://docs.safedns.com/uploads/images/gallery/2024-07/fTqbKW70mD2CHv1m-image-1719877376881.png)
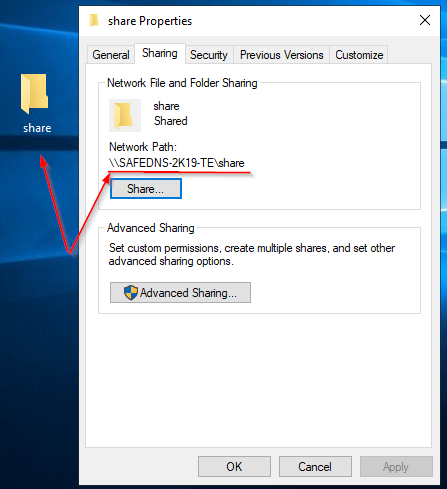
The folder permissions should be the following. User Everyone should have access to the read&amp;execute:

[![image-1719930007444.png](https://docs.safedns.com/uploads/images/gallery/2024-07/scaled-1680-/V5E5cpGwUYE9HX8x-image-1719930007444.png)](https://docs.safedns.com/uploads/images/gallery/2024-07/V5E5cpGwUYE9HX8x-image-1719930007444.png)

The preparation of the file process is over.

#### 5. Group Policy Configuration.

Open the Group Policy Management console

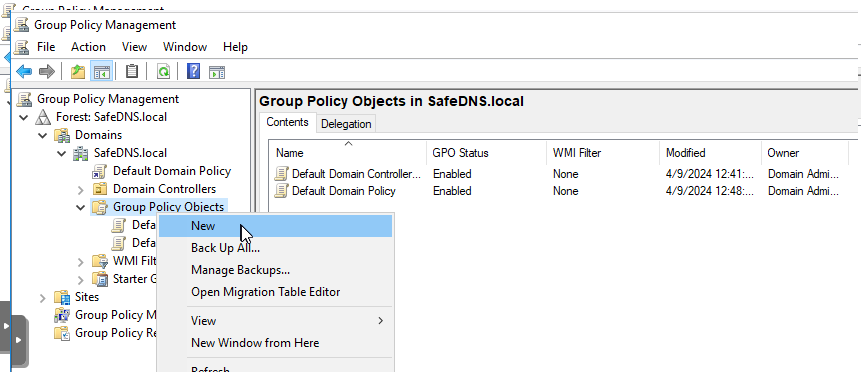
Select the current domain, then Group Policy Objects and open the context menu =&gt; New

[![image-1719930175238.png](https://docs.safedns.com/uploads/images/gallery/2024-07/scaled-1680-/m2fPOCTbXggQW51T-image-1719930175238.png)](https://docs.safedns.com/uploads/images/gallery/2024-07/m2fPOCTbXggQW51T-image-1719930175238.png)

Please name the Group Policy accordingly:

[![image-1719930314761.png](https://docs.safedns.com/uploads/images/gallery/2024-07/scaled-1680-/7SAcLCuN7K0pqu61-image-1719930314761.png)](https://docs.safedns.com/uploads/images/gallery/2024-07/7SAcLCuN7K0pqu61-image-1719930314761.png)
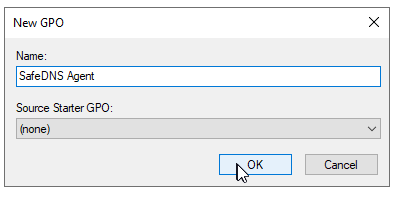
Once the policy is created, please set the User/Group applied the GPO installation:

[![image-1719930359537.png](https://docs.safedns.com/uploads/images/gallery/2024-07/scaled-1680-/UJPr3QIrAuGWQN3x-image-1719930359537.png)](https://docs.safedns.com/uploads/images/gallery/2024-07/UJPr3QIrAuGWQN3x-image-1719930359537.png)
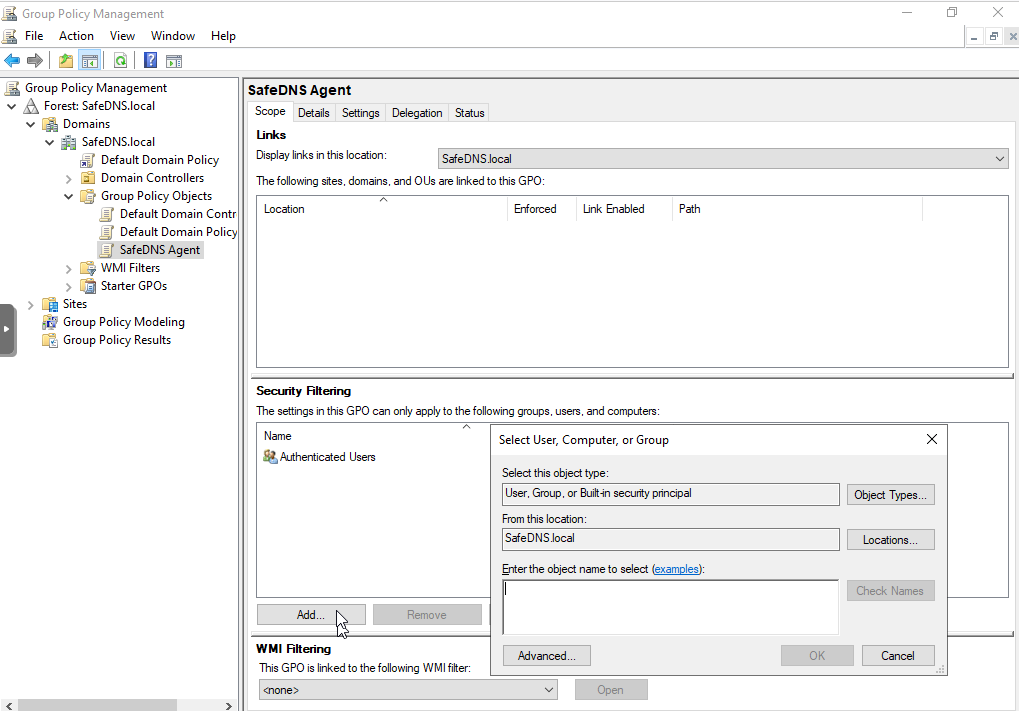
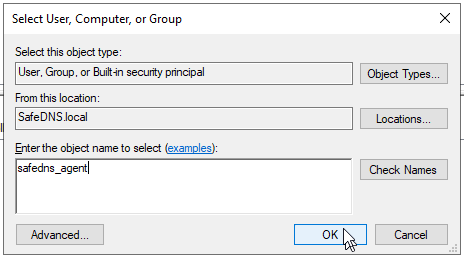
In the appeared window select the Group safedns\_agent - with the user safedns\_win11\_test:

[![image-1719930504658.png](https://docs.safedns.com/uploads/images/gallery/2024-07/scaled-1680-/efT9y6Y6Vc4Zw0Tb-image-1719930504658.png)](https://docs.safedns.com/uploads/images/gallery/2024-07/efT9y6Y6Vc4Zw0Tb-image-1719930504658.png)
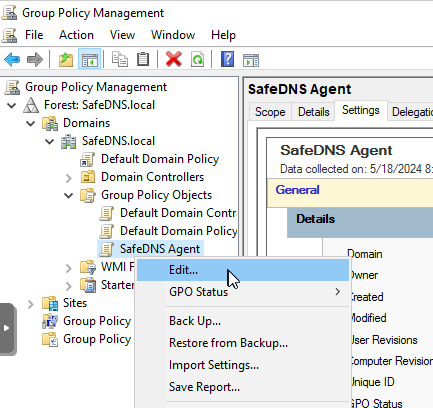
Once the GPO is created, tap the context menu of the object and click on Edit button:

[![image-1719930644053.png](https://docs.safedns.com/uploads/images/gallery/2024-07/scaled-1680-/prutRLgRGrRSaA7p-image-1719930644053.png)](https://docs.safedns.com/uploads/images/gallery/2024-07/prutRLgRGrRSaA7p-image-1719930644053.png)
<p class="callout warning">Important notice: There are 2 possible ways of the MSI package installation:</p>

1. ##### Installation Policy applied to the computer - Computer Configuration
2. ##### Installation Policy applied to the user - User configuration

[![image-1719930802132.png](https://docs.safedns.com/uploads/images/gallery/2024-07/scaled-1680-/LcZajQiSLYmUqyLk-image-1719930802132.png)](https://docs.safedns.com/uploads/images/gallery/2024-07/LcZajQiSLYmUqyLk-image-1719930802132.png)
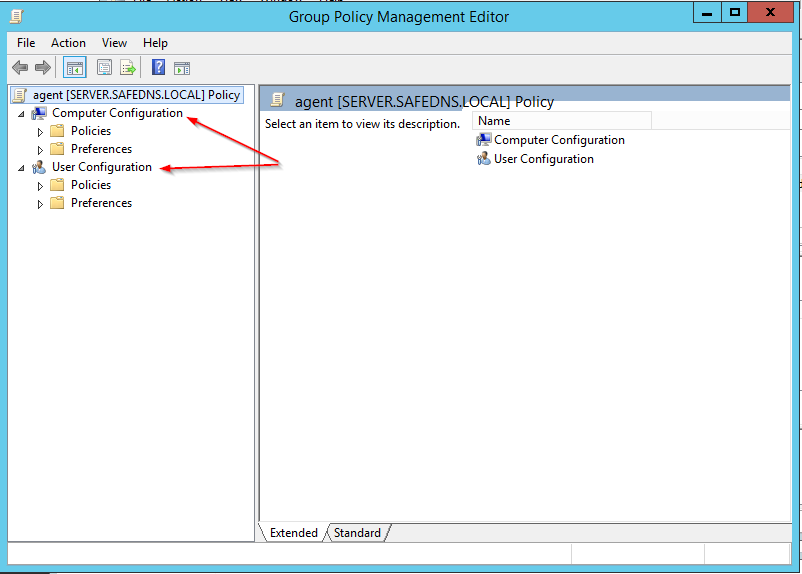
<p class="callout success">It is recommended to use Computer Configuration - the software installation will start without user interaction and the user can not stop/close installation.</p>

<p class="callout success">The second option - User Configuration requires user actions on the computer to start the package installation and will require Administrator credentials.</p>

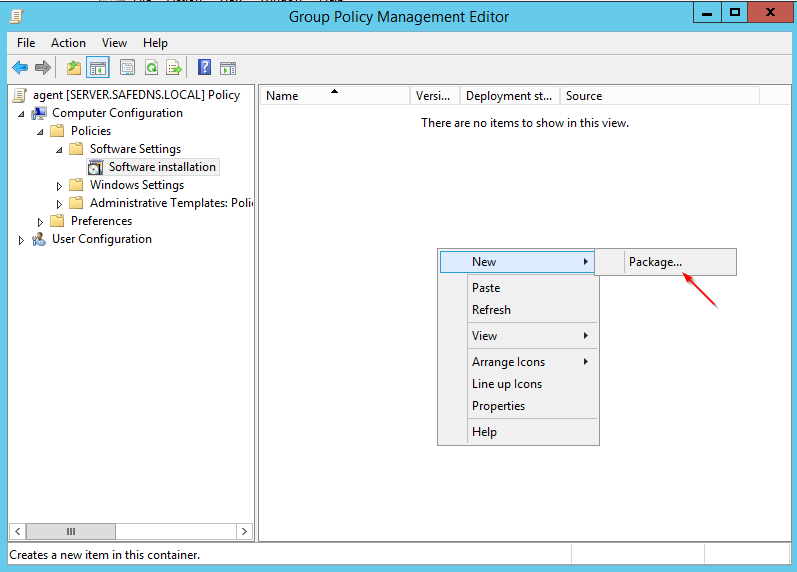
In the Group Policy Management Editor select Computer Configuration then Policies =&gt; Software Settings =&gt; Software Installation.

Tap the context menu button and select New=&gt;Package:

[![image-1719931149148.png](https://docs.safedns.com/uploads/images/gallery/2024-07/scaled-1680-/bgZow6vtrilY4MJ2-image-1719931149148.png)](https://docs.safedns.com/uploads/images/gallery/2024-07/bgZow6vtrilY4MJ2-image-1719931149148.png)

Select the SafeDNS Agent installation package. The path should be the following: \\\\server\\share\\SafeDNS\_AD\_Agent\_3.0.5.msi

[![image-1719931222454.png](https://docs.safedns.com/uploads/images/gallery/2024-07/scaled-1680-/AHJc3A0eMPvbD9B5-image-1719931222454.png)](https://docs.safedns.com/uploads/images/gallery/2024-07/AHJc3A0eMPvbD9B5-image-1719931222454.png)
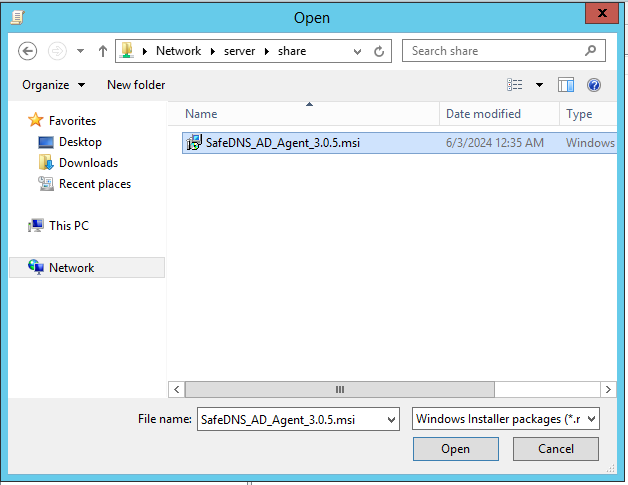
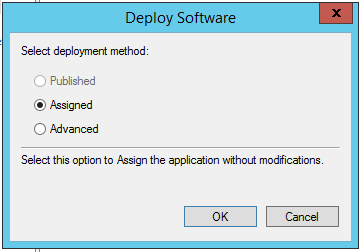
Select the Assigned deploy method:

[![image-1719931383646.png](https://docs.safedns.com/uploads/images/gallery/2024-07/scaled-1680-/eC9ZDldz9Hn6R5ep-image-1719931383646.png)](https://docs.safedns.com/uploads/images/gallery/2024-07/eC9ZDldz9Hn6R5ep-image-1719931383646.png)
Once the Application package is added, the new record should appear in the list:

[![image-1719931442193.png](https://docs.safedns.com/uploads/images/gallery/2024-07/scaled-1680-/U6YkIda8czGHyHQO-image-1719931442193.png)](https://docs.safedns.com/uploads/images/gallery/2024-07/U6YkIda8czGHyHQO-image-1719931442193.png)
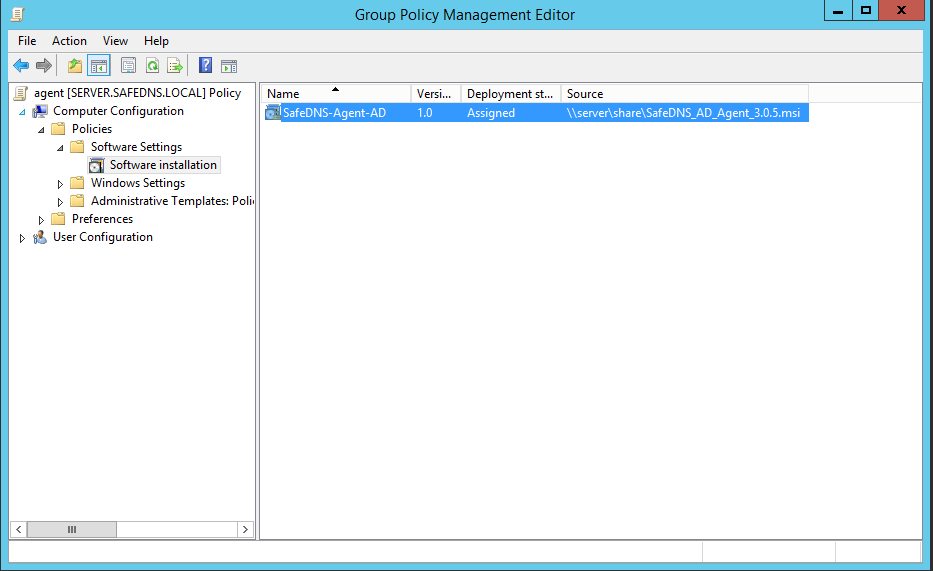
<p class="callout info">The installation is finished, the Agent should be installed after the next login to the computer.</p>

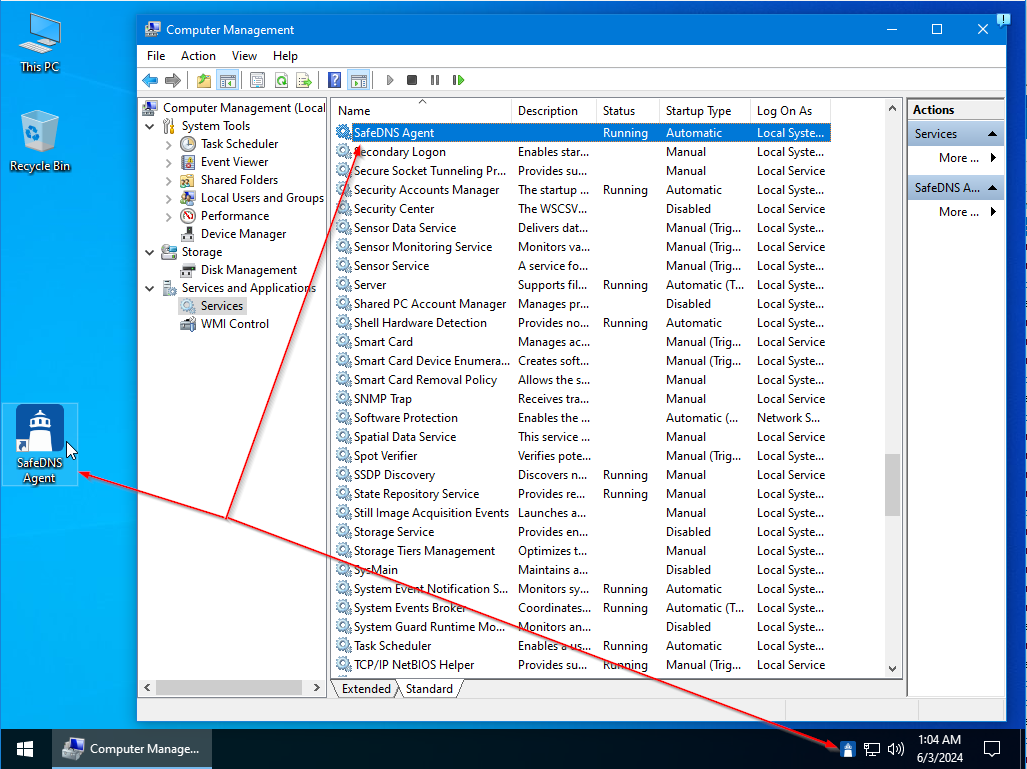
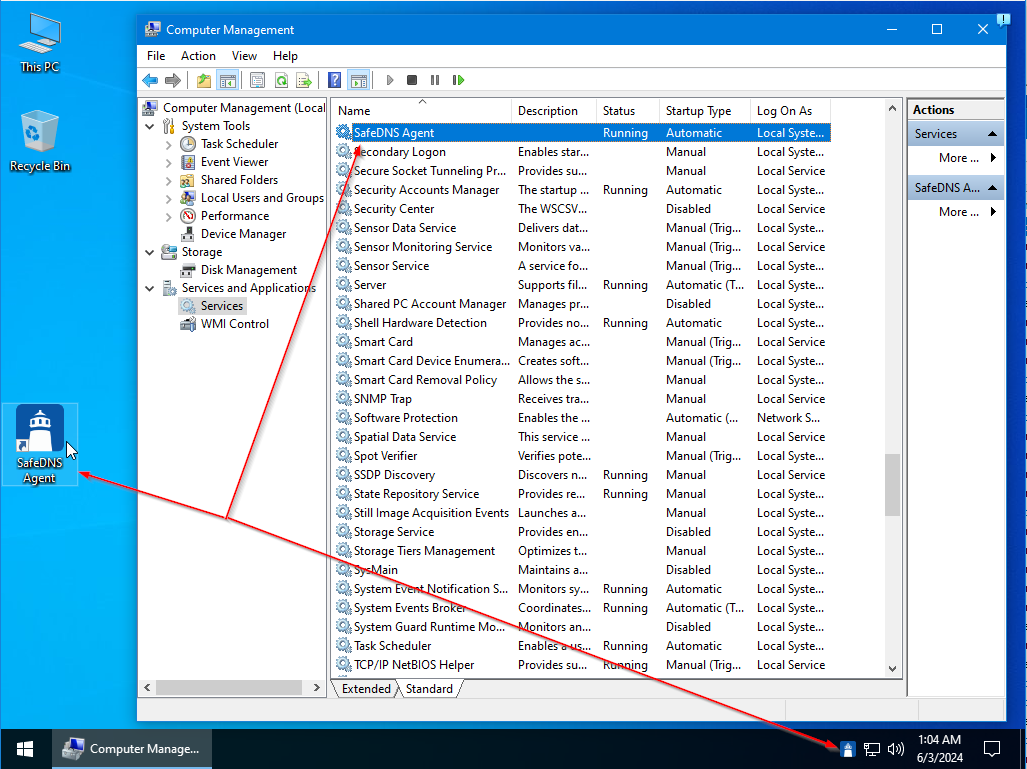
Depending on the MSI package settings, after the installation the following objects should appear:

1. SafeDNS Agen icon on the Desktop
2. SafeDNS Agent service
3. SafeDNS icon on the system tray

[![image-1719931503726.png](https://docs.safedns.com/uploads/images/gallery/2024-07/scaled-1680-/emJMNg8RQNwpMXq8-image-1719931503726.png)](https://docs.safedns.com/uploads/images/gallery/2024-07/emJMNg8RQNwpMXq8-image-1719931503726.png)
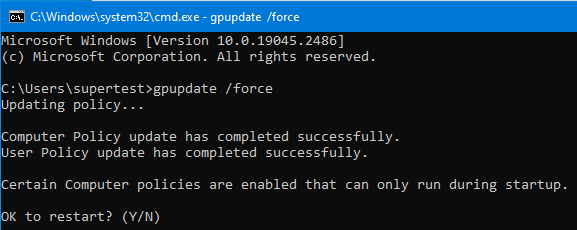
If there is a need to start the MSI package installation before restarting/new login please start the CMD command line and run the following command:

##### gpupdate /force

This command will initiate the installation process:

[![image-1719931829481.png](https://docs.safedns.com/uploads/images/gallery/2024-07/scaled-1680-/ipkxenlzPF9pVrhG-image-1719931829481.png)](https://docs.safedns.com/uploads/images/gallery/2024-07/ipkxenlzPF9pVrhG-image-1719931829481.png)
Once the computer restarted, the applicaation will appear on the Desktop, the service created and the icon appeared in the system tray:

[![image-1719931964437.png](https://docs.safedns.com/uploads/images/gallery/2024-07/scaled-1680-/oqjBY0YeodbeDvXt-image-1719931964437.png)](https://docs.safedns.com/uploads/images/gallery/2024-07/oqjBY0YeodbeDvXt-image-1719931964437.png)