Advanced
- How To Check The Filtering Status
- How to Clear DNS Cache
- How to troubleshoot access to domains using Network Tools
- How to check domain category
- Agent Unattended Installation
- Web Filtering Bypass Prevention
- DD Client Setup
- DNS-over-TLS using Stubby
- SafeDNS Root Certificate For HTTPS Pages
- How to enable two-factor authentication (2FA)
How To Check The Filtering Status
Since our filter is DNS-based, the best way to check the filtering is the nslookup command. Here you will find the checking methods for different platforms.
Please note that settings take 5-7 minutes to apply.
Stats and filtering status update every 10 minutes.
Windows
Take a look at the video guide.
- Open the "Start" menu
- Type "cmd"
- Select the suggested application - Command Prompt
- Enter and run the command nslookup -q=txt black.safedns.com or nslookup -q=txt black.safedns.com 127.0.0.1 if you are using the SafeDNS Agent
To check via IPv6 (if it was set up), use the command nslookup -q=txt black.safedns.com 2001:67c:2778::3939
Correct results should show your external IP address ("ip"), policy ID ("p"), and also SafeDNS Agent ID ("t") in case it is installed. If you see the results similar to screenshot 01, it means that the filtering is active.
If the "p":0, check if the IP address in the Dashboard > Settings > Devices is added correctly.
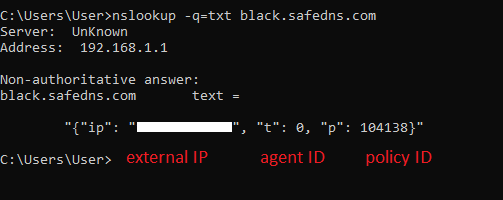
If you see the results similar to screenshot 02, it means that the filtering is not configured, and the primary and secondary DNS servers on your device or router are set up incorrectly. Please check your DNS settings.

Linux
To check via IPv6 (if it was set up), use the command nslookup -q=txt black.safedns.com 2001:67c:2778::3939
Correct results should show your external IP address ("ip"), policy ID ("p"), and also SafeDNS Agent ID ("t") in case it is installed. If you see the results similar to screenshot 03, it means that the filtering is active.
If the "p":0, check if the IP address in the Dashboard > Settings > Devices is added correctly.

If you see the results similar to screenshot 04, it means that the filtering is not configured, and the primary and secondary DNS servers on your device or router are set up incorrectly. Please check your DNS settings.

Mac
- Launch "Spotlight" with ⌘ + SPACE or by clicking on the magnifying glass in your menu
- Search for and launch the "Terminal" app
- Enter and run the command host -t txt black.safedns.com
To check via IPv6 (if it was set up), use the command nslookup -q=txt black.safedns.com 2001:67c:2778::3939
Correct results should show your external IP address ("ip"), policy ID ("p"), and also SafeDNS Agent ID ("t") in case it is installed. If you see the results similar to screenshot 05, it means that the filtering is active.
If the "p":0, check if the IP address in the Dashboard > Settings > Devices is added correctly.

If you see the results similar to screenshot 06, it means that the filtering is not configured, and the primary and secondary DNS servers on your device or router are set up incorrectly. Please check your DNS settings.

How to Clear DNS Cache
DNS cache refers to the temporary storage of information about previous DNS lookups on a router, machine's OS, or web browser.
Keeping a local copy of a DNS lookup allows your router, OS, or browser to quickly retrieve it and thus a domain can be resolved to its corresponding IP much more efficiently.
However, sometimes it can cause a problem when the new filtering settings conflict with the information saved in the cache. Usually, the problem resolves after clearing the cache on a browser level.
Browser level
Chrome, Edge, Opera, Firefox, and many others
Press Ctrl + Shift + Delete simultaneously on the keyboard to open the appropriate window. Select "Cache" and click "Clear".
Please note, that you don't need to delete cookies and saved passwords.
Alternatively, you can use the browser's Settings menu, search for the "cache" setting, and select the suggested option.
Advanced cache clearing for Chrome browser
Certain popular, high-traffic websites might open even after the cache is cleared. To fix this, do the following:
- Enter chrome://net-internals/#dns in the address bar and press Clear host cache.
- Enter chrome://net-internals/#sockets in the address bar and press Flush socket pools.
- Clear DNS cache of the operating system (read below).
Safari
- Click on Safari on the top menu bar.
- Click Preferences.
- Click the Privacy tab.
- Click Manage Website Data...
- Click Remove All.
- Click Remove Now.
- Go to the Safari menu on the top menu bar.
- Select Quit to close Safari and save your changes.
iOS, iPadOS
Safari browser:
1. Go to Settings (the app with the gear icon).
2. Scroll down until you see Safari. Tap it.
3. Press Clear History and Website Data.
4. Press Clear History and Data again in the warning notification.
Chrome browser:
1. On your iPhone or iPad, open the Chrome app.
2. At the bottom, press More ...
3. Press History > Clear browsing data.
4. Select Cookies, Site Data and Cached Images and Files.
5. Press Clear browsing data.
Android
- Long press on the app in the app menu.
- Select App info in the pop-up window.
- Press Storage usage in the app's info page.
- Press Clear cache.
System level
Windows
Mac
- Search for the Terminal in the applications list or press CMD+Space.
- Enter the following command:
sudo dscacheutil -flushcache; sudo killall -HUP mDNSResponder - Press Enter.
- If prompted, type your administrator account password.
- Press Enter again to submit your password.
Linux
- Search for the Terminal in the applications list or press Ctrl+Alt+T.
- Enter the following command:
sudo systemd-resolve --flush-caches - Press Enter.
- If prompted, type your administrator account password.
- Press Enter again to submit your password.
iOS, iPadOS, Android
- Turn Airplane mode on
- Reboot device
- Turn Airplane mode off
Router level
Reboot the router using the router's interface.
Alternatively, turn the router off by pressing its power button, wait for 15 seconds, and turn the router back on.
How to troubleshoot access to domains using Network Tools
This guide shows how to troubleshoot the issue when a domain is loading partially or some additional services from the main domain are not accessible.
Prerequisites:
Browser with the support of the Developers Tools. All popular modern browsers have this feature.
How to troubleshoot:
Start the browser and press F12, or go to Menu > Tools > Browser Tools > Web Developer Tools.
Path to the Developer Tools might be different in various browser
The HTTP status can have different values, including:
- 200 (OK) — the access was not blocked and the item has been loaded.
- 451 — Unavailable for Legal Reasons.
- Blocked icon — the access was forbidden and the item had not been loaded.
Using these statuses, you can identify the blocked domain.
Example:
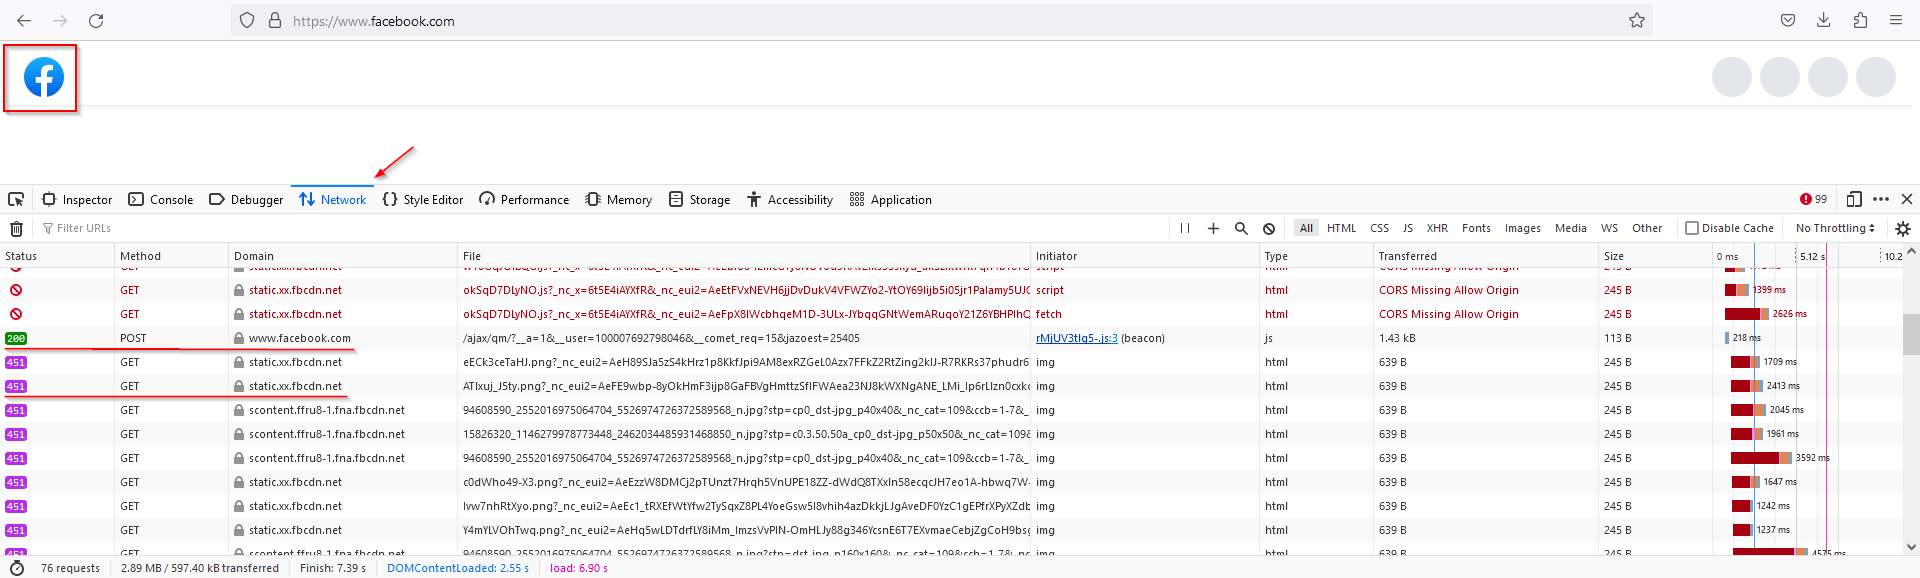
The access to facebook.com is not blocked, and the Facebook logo has been loaded.
However, all other data on the page was not loaded, because it is located on the blocked fbcdn.net domain.
To unblock this domain, please check its category here: https://www.safedns.com/check/
After that, navigate to the SafeDNS Dashboard and unblock that category.
If you want to keep the category blocked, you can add this domain to Allowlist instead.
How to check domain category
You can always check your domain category here.
Agent Unattended Installation
New Agent, versions 1.4.1+ (Windows only)
Installation
To initialize the unattended installation, run the installer with /verysilent switch in the command line.
You can use the additional keys:
- /login=< login > /password=< password > /pin=< pin code > to specify your login, password, and pin code.
Pin-code can be any 4-digit number that will be used instead of a password to access the Agent interface. It can be different for different devices.
It is mandatory to use the /login, /password, and /pin keys together. If only one of the keys is used, login, password, and pin will be requested via GUI at the first launch.
Example:/verysilent /login=email@email.com /password=StrongPass /pin=1234 - /token= <token> to pass the authentication key instead of the login, password, and pin code.
- /noad key can be used in cases when the Agent needs to be installed in an Active Directory environment as a regular Agent without AD GPO integration.
Keys from the old Agent will be added in the subsequent releases.
Uninstallation
To initialize the unattended uninstallation, run the uninstaller with /verysilent switch in the command line.
Old Agent
To initialize the unattended installation, run the installer with /S switch in the command line (S must be uppercase).
You can use the additional keys:
- /login=< login > and /pass=< password > to specify your login and password.
Example:safedns-agent-setup /S /login=email@email.com /pass=qwerty
It is mandatory to use the /login and /pass keys together. If only one of the keys is used, both login and password will be requested via GUI at the first launch. - /prof=< profile > to specify the filtering policy.
Example:safedns-agent-setup /S /login=email@email.com /pass=qwerty /prof=My policy
If the key is not used or the wrong policy is specified, a new policy will be created. - /conn=< interface > to specify the network interface which needs to be protected.
Example:safedns-agent-setup /S /login=email@email.com /pass=qwerty /conn=Wi-Fi - /pall to protect all network interfaces.
If both /conn and /pall are used, then only the former takes action. If neither key is used, only the default network interface will be protected. - /dupd turns off automatic checks for the new versions of the Agent.
- /darun disables automatic startup of the SafeDNS Agent GUI when the system starts (no icon will be shown in the system tray). This switch does not affect the SafeDNS Agent system service.
- /D=< path > to specify the installation directory (D must be uppercase). It must be the last option used in the command line and must not contain any quotation marks, even if the path contains whitespace characters.
Example:safedns-agent-setup /S /login=email@email.com /pass=qwerty /D=c:\program files (x86)\SafeDNS Agent
Only absolute paths are supported. - /nogui disables installation of the graphical user interface (GUI). When you use the key, all components will be installed, except for the dns-agent.exe file. You must specify the login and password with this key
Don't enclose options containing whitespace characters in quotation marks (i.e. /prof=My policy).
Old Agent, special version for Active Directory
This version supports all commands above and one additional key:
- /DNS=< IP address > to specify the DNS forwarder.
Example:safedns-agent-catserver-setup /S /login=email@email.com /pass=qwerty /DNS=192.168.0.1
Web Filtering Bypass Prevention
Common recommendations:
- Block the Proxies & Anonymizers category.
- Block the Firefox/Chrome Secure DNS feature in the VPN and Proxy section of AppBlocker.
- Make sure that all of your users have restricted operating system rights. If a user has no administrator rights, it will be impossible for them to delete the SafeDNS Agent, install any VPN/proxy, change the "hosts" file, or change the DNS server in the network settings.
- Prohibit access to any other DNS. If devices connect to the internet via a gateway or router, prohibit access to all DNS servers, except the SafeDNS public DNS servers. We recommend excluding the 195.46.39.0/24 network as well, as this is a whole SafeDNS network. If you are using a caching server in your corporate network, exclude its address instead.
- Prohibit access to HTTP proxies. To do that, restrict packet transfer to all IP addresses by TCP and UDP protocols on ports 3128 and 8080 in the firewall settings of your router.
- Prohibit access to DNS over TLS. To do that, restrict packet transfer to all IP addresses, except SafeDNS network 195.46.39.0/24, on TCP port 853.
- Disable IPv6 protocol. Even though SafeDNS does support IPv6 addresses, we generally recommend disabling this protocol on your router or in the network settings of your device. Please note, that this will not have any effect on the quality of your internet connection.
Recommendations for system administrators:
- Set up DNS requests rerouting to the SafeDNS public DNS server or to the caching server of your corporate network.
- Prohibit access to any external proxy servers.
- Restrict direct access to any website via its IP address.
- Restrict connection to unknown external VPN servers.
- Restrict running any unknown application.
- Restrict using any unknown hardware.
DD Client Setup
This guide explains how to install ddclient software in the case when you have a Dynamic IP address and your router does not have a Dynamic DNS feature.
Install and configure DDclient software

- Install DDclient (download link).
- Click "Next" until your reach the "Select Dynamic DNS server" window (see screenshot above).
- Enter any preferred name in the "Client hostname" field. (please do not use the space in this field)
- Enter www.safedns.com in the "Dynamic DNS server".
- Select HTTPS in the "Connection".
- Select dyndns2 in the "Dynamic DNS protocol".
- Enter your SafeDNS account login in the "Dynamic DNS username".
- Enter your SafeDNS password in the "Dynamic DNS password".
- Continue clicking "Next" until the setup process is finished.
After the installation
Check if the IP address is successfully bound to service in the ddclient.log file. There should be a line like this:
SUCCESS: updating my computer name: good: IP address set to 18.26.28.10
On Windows 10, 11 you can find the log file here:
- C:\Windows\ServiceProfiles\NetworkService\AppData\Local\ddclient.log
On Windows 7:
- C:\windows\ServiceProfiles\NetworkService\AppData\Local\ddclient.log
- C:\windows\ServiceProfiles\LocalService\AppData\Local\ddclient.log
- C:\Users\username\AppData\Local\ddclient.log
On Windows XP:
- C:\Documents and Settings\LocalService\Local Settings\Application Data\ddclient.log
- C:\Documents and Settings\NetworkService\Local Settings\Application Data\ddclient.log
- C:\Documents and Settings\username\Local Settings\Application Data\ddclient.log
If the log file is correct, the DD Client table in Dashboard > Settings > Devices (link) will be updated automatically.
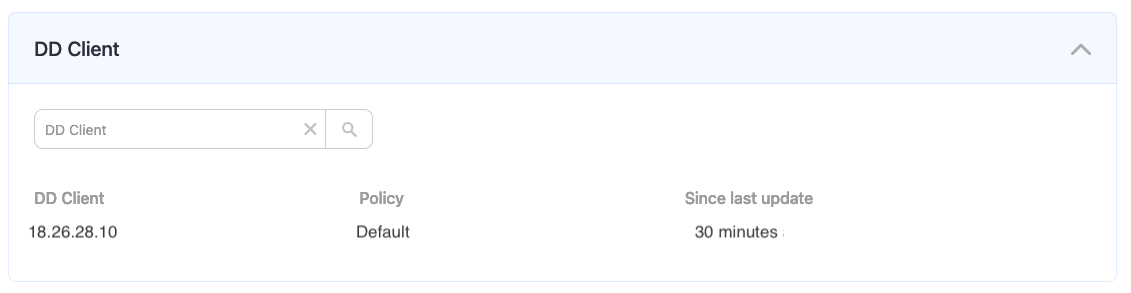
By default, DD Client checks the IP every 15 minutes. If the IP is changed, it will be updated in the SafeDNS Dashboard.
Please note that settings take 5-7 minutes to apply.
Stats and filtering status update every 10 minutes.
DNS-over-TLS using Stubby
The goal of the DNS-over-TLS protocol is to increase user privacy and security by preventing eavesdropping and manipulation of DNS data via man-in-the-middle attacks. With DoT, the content and response of the DNS query are encrypted.
Using this feature the SafeDNS service can identify users by their public IP address only. This feature does not work with the SafeDNS Agent or the SafeDNS VPN solution.
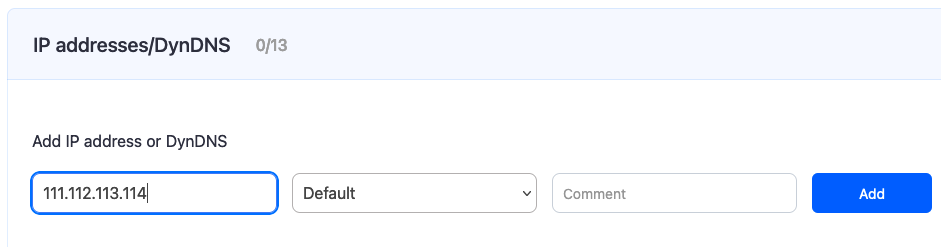
Before you start, please open your SafeDNS Dashboard > Settings > Devices. Enter your public IP address in the "Enter an IP address or DynDNS" field and click the "Add" button.
Windows 10
1. Download and install a Stubby .msi package.
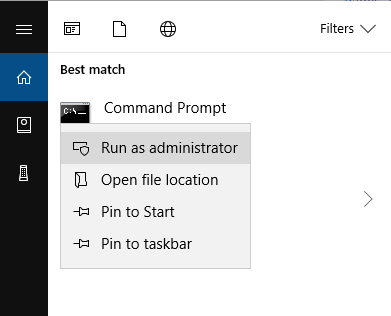
2. Run the Windows Command Prompt as administrator:
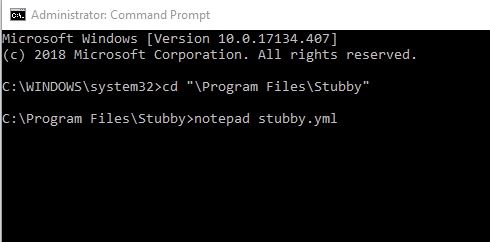
3. Go to the Stubby directory using the Command Prompt and open stubby.yml configuration file with Notepad:
4. Set settings following the example below:
resolution_type: GETDNS_RESOLUTION_STUB
dns_transport_list: GETDNS_TRANSPORT_TLS
tls_authentication: GETDNS_AUTHENTICATION_NONE tls_query_padding_blocksize: 128
edns_client_subnet_private: 0
idle_timeout: 100000
listen_addresses: - 127.0.0.1@53
round_robin_upstreams: 1
upstream_recursive_servers:
- address_data: 195.46.39.41
tls_auth_name: "dns-s.safedns.com" tls_pubkey_pinset:
- digest: "sha256"
value: kbv1ODr8gP7FV9/h2lp5t3sP4TdYZEwqUYj0mk0IBzg=
5. Run the following command to replace the default DNS server with a local Stubby:
PowerShell -ExecutionPolicy bypass -file "C:\Program Files\Stubby\stubby_setdns_windows.ps1"
6. Run the stubby.bat file
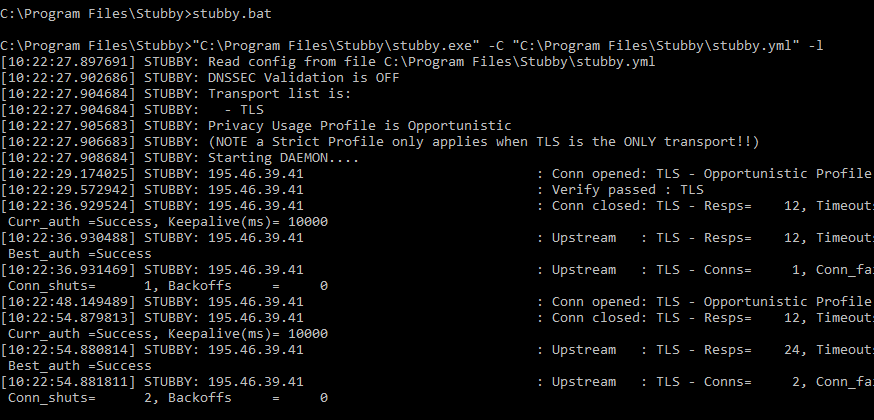
7. Check the filtering.
Linux (Ubuntu)
1. Install the Stubby package from a repository:
$ sudo apt install stubby
2. Set the configuration file /etc/stubby/stubby.yml as follows:
resolution_type: GETDNS_RESOLUTION_STUB
dns_transport_list: - GETDNS_TRANSPORT_TLS
tls_authentication: GETDNS_AUTHENTICATION_NONE
tls_query_padding_blocksize: 128
edns_client_subnet_private : 0
idle_timeout: 100000
listen_addresses: - 127.0.0.2@53
round_robin_upstreams: 1
upstream_recursive_servers:
- address_data: 195.46.39.41
tls_auth_name: "dns-s.safedns.com" tls_pubkey_pinset:
- digest: "sha256"
value: kbv1ODr8gP7FV9/h2lp5t3sP4TdYZEwqUYj0mk0IBzg=
3. Change DNS in /etc/resolv.conf file to 127.0.0.2:
nameserver 127.0.0.2
4. Start the filtering service
service stubby start
5. Check the filtering.
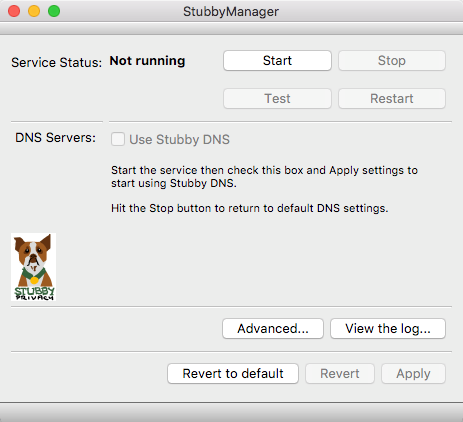
MacOS
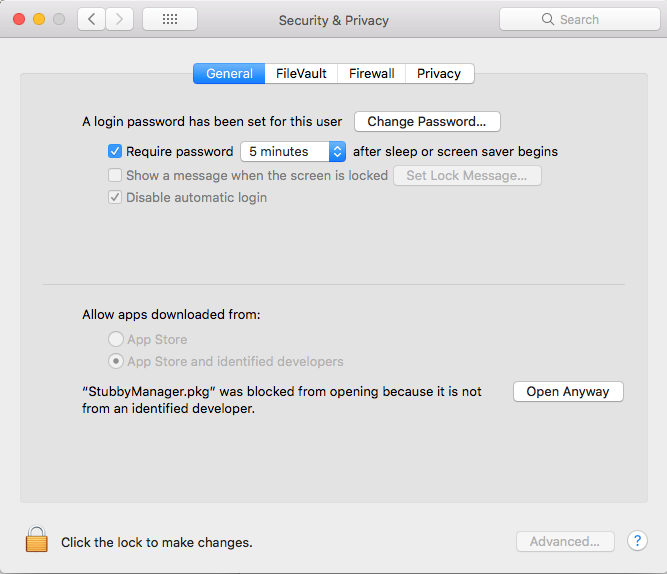
1. Download and install the Stubby Manager package.
If you get a security alert, click on "Open Anyway" in the security settings.
2. Launch a Stubby Manager app after installation and click the "Advanced" button.
3. Set the configuration file as follows:
resolution_type: GETDNS_RESOLUTION_STUB
dns_transport_list: - GETDNS_TRANSPORT_TLS
tls_authentication: GETDNS_AUTHENTICATION_NONE
tls_query_padding_blocksize: 128
edns_client_subnet_private : 0
idle_timeout: 100000
listen_addresses: - 127.0.0.1@53
round_robin_upstreams: 1
upstream_recursive_servers:
- address_data: 195.46.39.41
tls_auth_name: "dns-s.safedns.com" tls_pubkey_pinset:
- digest: "sha256"
value: kbv1ODr8gP7FV9/h2lp5t3sP4TdYZEwqUYj0mk0IBzg=
4. Apply the settings and click "Start".
5. Open "Network Properties" and set 127.0.0.1 as the DNS server.
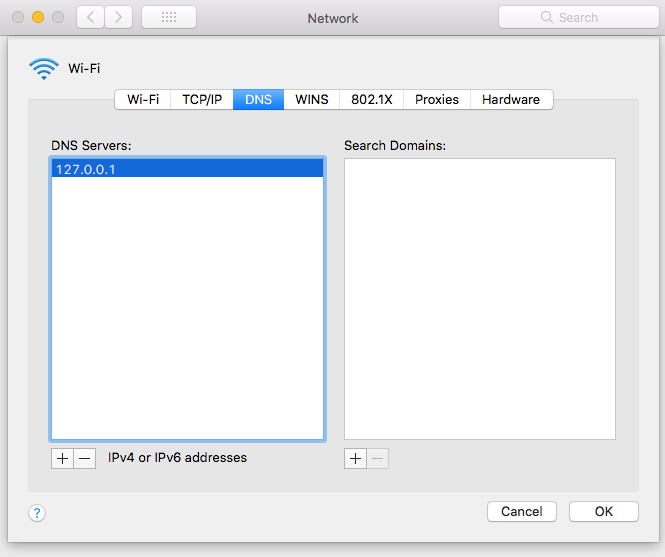
6. Check the filtering.
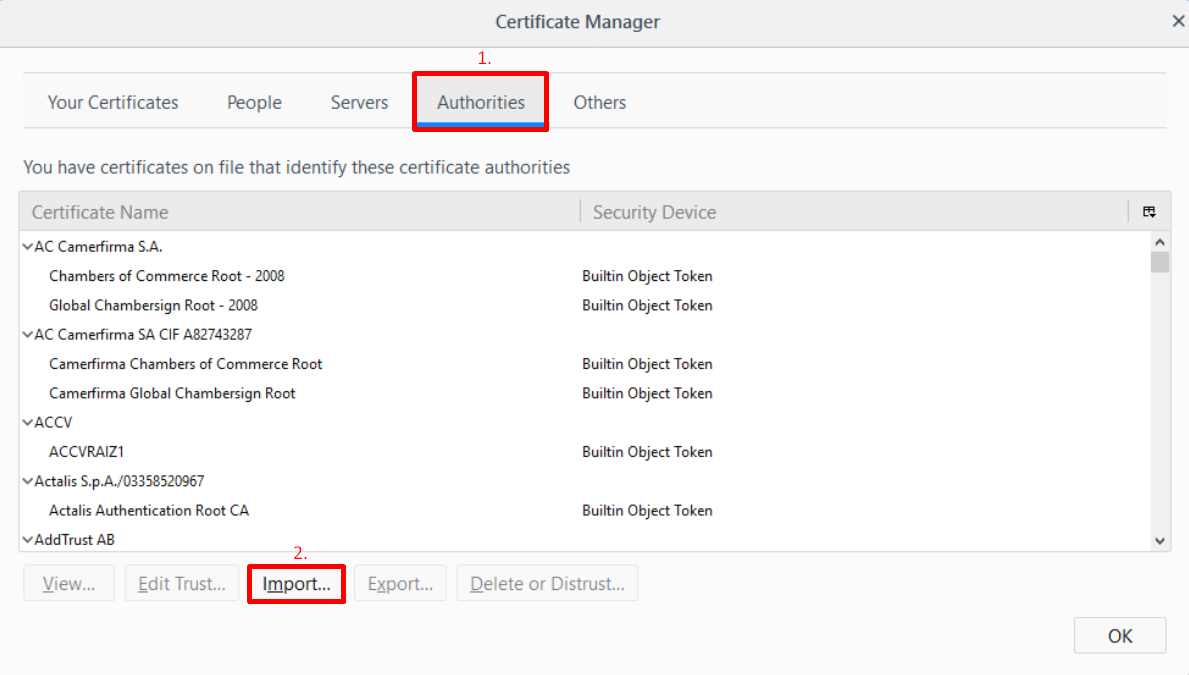
SafeDNS Root Certificate For HTTPS Pages
About the certificate
Root certificate or SSL certificate is the main part of the website security. SSL certificate is required for the correct operation of sites with a secure (HTTPS) connection. If you have issues with displaying the SafeDNS block page (your internet browser shows a message "Unable to access the site"), you need to download a SafeDNS certificate and configure it to use in your browser.
Please note that the certificate should be installed on each end device where you want HTTPS pages to display correctly.
If the browser starts installing the certificate after you click on the button, cancel it, right-click on the button and choose "Save as…"
Windows (Chrome, Edge, Opera browsers)
For Mozilla Firefox, see the next section.
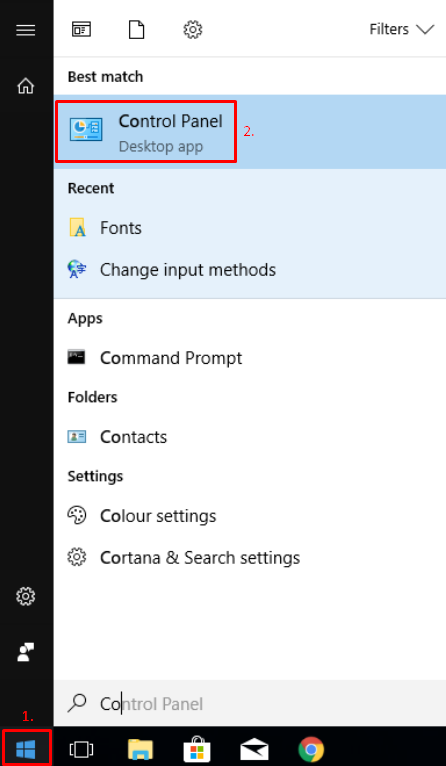
2. Open Internet Options.

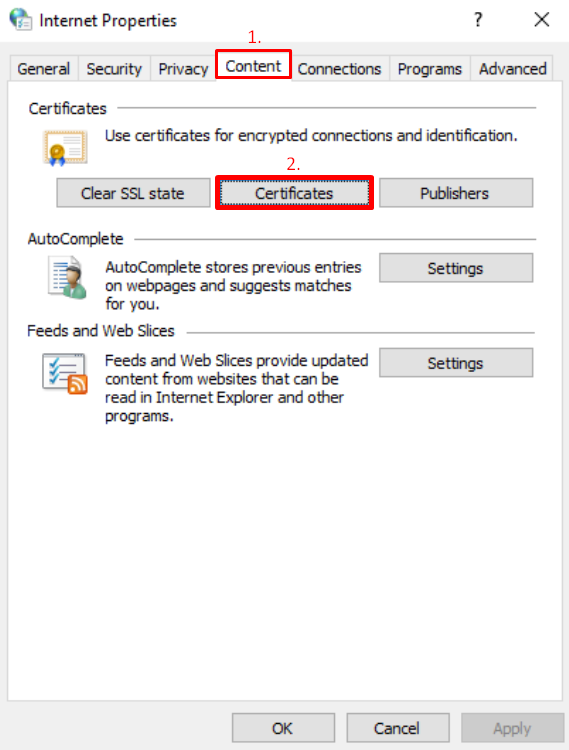

5. Click Next in Certificate Import Wizard.

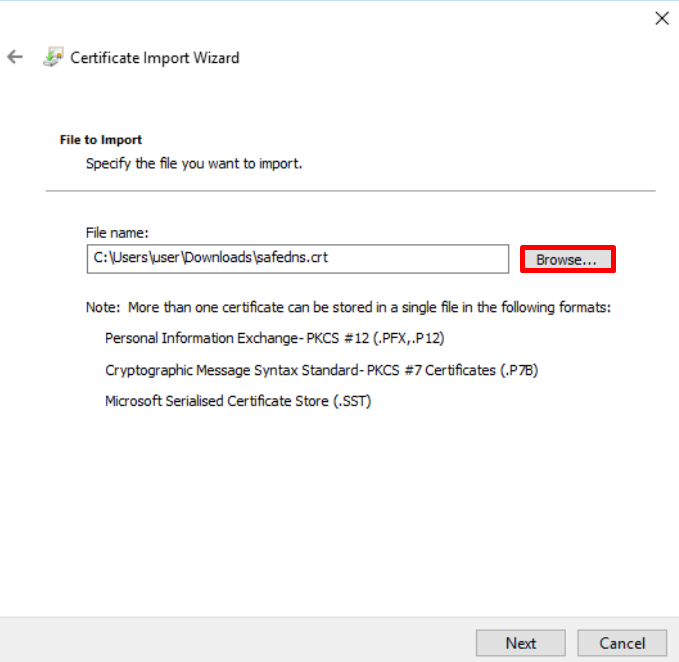
6. Click Browse and select a downloaded SafeDNS certificate file.
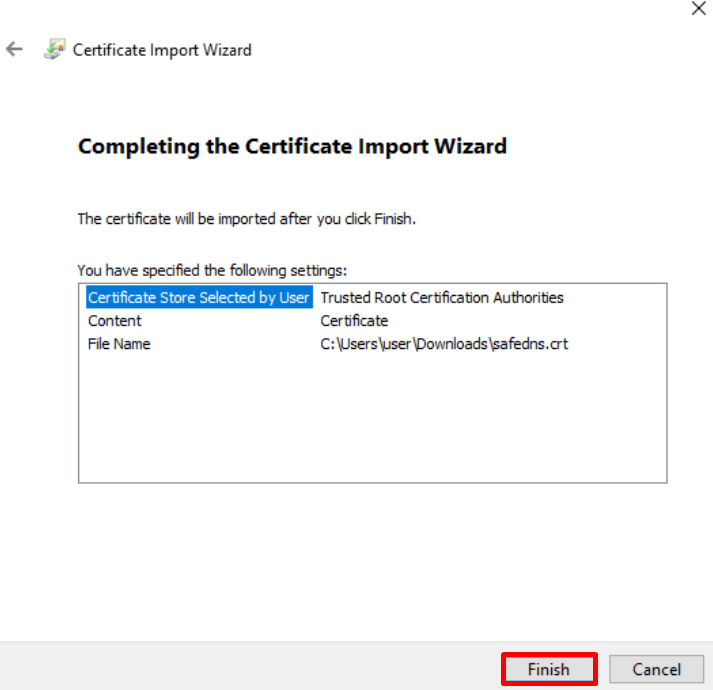
7. Make sure that the certificate is placed in the store Trusted Root Certification Authorities.

8. Close the window by clicking on Finish.
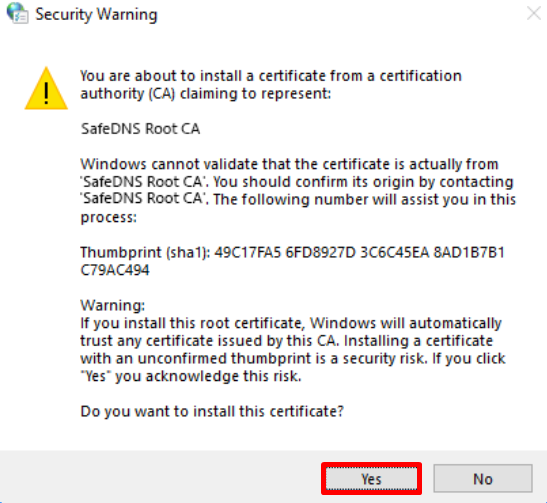
9. Click on Yes when Security Warning appears.
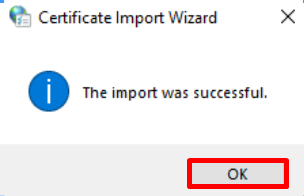
10. Close Certificate Import Wizard by clicking OK.
Mozilla Firefox (all platforms)
2. Choose Privacy & Security in the left menu, scroll to the bottom of the page, and click View Certificates.

4. Select the downloaded SafeDNS Certificate, tick the box Trust this CA to identify websites, and click OK.
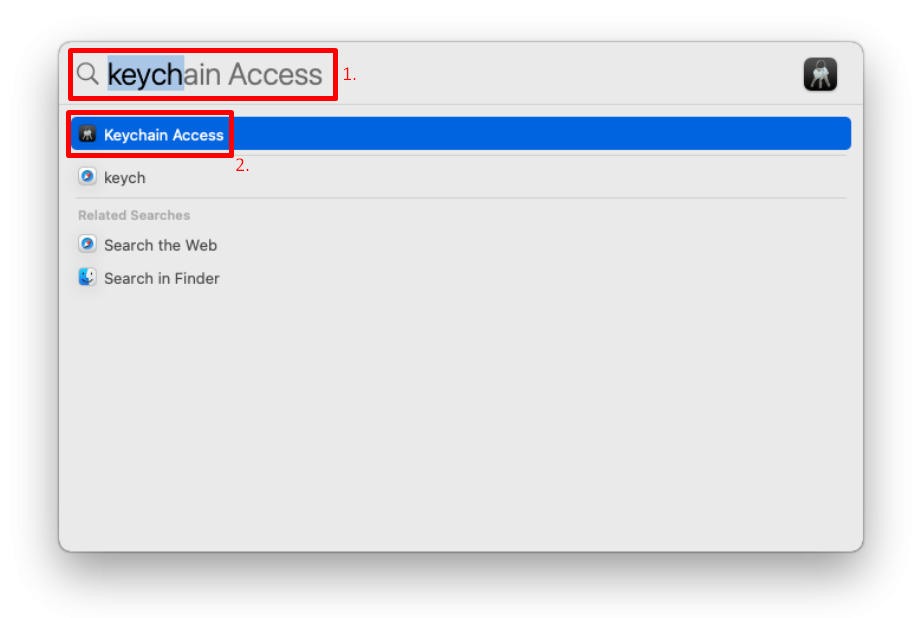
Mac OSX
1. Press the hotkey CTRL + SPACE and type 'Keychain' in the Spotlight search. Open the Keychain Access application.
2. Navigate to Login > System.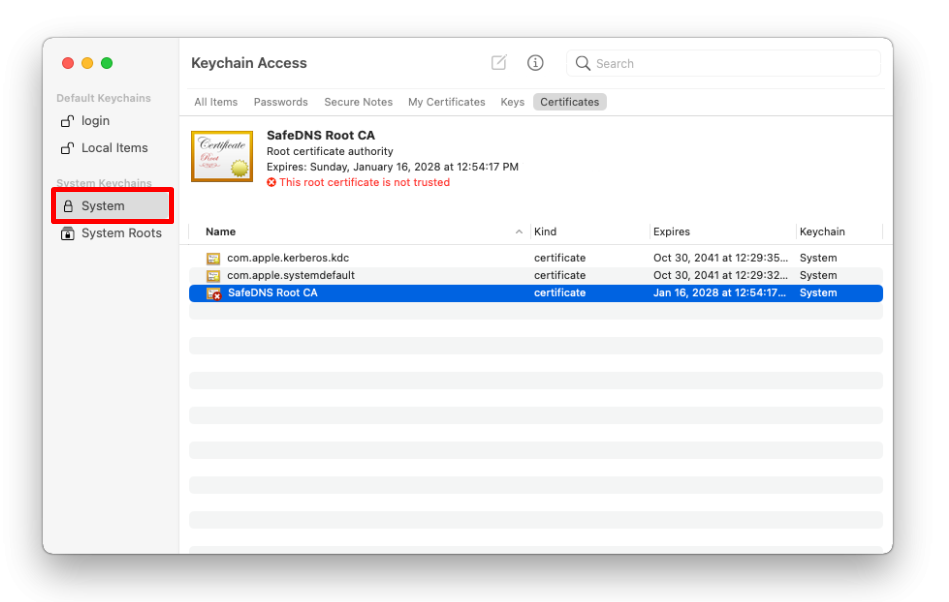
3. Drag and drop the downloaded SafeDNS certificate on the right side of the Keychain Access application where the rest of the certificates are stored.
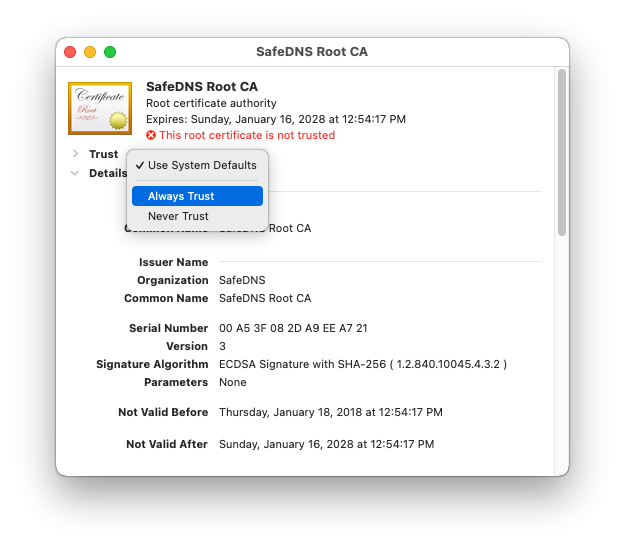
4. Double-click on the SafeDNS certificate and select Properties certificate. In the opened window, choose when to use this certificate, and select 'Always trust'. Close the window.
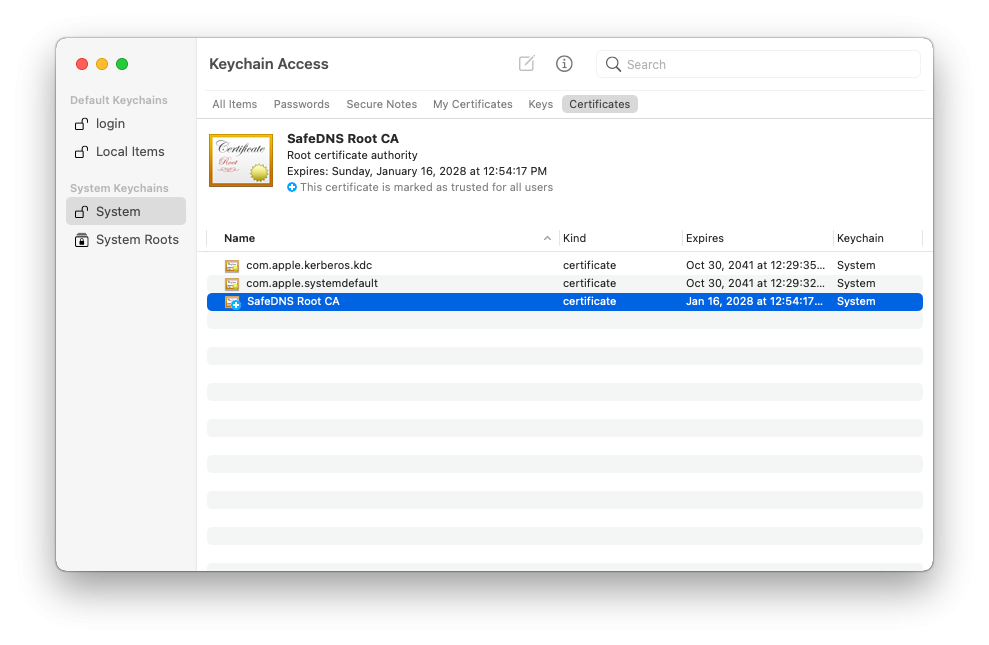
5. Make sure that the SafeDNS certificate is marked as trusted for this account in the Keychain Access application.
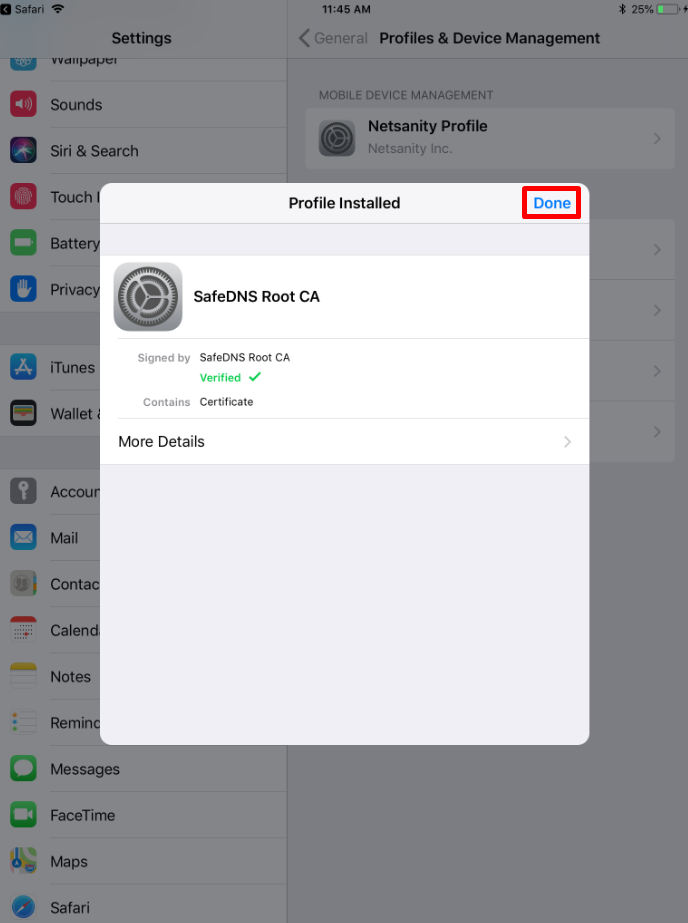
iPhone and iPad
1. Download the SafeDNS certificate.
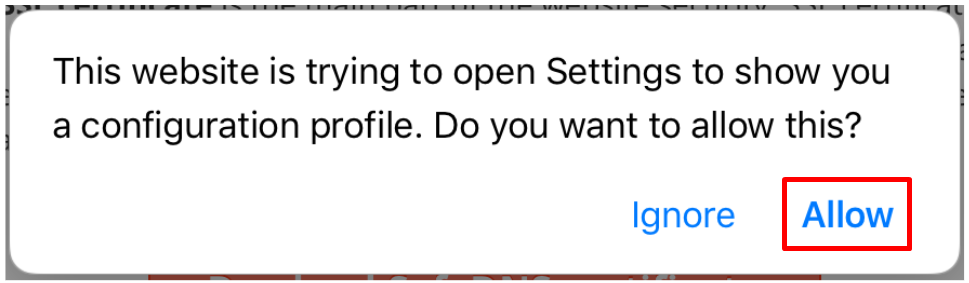
2. Allow the website to open Settings.
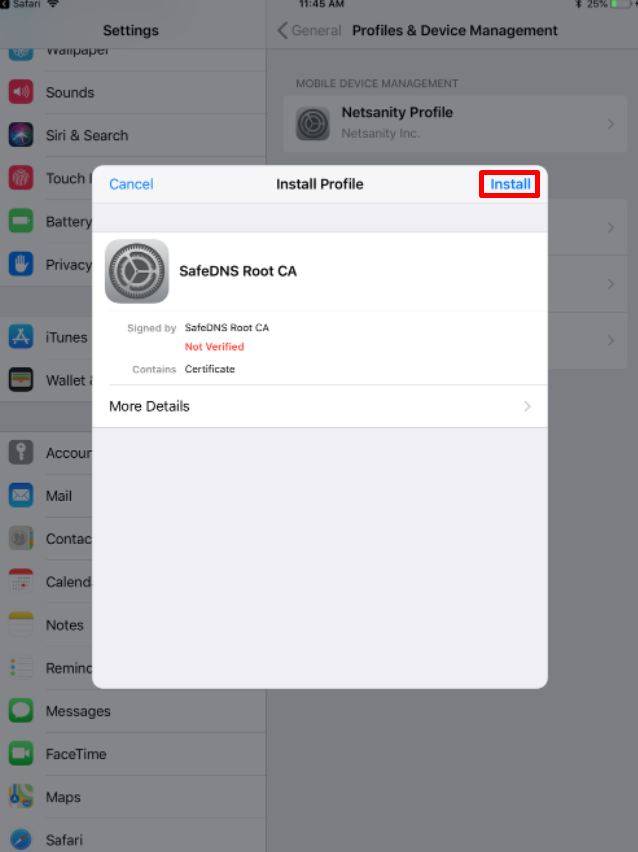
3. Tap Install.
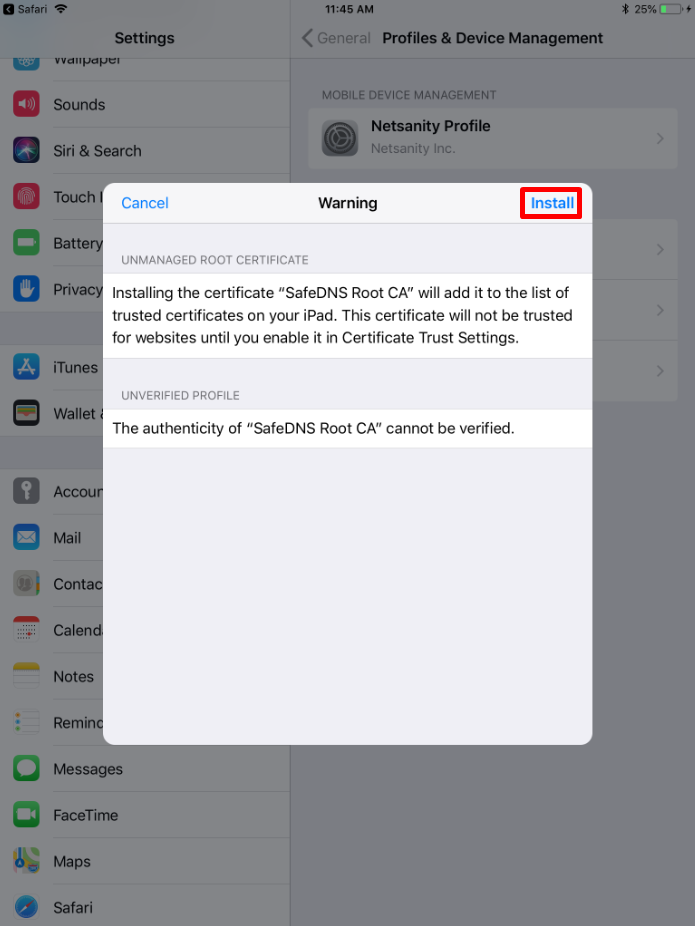
4. Tap on Install in the system warning window.
5. Tap Install in the confirmation window.
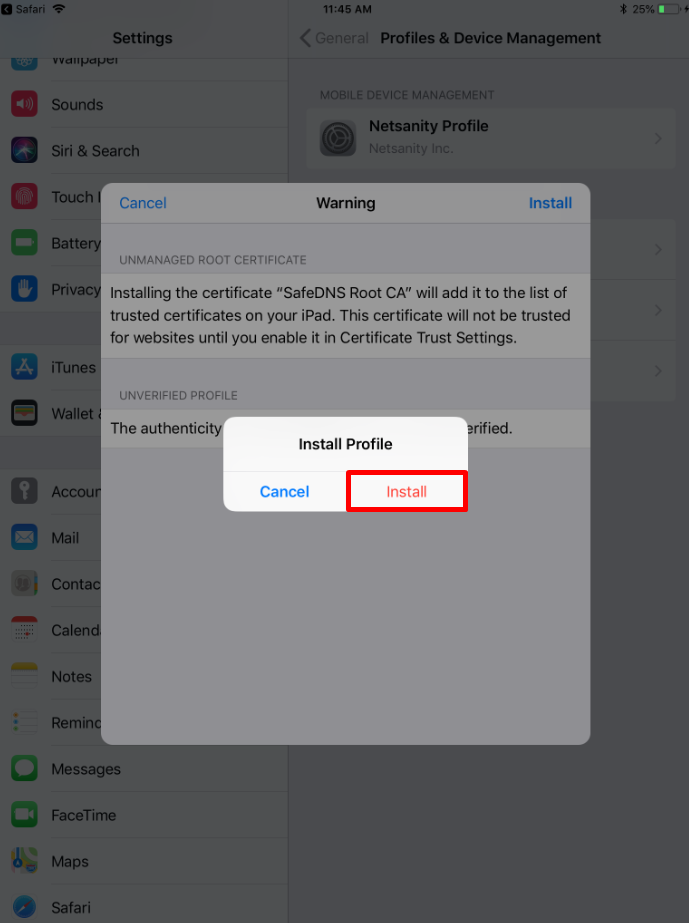
6. Tap Done.
7. Navigate to Settings > General > About > Certificate Trust Settings
8. Enable full trust for the SafeDNS Root CA certificate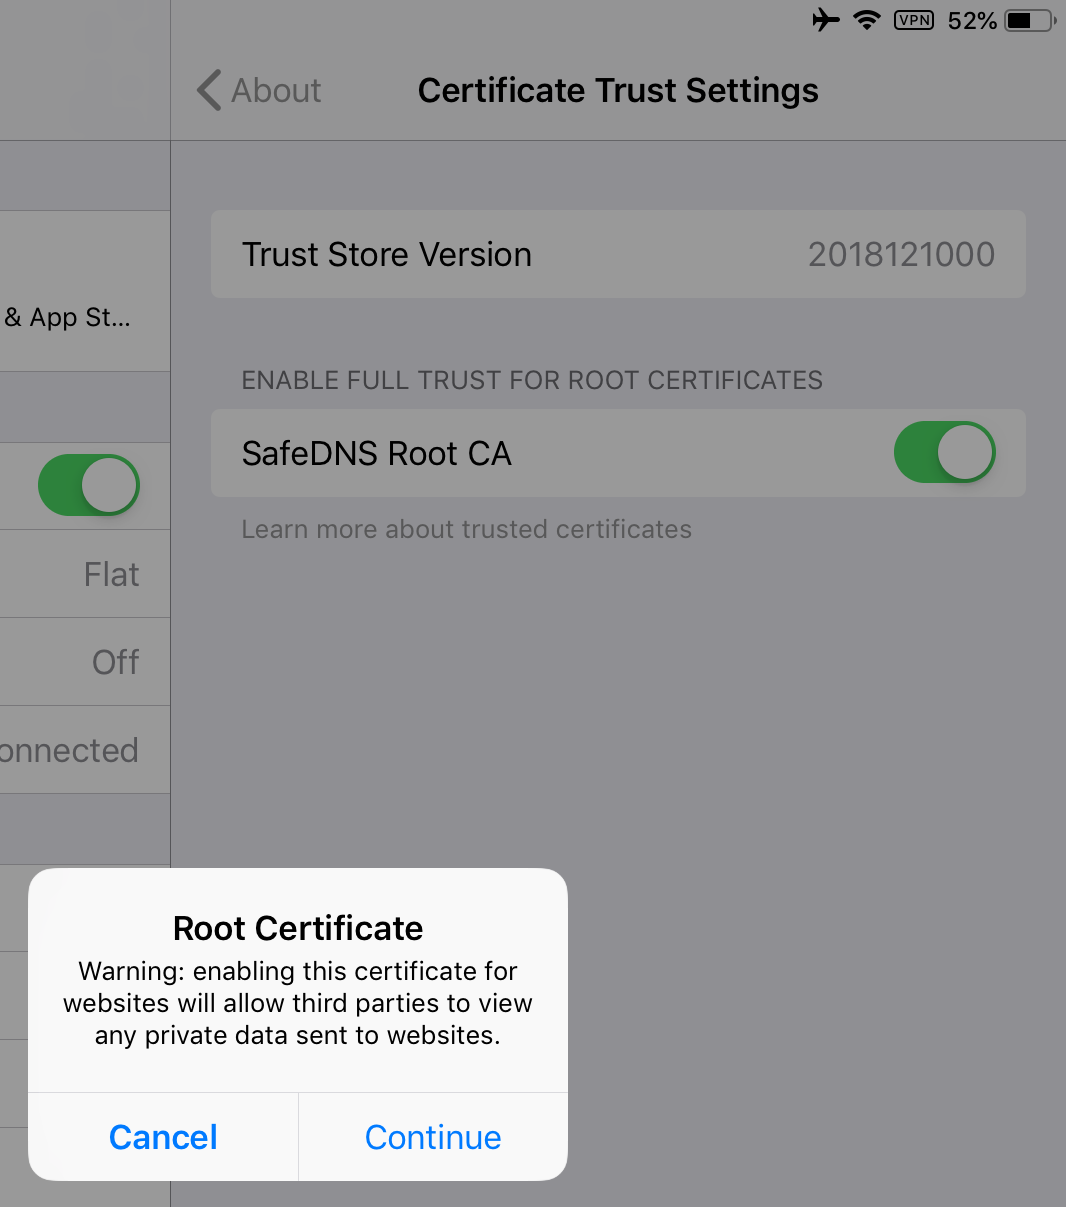
Android
1. Open the Settings app.
2. Start typing "certificate" in the search box.
3. Choose the option related to the certificate installation, a new window will open.
4. Choose "Install certificates from storage".
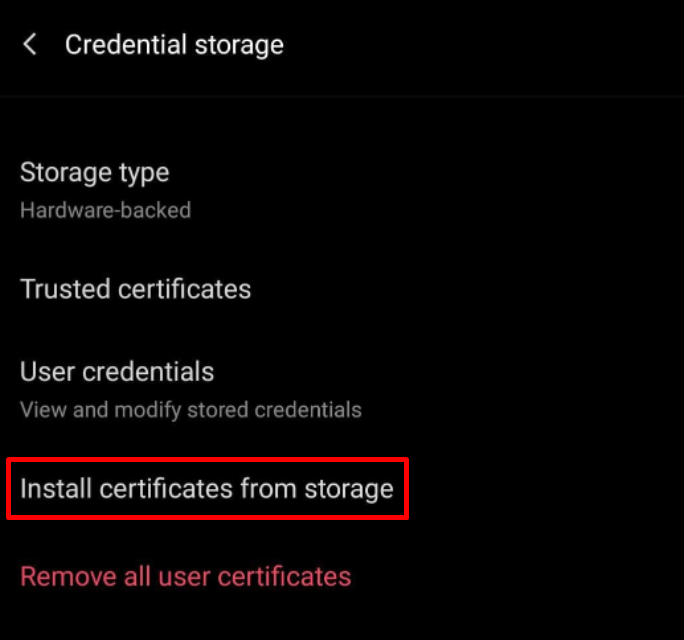
5. Press "CA certificate".

6. Follow the on-screen instructions to install the certificate.
Chromebooks and Google Workspace
In case the .crt certificate is not accepted, export it as a .pem file and import it into Workspace Admin.
Troubleshooting
If you don't see the block page on HTTPS pages after the certificate installation, or there is a browser warning about an invalid certificate, please, try reinstalling the certificate.
If the issue remains, ⤵contact our technical support team
How to enable two-factor authentication (2FA)
Enabling 2FA
To enable two-factor authentication, do the following:
2. Scroll down to the Two-Factor Authentication (2FA) panel
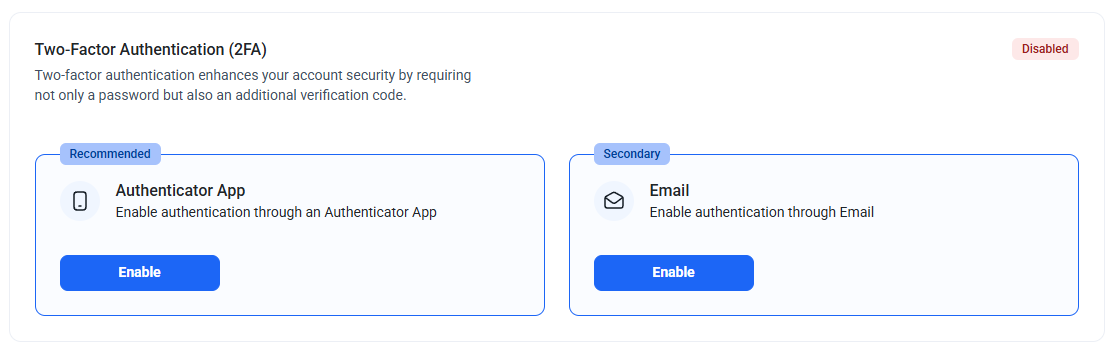
3. Choose the preferred method for authentication.
We recommend using the Authenticator App for better security.
4. Press Enable and follow the on-screen instructions for the selected method.
5. Save the backup codes when prompted.
Backup codes are shown only once. We strongly recommend keeping them on a different device or writing them down. Each code can be used only once.
Backup codes can be regenerated by pressing the Regenerate button. Previously generated codes will be invalidated.
If needed, you can enable both authentication methods. To do that, press Enable under the other method, then follow the on-screen instructions.
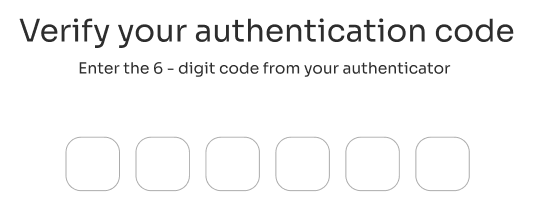
Using 2FA
2FA will be prompted on each login after entering the valid login and password.
If both authentication methods are enabled, you can use the other method via the Use the other method option.
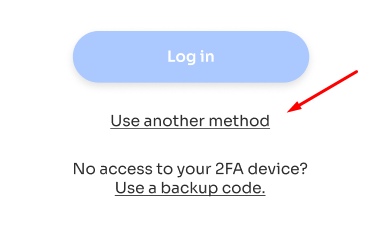
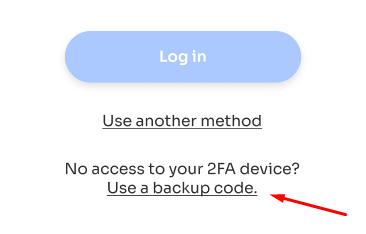
Using Backup Codes
If you lost access to the authentication method(s), you can use the backup codes instead via the Use a backup code option.
Each backup code can be used only once.
Disabling 2FA
You can disable 2FA by pressing the Disable button in the Two-Factor Authentication (2FA) panel.
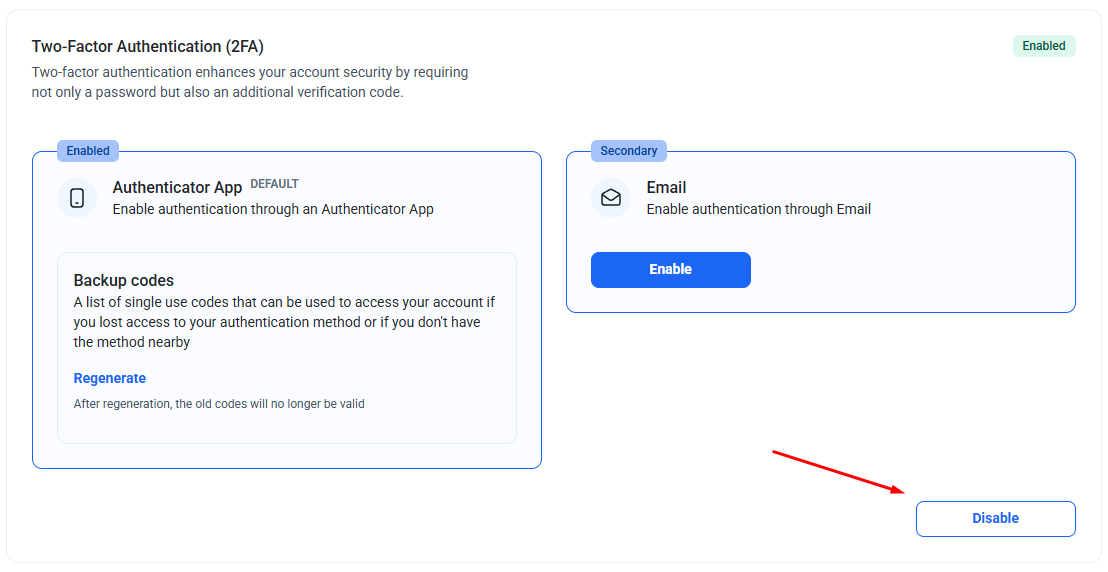
If both authentication methods are enabled, you can disable one or both.
Disabling 2FA via SafeDNS Support
If you lost access to authentication methods and backup codes, you can request to disable 2FA via the Use a backup code > Send Request option.
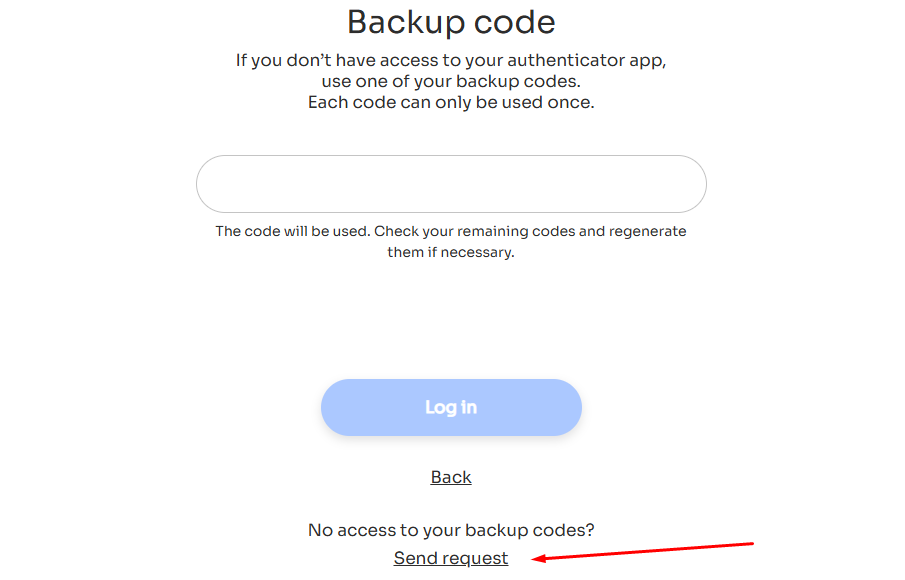
After the request is sent, the SafeDNS Support team will respond within 3 hours to the email address of your SafeDNS account.
If you need Support to reply to the other email, please send the request manually to support@safedns.com. Alternatively, you can use the live chat on any page of the SafeDNS website.
Please note that for security reasons, Support will ask additional questions to verify the account ownership.