DSL/Wi-Fi routers
- Router Setup
- Router Setup (IPv6)
- Keenetic Router Setup
- Asus and Asuswrt-Merlin Router Setup
- Unifi/Ubiquiti Router Setup
- Verizon Router Setup
- Mikrotik Router Setup
- OpenWRT Router Setup
- DD-WRT Router Setup
- Huawei iMaster NCE Campus Setup
- Comcast Xfinity Router Setup
- Meraki Router Setup
- Starlink Router and Network Setup
Router Setup
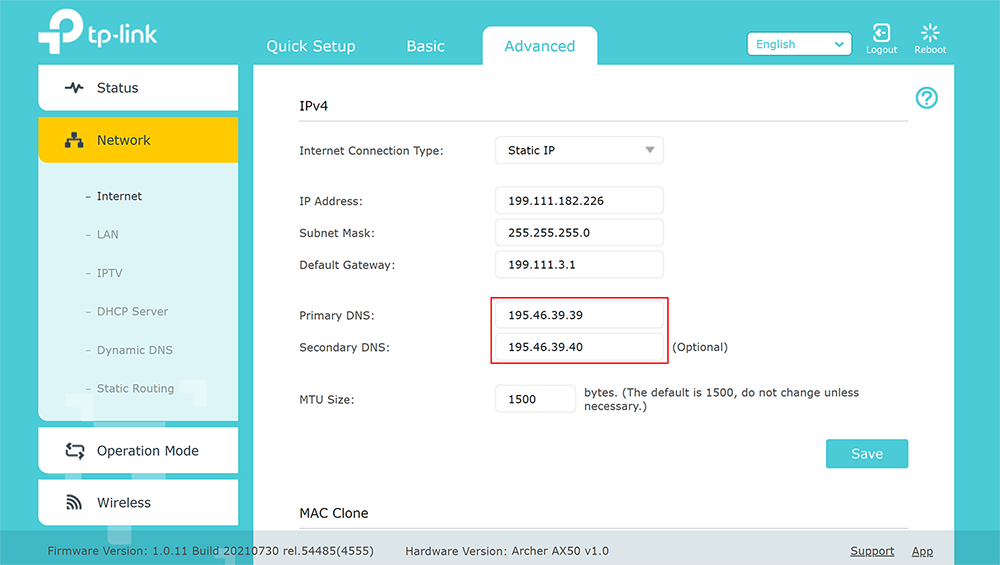
Router with Static IP address configuration
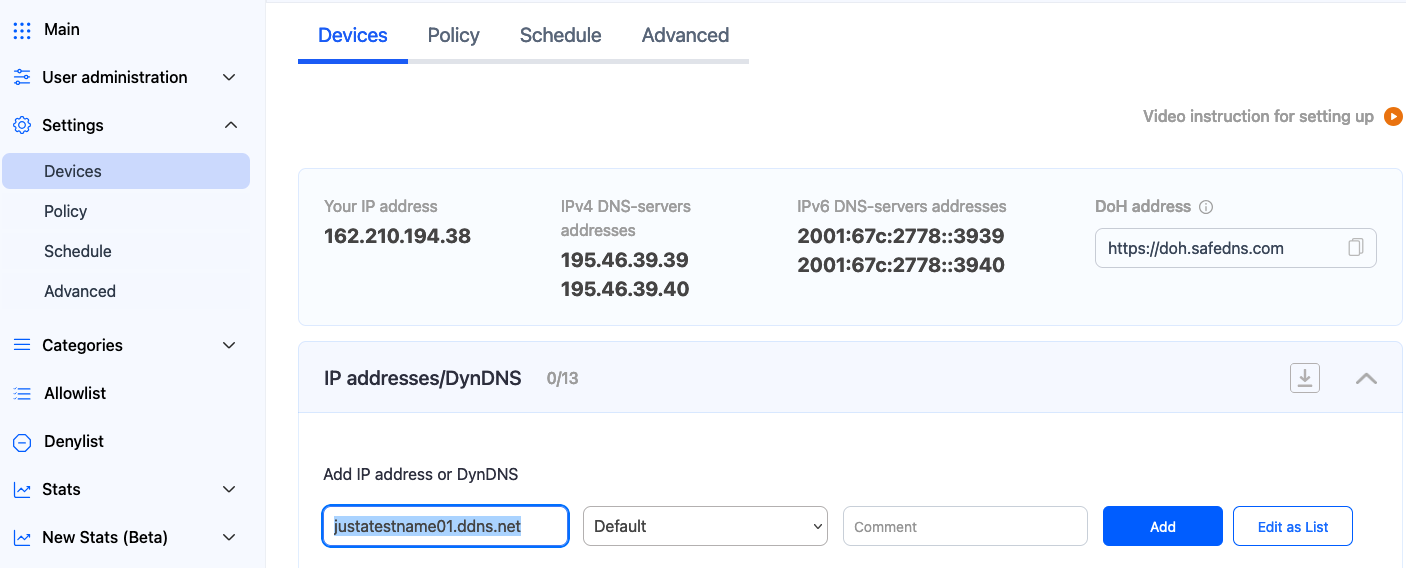
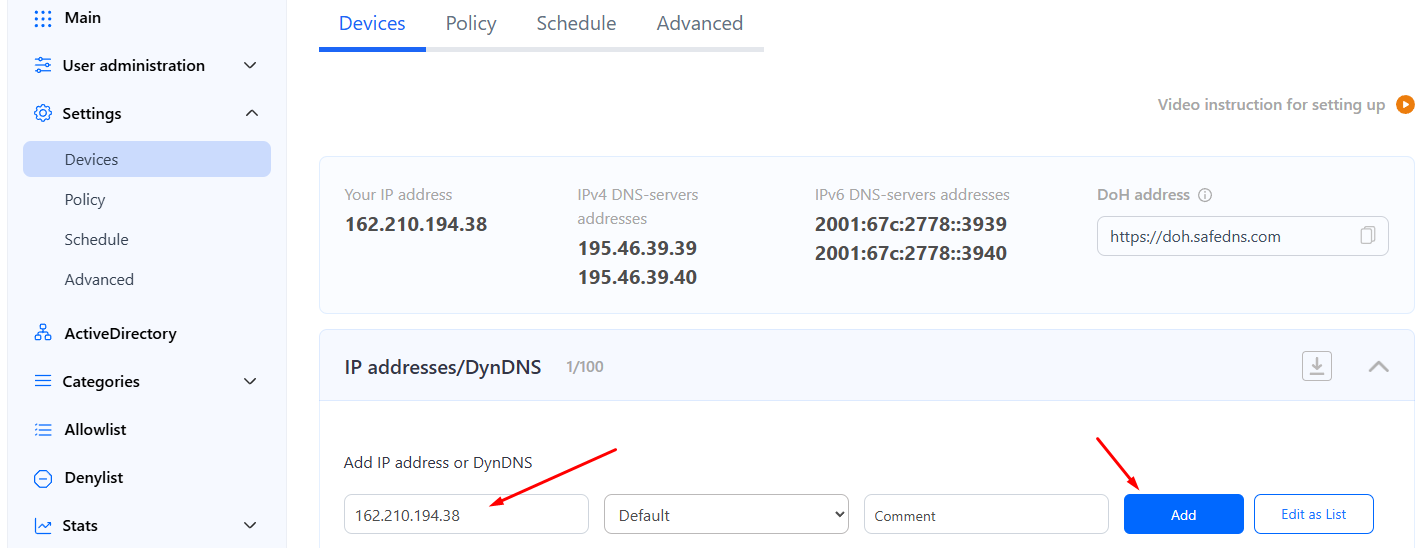
1. Go to SafeDNS Dashboard > Settings > Devices and copy your IP address to the "IP addresses / DynDNS" box, choose a policy, and click "Add".
2. Change your router’s DNS servers to SafeDNS addresses - 195.46.39.39 and 195.46.39.40
You have successfully configured your router.
Please note that settings take 5-7 minutes to apply.
Stats and filtering status update every 10 minutes.
Router with Dynamic IP address configuration
In case you have a Dynamic IP address, you need to configure the DynDNS/DDNS on the router using a Dynamic DNS service.
Most modern routers provide their own DynDNS services. We recommend using them.
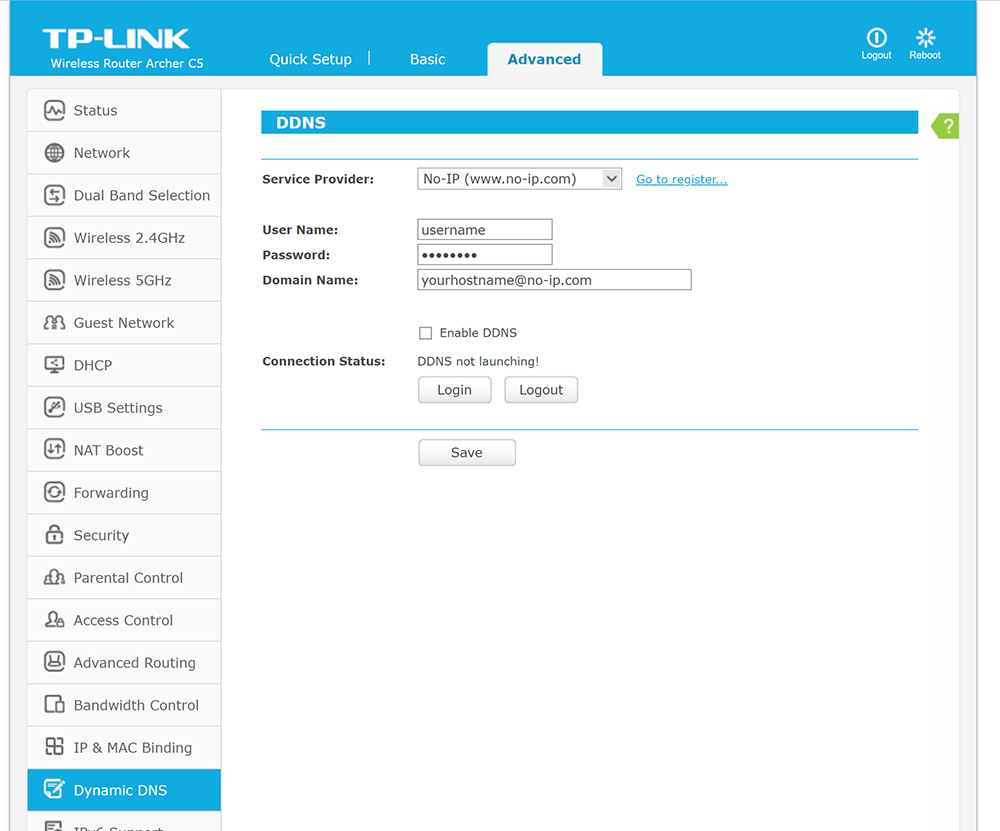
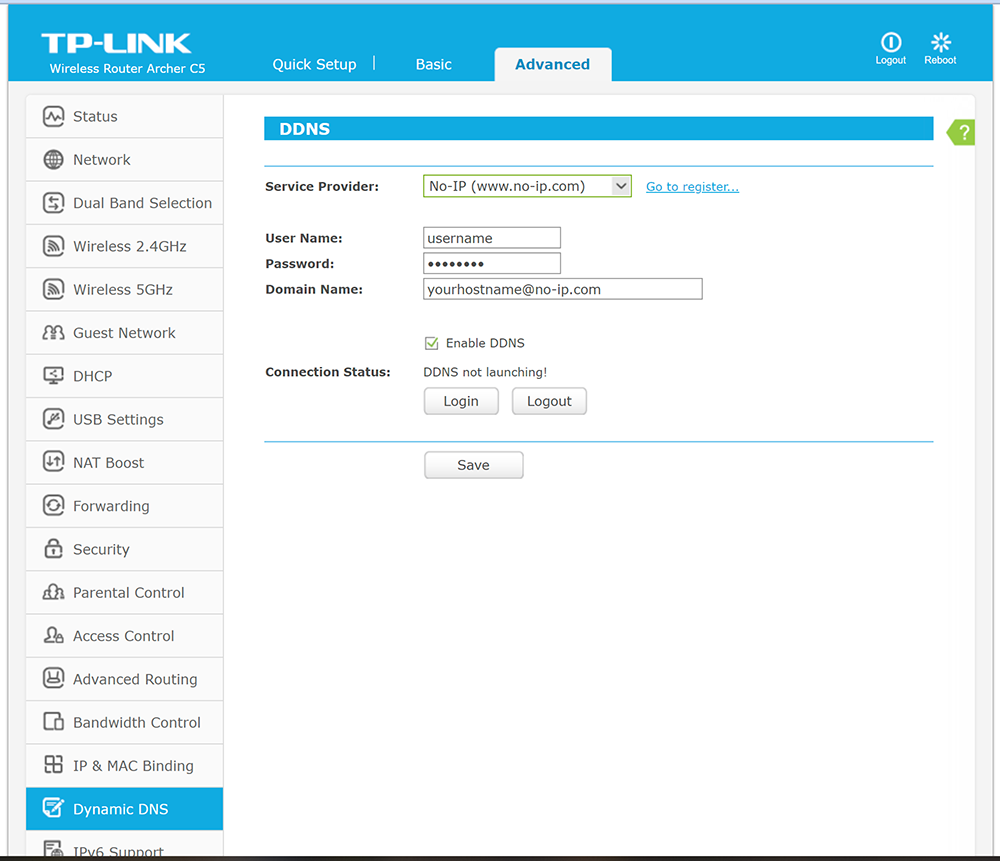
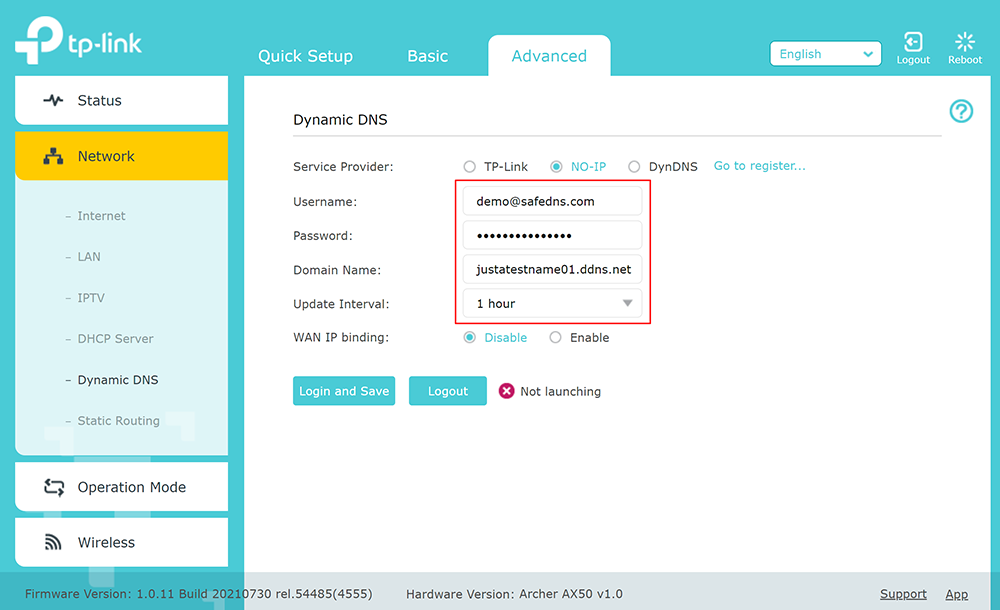
Here's an example of the DynDNS menu on the TP-Link router with the TP-Link service provider:
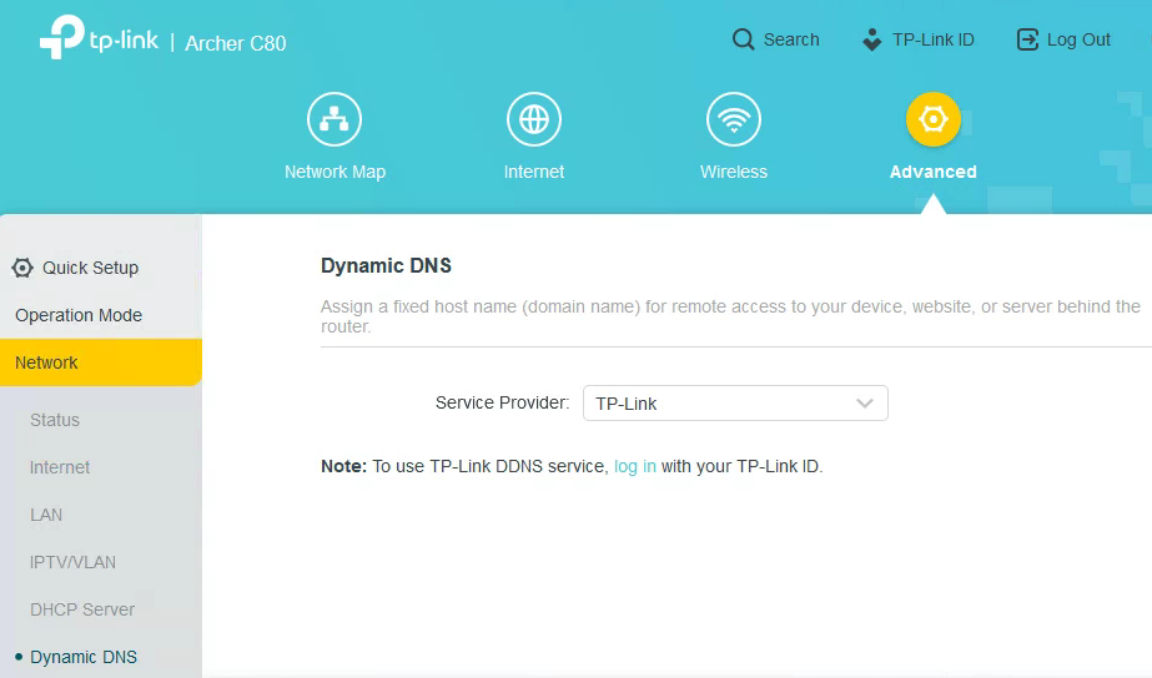
You only need to create a DynDNS record in the router interface. Then skip to Step 6 below.
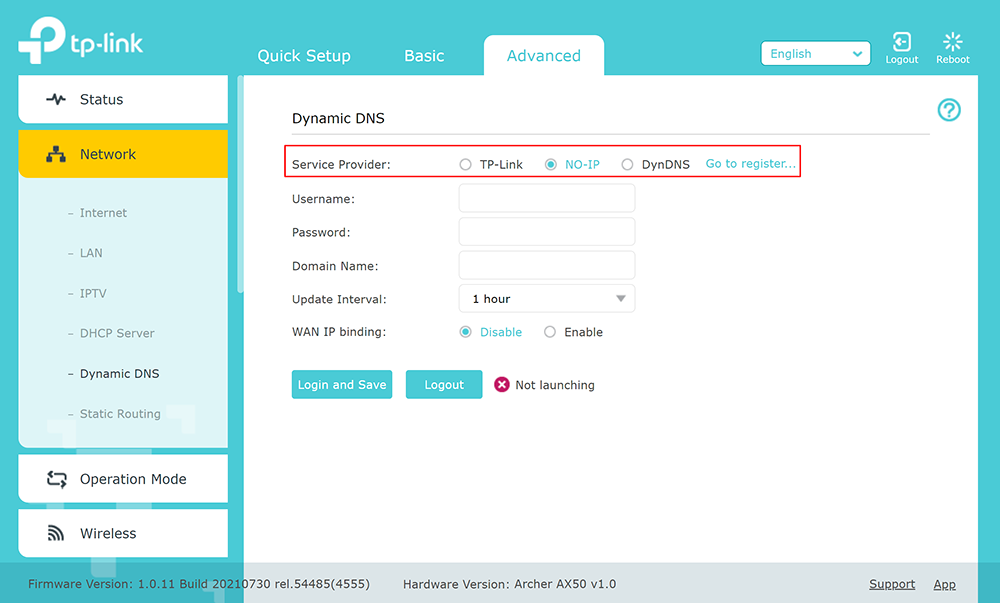
If your router does not have its own DynDNS service provider, we recommend using third-party NO-IP DynDNS.
1. In the router setting, go to DynDNS/DDNS settings,
2. Check the DynDNS service available for your router. If available, we recommend using the No IP DynDNS service provider.
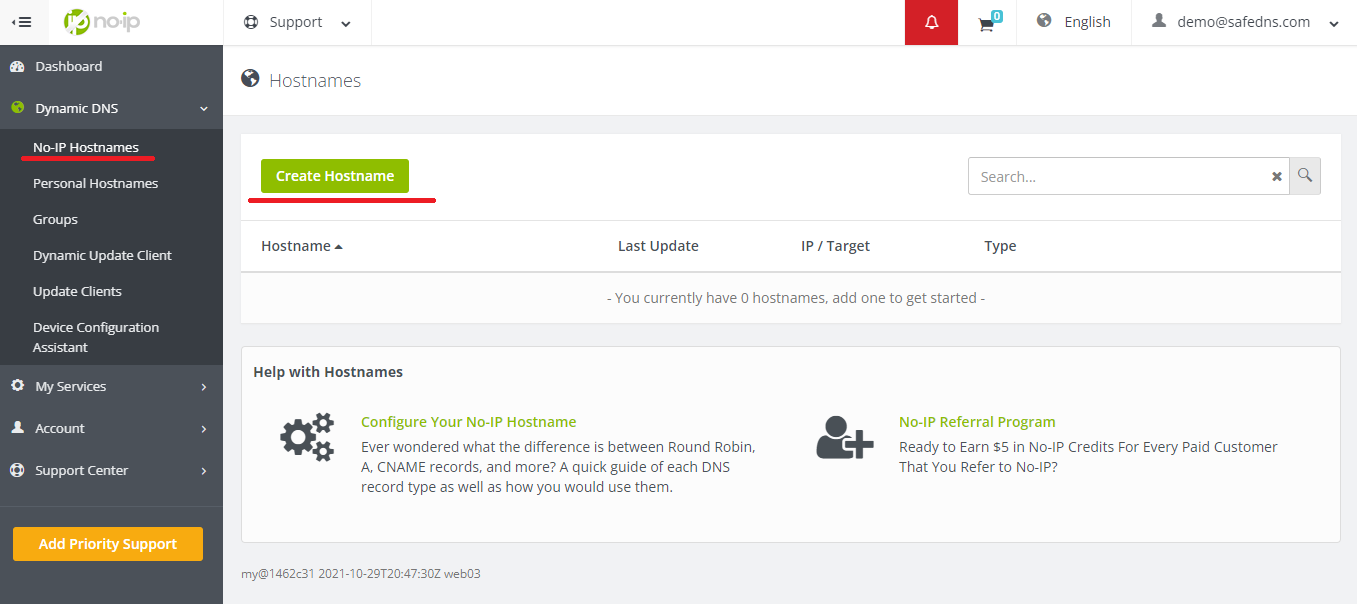
3. Go to the website noip.com and sign up.

4. In your No-IP account, create a hostname (any name you can think of).
5. Go back to your router and configure DDNS/DynDNS.
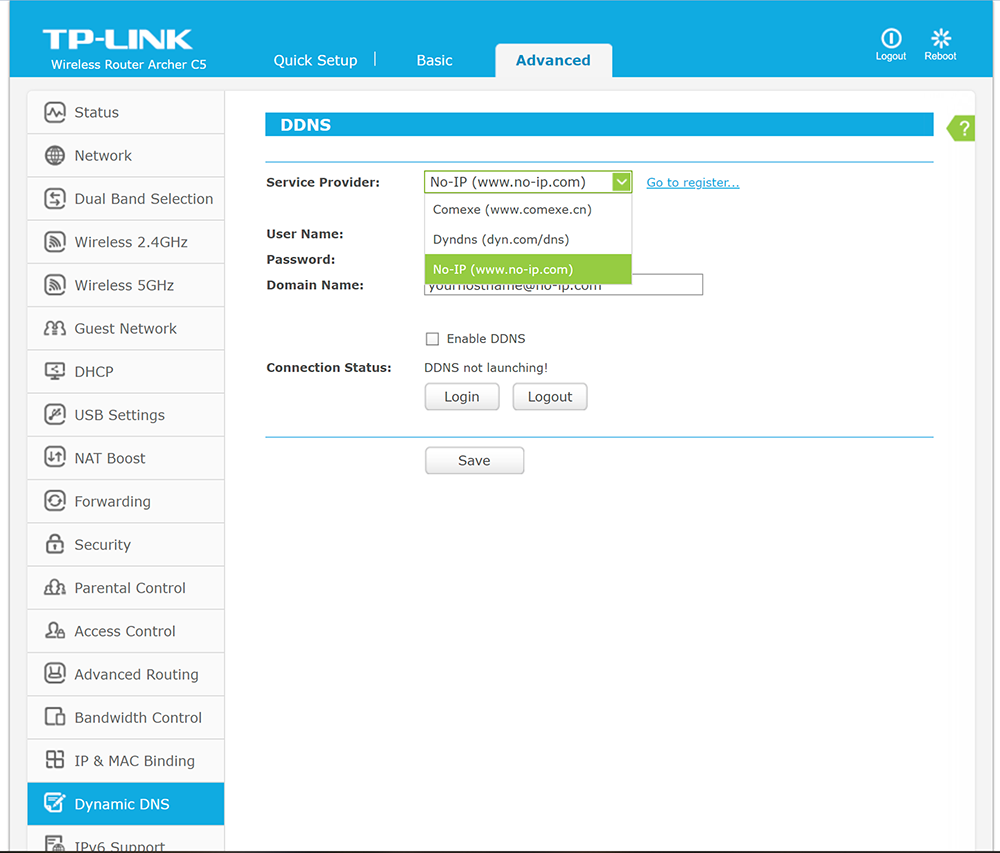
- Select No-IP as "Service provider".
- Type in the created hostname in the "Hostname" field.
- Type in your No-IP account credentials as "Username" and "Password", and click "Save".

If everything is correct, DynDNS/DDNS settings will apply.

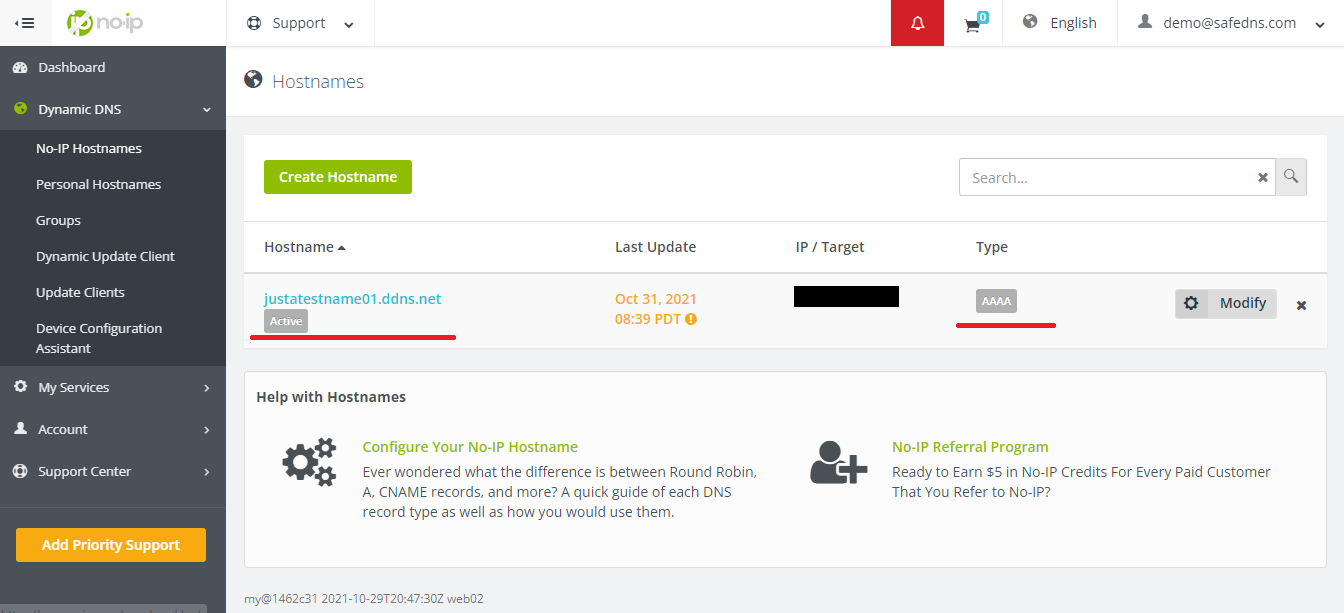
6. Go to SafeDNS Dashboard > Settings > Devices and copy your DynDNS hostname to the "IP addresses / DynDNS" box, choose a policy, and click "Add".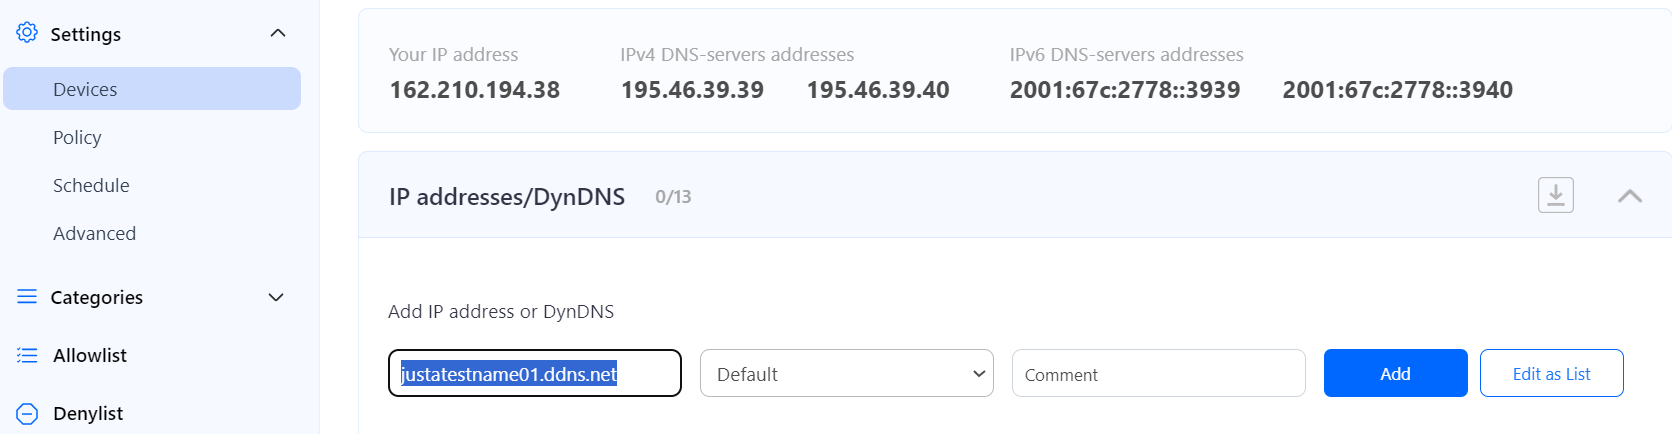
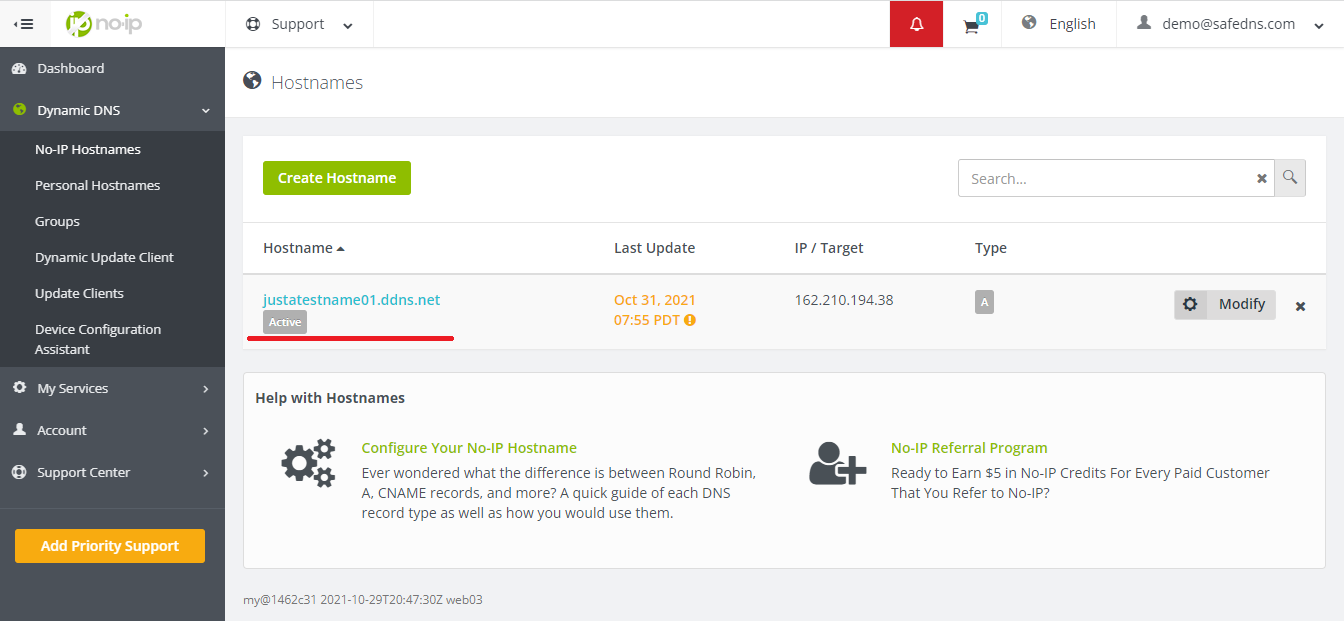
Once added, you will see it in the DynDNS section of the Dashboard.

7. Change your router’s DNS servers to SafeDNS addresses - 195.46.39.39 and 195.46.39.40
You have successfully configured your router.
Please note that settings take 5-7 minutes to apply.
Stats and filtering status update every 10 minutes.
Configuring the filter using the DDclient.
In rare cases when your router does not have a DynDNS/DDNS setting and your IP is Dynamic, you need to use third-party software - DDclient - on the PC connected to the network:
1. Install DDclient on a PC connected to the network. Once DDclient is installed, all devices connected to the same network will be filtered by the same rules.
2. Set up DNS servers in your router:

Router Setup (IPv6)
Router with static IP address configuration
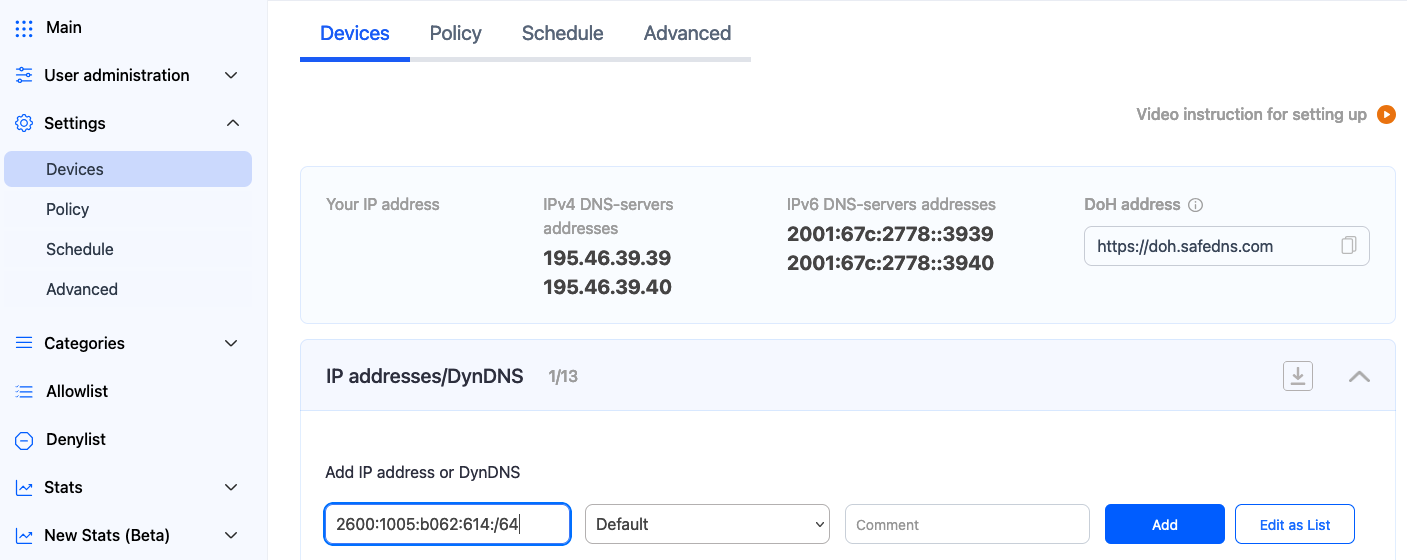
Go to SafeDNS Dashboard > Settings > Devices and copy your IP address to the "IP addresses / DynDNS" box, choose a policy, and click "Add".
We recommend adding the whole IPv6 router subnet - first 4 segments with /64 at the end. Example: 2600:1005:b062:61e4::/64 instead of 2600:1005:b062:61e4:1111:2222:3333:4444.
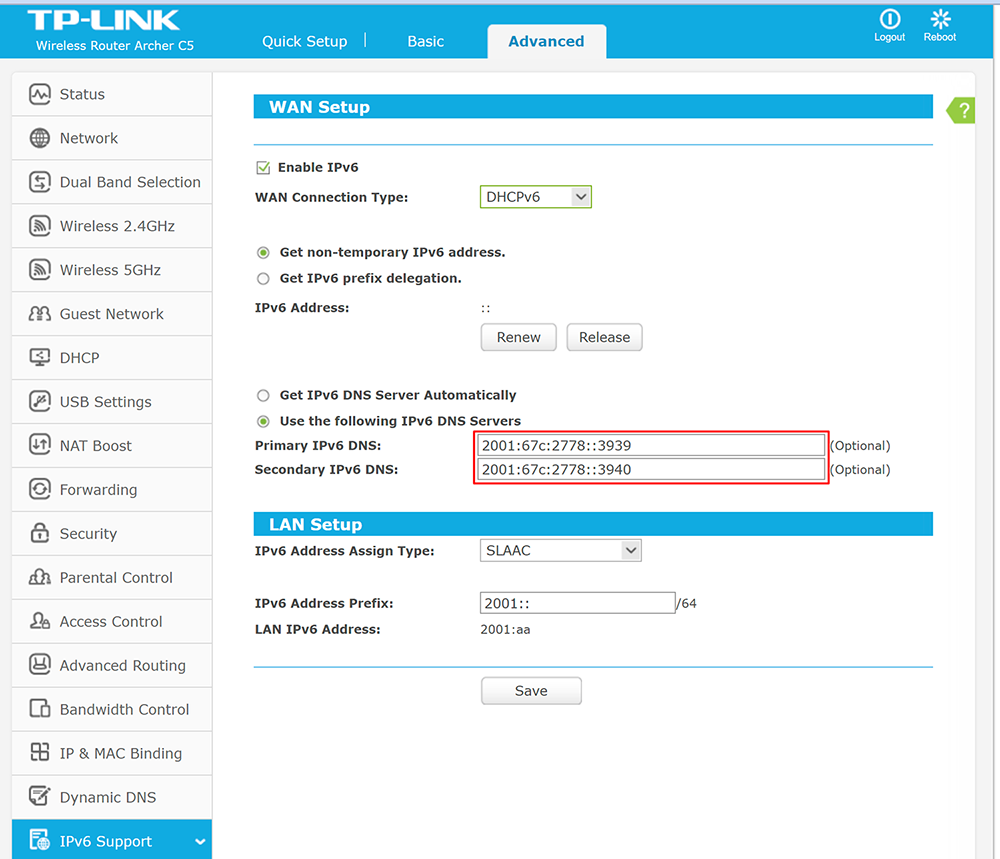
2. Change your router’s DNS servers to SafeDNS addresses - 2001:67c:2778::3939 and 2001:67c:2778::3940
Open the router’s settings page, click the "Advanced" tab, and choose IPv6 in the left menu. Choose "IPv6 setup" and type in SafeDNS IPv6 addresses.

You have successfully configured your router.
Please note that settings take 5-7 minutes to apply.
Stats and filtering status update every 10 minutes.
Router with Dynamic IP address configuration
In case you have a Dynamic IP address, you need to configure the DynDNS/DDNS on the router using a Dynamic DNS service.
Most modern routers provide their own DynDNS services. We recommend using them.
Here's an example of the DynDNS menu on the TP-Link router with the TP-Link service provider:
You only need to create a DynDNS record in the router interface. Then skip to Step 6 below.
If your router does not have its own DynDNS service provider, we recommend using third-party NO-IP DynDNS.
1. In the router setting, go to DynDNS/DDNS settings.
2. Check the DynDNS service available for your router. If available, we recommend using the No-IP DynDNS service provider.
3. Go to the website noip.com and sign up.

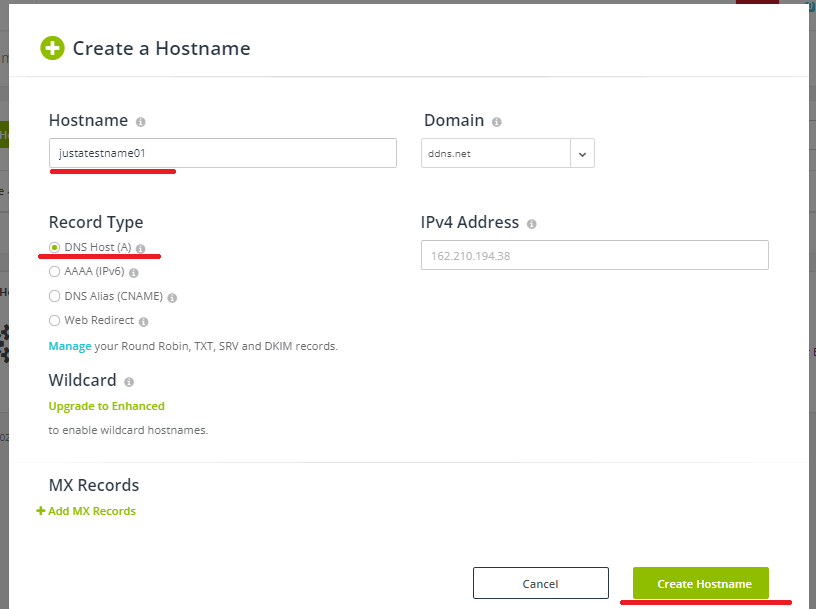
4. In your No-IP account, create a hostname (any name you can think of).
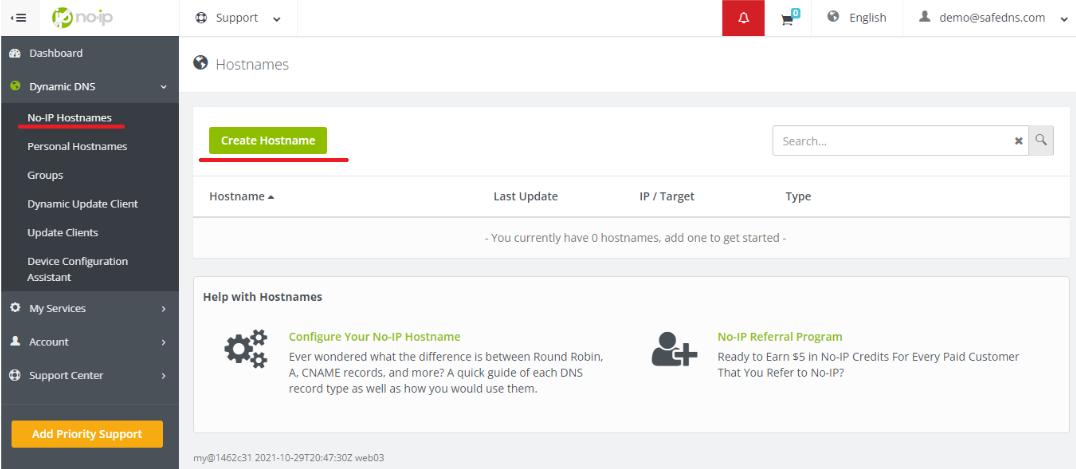
5. Choose the IPv6 type and create the hostname. Make sure that the "IPv6 Address" field is containing your IPv6 address: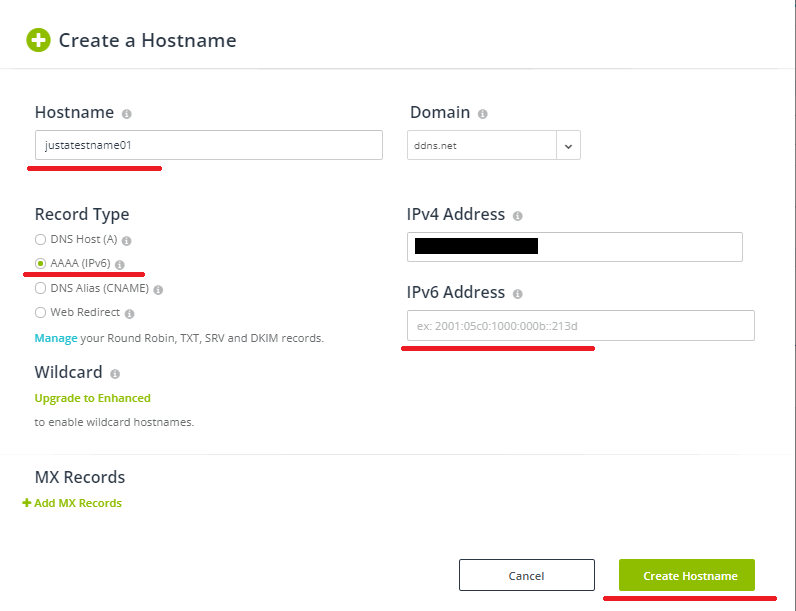
6. Go back to your router and configure DDNS/DynDNS
- Select No-IP as "Service provider".
- Type in the created hostname in the "Hostname" field.
- Type in your No-IP account credentials as "Username" and "Password", and click "Save".

7. Go to SafeDNS Dashboard -> Settings -> Devices and copy your DynDNS hostname to the "IP addresses / DynDNS" box, choose a policy, and click "Add".
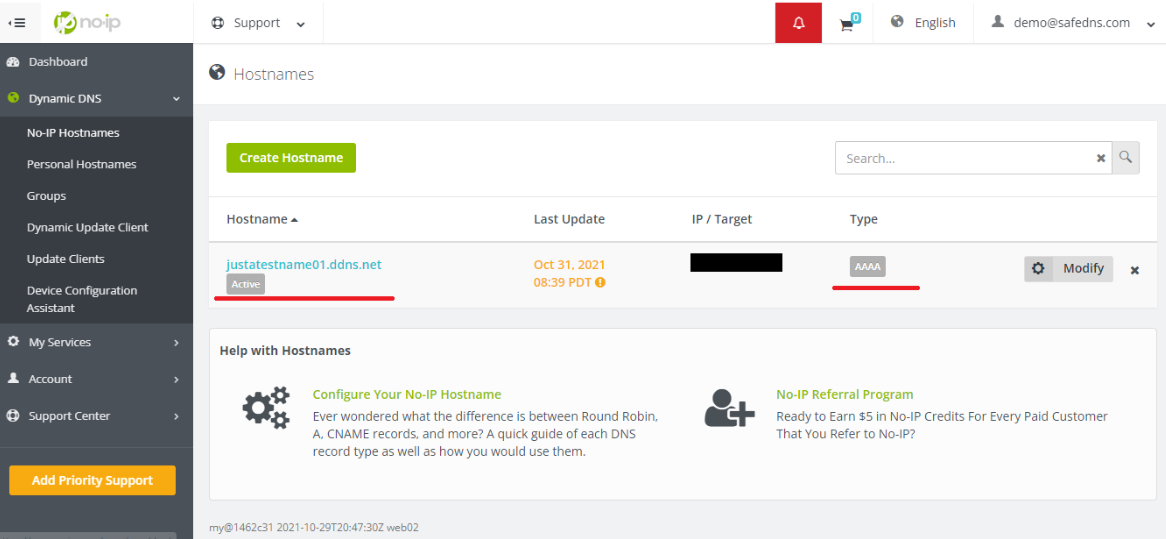
Once added, you will see it in the DynDNS section of the Dashboard.

8. Change your router’s DNS servers to SafeDNS addresses - 2001:67c:2778::3939 and 2001:67c:2778::3940
Open the router’s settings page, click the "Advanced" tab, and choose IPv6 in the left menu. Choose "IPv6 setup" and type in SafeDNS IPv6 addresses.
You have successfully configured your router.
Please note that settings take 5-7 minutes to apply.
Stats and filtering status update every 10 minutes.
Configuring the filter using the DDclient
In rare cases when your router does not have a DynDNS/DDNS setting and your IP is Dynamic, you need to use third-party software - DDclient - on the PC connected to the network:
1. Install DDclient on a PC connected to the network. Once DDclient is installed, all devices connected to the same network will be filtered by the same rules.
2. Set up DNS servers in your router:
Keenetic Router Setup
SafeDNS service in Keenetic routers is implemented as an operating system component. You can add or remove this Internet Safety service from the system and turn it on or off completely, without affecting the parameters of the main Internet connection: SafeDNS will work behind any NAT and with a dynamic IP address.
It is not possible to run SafeDNS, Cloudflare DNS, and AdGuard DNS services at the same time. Only one of them can be used.
Before setting up the Internet safety service, register your home network devices according to the instruction Connected devices registration.
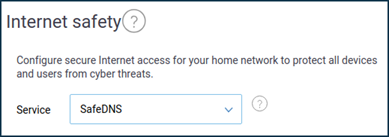
Setup
1. Select "SafeDNS" in the 'Service' field on the "Internet safety" page.
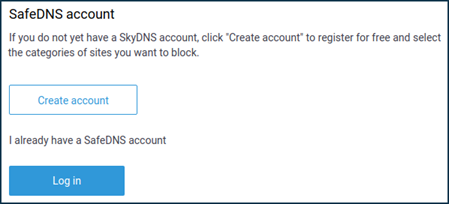
2. Enter your SafeDNS account's parameters by clicking "Log in" in the "SafeDNS account" section. If you do not have a SafeDNS account yet, click "Create account".
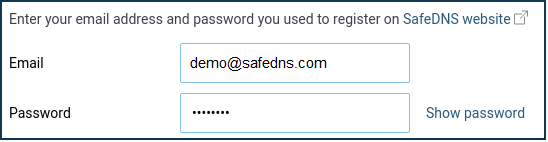
3. Enter your SafeDNS account e-mail/login and password.
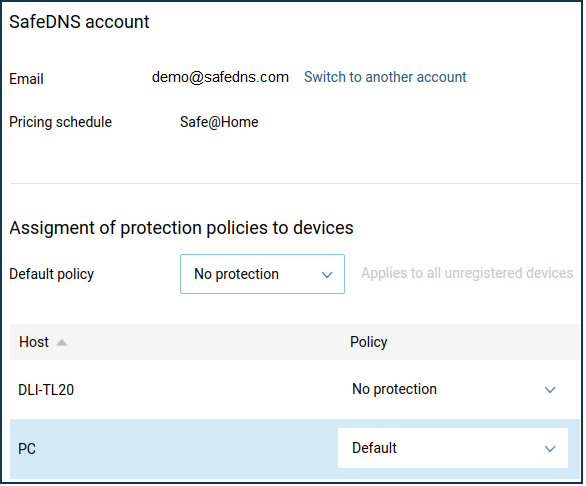
4. Assign filtering policies in the "Assignment of protection policies to devices" section.
You can assign filtering policies to permanent home network devices (registered in Keenetic) and the default policy for all unregistered devices.
Your devices connected to the Keenetic router are now filtered with the assigned SafeDNS filtering policies.
Please note that settings take 5-7 minutes to apply.
Stats and filtering status update every 10 minutes.
Asus and Asuswrt-Merlin Router Setup
Router with Static IP address configuration
1. Go to SafeDNS Dashboard > Settings > Devices and copy your IP address to the "IP addresses / DynDNS" box, choose a policy, and click "Add".

2. Open a browser and type in the Default Gateway address into your browser's URL address bar. By default, it is 192.168.1.1
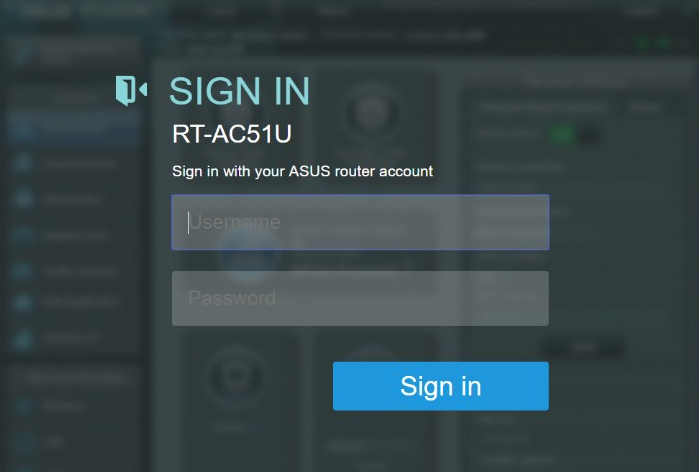
Your router might have a different Default Gateway IP address. Check the backside of your router to find the Default Gateway IP address of your particular router.
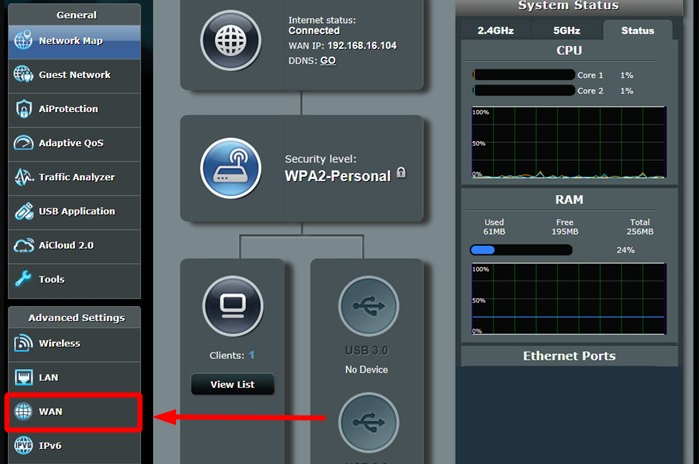
3. Once you log in, click on the WAN tab in the Advanced Settings section.
4. You will find the WAN DNS Settings tab there. Press on the NO option next to Connect to DNS server automatically.
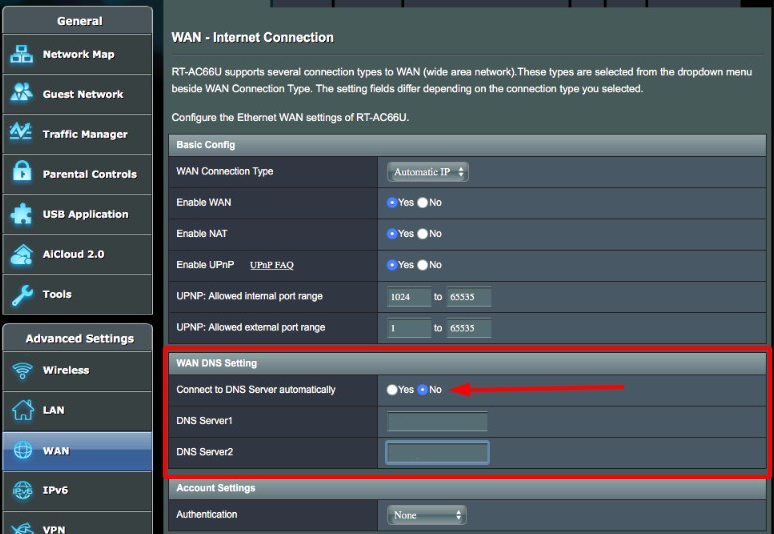
5. In the DNS Server1 and DNS Server2 tabs, enter the following DNS addresses:
- 195.46.39.39
- 195.46.39.40
6. To save the changes, press Apply and restart your router.

In the Asus router, it's possible to force DNS traffic through port 53. These are the steps:
1. Click on WAN and go to Port trigger.
2. Enable the Port trigger.
3. In the section trigger port list enter:
name: SafeDNS
trigger port: 53
protocol: TCP
incoming port: 53
protocol: UDP
4. Click Add and Apply.
By blocking port 53, all devices connected to the router will be forced to use the SafeDNS servers.
You have successfully configured your router.
Please note that settings take 5-7 minutes to apply.
Stats and filtering status update every 10 minutes.
Router with Dynamic IP address configuration
In case you have a Dynamic IP address, you need to configure the DynDNS/DDNS on the router using a Dynamic DNS service.
Most modern routers provide their own DynDNS services. We recommend using them.
If your router does not have its own DynDNS service provider, we recommend using third-party NO-IP DynDNS.
1. Check the DynDNS service available for your router. If available, we recommend using the No IP DynDNS service provider.
2. Go to the website noip.com and sign up.
3. In your No-IP account, create a hostname (any name you can think of).
4. Go back to your router and configure DDNS/DynDNS.
- Select No-IP as "Server".
- Type in the created hostname in the "Host Name" field.
- Type in your No-IP account credentials as "Username" and "Password", and click "Save".
- Set "Enablewildcard" to NO.


If everything is correct, DynDNS/DDNS settings will apply.
5. Go to SafeDNS Dashboard > Settings > Devices and copy your DynDNS hostname to the "IP addresses / DynDNS" box, choose a policy, and click "Add".
Once added, you will see it in the DynDNS section of the Dashboard.

6. Open a browser and type in the Default Gateway address into your browser's URL address bar. By default, it is 192.168.1.1
Your router might have a different Default Gateway IP address. Check the backside of your router to find the Default Gateway IP address of your particular router.
7. Once you log in, click on the WAN tab in the Advanced Settings section.
8. You will find the WAN DNS Settings tab there. Press on the NO option next to Connect to DNS server automatically.
9. In the DNS Server1 and DNS Server2 tabs, enter the following DNS addresses:
- 195.46.39.39
- 195.46.39.40
10. To save the changes, press Apply and restart your router.
In the Asus router, it's possible to force DNS traffic through port 53. These are the steps:
1. Click on WAN and go to Port trigger.
2. Enable the Port trigger.
3. In the section trigger port list enter:
name: SafeDNS
trigger port: 53
protocol: TCP
incoming port: 53
protocol: UDP
4. Click Add and Apply.
By blocking port 53, all devices connected to the router will be forced to use the SafeDNS servers.
You have successfully configured your router.
Please note that settings take 5-7 minutes to apply.
Stats and filtering status update every 10 minutes.
Asuswrt-Merlin DNS Director
This part of the article contains information for Asus routers with custom firmware Asuswrt-Merlin.
Asuswrt-Merlin is a third-party alternative firmware for Asus routers (official page).
List of the supported devices - here.
DNS Director is a feature that allows you to force specific devices on your network to use specific DNS. This can be done globally, or on a per-device basis. Each of them can have a different nameserver enforced.
For example, you can have your LAN use a custom DNS server, but force your children's devices to use SafeDNS filtering.
Safe Family and Business plans users can group devices in up to 6 groups and filter them with different policies using the NAT DNS feature.
The configuration can be found in the DNS Director tab, located in the LAN section:

Configuring the filter using the DDclient
In rare cases when your router does not have a DynDNS/DDNS setting and your IP is Dynamic, you need to use third-party software - DDclient - on the PC connected to the network:
1. Install DDclient on a PC connected to the network. Once DDclient is installed, all devices connected to the same network will be filtered by the same rules.
2. Set up DNS servers in your router:

Unifi/Ubiquiti Router Setup
Router with Static IP address configuration
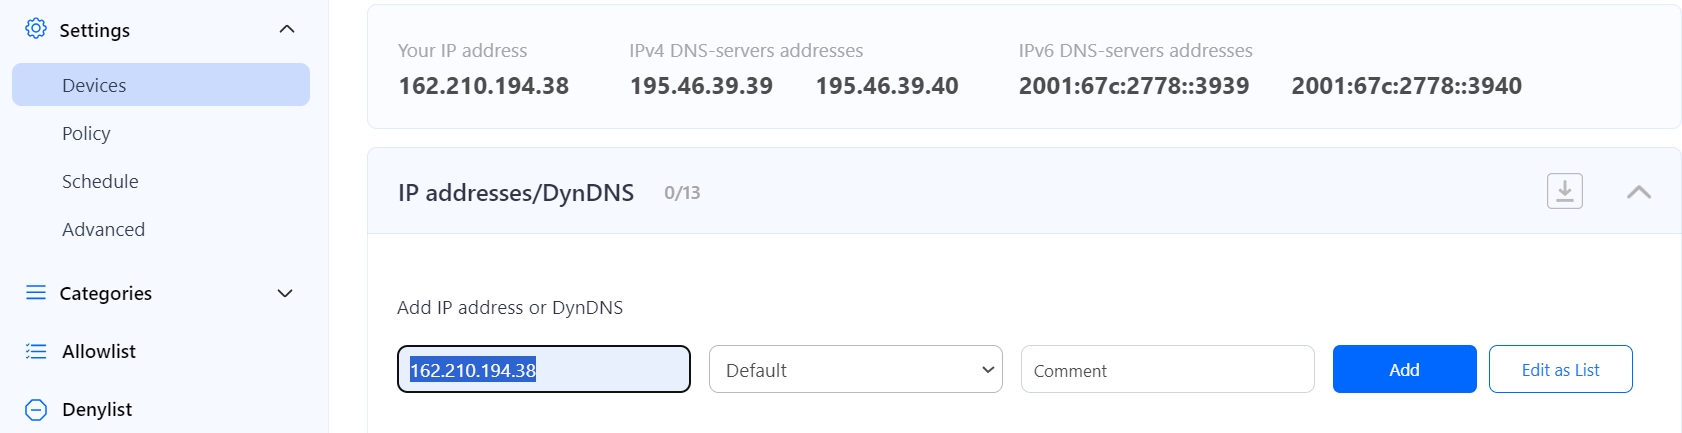
1. Go to SafeDNS Dashboard > Settings > Devices and copy your IP address to the "IP addresses / DynDNS" box, choose a policy, and click "Add".

2. Start the Unifi Controller Application and wait for the load. Once it is loaded, start the browser.
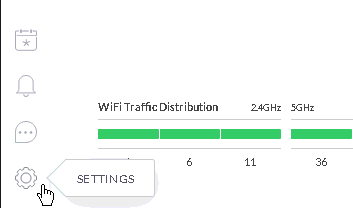
3. Open the Settings menu from the Dashboard:
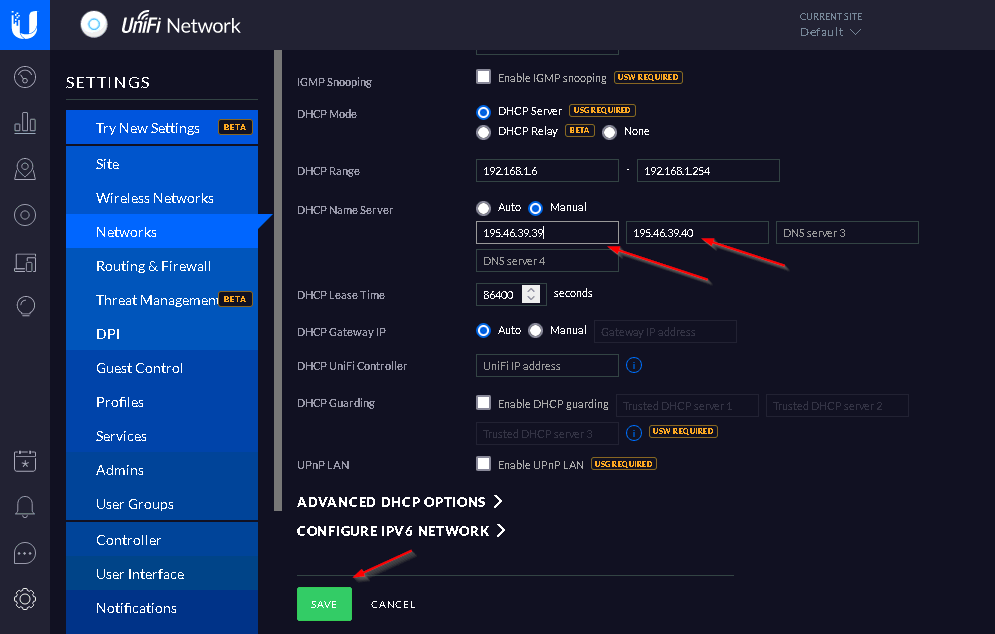
4. Browse the Networks menu and select the option either Create New Network or Edit. It depends on the requirements, if you are creating a new setup, there might be no networks created – then you need to create a new network. If you are starting to use SafeDNS on the existing network – then select the Edit option:
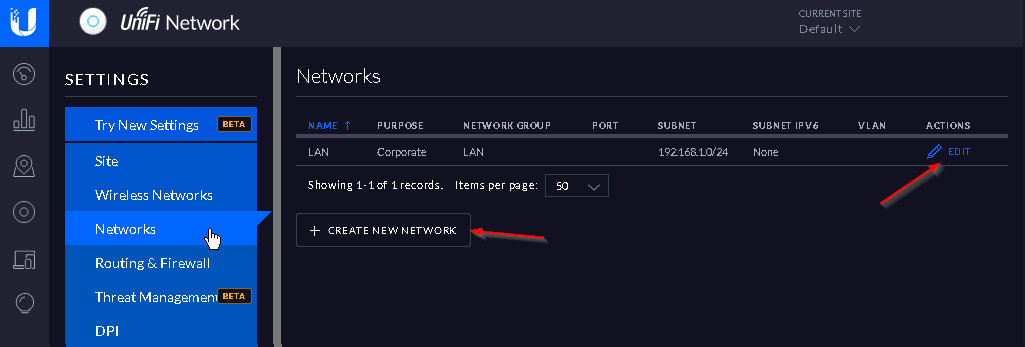
The following configuration can be used as an example of your Local Network setup.
5. Set the following DHCP Name Server addresses: 195.46.39.39 and 195.46.39.40

6. After adding SafeDNS Name Servers, Press the Save button and wait for the provisioning process of the Unifi access points – it may take a while.
You have successfully configured your router.
Please note that settings take 5-7 minutes to apply.
Stats and filtering status update every 10 minutes.
Router with Dynamic IP address configuration
In case you have a Dynamic IP address, you need to configure the DynDNS/DDNS on the router using a third-party Dynamic DNS service.
1. In the router setting, go to DynDNS/DDNS settings.
2. Check the DynDNS service available for your router. If available, we recommend using the No IP DynDNS service provider.
3. Go to the website noip.com and sign up.
4. In your No-IP account, create a hostname (any name you can think of).
5. Go back to your router and configure DDNS/DynDNS.
- Select No-IP as "Service provider".
- Type in the created hostname in the "Hostname" field.
- Type in your No-IP account credentials as "Username" and "Password", and click "Save".
If everything is correct, DynDNS/DDNS settings will apply.
6. Go to SafeDNS Dashboard > Settings > Devices and copy your DynDNS hostname to the "IP addresses / DynDNS" box, choose a policy, and click "Add".
Once added, you will see it in the DynDNS section of the Dashboard.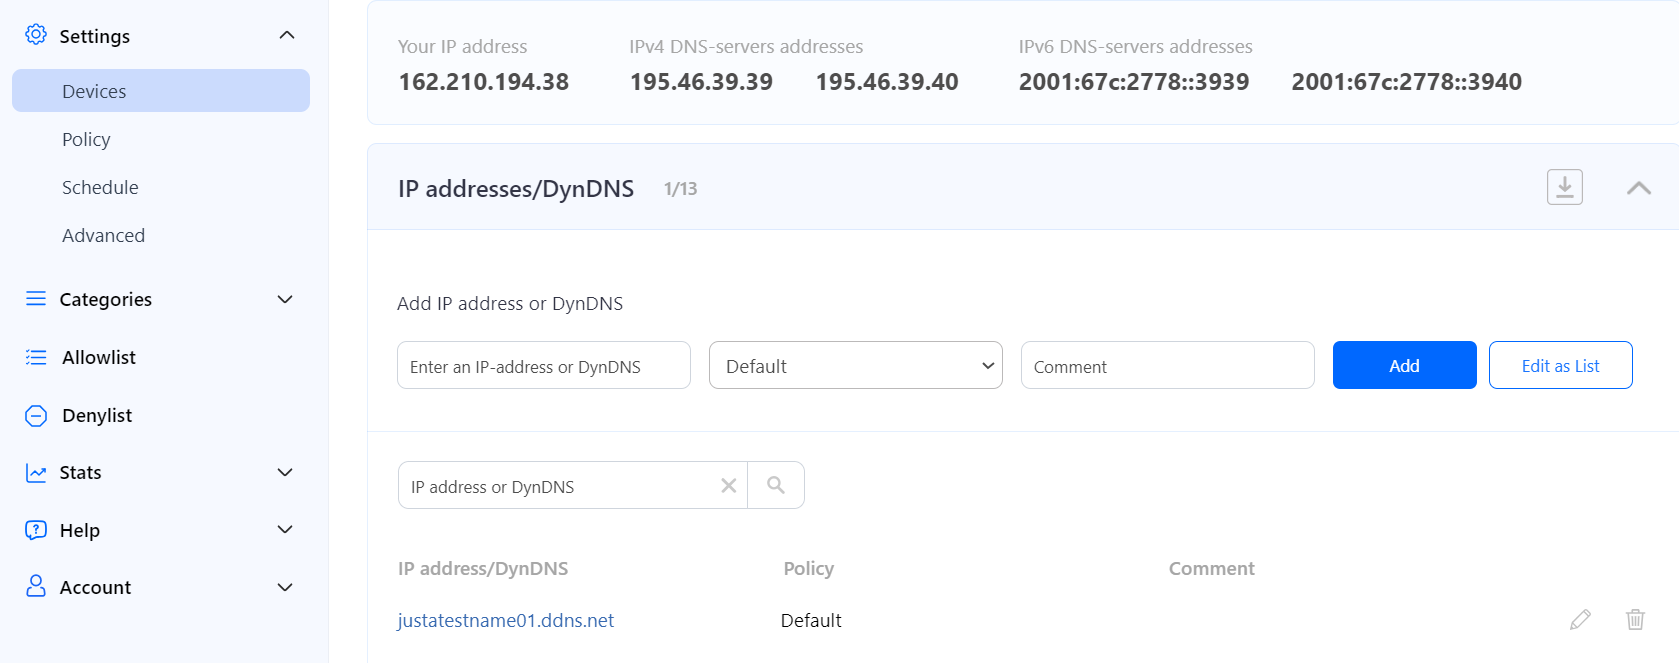
7. Start the Unifi Controller Application and wait for the load. Once it is loaded, start the browser.
8. Open the Settings menu from the Dashboard:
9. Browse the Networks menu and select the option either Create New Network or Edit. It depends on the requirements, if you are creating a new setup, there might be no networks created – then you need to create a new network. If you are starting to use SafeDNS on the existing network – then select the Edit option:
The following configuration can be used as an example of your Local Network setup.
10. Set the following DHCP Name Server addresses: 195.46.39.39 and 195.46.39.40
11. After adding SafeDNS Name Servers, Press the Save button and wait for the provisioning process of the Unifi access points – it may take a while.
You have successfully configured your router.
Please note that settings take 5-7 minutes to apply.
Stats and filtering status update every 10 minutes.
Configuring the filter using the DDclient.
In rare cases when your router does not have a DynDNS/DDNS setting and your IP is Dynamic, you need to use third-party software - DDclient - on the PC connected to the network:
1. Install DDclient on a PC connected to the network. Once DDclient is installed, all devices connected to the same network will be filtered by the same rules.
2. Set up DNS servers in your router:
Verizon Router Setup
Router with Static IP address configuration
1. Go to SafeDNS Dashboard > Settings > Devices and copy your IP address to the "IP addresses / DynDNS" box, choose a policy, and click "Add".
2. Locate the network configuration on your router and set the SafeDNS server- 195.46.39.39 and 195.46.39.40
To do that, click on the icon My Network and browse the Network Connection option:
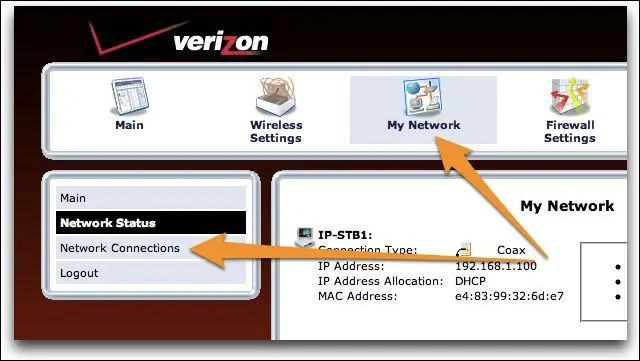
My Network > Network Connections
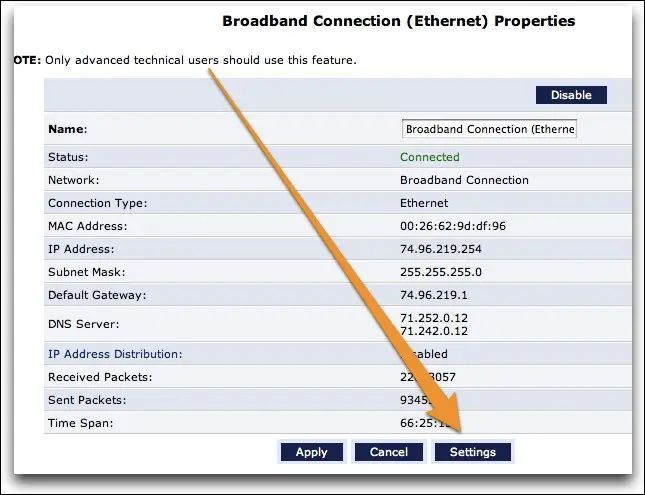
3. Locate in the connection list the Broadband Connection with the status: Connected:
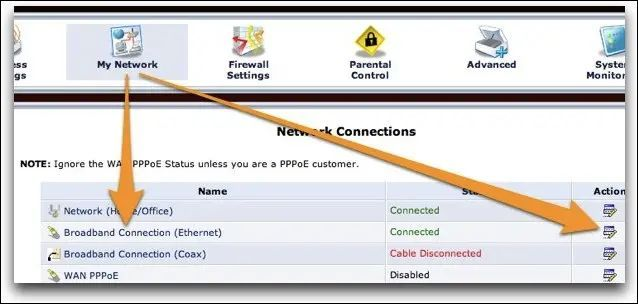
On the next screen locate the Settings button and press it:
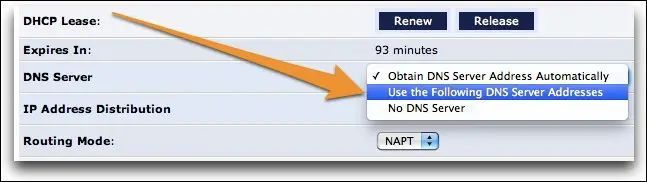
4. Change the DNS server option by selecting the “Use the Following DNS Server Addresses”
5. Once the option is changed, the fields are activated where you can set the SafeDNS DNS servers:
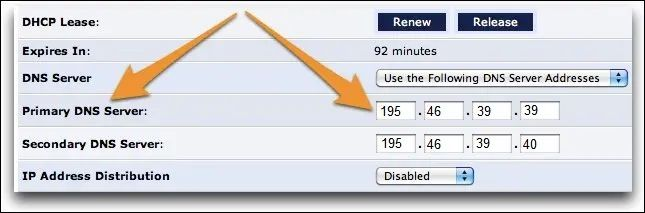
195.46.39.39 and 195.46.39.40.
You have successfully configured your router.
Please note that settings take 5-7 minutes to apply.
Stats and filtering status update every 10 minutes.
Mikrotik Router Setup
Router with Static IP address configuration
Go to SafeDNS Dashboard > Settings > Devices and copy your IP address to the "IP addresses / DynDNS" box, choose a policy, and click "Add".
2. Change your router’s DNS servers to SafeDNS addresses - 195.46.39.39 and 195.46.39.40
To do that, open the configuration page of the Mikrotik router, and browse the following option:
Menu > IP >DHCP Server > Networks
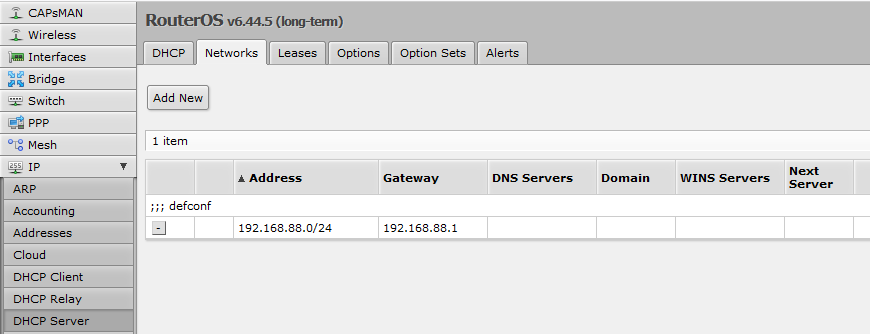
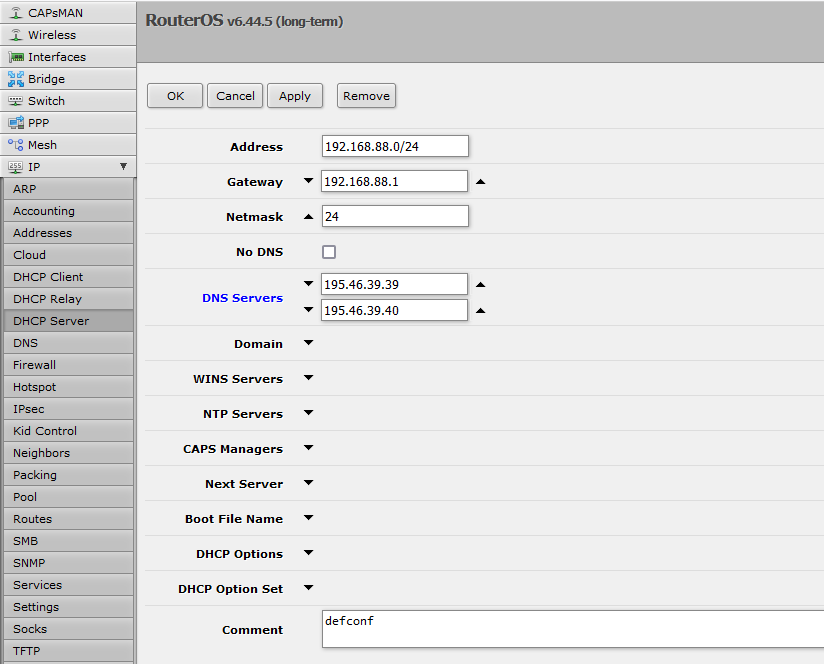
3. Select the “Network” used by the DHCP server and change/add the SafeDNS addresses - 195.46.39.39 and 195.46.39.40. Replace the DNS servers if there was configured any:
You have successfully configured your router.
Please note that settings take 5-7 minutes to apply.
Stats and filtering status update every 10 minutes.
Router with Dynamic IP address configuration
Mikrotik Routers has the embedded feature of the Dynamic DNS setup named VPN Access.
It can be activated easily from the router with no configuration needed on any DDNS service.
1. Open the main page of the router – the Quick Set Menu and scroll down to the VPN setup:
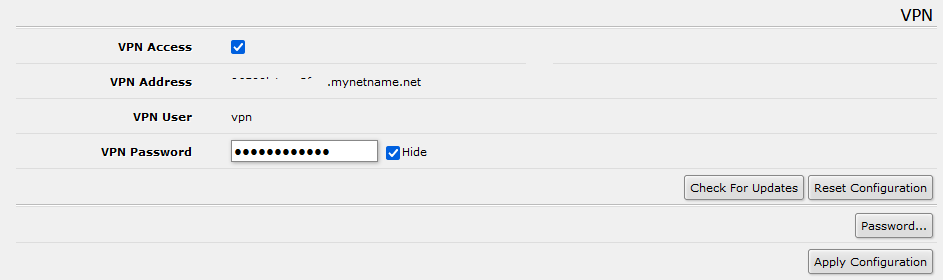
2. Activate the VPN access and set the VPN Password. Click the button Apply Configuration in order to save and activate the settings. Copy the VPN address to the clipboard.
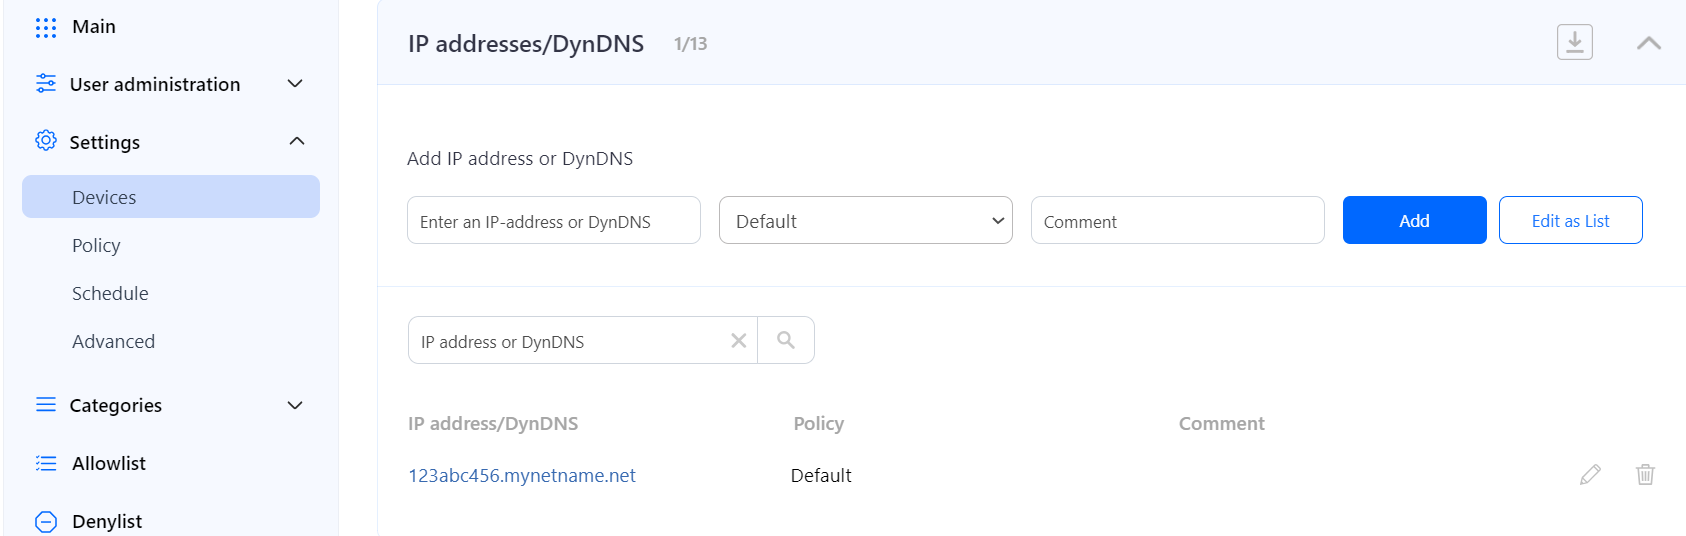
3. Go to SafeDNS Dashboard > Settings > Devices paste the VPN address the "IP addresses / DynDNS" box, choose a policy, and click "Add".

Once added, you will see it in the DynDNS section of the Dashboard.
4. Change your router’s DNS servers to SafeDNS addresses - 195.46.39.39 and 195.46.39.40
To do that, open the configuration page of the Mikrotik router, and browse the following option:
Menu > IP >DHCP Server > Networks
5. Select the “Network” used by the DHCP server and change/add the SafeDNS addresses - 195.46.39.39 and 195.46.39.40. Replace the DNS servers if there was configured any:
You have successfully configured your router.
Please note that settings take 5-7 minutes to apply.
Stats and filtering status update every 10 minutes.
DoH setup
DoH is supported on all paid plans.
DoH links with policy are available on Education & Non-Profit, Pro, and Pro Plus plans only.
MikroTik router allows to set up DoH connection to SafeDNS.
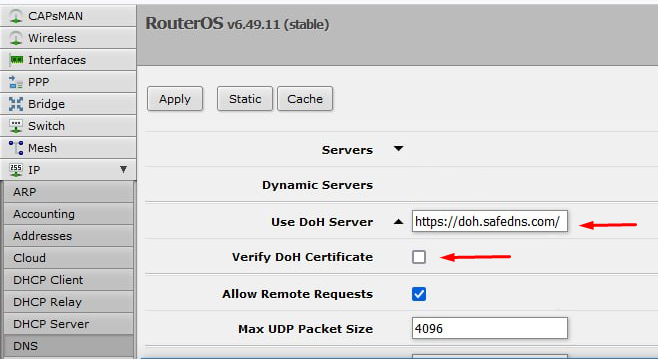
DoH link without policy
With this setup, all devices connected to the network with IP address added in the SafeDNS Dashboard will be filtered with the selected policy.
If IP address of the router is changed, you need to add a new IP address in the SafeDNS Dashboard.
In the MikroTik router:
1. Navigate to IP > DNS, enter "https://doh.safedns.com/" in the Use DoH Server field, untick Verify DoH Certificate, and save the changes.
DoH link with policy
With this setup, all devices connected to the router will be filtered with the selected policy.
The Router is identified by the policy token in the link. If the IP address of the router changes, it will not affect the filtering.
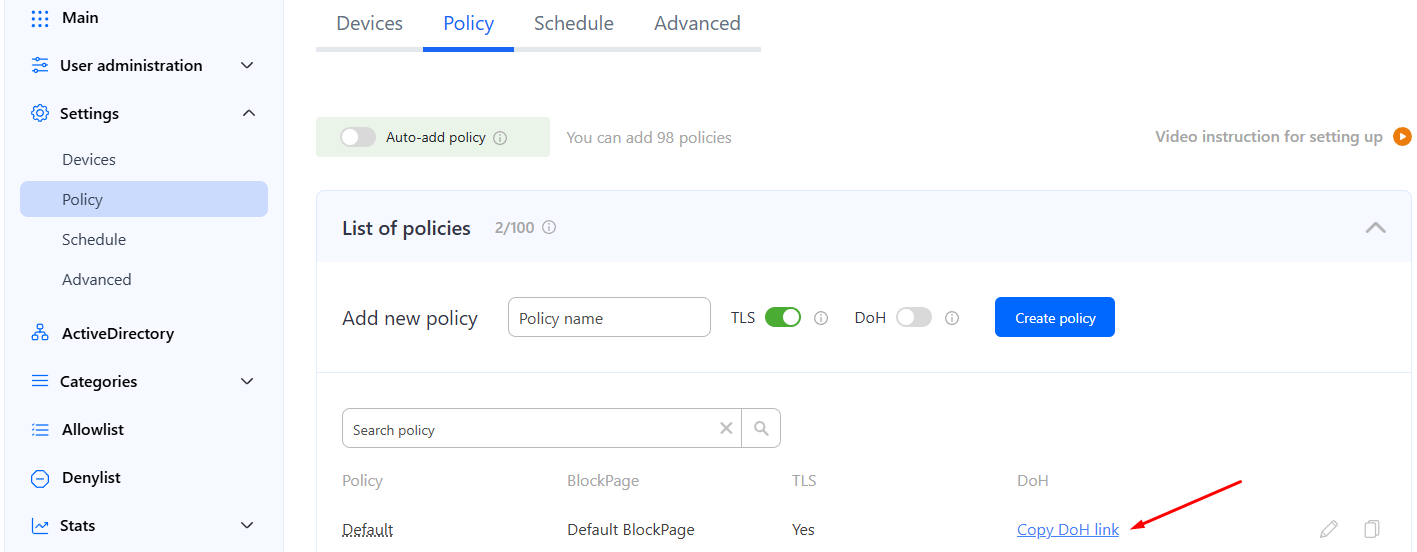
2. In the MikroTik router, navigate to IP > DNS, enter the copied link in the Use DoH Server field, untick Verify DoH Certificate, and save the changes.
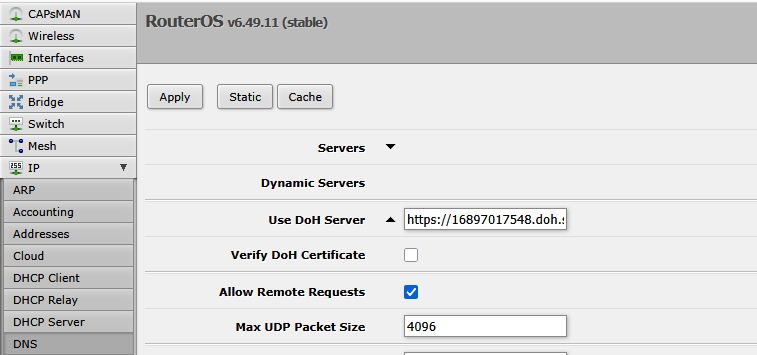
After that, all devices connected to the router will be filtered with the selected policy.
OpenWRT Router Setup
If you have static IP or use a DynDNS service you can set up SafeDNS on your OpenWRT router just like any other router using this guide.
Only OpenWRT versions 17 or lower are supported.
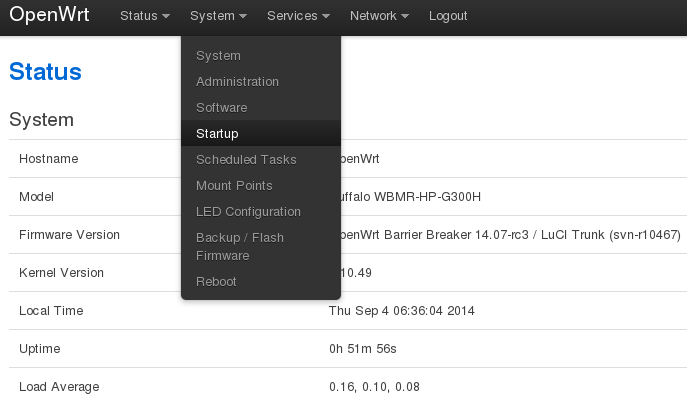
- Setup DDNS client. Select in menu System > Software.


2. Click Update lists.
3. Type luci-app-ddns in Download and install package and click OK.


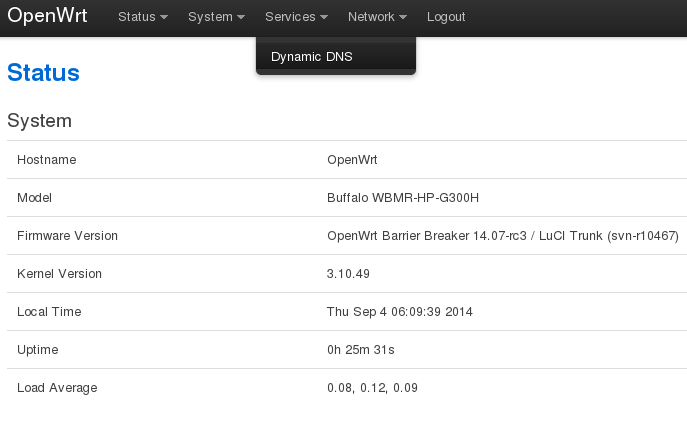
4. Click Status in the menu to refresh the menu. New item Services and subitem Dynamic DNS will appear in the menu.
5. Fill out the form on page Dynamic DNS:
- In Custom update-URL insert -
https://[USERNAME]:[PASSWORD]@www.safedns.com/nic/update?hostname=[DOMAIN] - In Hostname type any unique name for your router
- In Username type login for SafeDNS site, in Password type password for SafeDNS site.
- Click Save & Apply
6. Enable and start DDNS service.
8. Click the Disabled button for ddns service, then click Start.
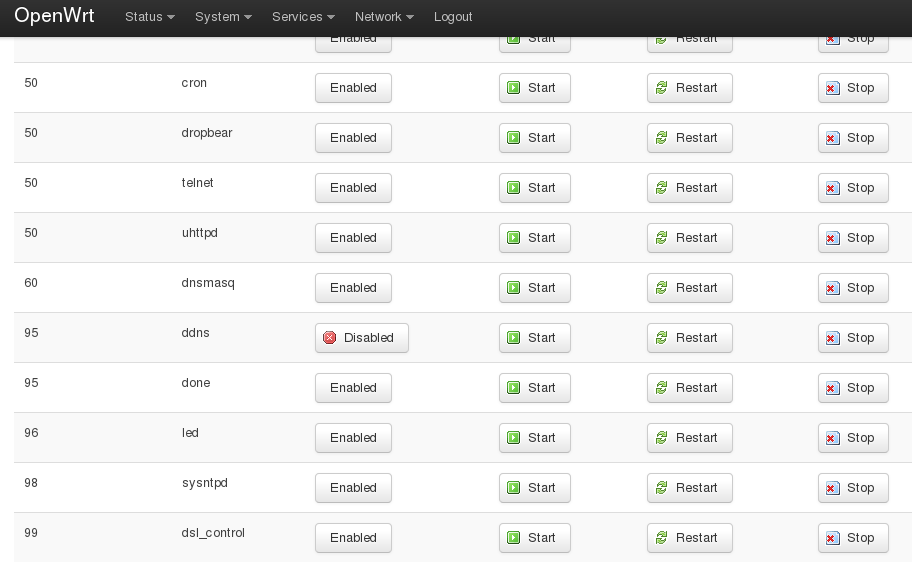
9. Check the string appearing in the system log (Status > System log):
user.notice ddns-scripts-myddns: Update successful
11. In Use custom DNS servers add 195.46.39.39 and 195.46.39.40. Click Save & Apply.
After that, you can continue configuring your filtering options in the SafeDNS Dashboard.
Please note that settings take 5-7 minutes to apply.
Stats and filtering status update every 10 minutes.
DD-WRT Router Setup
If you have static IP or use a DynDNS service, you can set up SafeDNS on your DD-WRT router just like any other router using this guide.
Alternatively, you can configure the SafeDNS filter on a DD-WRT router using its native firmware:
1. Go to the “Setup” tab > “Basic setup” > find the section “Network Address Server Settings” and set 195.46.39.39 and 195.46.39.40 as DNS servers.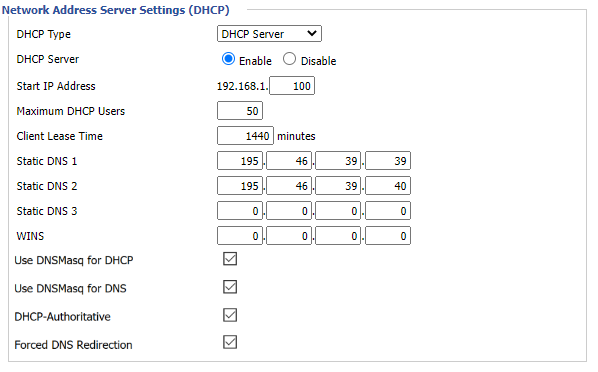
Select the "Forced DNS Redirection" to force all DNS requests from the network to use SafeDNS servers, even if the end device has custom DNS servers.
2. In the "WAN Setup" section check the "Ignore WAN DNS" option.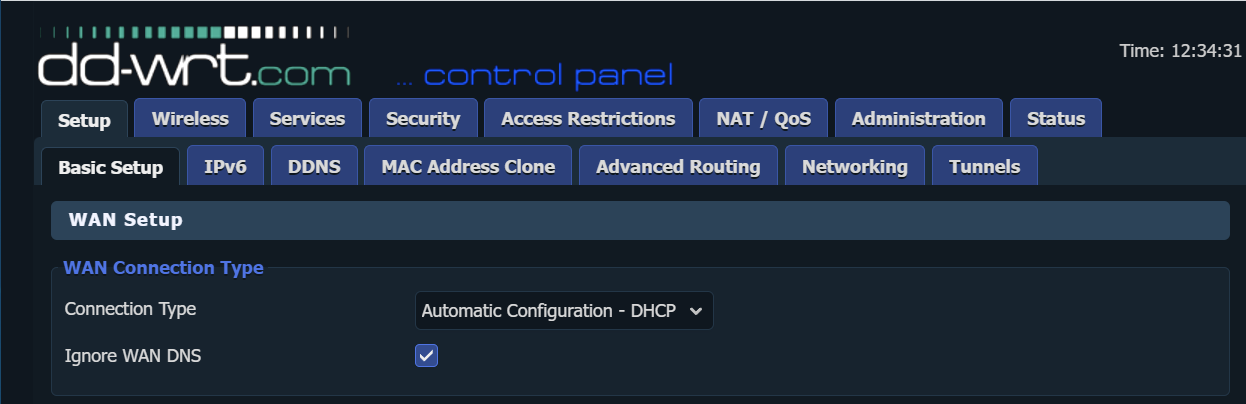
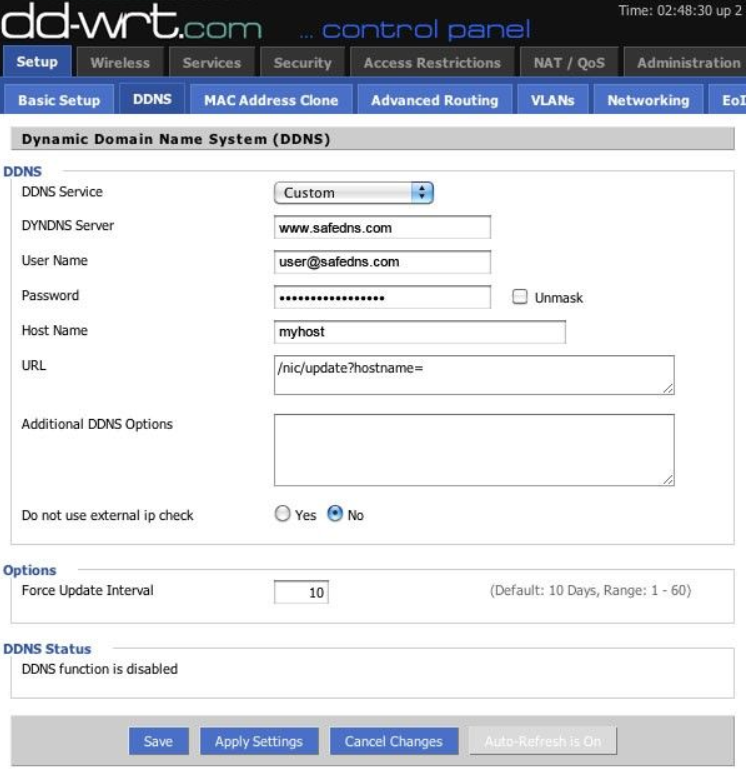
3. Go to the DDNS tab.
4. Select Custom for DDNS Service type.
5. Type in www.safedns.com in the DYNDNS Server field.
6. Type in your login (email) from the SafeDNS account in the User Name field.
7. Type in your password in the Password field.
8. Type in any name (hostname) in the Host field.
9. Type in /nic/update?hostname= in the URL field.
10. Save and apply settings.
If all settings are correct, you will see the successful update of your address in the DDNS Status block.
After that, you can continue configuring your filtering options in the SafeDNS Dashboard.
Please note that settings take 5-7 minutes to apply.
Stats and filtering status update every 10 minutes.
Huawei iMaster NCE Campus Setup
Prerequisites
- Sign up for a Reseller account by contacting the SafeDNS Sales team (sales@safedns.com).
- Create a sub-account for each tenant or group of tenants, implementing the multi-tenant capability of SafeDNS.
- Configure the filtering rules for each tenant.
- Receive the public Subscription API key from the SafeDNS manager.
To read more about API methods, please check the Subscription API documentation.
Setup
Connect a SafeDNS account to iMaster NCE controller
Activate URL-Filtering
- Select a site in iMaster NCE controller, on which you want to use URL Filtering
- Navigate to Provision > Physical Network > Site Configuration.
- Select a site from the site drop-down list in the upper left corner.
- Navigate to the Site Configuration tab.
- Navigate to AP > Advanced.
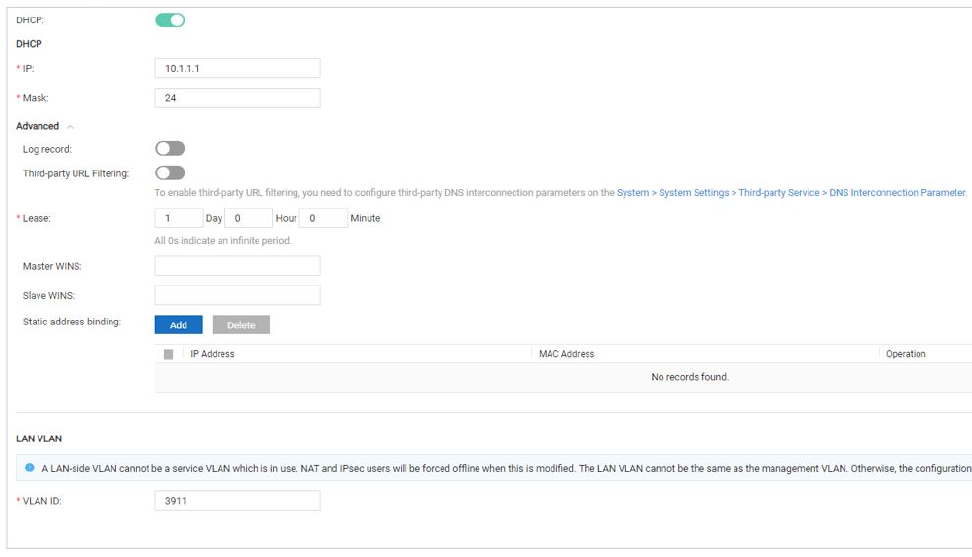
- Enable DHCP.
- Set DHCP server parameters.
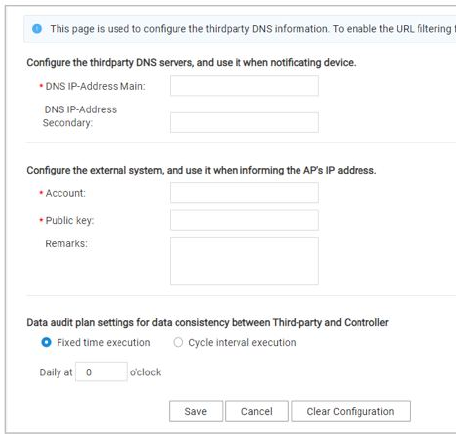
- Enable Third-party URL Filtering.
(Optional) Update TLS certificate
A SafeDNS certificate is used for unidirectional authentication between iMaster NCE-Campus and a third-party SafeDNS server.
This operation is involved in URL filtering by SafeDNS.
By default, the SafeDNS certificate is preinstalled on iMaster NCE-Campus.
Contact SafeDNS if you need an updated certificate.
- Log in to iMaster NCE Campus as the system administrator.
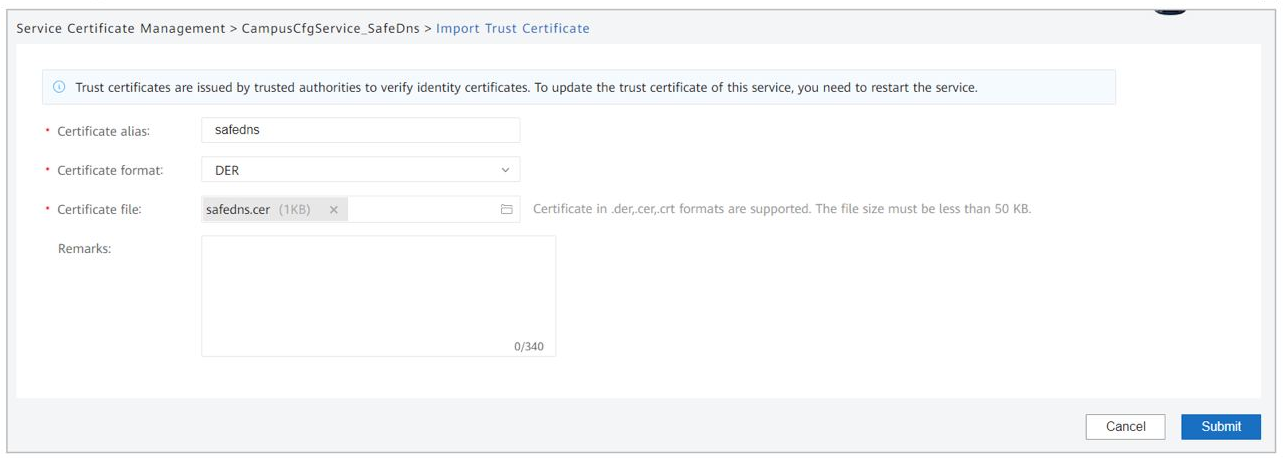
- Navigate to System > System Management > Certificate Management.
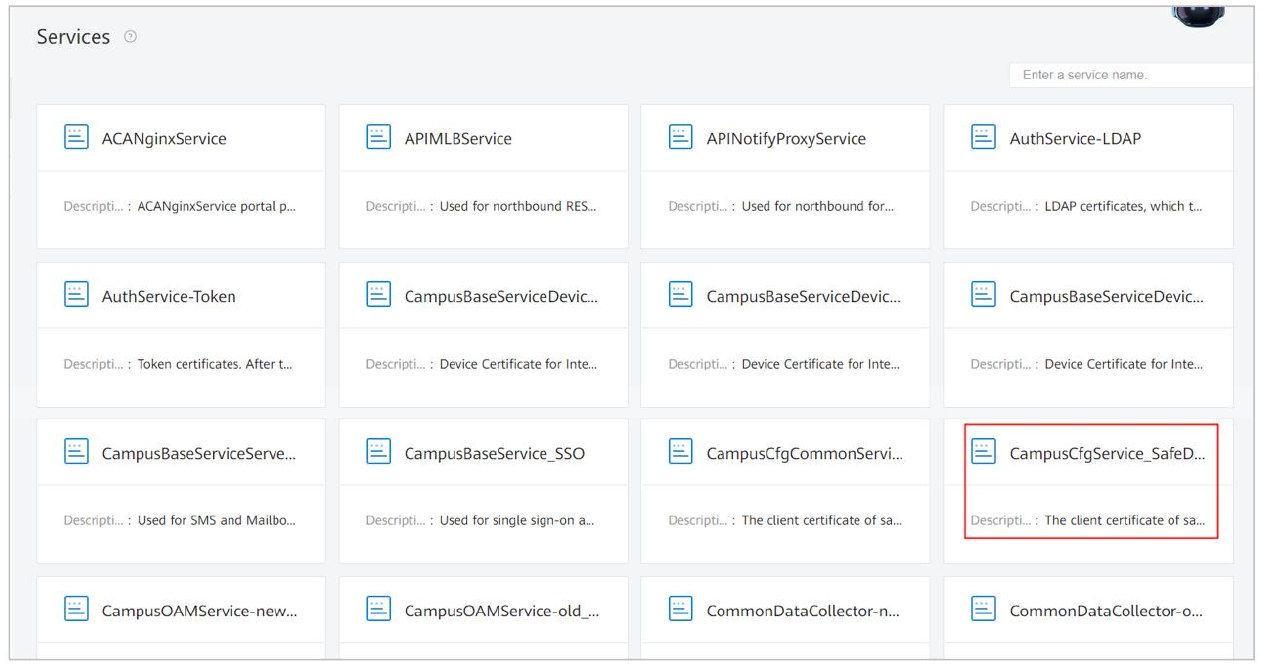
- Select Service Certificate Management

- Select CampusCfgService_SafeDNS.
- Click on the Trust Certificate tab.
- Click Import.

- Set Certificate Format to DER.
- Select the certificate file and click Submit.
- Wait for 2 minutes.
- Restart the CampusCfgService service for the certificate to apply:
- Log in to the management panel.
- Navigate to Product > System Monitoring > Service tab.
- Search for CampusCfgService.
- Select the service.
- Click Stop.
- Click Start.
- Log in to the management panel.
- Log in to the iMaster NCE Campus and check whether the certificate file is successfully uploaded to the following path:
/opt/oss/NCECAMPUS/apps/CampusCfgService/controller/configuration/safedns
Comcast Xfinity Router Setup
Most Xfinity routers for both residential and business users come with the firmware that intercepts all DNS requests. Even if DNS addresses are changed, the router will continue redirecting DNS requests to Comcast servers.
Business users
For business users, DNS interception is controlled by the Security Edge feature that can be disabled in your account on the Comcast for Business portal.
Residential users
Unfortunately, residential users can not disable DNS interception on Xfinity routers.
However, there are several possible solutions on how to bypass DNS interception.
Solution 1 - connect a third-party router
Connecting a third-party router to Xfinity router will create a secondary network in which you have full control over router's settings. After that, set up the third-party router using this guide for routers and connect all your devices to it.
Solution 2 - install SafeDNS Agent on devices
The Agent is available on the following billing plans: Safe Family, Pro, Pro Plus, and archived Safe@Home, Safe@Office.
Alternatively, you can install SafeDNS Agents on all devices that require filtering. SafeDNS Agent works in any network.
If you have installed SafeDNS Agent and the filtering doesn't work correctly, please check the parental control feature:
- Log into Xfinity dashboard.
- Navigate to Network.
- Select your gateway/router.
- Select device you need to remove parental controls from.
Unfortunately, this setting has to be disabled for each device separately. - Scroll down to the Assigned to panel and click on the cogwheel icon.
- Click on the parental control option.
- Select Off and click Apply Changes.
Alternatively, you can enable DoH or DoT in the Agent's Settings to bypass the parental control feature.
Solution 3 - use OpenVPN for filtering on devices
The filtering can be set up using a third-party application OpenVPN on all devices that require filtering.
Please follow this guide for OpenVPN setup.
Solution 4 - use Encrypted DNS (DoH/DoT)
Please follow this guide for Encrypted DNS setup.
Meraki Router Setup
Router with Static IP address configuration
1. Go to SafeDNS Dashboard > Settings > Devices and copy your IP address to the "IP addresses / DynDNS" box, choose a policy, and click "Add".

2. Change your router’s DNS servers to SafeDNS addresses:
To do that, on the Meraki Dashboard, navigate to Security & SD-WAN > Configure > DHCP > Main subnet/VLAN ID > DNS nameservers and choose Specify nameservers... from the drop-down.
In the "Custom nameservers" field indicate SafeDNS addresses − 195.46.39.39 and 195.46.39.40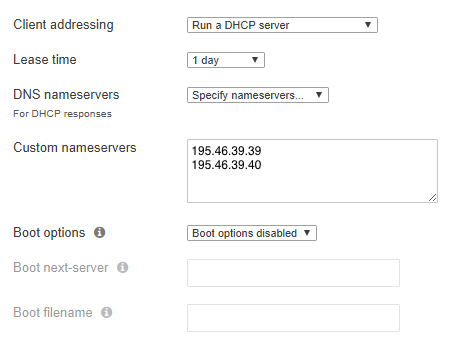
You have successfully configured your router.
Please note that settings take 5-7 minutes to apply.
Stats and filtering status update every 10 minutes.
Router with Dynamic IP address configuration
Using Meraki Built-in Dynamic DNS.
1. Once on the Security & SD-WAN > Monitor > Appliance status page, select the pencil icon next to Hostname, located between the WAN IP and Serial Number on the left of the page.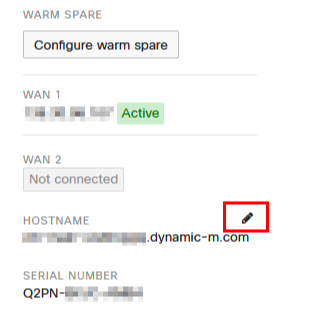
A dialog box will appear for configuring Dynamic DNS. Select Enabled in the dialog box and enter a public domain name if necessary, then select Update.
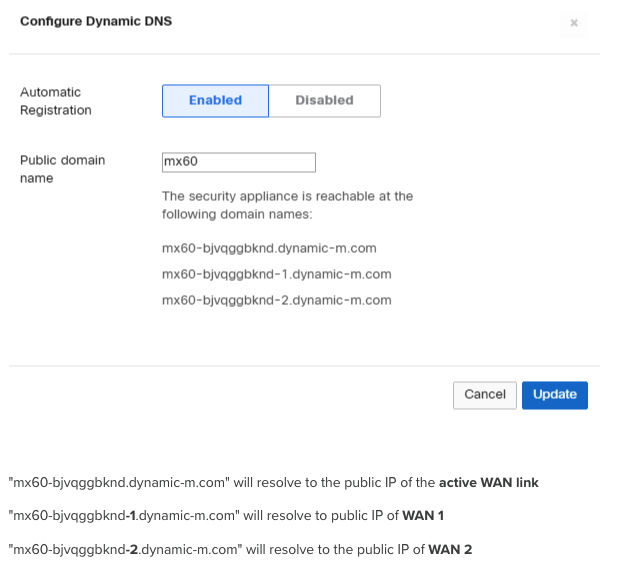
2. Go to SafeDNS Dashboard > Settings > Devices and copy the DynDNS hostname of the needed WAN to the "IP addresses / DynDNS" box, choose a policy, and click "Add".
Once added, you will see it in the DynDNS section of the Dashboard.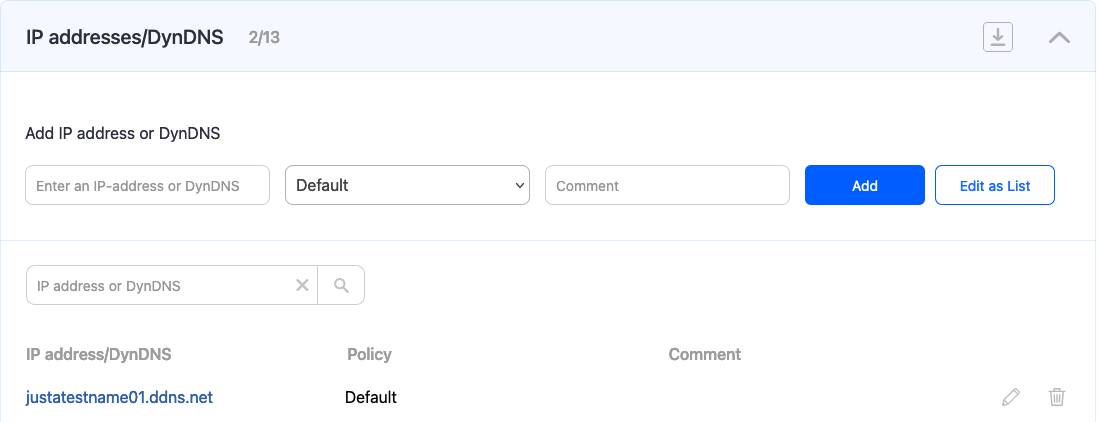
After DynDNS is enabled, you can confirm it is working by performing a DNS query for the MX DDNS hostname. Open a command prompt (cmd) on any workstation and type "nslookup <your dynamic DNS name>." The DNS response should return the current active public IP address.
Starlink Router and Network Setup
Starlink provides internet access with unique networking characteristics, including dynamic IP addresses for all users and CGNAT (Carrier-Grade NAT) for most customers. Some Starlink plans offer a dedicated (but still dynamic) public IP.
This guide covers methods to configure DNS filtering on Starlink, depending on your setup:
-
Users with dedicated dynamic IPs.
-
Users behind CGNAT with shared IPs.
-
Universal solutions (DoH, VPN, or SafeDNS Agents) that work for all scenarios.
Starlink with a dedicated dynamic IP
1. Using Starlink Router
This method is suitable for testing the filtering service. However, it is not recommended for the final setup, because the filtering will stop working as soon as the IP changes.
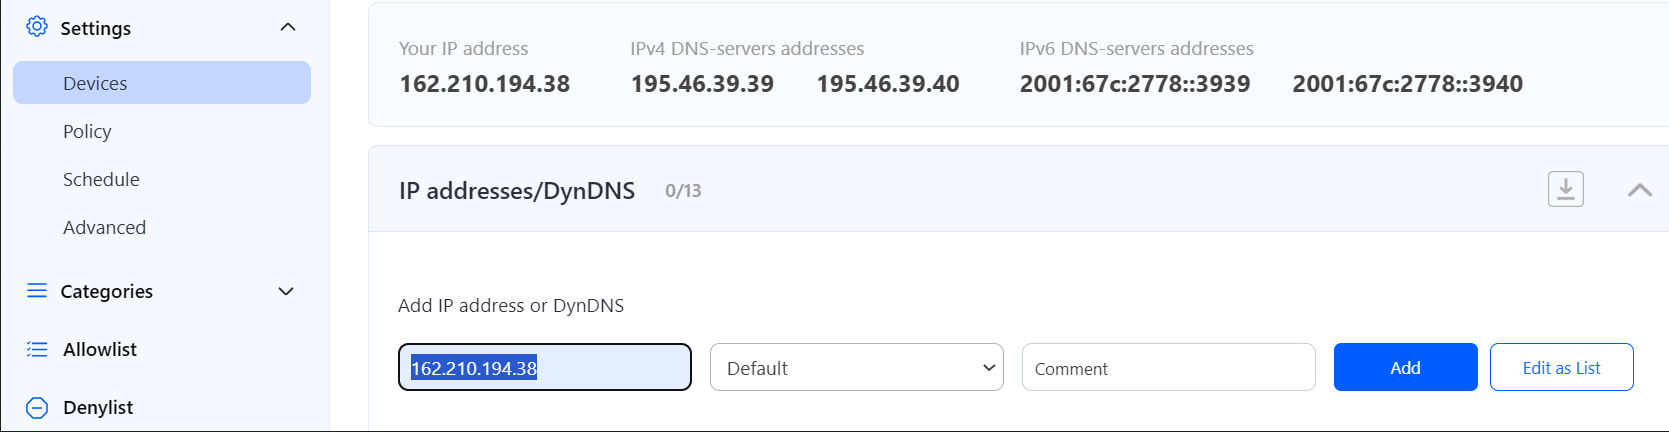
1. Go to SafeDNS Dashboard > Settings > Devices and copy your IP address to the "IP addresses / DynDNS" box, choose a policy, and click "Add".
2. Change your router’s DNS servers to SafeDNS addresses - 195.46.39.39 and 195.46.39.40
To change the DNS settings on a Starlink router, follow these steps:
-
Connect to the Starlink Network.
-
Open the Starlink app on your smartphone or tablet. If you don’t have the app, you can download it from the App Store (iOS) or Google Play Store (Android).
-
Log in to your Starlink account.
-
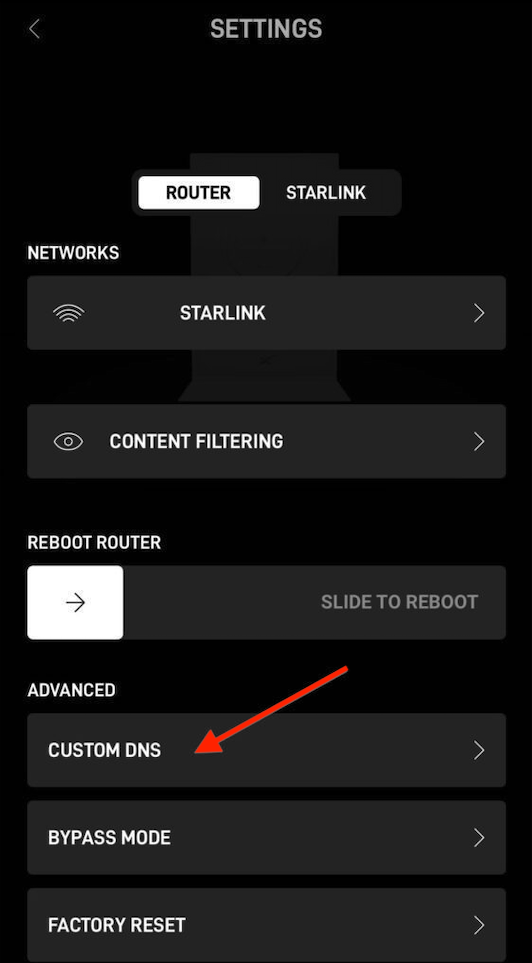
Navigate to SETTINGS > CUSTOM DNS.

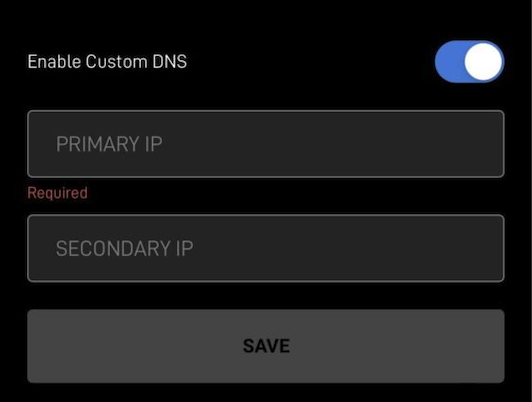
- Toggle "Enable Custom DNS" on and enter SafeDNS addresses 195.46.39.39 and 195.46.39.40.

-
Save Changes.
Please note that settings take 5-7 minutes to apply.
Stats and filtering status update every 10 minutes.
2. Using a third-party router with DynDNS
This method is recommended for the final setup. It applies the filtering for all devices connected to the router, and also automatically updates the IP address when it changes.
- Enable Bypass Mode on the Starlink router.
- Connect a third-party router supporting DynDNS (most modern routers should support this feature).
- Configure DynDNS by following this general guide for routers with Dynamic IP address configuration.
3. Using DD Client on the end device (local DynDNS)
This method is a compromise between the methods above. It allows updating a dynamic IP automatically without using a third-party router.
You must install a DD Client on a device in the filtered network. Ideally, this device should be on and connected to the Internet most time. DD Client is available for most operating systems.
Please follow the DD Client guide.
Starlink behind CGNAT (shared public IP)
In rare cases, it might be possible to set up the filtering using the methods for dedicated IP setup. However, there is no guarantee that the filtering will work without interruptions. We strongly suggest using the universal solutions methods listed below.
Universal solutions (any Starlink configuration)
All methods listed here will work for both dedicated IP and shared IP cases.
1. Encrypted DNS (DoH or DoT) on a third-party router
This method is recommended for the final setup. It applies the filtering for all devices connected to the router.
- Enable Bypass Mode on the Starlink router.
- Connect a third-party router supporting DoH/DoT (not all routers support this feature).
- Follow the Encrypted DNS guide.
2. Encrypted DNS (DoH or DoT) on end devices
This method provides filtering for each end device where the DoH/DoT link is used.
Please follow the Encrypted DNS guide.
3. SafeDNS Agent
This method requires the installation of SafeDNS Agent on each end device that needs to be filtered.
Please follow the SafeDNS Agent guides:
4. OpenVPN
This method allows connecting to the SafeDNS server using VPN.
Please follow the general OpenVPN guide.