HTML blockpage example
```HTML
You have been denied access to this website. For further info please contact YOUR@EMAIL.COM$website $reason If the categories are listed incorrectly, press the 'Report' button below. |
Blocking/allowing a domain automatically blocks/allows all its subdomains, overriding Categories settings.
It is possible to simultaneously block a domain and allow its subdomain(s), and vice versa.
1. Navigate to the "**Allowlist"** or "**Denylist"** tab to create a new named list. 2. Find the "**Create list"** button and enter the name of the new list into the "**List name"** box on the right and click "**Create list"**. It will appear at the bottom of the page. [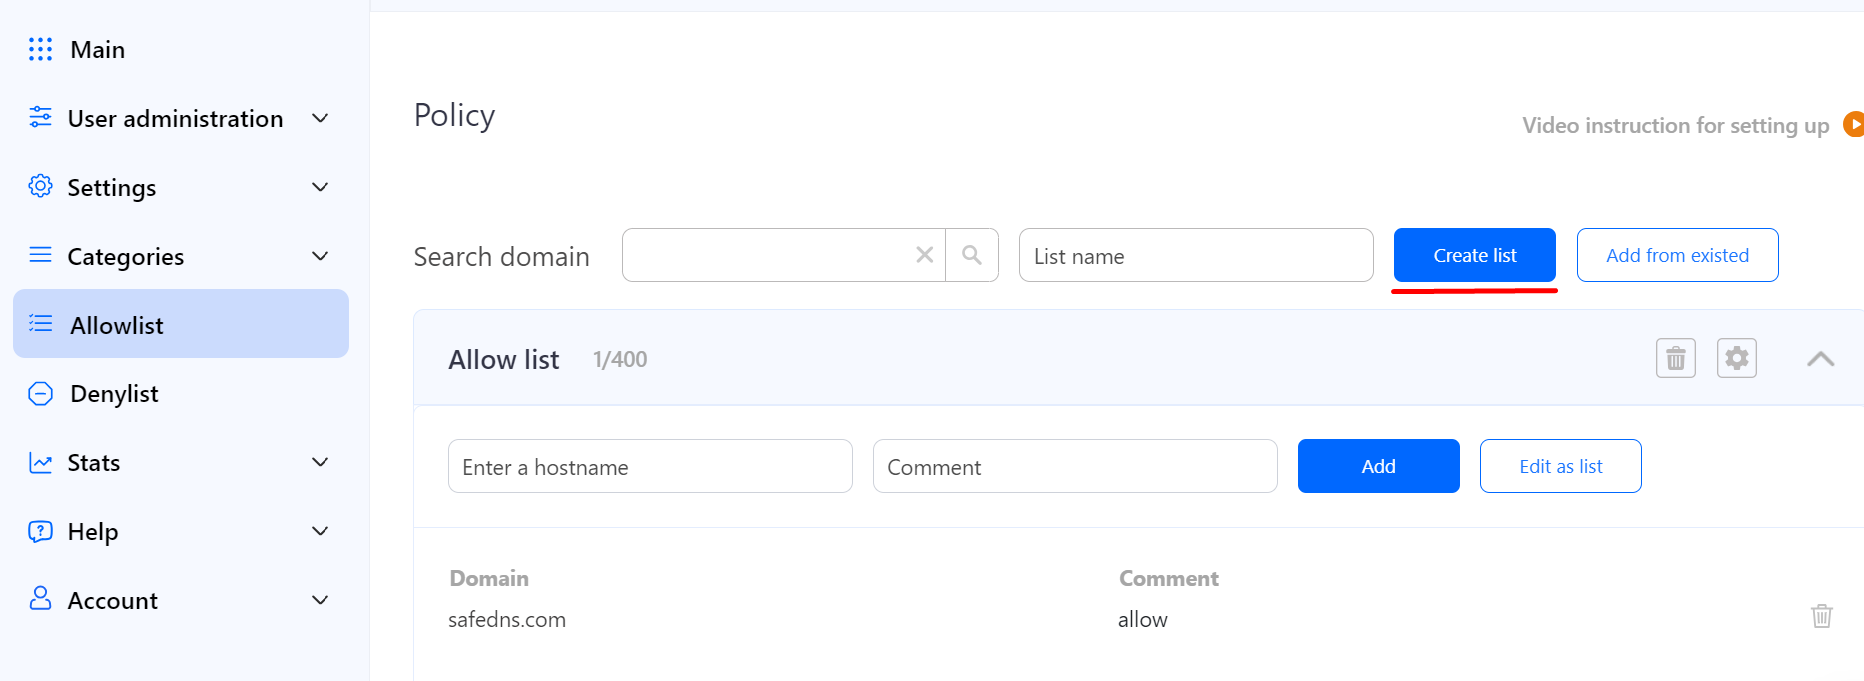](https://docs.safedns.com/uploads/images/gallery/2024-08/P3dogHXd3cRz2BhK-1-allow-denylists.png) 3. Click the **Cogwheel** button on the right, then click "**Save"** to add the newly created named list to the multiple policies (profiles). [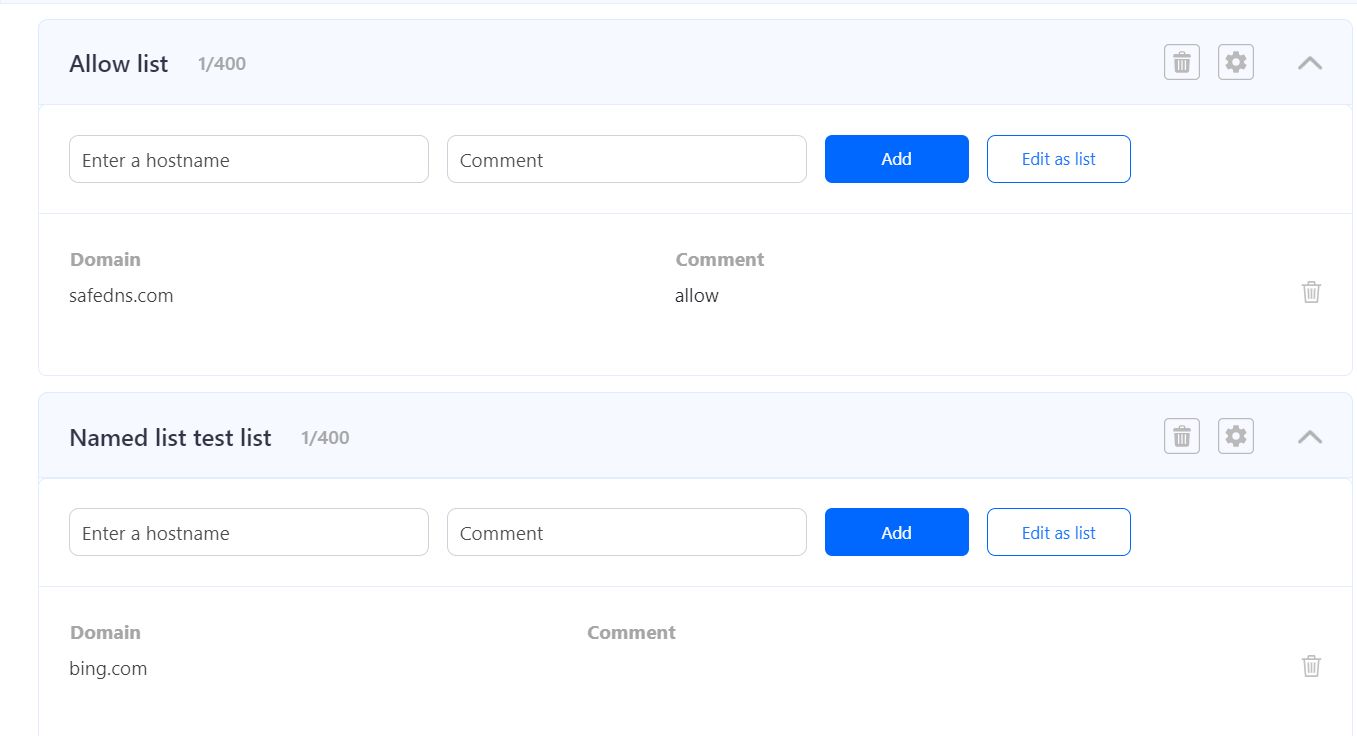](https://docs.safedns.com/uploads/images/gallery/2024-08/E6DN6PLZZDF7gVlY-2-allow-denylists.png)The same steps work for the **Denylist** section.
Wildcards are not supported at the moment.
Please note that settings take 5-7 minutes to apply. Stats and filtering status update every 10 minutes.
# General Setup via OpenVPN Some devices are not yet supported by the SafeDNS Agent or cannot have it installed for various reasons. In this case, you can configure the SafeDNS filtering via the third-party app OpenVPN. **[⤵Download OpenVPN](https://openvpn.net/download-open-vpn/)**Schedule logic: selected custom Policy (profile) is applied at the selected time; Default policy is applied at all other times.
This system allows a much more flexible schedule, that you can apply in advanced scenarios such as: 1. Turning off the internet on schedule, with the filtered internet at the other time. This option is often used by parents to limit kids during school hours. 2. Filtering of unproductive websites at the workplace, with unfiltered access during lunch break, and before and after the workday. This type of scheduling is suitable for use within organizations. 3. Filtered internet in the hours when the computer is used by a child, with different filtering rules in the hours when the computer is used by adults. --- #### Schedule setup To set the schedule, you must create an additional Policy (profile) for which the schedule will be enabled. 1. Log in to your SafeDNS Dashboard 2. Go to **Settings > Policy** 3. Enter the name of the policy (e.g. *"Schedule"*), and click "**Create policy**". [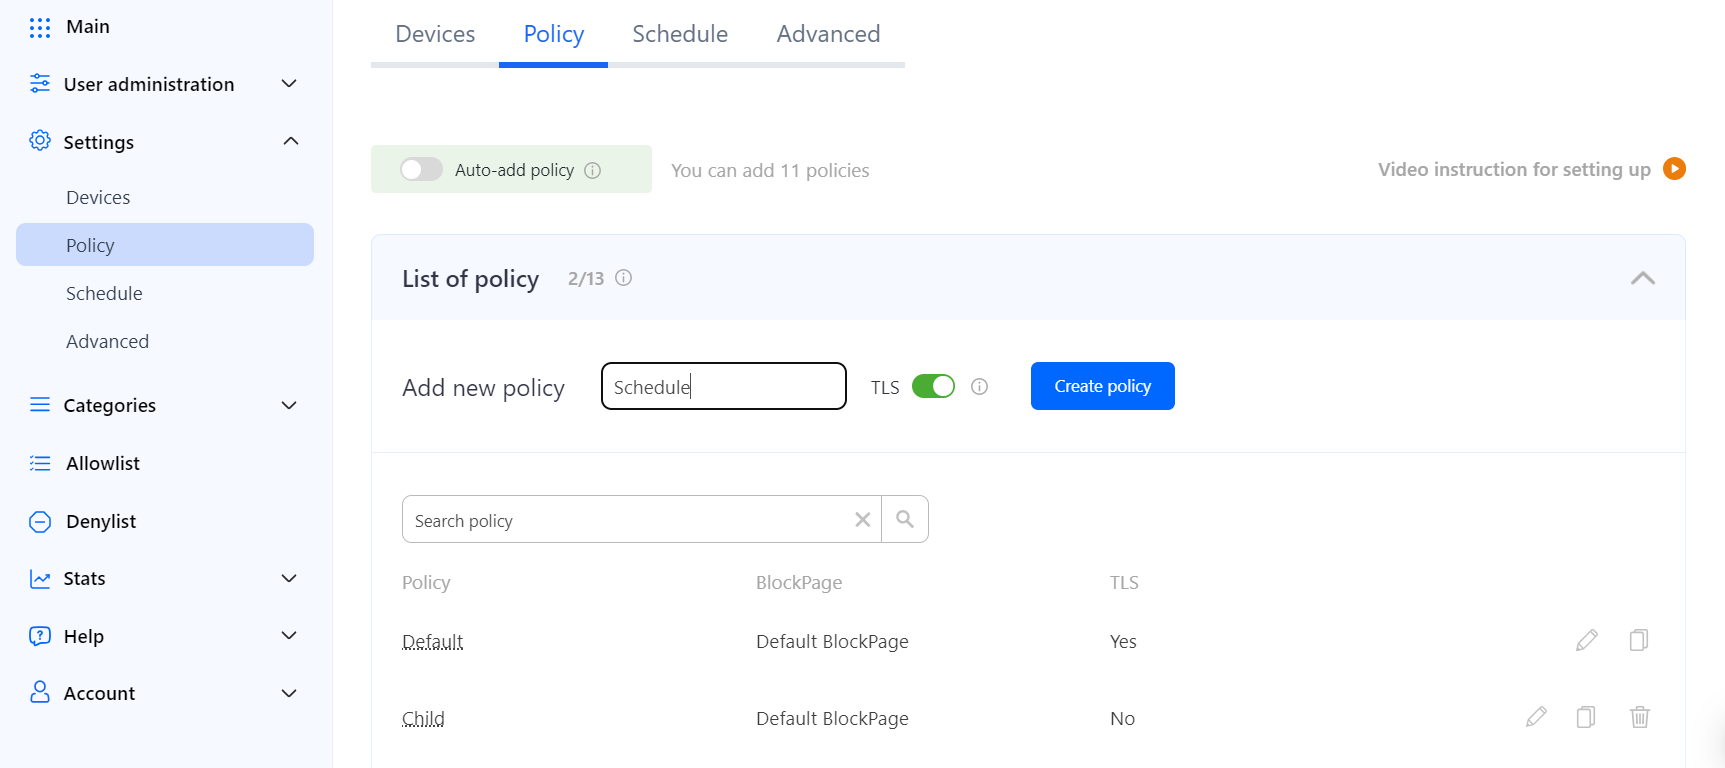](https://docs.safedns.com/uploads/images/gallery/2024-08/D3EyhBspQr3q1wKH-1-schedule.png) After creating a policy, you can start setting up the schedule. 1. Go to **Settings > Schedule**. 2. Click on the cogwheel to the right from the newly created policy *"Schedule"*. 3. Set the time at which the policy *"Schedule"* should be active. The rest of the time the Default policy will be active. The appearance and functionality of the Schedule depend on your billing plan. 4. Switch on the **Schedule is enabled** on the right. 5. Click "**Save**".[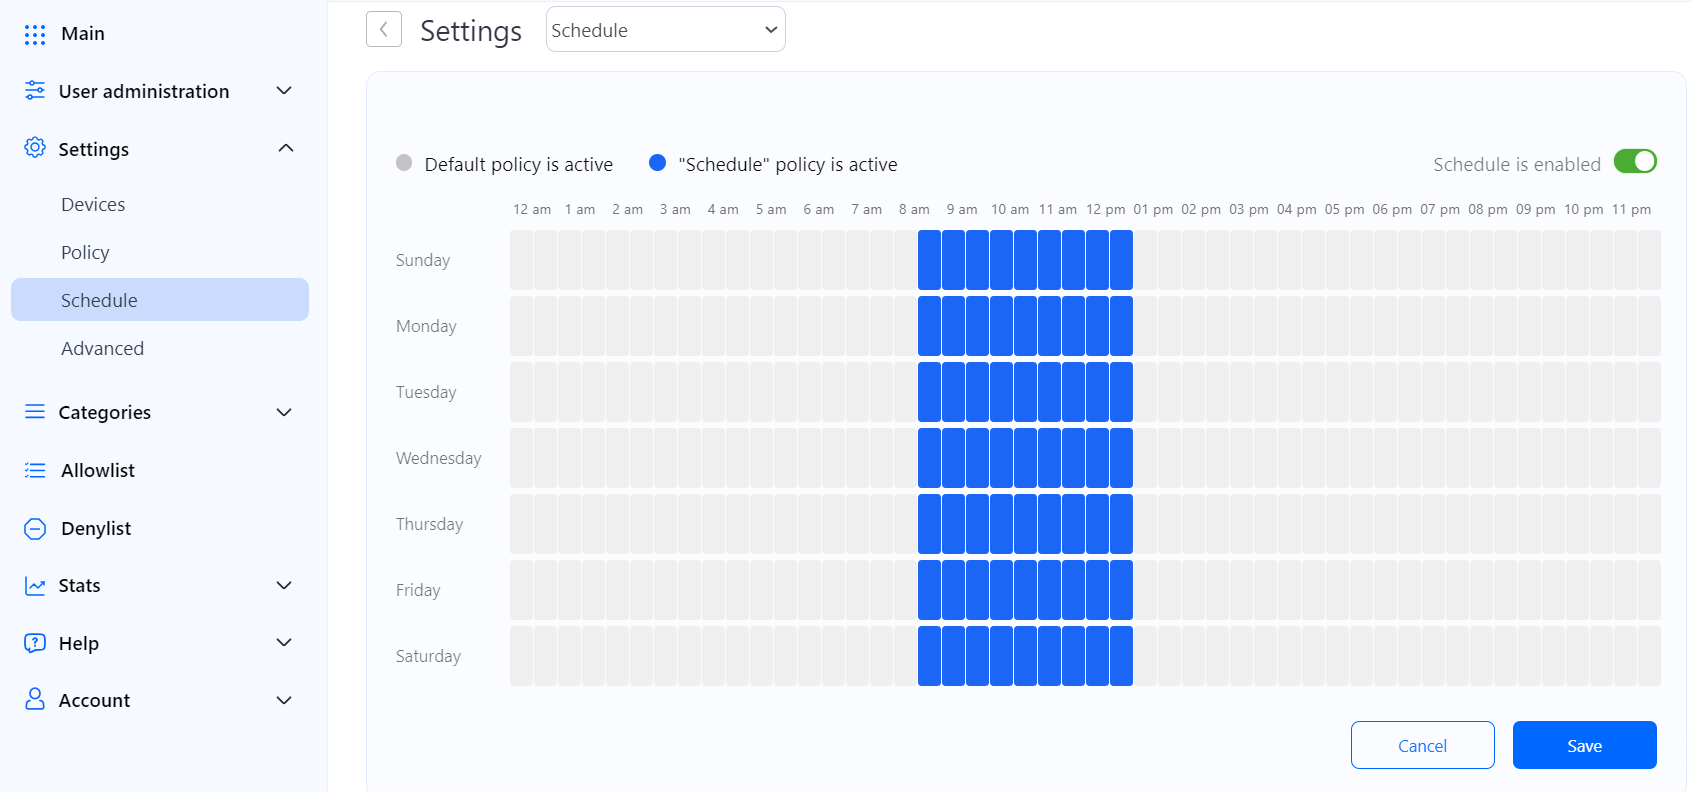](https://docs.safedns.com/uploads/images/gallery/2024-08/Z9ErS6hmGcLw0pc8-2-schedule.png) After setting the schedule, you need to apply it to your network or individual computers. If you use the SafeDNS Agent, you need to open **Settings > Policy** and set the *"Schedule"* policy as active. [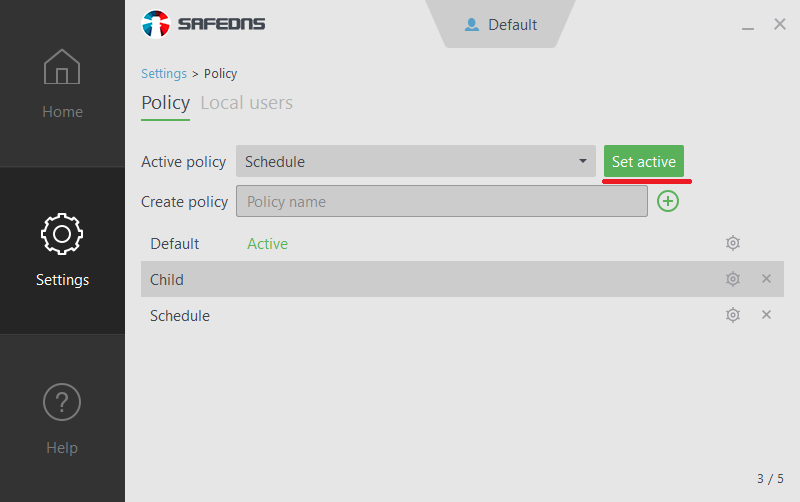](https://docs.safedns.com/uploads/images/gallery/2022-08/imTL1FaKyO2jOu9Z-3-activating-schedule-on-computer.png) If you use an unattended installation of the Agent for computers in a corporate network, you will need to reinstall it with the scheduling policy as the main policy parameter. If your filtering is set up at the router/modem, proxy, or gateway, you need to bind your external (public) IP address to the custom *"Schedule"* policy. 1. Go to **Settings > Devices** 2. Navigate to your IP address/DynDNS and click on the edit icon on the right. 3. Change the Policy to the custom *"Schedule"* using the dropdown menu. 4. Click on the green checkmark on the right to apply changes.[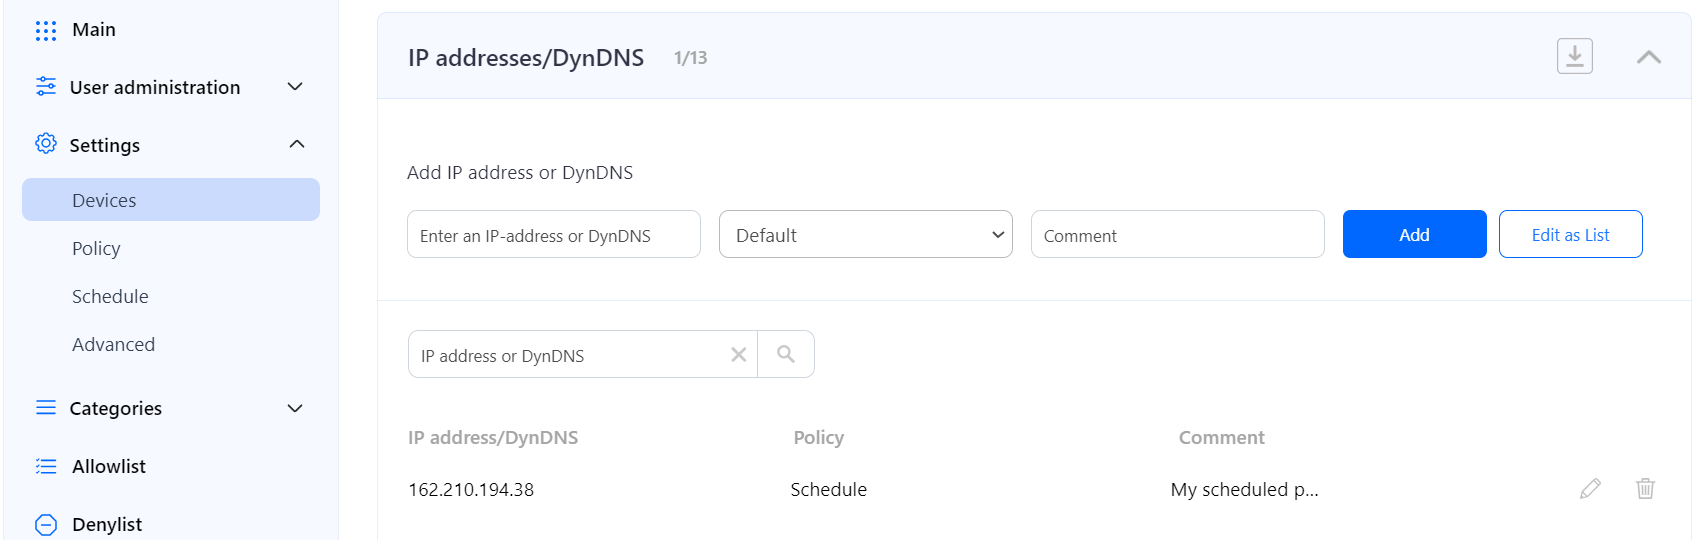](https://docs.safedns.com/uploads/images/gallery/2024-08/MbqGbyu8q0ysqB28-3-schedule.png) After the settings are applied, the Schedule will be active. You can have multiple policies with different schedules for different users and networks, but note that the switch will always be between the current policy and the *"Default"* policy.Please note that settings take 5-7 minutes to apply. Stats and filtering status update every 10 minutes.
--- #### Possible problems with the schedule ##### Scheduled settings switch at the wrong time Make sure that you have the correct time zone applied. In the Dashboard, click on the **Cogwheel** icon in the top right corner, select the correct time zone and click **"Save changes"**.Please note that settings take 5-7 minutes to apply.
Because of the cache of DNS queries at the system level and in the browser, your computer can not immediately respond to the newly applied settings. To eliminate this, we recommend disabling automatic control of the browser cache. ##### The schedule is not working at all Make sure that you have followed all steps above. If everything is done correctly and the problem persists, please contact our technical support. # Block Page Setup The block page is displayed when a user is trying to access a website blocked by the filtering rules. SafeDNS provides instruments to customize the block page. For example, you can add your logo and contact details on the block page, and an explanation why the website site is blocked. --- #### Creating custom block page To create a custom block page, do the following: 1. Log in to SafeDNS Dashboard. 2. Navigate to **Settings > Advanced** and scroll down to the **block page** section. 3. Click "**Add new**". [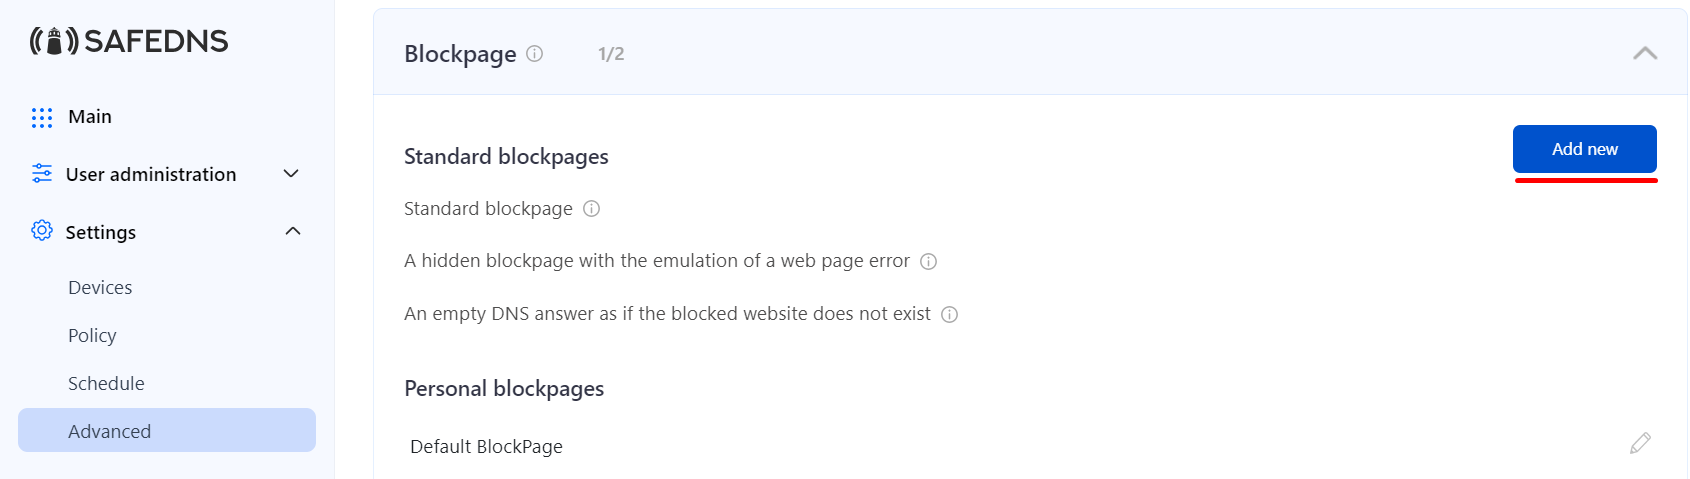](https://docs.safedns.com/uploads/images/gallery/2024-08/OydvFnwCz9EewKYd-1-blockpage.png) 4. Enter the name of the new block page and choose its type from the dropdown menu. Click "Add". [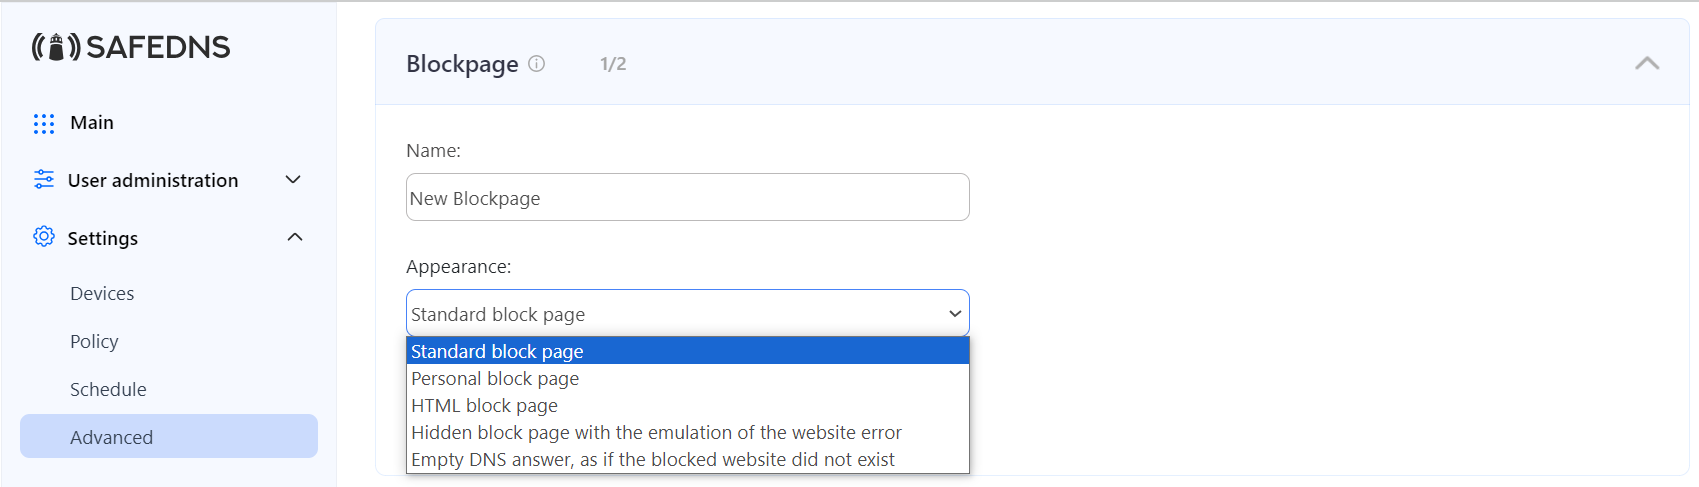](https://docs.safedns.com/uploads/images/gallery/2024-08/OyAVLhxT1h2sKh7o-2-blockpage.png) --- #### Block page types - **Standard block page** - default SafeDNS block page. [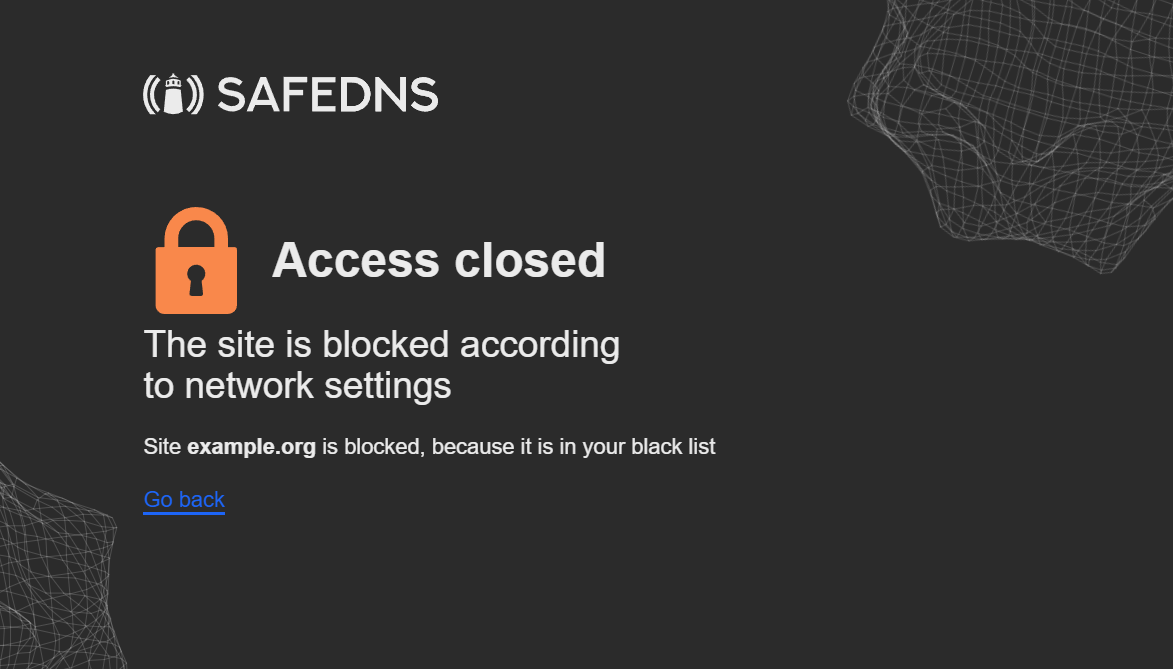](https://docs.safedns.com/uploads/images/gallery/2025-01/VirHFG5lFbYeEsNV-screenshot-342.png) - **Personal block page** - simple block page with the customizable image and description. [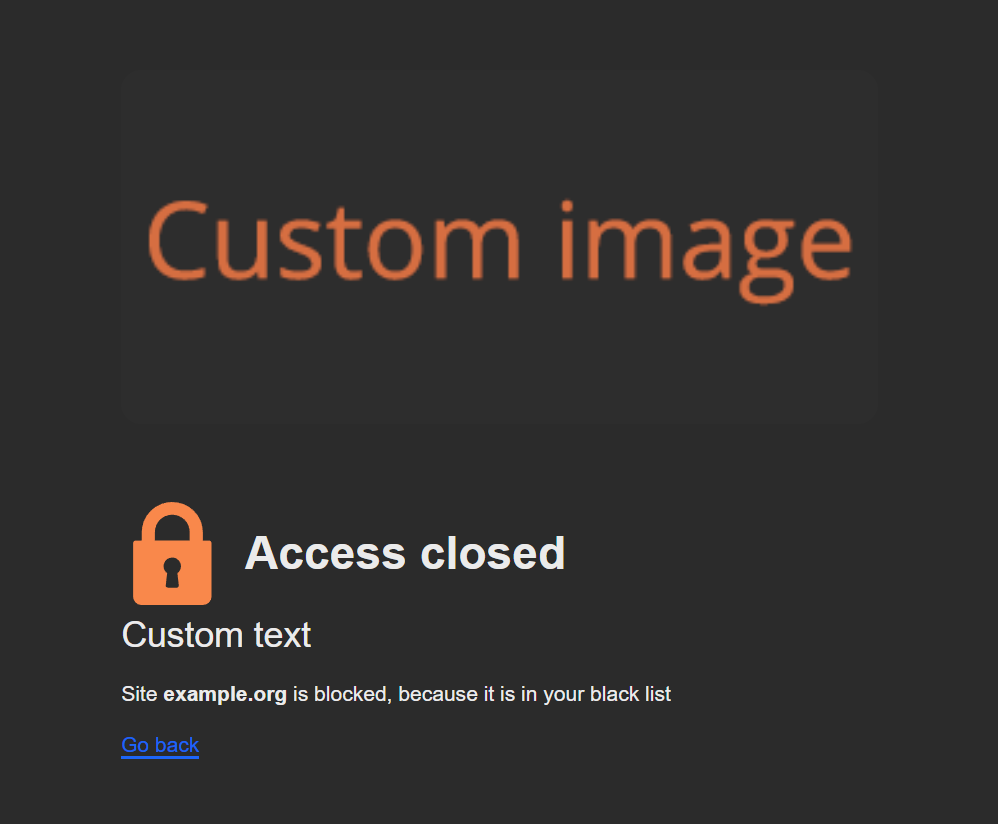](https://docs.safedns.com/uploads/images/gallery/2025-01/H4REGkHQV5EDc0su-screenshot-343.png) - **HTML block page** - block page with the HTML support. The following variables are supported: - *$website* - shows the address of a blocked website. - *$domain* - shows the domain part of the *$website*. - *$reason* - shows the reason of the block, supports language prefix. - *$category* - shows the filtering category(-ies) of the blocked *$domain*, supports language prefix.You can add a language prefix to translate the *$reason* and *$category* variables (e.g *$fr:reason, $ar:category*). List of available languages: sq (Albanian), ar (Arabic), es (Spanish), sv (Swedish), tr (Turkish), it (Italian), en (English), ur (Urdu), pt\_BR (Brazilian Portuguese), fr (French), de (German).
You have been denied access to this website. For further info please contact YOUR@EMAIL.COM$website $reason If the categories are listed incorrectly, press the 'Report' button below. |
The availability of a certain block page type depends on your billing plan.
You can always edit the block page type by clicking on the pencil icon to the right. [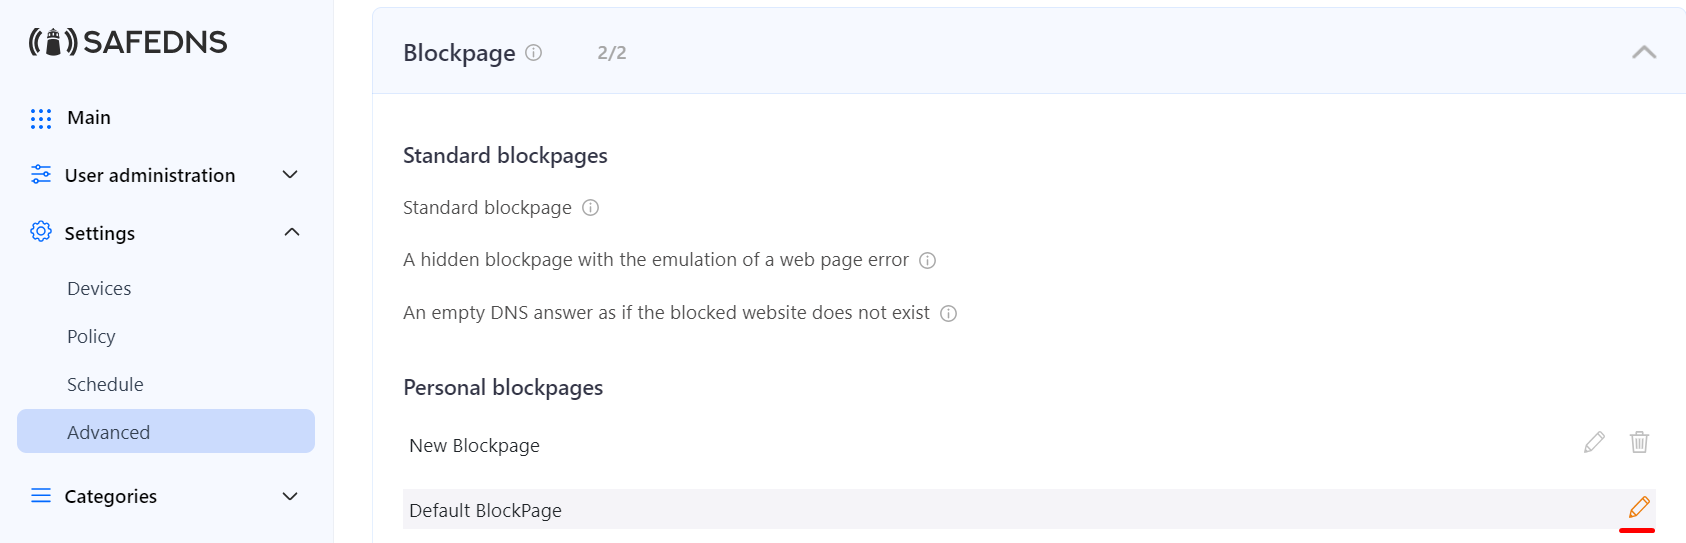](https://docs.safedns.com/uploads/images/gallery/2024-08/27QoGtcmjHoxfEq1-3-blockpage.png) --- #### Applying custom block page To create a custom block page, do the following: 1. Navigate to **Settings > Policy**. 2. Click on the pencil icon to the right from the filtering policy. 3. Select the custom block page from the dropdown menu. 4. Click on the green check mark to save the changes. [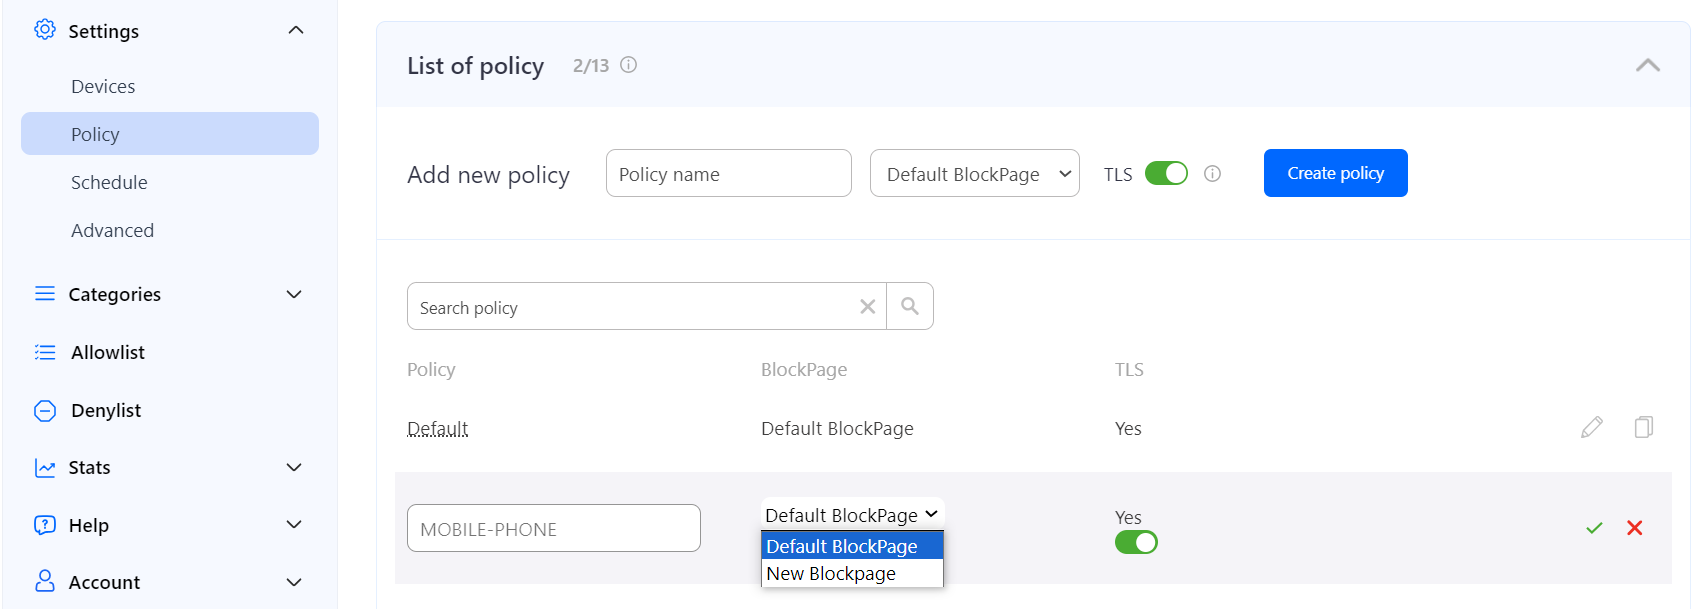](https://docs.safedns.com/uploads/images/gallery/2024-08/gMImjMfPTULXXNUA-4-blockpage.png) Please note that the SafeDNS TLS certificate should be installed on each end device where you want HTTPS pages to display correctly. Without the certificate, block page will be displayed for HTTP websites only. [SafeDNS Root CA certificate installation guide](https://docs.safedns.com/books/guides/page/safedns-root-certificate-for-https-pages).