SafeDNS Shield
- Overview
- Architecture and deployment
- Setup and requirements
- Miscellaneous
- REST API overview
- REST API reference
Overview
SafeDNS Shield is an on-premises web filtering and security solution that operates as a DNS proxy. It processes every DNS query to identify the requesting user, evaluates the queried domain against that user’s filtering policy, and then allows or blocks the request.
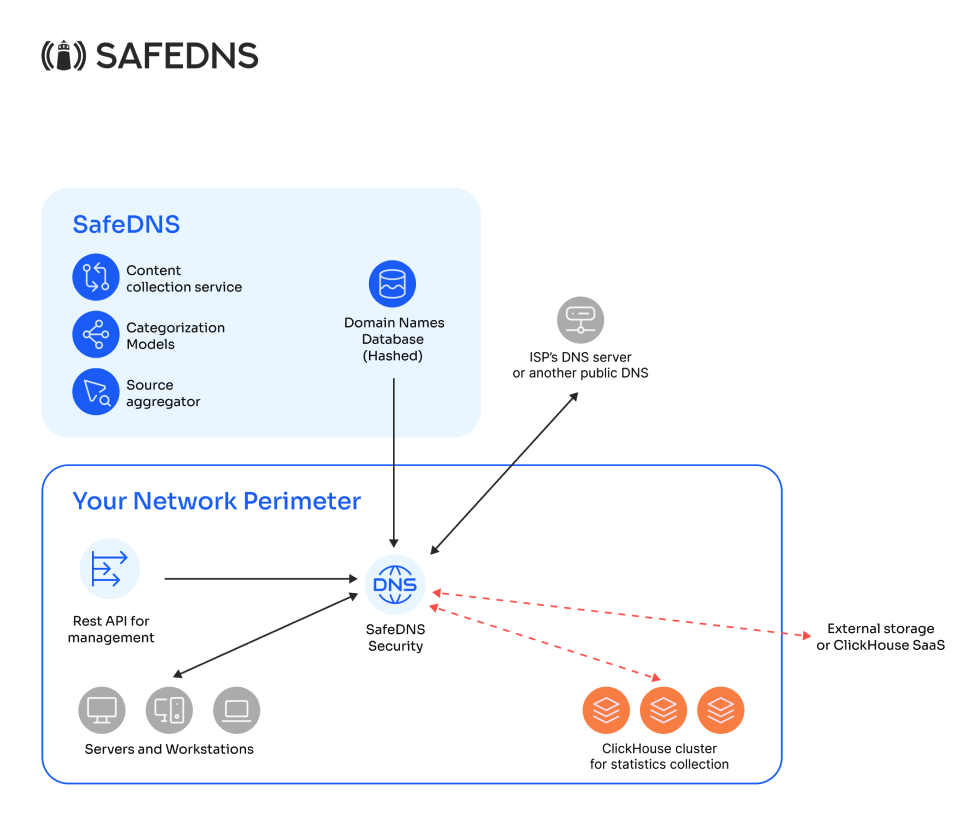
When a domain is blocked, the proxy resolves it to the IP address of a block page instead of returning the actual IP. The block page can be a custom corporate page hosted outside the solution, or the default block page built into SafeDNS Shield, which can also be customized.
If a domain is allowed, the proxy forwards the DNS request to the next server in the resolution chain. This server can be a local corporate DNS server, an ISP’s caching DNS resolver, or any public DNS service (for example, Google Public DNS or Cloudflare).
Because SafeDNS Shield inspects all DNS traffic, it enables comprehensive, per‑user traffic analysis. Every request is logged, providing access to detailed statistical information.
Architecture and deployment
Components
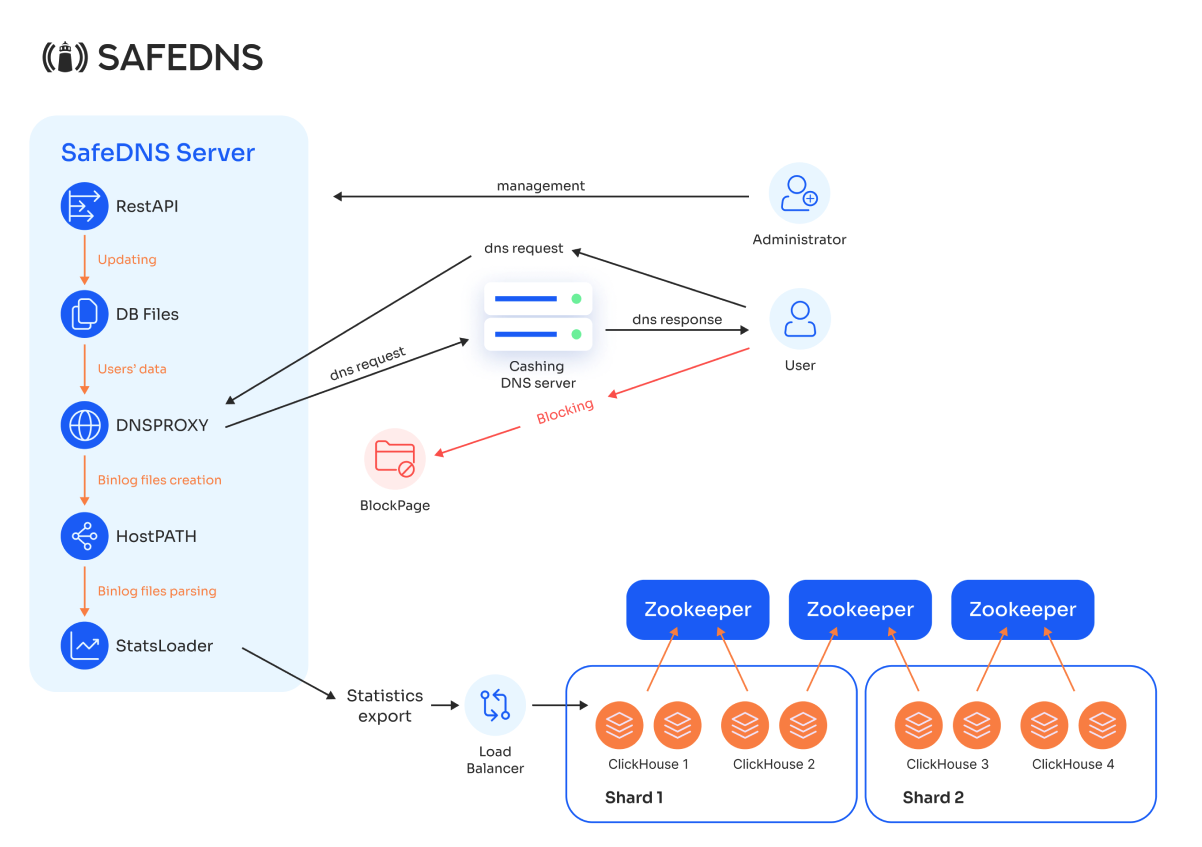
SafeDNS Shield is composed of the following components:
-
DNS Proxy Module
The core filtering engine. It receives DNS requests from end users, identifies the requesting user, applies the configured filtering policy, and returns either the resolved IP address or the IP address of a block page. -
Internal Database
Stores all configuration and policy data: user identifiers (subnet, IP, port), filtering profiles, block pages, user groups, and their assignments. - Block pages
HTTP/S pages served to the users instead of blocked websites. Can be hosted alongside Shield or on an external server. -
REST API
Provides a management interface for administrators to update the Internal Database. It supports creation and modification of:-
User identifiers (subnet, IP, port)
-
Filtering profiles (categories to block)
-
Block pages
-
-
Binary Log Parsing Module (StatsLoader)
Processes the binary log files generated by the DNS Proxy. It parses the DNS query logs, extracts statistics, and sends them to the ClickHouse cluster for storage and analysis. -
ClickHouse Cluster
A distributed database for storing and analyzing DNS request statistics. The cluster is divided into shards, each containing multiple mirrored nodes for fault tolerance and high‑performance parallel reads and writes.-
Load Balancer
Receives statistics data from StatsLoader and distributes it evenly across the ClickHouse cluster nodes. -
ZooKeeper
Manages coordination and configuration of the ClickHouse cluster, ensuring data consistency and system reliability.
-
The DNS Proxy writes its binary query logs to a designated host path (HostPATH), from which StatsLoader reads them.
External dependencies
The following elements are not part of SafeDNS Shield but are required for operation:
-
User – The end‑user device that sends DNS requests to SafeDNS Shield.
-
Caching DNS Server – A recursive resolver deployed on the organization’s network that performs upstream DNS resolution for allowed queries.
Deployment options
SafeDNS Shield supports multiple deployment options to accommodate different network topologies. This section describes the most common scenarios.
For ISPs

This deployment option is used in ISP networks, where NAT separates end users from the on-premises DNS infrastructure, making it impossible to identify them solely by their individual IP addresses.
For corporate clients
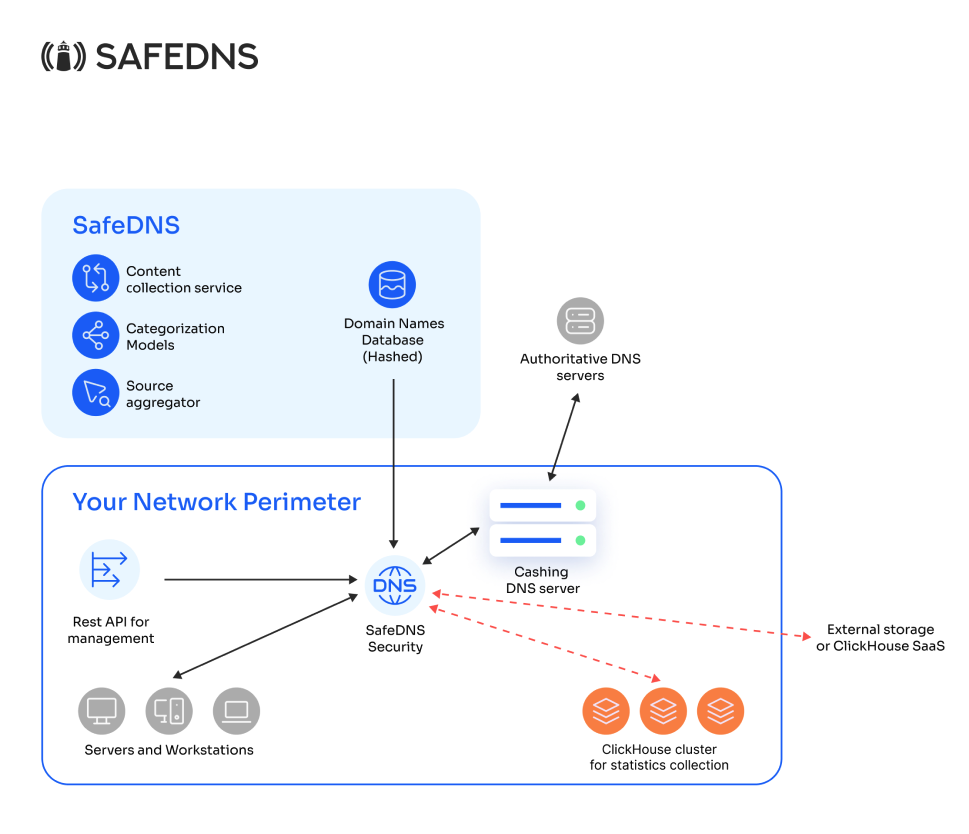
or
This deployment option is used in corporate networks where end users can be identified by their individual IP addresses at the point where SafeDNS Shield is deployed. Depending on whether the organization has its own caching DNS server, requests are forwarded to that server or to an external resolver, such as an ISP’s DNS or a public DNS service (e.g., 1.1.1.1 or 8.8.8.8).
User Identification
User Identification
To apply filtering policies and to separate statistics on a per‑user basis, SafeDNS Shield must identify each end user. Identification is based on the source address of the DNS request and can be configured using one of the following methods:
-
IP address – Use when each user has a unique IP address.
-
IP subnet – Use when per‑user granularity is not required and all users in a subnet can share the same policy.
-
IP:port – Use when multiple users share a single IP address (for example, behind NAT44 or CGNAT). The source port distinguishes individual users.
-
IP:port range – Use when users can be identified by a range of source ports on a shared IP address.
The appropriate method depends on the network topology and the level of user separation required.
Setup and requirements
Product setup and support
Custom Local Deployment
Setup, maintenance, and support for an on-premises deployment are managed entirely by SafeDNS specialists, establishing a clear division of responsibilities. The client provides the required hardware and full remote access, after which SafeDNS performs the complete turnkey installation.
Following deployment, SafeDNS specialists work with the client to configure the initial filtering rules and provide training to enable the client’s staff to make future adjustments independently. A dedicated support line is available for clients using on-premises solutions.
VM Deployment via ISO Image
As an alternative to a physical server installation, SafeDNS Shield can be deployed as a virtual appliance by mounting the provided ISO image in a virtual machine. This method streamlines deployment in environments that rely on virtualization infrastructure.
System requirements
The following specifications apply to a server running the SafeDNS Shield components. All deployments require Debian 12 (x86‑64).
DNS Proxy Module
Choose a configuration based on the expected peak query load.
CPU: Intel 12th‑generation or later, Intel Xeon Silver/Gold, or equivalent AMD Ryzen/Epyc.
| Queries per second (QPS) | CPU Cores | RAM | Storage | Network |
|---|---|---|---|---|
| Up to 1,000 | 4 | 8 GB | 200 GB NVMe | 1 Gbps |
| Up to 15,000 | 12 | 16 GB | 512 GB SSD (RAID 1) | 1 Gbps |
| Up to 310,000 | 64 | 128 GB | 2 TB SSD/NVMe (RAID 1) | 1 Gbps |
| Up to 2,000,000 | 128 | 2 TB | 16 TB SSD/NVMe (RAID 1) | 25 Gbps |
ClickHouse Cluster (Statistics Storage)
The ClickHouse cluster stores and analyzes DNS request logs. A single node meets the following minimum:
- CPU: 6 cores (x86‑64)
- RAM: 16 GB
- Storage: 500 GB NVMe
- Expandable up to 6 TB depending on traffic volume and retention needs
Example configuration for 75,000 QPS and one year of log retention:
- 4 ClickHouse data nodes
- CPU: 6 cores
- RAM: 16 GB
- Storage: 6 TB NVMe
- 3 ClickHouse Keeper nodes (coordination service)
- CPU: 2 cores
- RAM: 4 GB
- Storage: 60 GB SSD
We recommend a minimum cluster of 4 data servers arranged as 2 shards × 2 replicas. This provides parallel read/write operations and redundancy. A load balancer distributes incoming statistics across the nodes.
For lower traffic volumes, a standalone ClickHouse server can be deployed without ClickHouse Keeper, eliminating the need for the coordination layer.
Miscellaneous
Working with statistics
The DNS Proxy generates binary logs, which are stored directly on the SafeDNS Shield server. A dedicated parsing module processes these logs and exports the resulting data to an external DBMS for analysis and report generation. The module includes a connector for ClickHouse, which provides the best performance for this data type, but logs can also be exported to other databases if required.
The local binary log storage acts as a buffer: if the connection to ClickHouse is temporarily lost, logs generated during the outage are retained on disk and automatically exported once connectivity is restored. No data is lost during short interruptions, provided the local storage on the Shield server does not become completely full.
Although the statistics module is not essential for the core filtering functionality, it is indispensable for assessing system performance and investigating incidents effectively.
Note on HTTPS block pages
To display the built‑in block page for HTTPS requests, the SafeDNS root certificate must be added to the trusted certificate store on every end user device. Without the certificate, web browsers cannot validate the block page’s TLS certificate; instead of the block page, users will see a TLS/SSL error. Access to the requested resource will still be denied.
Displaying the block page over HTTP does not require the certificate.
If an externally hosted block page is used, certificate requirements depend on your own hosting configuration.
REST API overview
SafeDNS Shield filtering configuration is managed through its REST API. The API address is deployment-specific. The default management API port is 8080, but the host, protocol, and port may be changed during deployment.
Use the following placeholder throughout this guide:
<base-url> = http[s]://<shield-management-host>:<management-api-port>
For example:
http://192.0.2.10:8080
Access is normally restricted to source addresses approved during deployment.
Using the API
Authentication
All client-facing API requests require an HTTP bearer token.
Authorization: Bearer <token>
Content-Type: application/json
Example:
curl \
  --header "Authorization: Bearer <token>" \
  --header "Content-Type: application/json" \
  "<base-url>/profiles/"
Use the token and management API address assigned to the Shield deployment.
General behavior
- Successfully completed configuration changes take effect immediately. No service restart or separate activation request is required.
- Successful create operations normally return
201 Created. - Successful update and retrieval operations normally return
200 OK. - Successful deletion and initialization operations return
204 No Contentwith no response body. - Invalid request data may return
422 Unprocessable Entitywith validation details. - IPv4 addresses are supplied as dotted-decimal strings in request bodies, but some resource paths identify an IPv4 address by its unsigned integer representation.
- The examples use trailing slashes where they appear in the API specification.
Profiles and filtering
A filtering profile combines category rules, application rules, block-page behavior, and several profile-level options.
Profile fields
| Field | Type | Description |
|---|---|---|
id |
integer | Client-supplied profile identifier. Required when creating a profile. |
page_id |
integer or null |
Identifier of the block page assigned to the profile. |
white_list_only |
boolean | When enabled, only domains on the allowlist and explicitly allowed applications are permitted. Default: false. |
empty_dns_answer |
boolean | When enabled, Shield returns an empty DNS answer for a blocked domain instead of directing the client to a block page. Default: false. |
appaware_priority_over_bwlists |
boolean | When enabled, application rules take priority over explicit domain allow/deny-list rules. Default: false. |
A profile request also supports:
| Field | Type | Description |
|---|---|---|
cat_ids |
array of integers | Complete collection of filtering category IDs assigned to the profile. |
apps |
array of objects | Complete collection of application rules assigned to the profile. |
Each application rule contains:
{
  "app_id": 12,
  "status": "deny"
}
Supported statuses are:
-
deny— blocks domains associated with the application. -
allow— explicitly permits resolution of domains associated with the application, including when those domains would otherwise be blocked by the profile's category rules.
Application IDs can be obtained from:
GET /app_aware/application/
Category IDs are listed in the SafeDNS category reference.
Replacement semantics
When cat_ids or apps is included in:
PATCH /profiles/{profile_id}
it replaces the complete existing collection. It is not merged with the current configuration.
- Omitting
cat_idsleaves the category collection unchanged. - Sending
"cat_ids": []removes all category assignments. - Omitting
appsleaves the application-rule collection unchanged. - Sending
"apps": []removes all application rules.
Initial configuration example
The /init/ operation creates the initial Shield configuration in one request.
-
Method:
POST -
URL:
<base-url>/init/
{
  "blockpages": [
    {
      "id": 1,
      "type": 0
    },
    {
      "id": 2,
      "type": 1
    }
  ],
  "profiles": [
    {
      "profile": {
        "id": 1,
        "page_id": 1,
        "white_list_only": false,
        "empty_dns_answer": false,
        "appaware_priority_over_bwlists": false
      },
      "cat_ids": [3, 4, 12],
      "apps": [
        {
          "app_id": 1,
          "status": "deny"
        },
        {
          "app_id": 12,
          "status": "deny"
        },
        {
          "app_id": 93,
          "status": "deny"
        }
      ]
    }
  ],
  "bw_lists": [
    {
      "profile_id": 1,
      "type": "deny",
      "domains": [
        "example1.com",
        "example2.com",
        "example3.com"
      ]
    }
  ],
  "napts": [],
  "nets": [
    {
      "ip": "100.100.100.100",
      "profile_id": 1,
      "prefix_len": 32
    },
    {
      "ip": "100.110.110.0",
      "profile_id": 1,
      "prefix_len": 24
    },
    {
      "ip": "100.120.0.0",
      "profile_id": 1,
      "prefix_len": 16
    }
  ],
  "nets6": []
}
All six top-level arrays are required. Include an empty array when a resource type is not used:
-
blockpages -
profiles -
bw_lists -
napts -
nets -
nets6
The example creates:
- Two block-page records:
- Type
0: default block page. - Type
1: custom block page.
- Type
- Profile
1, assigned to block page1. - Three blocked content/security categories.
- Three denied applications.
- Three explicitly denied domains.
- One IPv4 host assignment and two IPv4 subnet assignments.
Custom block-page content is configured outside the Shield REST API. The API only creates and assigns the block-page record.
A successful initialization returns:
204 No Content
Profile configuration examples
Modifying filtering categories
To change categories assigned to a profile, send the complete desired category collection.
The following request replaces the existing categories of profile 1 with six categories:
-
Method:
PATCH -
URL:
<base-url>/profiles/1
{
  "cat_ids": [3, 4, 12, 66, 70, 71]
}
Because apps and profile are omitted, only the category collection is changed.
To remove all category assignments:
{
  "cat_ids": []
}
Replacing application rules for a profile
Application rules can be replaced together through the profile endpoint.
-
Method:
PATCH -
URL:
<base-url>/profiles/1
{
  "apps": [
    {
      "app_id": 1,
      "status": "deny"
    },
    {
      "app_id": 12,
      "status": "allow"
    }
  ]
}
This request removes any other application rules previously assigned to profile 1. It denies application 1 and explicitly permits domains associated with application 12, even if category rules would otherwise block them.
To remove all application rules:
{
  "apps": []
}
Managing individual application rules
Retrieve the application catalogue
-
Method:
GET -
URL:
<base-url>/app_aware/application/
Example response:
[
  {
    "id": 1,
    "name": "Application name"
  }
]
Retrieve all application rules for a profile
-
Method:
GET -
URL:
<base-url>/profile/1/app_aware
Example response:
[
  {
    "profile_id": 1,
    "app_id": 12,
    "status": "allow"
  }
]
Add one application rule
-
Method:
POST -
URL:
<base-url>/profile/1/app_aware
{
  "app_id": 12,
  "status": "allow"
}
Add several application rules with the same status
-
Method:
POST -
URL:
<base-url>/profile/1/app_aware/batch
{
  "app_ids": [1, 12, 93],
  "status": "deny"
}
Delete an application rule
The final path value is the application ID. The current OpenAPI parameter name is app_aware_id, but it identifies the same value as app_id.
-
Method:
DELETE -
URL:
<base-url>/profile/1/app_aware/12
No request body is required.
Adding a domain to the allowlist
To exempt a domain from category-based blocking, add it to the allowlist of the relevant profile.
-
Method:
POST -
URL:
<base-url>/profile/1/bw_list
{
  "type": "allow",
  "domain": "example4.com"
}
Adding domains to the denylist
To block several domains directly, use the batch operation.
-
Method:
POST -
URL:
<base-url>/profile/1/bw_list/batch
{
  "type": "deny",
  "domains": [
    "example5.com",
    "example6.com",
    "example7.com",
    "example8.com",
    "example9.com"
  ]
}
Allow/deny-list storage limitation
Shield stores allowlist and denylist domains as hashes. The API therefore cannot retrieve or enumerate the original domain names after they have been submitted.
API clients should retain their own copy of configured allowlists and denylists when later inspection, reconciliation, or synchronization is required.
Update and delete operations still accept the original domain name. Shield calculates its hash internally to locate the stored rule.
Creating a new filtering profile
-
Method:
POST -
URL:
<base-url>/profiles/
{
  "profile": {
    "id": 2,
    "page_id": 1,
    "white_list_only": false,
    "empty_dns_answer": false,
    "appaware_priority_over_bwlists": false
  },
  "cat_ids": [3, 4, 12, 13, 66, 70, 71],
  "apps": [
    {
      "app_id": 1,
      "status": "deny"
    },
    {
      "app_id": 12,
      "status": "deny"
    },
    {
      "app_id": 93,
      "status": "deny"
    }
  ]
}
This creates profile 2, assigns block page 1, enables the listed filtering categories, and adds three denied application rules.
Subscriber assignments
Assigning an IPv4 address or subnet
To assign an IPv4 host to profile 1, create a /32 network record.
-
Method:
POST -
URL:
<base-url>/net/
{
  "ip": "100.100.100.101",
  "profile_id": 1,
  "prefix_len": 32
}
To assign a /24 subnet:
{
  "ip": "100.100.101.0",
  "profile_id": 1,
  "prefix_len": 24
}
Supported IPv4 prefix lengths are /10 through /32.
Retrieve all IPv4 assignments
-
Method:
GET -
URL:
<base-url>/net/
Example response:
[
  {
    "ip": "100.100.100.101",
    "profile_id": 1,
    "prefix_len": 32
  },
  {
    "ip": "100.100.101.0",
    "profile_id": 1,
    "prefix_len": 24
  }
]
IPv4 integer representation
Individual IPv4 resource paths identify an address by its unsigned 32-bit integer representation.
For example:
100.100.100.101 = 1684300901
100.100.101.0   = 1684301056
Python conversion example:
from ipaddress import IPv4Address

int_ip = int(IPv4Address("100.100.100.101"))
print(int_ip)  # 1684300901
Reassign an IPv4 address or subnet
-
Method:
PATCH -
URL:
<base-url>/net/1684301056
{
  "ip": "100.100.101.0",
  "profile_id": 2,
  "prefix_len": 24
}
Remove an IPv4 address or subnet
-
Method:
DELETE -
URL:
<base-url>/net/1684301056
No request body is required.
Assigning an IPv6 address or subnet
-
Method:
POST -
URL:
<base-url>/net6/
{
  "ip": "2001:db8:100::",
  "profile_id": 1,
  "prefix_len": 64
}
Supported IPv6 prefix lengths are /16 through /128.
Retrieve all IPv6 assignments
-
Method:
GET -
URL:
<base-url>/net6/
Example response:
[
  {
    "ip": "2001:db8:100::",
    "profile_id": 1,
    "prefix_len": 64
  }
]
Identifying subscribers through NAPT port ranges
NAPT records assign different source-port ranges on a shared IPv4 address to different filtering profiles.
Port boundaries are inclusive. A range from 10000 to 19999 includes both port 10000 and port 19999.
Create a NAPT assignment
-
Method:
POST -
URL:
<base-url>/napt/
{
  "ip": "203.0.113.10",
  "lower_port_bound": 10000,
  "upper_port_bound": 19999,
  "profile_id": 1
}
Port values must be between 0 and 65535. The complete port range is 0 through 65535.
Create several NAPT assignments
-
Method:
POST -
URL:
<base-url>/napt/batch
[
  {
    "ip": "203.0.113.10",
    "lower_port_bound": 10000,
    "upper_port_bound": 19999,
    "profile_id": 1
  },
  {
    "ip": "203.0.113.10",
    "lower_port_bound": 20000,
    "upper_port_bound": 29999,
    "profile_id": 2
  }
]
Retrieve all NAPT assignments for an IPv4 address
The path uses the integer representation of the IPv4 address.
-
Method:
GET -
URL:
<base-url>/napt/3405803786
3405803786 is the integer representation of 203.0.113.10.
Delete several NAPT assignments
Unlike individual NAPT resource paths, the batch-deletion body uses dotted-decimal IPv4 strings.
-
Method:
DELETE -
URL:
<base-url>/napt/batch
[
  {
    "ip": "203.0.113.10",
    "lower_port_bound": 10000,
    "upper_port_bound": 19999
  },
  {
    "ip": "203.0.113.10",
    "lower_port_bound": 20000,
    "upper_port_bound": 29999
  }
]
profile_id is not included in the batch-deletion request.
Profile schedules
A schedule temporarily switches one profile to another during specified periods.
The profile identified in the URL is the source profile. target_profile_id identifies the profile used during scheduled periods. A profile cannot target itself.
Supported day formats
Both weekday names and integers are accepted:
| Integer | Weekday |
|---|---|
0 |
Monday |
1 |
Tuesday |
2 |
Wednesday |
3 |
Thursday |
4 |
Friday |
5 |
Saturday |
6 |
Sunday |
Weekday names must be lowercase:
monday, tuesday, wednesday, thursday, friday, saturday, sunday
Examples in this guide use weekday names for readability.
Times use HH:MM format and must fall on 30-minute boundaries, such as 08:00, 12:30, or 18:00. 00:00 represents the start of a day and 24:00 represents the end of a day.
Create a schedule
-
Method:
POST -
URL:
<base-url>/profile/1/schedule
{
  "target_profile_id": 2,
  "periods": [
    {
      "start": {
        "day": "monday",
        "time": "18:00"
      },
      "end": {
        "day": "tuesday",
        "time": "08:00"
      }
    },
    {
      "start": {
        "day": 5,
        "time": "00:00"
      },
      "end": {
        "day": 5,
        "time": "24:00"
      }
    }
  ]
}
This example switches profile 1 to profile 2 from Monday evening through Tuesday morning and for the whole of Saturday.
Update a schedule
-
Method:
PATCH -
URL:
<base-url>/profile/1/schedule
To change the target profile for all existing periods:
{
  "target_profile_id": 3
}
To replace all existing periods:
{
  "periods": [
    {
      "start": {
        "day": "friday",
        "time": "18:00"
      },
      "end": {
        "day": "monday",
        "time": "08:00"
      }
    }
  ]
}
When periods is supplied, all previously configured periods are deleted and replaced by the submitted collection.
Delete a schedule
-
Method:
DELETE -
URL:
<base-url>/profile/1/schedule
No request body is required.
Block pages
Block-page records use two types:
| Type | Meaning |
|---|---|
0 |
Default block page |
1 |
Custom block page |
Example creation request:
-
Method:
POST -
URL:
<base-url>/blockpage/
{
  "id": 2,
  "type": 1
}
Custom block-page content is configured outside the Shield REST API.
REST API reference
This reference describes the client-facing operations exposed by the current SafeDNS Shield REST API.
Using the API
Base URL
SafeDNS Shield does not have a universal API hostname. The management API address is assigned during deployment.
<base-url> = http[s]://<shield-management-host>:<management-api-port>
The default management API port is 8080, but it may be changed for a particular deployment.
Authentication
All operations in this reference require HTTP bearer authentication.
Authorization: Bearer <token>
Content-Type: application/json
Example:
curl \
  --header "Authorization: Bearer <token>" \
  --header "Content-Type: application/json" \
  "<base-url>/profiles/"
Access may additionally be restricted by source IP address according to the deployment configuration.
General conventions
Immediate application
Successfully completed changes take effect immediately. No service restart, reload, or separate activation operation is required.
Success status codes
| Status | Typical use |
|---|---|
200 OK |
Successful retrieval or update |
201 Created |
Successful resource creation |
204 No Content |
Successful deletion or initialization; no response body |
Validation errors
Invalid request data may return 422 Unprocessable Entity.
Example response:
{
  "detail": [
    {
      "loc": [
        "body",
        "field_name"
      ],
      "msg": "Validation error message",
      "type": "validation_error"
    }
  ]
}
The current OpenAPI specification formally describes validation errors but does not provide complete response schemas for every possible authentication, authorization, conflict, or not-found condition.
IPv4 representations
IPv4 addresses appear in two forms:
-
Dotted-decimal string, for example
"100.100.100.101", in request and response bodies. -
Unsigned 32-bit integer, for example
1684300901, in individual IPv4 and NAPT resource paths.
Python conversion example:
from ipaddress import IPv4Address

int_ip = int(IPv4Address("100.100.100.101"))
ip = str(IPv4Address(1684300901))
Category IDs
Filtering profiles refer to categories by numeric cat_ids. See the SafeDNS category reference.
Application IDs
Application IDs can be retrieved through:
GET /app_aware/application/
Allow/deny-list storage
Shield stores allowlist and denylist domains as hashes. The original domain names cannot be retrieved or enumerated through the API after submission.
Clients that need to inspect or synchronize these lists must retain their own copy of the original domains. Update and delete requests still use the original domain name; Shield calculates the corresponding hash internally.
Endpoint summary
| Group | Method | Path | Purpose |
|---|---|---|---|
| Initialization | POST |
/init/ |
Create the initial configuration in one request |
| Profiles | GET |
/profiles/ |
Retrieve all profiles |
| Profiles | POST |
/profiles/ |
Create a profile |
| Profiles | GET |
/profiles/{profile_id} |
Retrieve one profile |
| Profiles | PATCH |
/profiles/{profile_id} |
Update a profile and replace selected collections |
| Profile applications | GET |
/profile/{profile_id}/app_aware |
Retrieve application rules for a profile |
| Profile applications | POST |
/profile/{profile_id}/app_aware |
Add one application rule |
| Profile applications | POST |
/profile/{profile_id}/app_aware/batch |
Add several application rules with one status |
| Profile applications | DELETE |
/profile/{profile_id}/app_aware/{app_id} |
Delete an application rule |
| Application catalogue | GET |
/app_aware/application/ |
Retrieve all available applications |
| Block pages | GET |
/blockpage/ |
Retrieve all block-page records |
| Block pages | POST |
/blockpage/ |
Create a block-page record |
| Block pages | GET |
/blockpage/{page_id} |
Retrieve one block-page record |
| Block pages | PATCH |
/blockpage/{page_id} |
Update a block-page record |
| Block pages | DELETE |
/blockpage/{page_id} |
Delete a block-page record |
| Domain lists | POST |
/profile/{profile_id}/bw_list |
Add one allowlist or denylist domain |
| Domain lists | POST |
/profile/{profile_id}/bw_list/batch |
Add several allowlist or denylist domains |
| Domain lists | PATCH |
/profile/{profile_id}/bw_list/{domain} |
Change a stored domain rule |
| Domain lists | DELETE |
/profile/{profile_id}/bw_list/{domain} |
Delete a stored domain rule |
| IPv4 networks | GET |
/net/ |
Retrieve all IPv4 assignments |
| IPv4 networks | POST |
/net/ |
Create an IPv4 assignment |
| IPv4 networks | GET |
/net/{int_ip} |
Retrieve an IPv4 assignment |
| IPv4 networks | PATCH |
/net/{int_ip} |
Update an IPv4 assignment |
| IPv4 networks | DELETE |
/net/{int_ip} |
Delete an IPv4 assignment |
| IPv6 networks | GET |
/net6/ |
Retrieve all IPv6 assignments |
| IPv6 networks | POST |
/net6/ |
Create an IPv6 assignment |
| IPv6 networks | GET |
/net6/{ipv6} |
Retrieve an IPv6 assignment |
| IPv6 networks | PATCH |
/net6/{ipv6} |
Update an IPv6 assignment |
| IPv6 networks | DELETE |
/net6/{ipv6} |
Delete an IPv6 assignment |
| NAPT | POST |
/napt/ |
Create a NAPT assignment |
| NAPT | POST |
/napt/batch |
Create several NAPT assignments |
| NAPT | GET |
/napt/{int_ip} |
Retrieve all NAPT assignments for an IPv4 address |
| NAPT | GET |
/napt/{int_ip}/{lower_port_bound}/{upper_port_bound} |
Retrieve one NAPT assignment |
| NAPT | PATCH |
/napt/{int_ip}/{lower_port_bound}/{upper_port_bound} |
Update one NAPT assignment |
| NAPT | DELETE |
/napt/{int_ip}/{lower_port_bound}/{upper_port_bound} |
Delete one NAPT assignment |
| NAPT | DELETE |
/napt/batch |
Delete several NAPT assignments |
| Schedules | GET |
/profile/{profile_id}/schedule |
Retrieve a profile schedule |
| Schedules | POST |
/profile/{profile_id}/schedule |
Create a profile schedule |
| Schedules | PATCH |
/profile/{profile_id}/schedule |
Update a profile schedule |
| Schedules | DELETE |
/profile/{profile_id}/schedule |
Delete a profile schedule |
Data models
Profile object
{
  "id": 1,
  "page_id": 1,
  "white_list_only": false,
  "empty_dns_answer": false,
  "appaware_priority_over_bwlists": false
}
| Field | Type | Description |
|---|---|---|
id |
integer | Profile identifier. Required on creation. |
page_id |
integer or null |
Assigned block-page identifier. |
white_list_only |
boolean | Allows only allowlisted domains and explicitly allowed applications. Default: false. |
empty_dns_answer |
boolean | Returns an empty DNS answer instead of a block-page response for blocked domains. Default: false. |
appaware_priority_over_bwlists |
boolean | Gives application rules priority over domain allow/deny lists. Default: false. |
Profile with categories and applications
{
  "profile": {
    "id": 1,
    "page_id": 1,
    "white_list_only": false,
    "empty_dns_answer": false,
    "appaware_priority_over_bwlists": false
  },
  "cat_ids": [3, 4, 12],
  "apps": [
    {
      "app_id": 12,
      "status": "allow"
    }
  ]
}
cat_ids contains filtering category IDs. apps contains application rules.
Application rule
{
  "app_id": 12,
  "status": "allow"
}
| Field | Type | Description |
|---|---|---|
app_id |
integer | Application identifier. |
status |
string | allow or deny. Default in the schema: deny. |
Behavior:
-
denyblocks domains associated with the application. -
allowpermits resolution of application-associated domains even when category rules would otherwise block them.
Application-rule response
{
  "profile_id": 1,
  "app_id": 12,
  "status": "allow"
}
Block-page object
{
  "id": 1,
  "type": 0
}
| Type | Meaning |
|---|---|
0 |
Default block page |
1 |
Custom block page |
Custom block-page content is configured outside the REST API.
IPv4 network object
{
  "ip": "100.100.100.101",
  "profile_id": 1,
  "prefix_len": 32
}
| Field | Type | Constraints |
|---|---|---|
ip |
IPv4 string | Dotted-decimal IPv4 address or network address |
profile_id |
integer | Assigned filtering profile |
prefix_len |
integer | 10 through 32; default 32 |
IPv6 network object
{
  "ip": "2001:db8:100::",
  "profile_id": 1,
  "prefix_len": 64
}
| Field | Type | Constraints |
|---|---|---|
ip |
IPv6 string | IPv6 address or network address |
profile_id |
integer | Assigned filtering profile |
prefix_len |
integer | 16 through 128; default 128 |
NAPT object
{
  "ip": "203.0.113.10",
  "lower_port_bound": 10000,
  "upper_port_bound": 19999,
  "profile_id": 1
}
| Field | Type | Constraints |
|---|---|---|
ip |
IPv4 string | Dotted-decimal IPv4 address |
lower_port_bound |
integer | 0 through 65535; default 0 |
upper_port_bound |
integer | 0 through 65535; default 65535 |
profile_id |
integer | Assigned filtering profile |
Port boundaries are inclusive.
Schedule object
{
  "target_profile_id": 2,
  "periods": [
    {
      "start": {
        "day": "monday",
        "time": "18:00"
      },
      "end": {
        "day": "tuesday",
        "time": "08:00"
      }
    }
  ]
}
day accepts either a lowercase weekday name or an integer:
| Integer | Weekday |
|---|---|
0 |
Monday |
1 |
Tuesday |
2 |
Wednesday |
3 |
Thursday |
4 |
Friday |
5 |
Saturday |
6 |
Sunday |
Times use HH:MM and must be divisible into 30-minute intervals. 00:00 and 24:00 are supported day boundaries.
Initialization
Initialize configuration
POST /init/
Creates the initial Shield configuration from a single request containing block pages, profiles, domain rules, NAPT assignments, IPv4 networks, and IPv6 networks.
Request body
All six top-level arrays are required, including arrays that are empty.
{
  "blockpages": [
    {
      "id": 1,
      "type": 0
    }
  ],
  "profiles": [
    {
      "profile": {
        "id": 1,
        "page_id": 1,
        "white_list_only": false,
        "empty_dns_answer": false,
        "appaware_priority_over_bwlists": false
      },
      "cat_ids": [3, 4, 12],
      "apps": [
        {
          "app_id": 12,
          "status": "deny"
        }
      ]
    }
  ],
  "bw_lists": [
    {
      "profile_id": 1,
      "type": "deny",
      "domains": [
        "example1.com",
        "example2.com"
      ]
    }
  ],
  "napts": [],
  "nets": [
    {
      "ip": "100.100.100.101",
      "profile_id": 1,
      "prefix_len": 32
    }
  ],
  "nets6": []
}
Success response
204 No Content
Profiles
Retrieve all profiles
GET /profiles/
Returns all profiles, including profile settings, category IDs, and application rules.
Success response
200 OK
[
  {
    "profile": {
      "id": 1,
      "page_id": 1,
      "white_list_only": false,
      "empty_dns_answer": false,
      "appaware_priority_over_bwlists": false
    },
    "cat_ids": [3, 4, 12],
    "apps": [
      {
        "app_id": 12,
        "status": "deny"
      }
    ]
  }
]
Create a profile
POST /profiles/
Request body
{
  "profile": {
    "id": 2,
    "page_id": 1,
    "white_list_only": false,
    "empty_dns_answer": false,
    "appaware_priority_over_bwlists": false
  },
  "cat_ids": [3, 4, 12, 13],
  "apps": [
    {
      "app_id": 12,
      "status": "allow"
    },
    {
      "app_id": 93,
      "status": "deny"
    }
  ]
}
Success response
201 Created
The response body contains the created profile with its categories and application rules.
Retrieve a profile
GET /profiles/{profile_id}
Path parameters
| Parameter | Type | Description |
|---|---|---|
profile_id |
integer | Profile identifier |
Success response
200 OK
The response body uses the Profile with categories and applications model.
Update a profile
PATCH /profiles/{profile_id}
Updates profile-level settings and optionally replaces the profile's complete category or application collections.
Path parameters
| Parameter | Type | Description |
|---|---|---|
profile_id |
integer | Profile identifier |
Request body
All top-level fields are optional. Include only the areas to be changed.
{
  "profile": {
    "page_id": 2,
    "white_list_only": false,
    "empty_dns_answer": true,
    "appaware_priority_over_bwlists": true
  },
  "cat_ids": [3, 4, 12, 66],
  "apps": [
    {
      "app_id": 12,
      "status": "allow"
    }
  ]
}
Collection replacement rules
- When
cat_idsis present, it replaces the complete existing category collection. -
"cat_ids": []removes all category assignments. - When
appsis present, it replaces the complete existing application-rule collection. -
"apps": []removes all application rules. - Omitted collections remain unchanged.
Success response
200 OK
The response body contains the updated profile with its current categories and application rules.
Application catalogue and profile application rules
Retrieve all available applications
GET /app_aware/application/
Returns the application catalogue used to obtain valid app_id values.
Success response
200 OK
[
  {
    "id": 12,
    "name": "Application name"
  }
]
Retrieve all application rules for a profile
GET /profile/{profile_id}/app_aware
Path parameters
| Parameter | Type | Description |
|---|---|---|
profile_id |
integer | Profile identifier |
Success response
200 OK
[
  {
    "profile_id": 1,
    "app_id": 12,
    "status": "allow"
  },
  {
    "profile_id": 1,
    "app_id": 93,
    "status": "deny"
  }
]
Add one application rule
POST /profile/{profile_id}/app_aware
Path parameters
| Parameter | Type | Description |
|---|---|---|
profile_id |
integer | Profile identifier |
Request body
{
  "app_id": 12,
  "status": "allow"
}
status may be allow or deny. The schema default is deny, but clients should set the value explicitly.
Success response
201 Created
{
  "profile_id": 1,
  "app_id": 12,
  "status": "allow"
}
Add several application rules
POST /profile/{profile_id}/app_aware/batch
All submitted applications receive the same status.
Request body
{
  "app_ids": [1, 12, 93],
  "status": "deny"
}
Success response
201 Created
[
  {
    "profile_id": 1,
    "app_id": 1,
    "status": "deny"
  },
  {
    "profile_id": 1,
    "app_id": 12,
    "status": "deny"
  },
  {
    "profile_id": 1,
    "app_id": 93,
    "status": "deny"
  }
]
Delete an application rule
DELETE /profile/{profile_id}/app_aware/{app_id}
The current OpenAPI document names the final parameter app_aware_id, but the API uses the application ID itself.
Path parameters
| Parameter | Type | Description |
|---|---|---|
profile_id |
integer | Profile identifier |
app_id |
integer | Application identifier |
Success response
204 No Content
There is no request body.
To replace or change the complete application configuration predictably, use PATCH /profiles/{profile_id} with the full desired apps collection.
Block pages
Retrieve all block pages
GET /blockpage/
Success response
200 OK
[
  {
    "id": 1,
    "type": 0
  },
  {
    "id": 2,
    "type": 1
  }
]
Create a block page
POST /blockpage/
Request body
{
  "id": 2,
  "type": 1
}
type must be 0 or 1.
Success response
201 Created
{
  "id": 2,
  "type": 1
}
Retrieve a block page
GET /blockpage/{page_id}
Path parameters
| Parameter | Type | Description |
|---|---|---|
page_id |
integer | Block-page identifier |
Success response
200 OK
The response body contains a block-page object.
Update a block page
PATCH /blockpage/{page_id}
Request body
{
  "type": 0
}
Success response
200 OK
The response body contains the updated block-page object.
Delete a block page
DELETE /blockpage/{page_id}
Success response
204 No Content
There is no request body.
Domain allowlists and denylists
Shield stores submitted domains as hashes. There is no GET operation for listing the original domains in a profile's allowlist or denylist.
Supported rule types are:
-
allow -
deny
Clients should always send type explicitly.
Add one domain
POST /profile/{profile_id}/bw_list
Path parameters
| Parameter | Type | Description |
|---|---|---|
profile_id |
integer | Profile identifier |
Request body
{
  "type": "allow",
  "domain": "example.com"
}
Success response
201 Created
The API returns the stored database representation:
{
  "profile_id": 1,
  "domain_hash": 123456789,
  "cat_id": 0
}
Add several domains
POST /profile/{profile_id}/bw_list/batch
Request body
{
  "type": "deny",
  "domains": [
    "example1.com",
    "example2.com",
    "example3.com"
  ]
}
Success response
201 Created
The response is an array of stored database representations.
Update a domain rule
PATCH /profile/{profile_id}/bw_list/{domain}
Changes the allow/deny state of a stored domain rule.
Path parameters
| Parameter | Type | Description |
|---|---|---|
profile_id |
integer | Profile identifier |
domain |
string | Original submitted domain |
Request body
The current API schema includes the domain and profile ID in the body as well as the path:
{
  "type": "allow",
  "domain": "example.com",
  "profile_id": 1
}
Success response
200 OK
The response uses the stored domain-rule representation containing profile_id, domain_hash, and cat_id.
Delete a domain rule
DELETE /profile/{profile_id}/bw_list/{domain}
Path parameters
| Parameter | Type | Description |
|---|---|---|
profile_id |
integer | Profile identifier |
domain |
string | Original submitted domain |
Success response
204 No Content
There is no request body.
IPv4 networks
Supported prefix lengths are /10 through /32.
Retrieve all IPv4 assignments
GET /net/
Success response
200 OK
[
  {
    "ip": "100.100.100.101",
    "profile_id": 1,
    "prefix_len": 32
  },
  {
    "ip": "100.100.101.0",
    "profile_id": 2,
    "prefix_len": 24
  }
]
Create an IPv4 assignment
POST /net/
Request body
Host assignment:
{
  "ip": "100.100.100.101",
  "profile_id": 1,
  "prefix_len": 32
}
Subnet assignment:
{
  "ip": "100.100.101.0",
  "profile_id": 1,
  "prefix_len": 24
}
Success response
201 Created
The response body contains the created IPv4 network object.
Retrieve an IPv4 assignment
GET /net/{int_ip}
int_ip is the unsigned integer representation of the address or network address.
Example:
GET /net/1684301056
retrieves the record identified by 100.100.101.0.
Success response
200 OK
The response body contains an IPv4 network object.
Update an IPv4 assignment
PATCH /net/{int_ip}
Request body
{
  "ip": "100.100.101.0",
  "profile_id": 2,
  "prefix_len": 24
}
Success response
200 OK
The response body contains the updated IPv4 network object.
Delete an IPv4 assignment
DELETE /net/{int_ip}
Success response
204 No Content
There is no request body.
IPv6 networks
Supported prefix lengths are /16 through /128.
Retrieve all IPv6 assignments
GET /net6/
Success response
200 OK
[
  {
    "ip": "2001:db8:100::",
    "profile_id": 1,
    "prefix_len": 64
  }
]
Create an IPv6 assignment
POST /net6/
Request body
{
  "ip": "2001:db8:100::",
  "profile_id": 1,
  "prefix_len": 64
}
Success response
201 Created
The response body contains the created IPv6 network object.
Retrieve an IPv6 assignment
GET /net6/{ipv6}
Path parameters
| Parameter | Type | Description |
|---|---|---|
ipv6 |
IPv6 string | IPv6 address or network address identifying the record |
Success response
200 OK
The response body contains an IPv6 network object.
Update an IPv6 assignment
PATCH /net6/{ipv6}
Request body
{
  "ip": "2001:db8:100::",
  "profile_id": 2,
  "prefix_len": 64
}
Success response
200 OK
The response body contains the updated IPv6 network object.
Delete an IPv6 assignment
DELETE /net6/{ipv6}
Success response
204 No Content
There is no request body.
NAPT assignments
NAPT assignments map inclusive source-port ranges on a shared IPv4 address to filtering profiles.
Port constraints:
- Minimum:
0 - Maximum:
65535 - Default lower bound:
0 - Default upper bound:
65535 - Both boundaries are included in the assignment.
Individual resource paths use integer int_ip. Request and response bodies use dotted-decimal ip strings.
Create a NAPT assignment
POST /napt/
Request body
{
  "ip": "203.0.113.10",
  "lower_port_bound": 10000,
  "upper_port_bound": 19999,
  "profile_id": 1
}
Success response
201 Created
The response body contains the created NAPT object.
Create several NAPT assignments
POST /napt/batch
Request body
[
  {
    "ip": "203.0.113.10",
    "lower_port_bound": 10000,
    "upper_port_bound": 19999,
    "profile_id": 1
  },
  {
    "ip": "203.0.113.10",
    "lower_port_bound": 20000,
    "upper_port_bound": 29999,
    "profile_id": 2
  }
]
Success response
201 Created
The response is an array of created NAPT objects.
Retrieve all NAPT assignments for an IPv4 address
GET /napt/{int_ip}
Example:
GET /napt/3405803786
3405803786 is the integer representation of 203.0.113.10.
Success response
200 OK
[
  {
    "ip": "203.0.113.10",
    "lower_port_bound": 10000,
    "upper_port_bound": 19999,
    "profile_id": 1
  },
  {
    "ip": "203.0.113.10",
    "lower_port_bound": 20000,
    "upper_port_bound": 29999,
    "profile_id": 2
  }
]
Retrieve one NAPT assignment
GET /napt/{int_ip}/{lower_port_bound}/{upper_port_bound}
Example:
GET /napt/3405803786/10000/19999
Success response
200 OK
The response body contains one NAPT object.
Update a NAPT assignment
PATCH /napt/{int_ip}/{lower_port_bound}/{upper_port_bound}
The path identifies the current record. The body contains the desired resulting values.
Request body
{
  "ip": "203.0.113.10",
  "lower_port_bound": 10000,
  "upper_port_bound": 19999,
  "profile_id": 2
}
Success response
200 OK
The response body contains the updated NAPT object.
Delete one NAPT assignment
DELETE /napt/{int_ip}/{lower_port_bound}/{upper_port_bound}
Success response
204 No Content
There is no request body.
Delete several NAPT assignments
DELETE /napt/batch
The batch-deletion request uses dotted-decimal ip strings, not integer int_ip values. It does not include profile_id.
Request body
[
  {
    "ip": "203.0.113.10",
    "lower_port_bound": 10000,
    "upper_port_bound": 19999
  },
  {
    "ip": "203.0.113.10",
    "lower_port_bound": 20000,
    "upper_port_bound": 29999
  }
]
Success response
204 No Content
Profile schedules
A schedule switches the profile identified by {profile_id} to target_profile_id during configured periods.
The source profile and target profile must be different.
Day and time values
day accepts either:
- A lowercase weekday name:
mondaythroughsunday. - An integer from
0through6, where0is Monday and6is Sunday.
time uses HH:MM format. Valid times fall on 30-minute boundaries. 00:00 and 24:00 are supported.
Retrieve a schedule
GET /profile/{profile_id}/schedule
Success response
200 OK
{
  "target_profile_id": 2,
  "periods": [
    {
      "start": {
        "day": "monday",
        "time": "18:00"
      },
      "end": {
        "day": "tuesday",
        "time": "08:00"
      }
    }
  ]
}
Create a schedule
POST /profile/{profile_id}/schedule
Request body
{
  "target_profile_id": 2,
  "periods": [
    {
      "start": {
        "day": "monday",
        "time": "18:00"
      },
      "end": {
        "day": "tuesday",
        "time": "08:00"
      }
    },
    {
      "start": {
        "day": 5,
        "time": "00:00"
      },
      "end": {
        "day": 5,
        "time": "24:00"
      }
    }
  ]
}
Success response
201 Created
The response body contains the created schedule.
Update a schedule
PATCH /profile/{profile_id}/schedule
The request may update the target profile, the periods, or both.
Change the target profile
{
  "target_profile_id": 3
}
When only target_profile_id is supplied, it is changed for all existing periods.
Replace all periods
{
  "periods": [
    {
      "start": {
        "day": "friday",
        "time": "18:00"
      },
      "end": {
        "day": "monday",
        "time": "08:00"
      }
    }
  ]
}
When periods is supplied, all previously configured periods are deleted and replaced by the submitted collection.
Success response
200 OK
The response body contains the updated schedule.
Delete a schedule
DELETE /profile/{profile_id}/schedule
Success response
204 No Content
There is no request body.
Complete curl examples
Retrieve profiles
curl \
  --request GET \
  --header "Authorization: Bearer <token>" \
  --header "Accept: application/json" \
  "<base-url>/profiles/"
Create an IPv4 assignment
curl \
  --request POST \
  --header "Authorization: Bearer <token>" \
  --header "Content-Type: application/json" \
  --data '{
    "ip": "100.100.100.101",
    "profile_id": 1,
    "prefix_len": 32
  }' \
  "<base-url>/net/"
Replace profile categories and application rules
curl \
  --request PATCH \
  --header "Authorization: Bearer <token>" \
  --header "Content-Type: application/json" \
  --data '{
    "cat_ids": [3, 4, 12, 66],
    "apps": [
      {
        "app_id": 12,
        "status": "allow"
      },
      {
        "app_id": 93,
        "status": "deny"
      }
    ]
  }' \
  "<base-url>/profiles/1"