SafeDNS Shield
1. Product Overview
Our on-premise solution for DNS traffic content filtering is a DNS Proxy, which processes DNS queries to identify the user, compares the target domain with the filtering policy of the client, and decides whether to block or allow the traffic.
As for the technical part, the blocking is implemented by substituting the target resource's IP address with the IP address of the block page. This can either be a custom corporate page hosted outside of our solution, or a default block page embedded within our solution itself (which can also be customized).
An important limitation is the need to add our root certificate to the trusted list on every end-user device to display the block page over the https protocol. For block page display via http protocol, this is not required. Without the certificate installed on the end device, when a domain is blocked over https, the user will not see the block page, but access to the resource will still be denied.
If blocking is not required, the DNS Proxy simply forwards the target domain resolution request to the next caching DNS server in the chain. This can be either a local corporate DNS server, an ISP's DNS, or any public DNS service.
Furthermore, by processing all DNS traffic, this solution enables comprehensive traffic analysis on a per-user basis. Logs of all requests are compiled, and access to statistical information is provided.
2. Product Deployment options within the Company's Network
Depending on the client's network topology, there can be numerous deployment schemes. Below are examples of typical solutions.
For ISPs
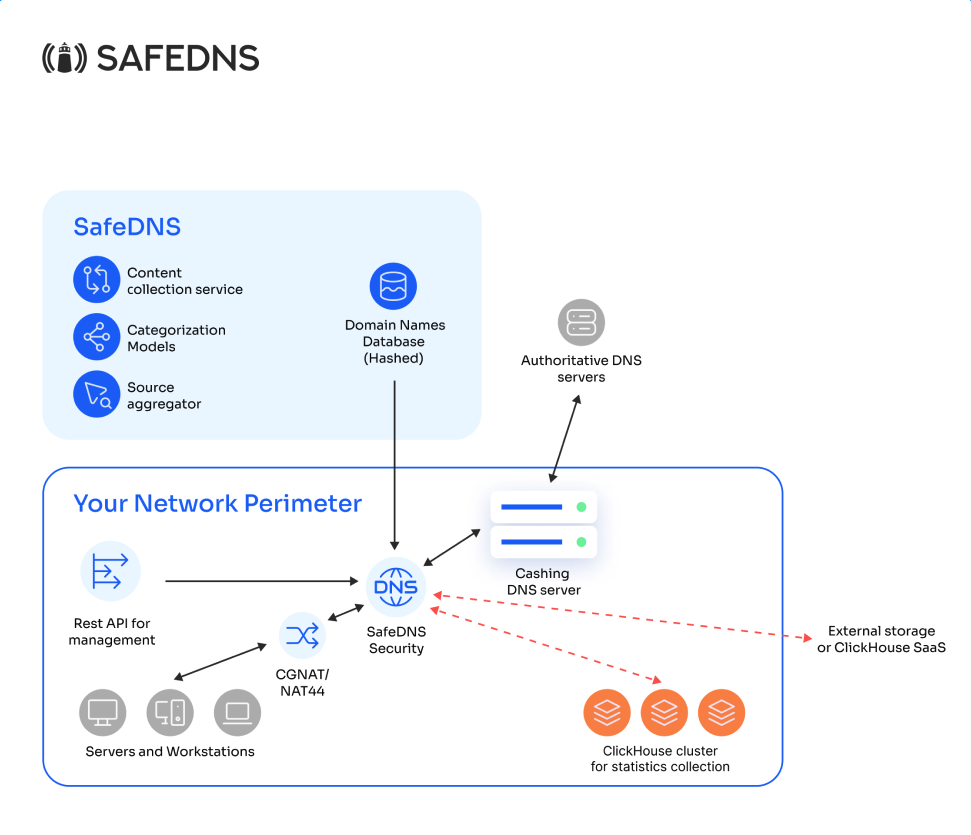
This deployment option is used in large networks where end users are behind NAT in relation to the client's main equipment, making it impossible to identify them by individual IP addresses.
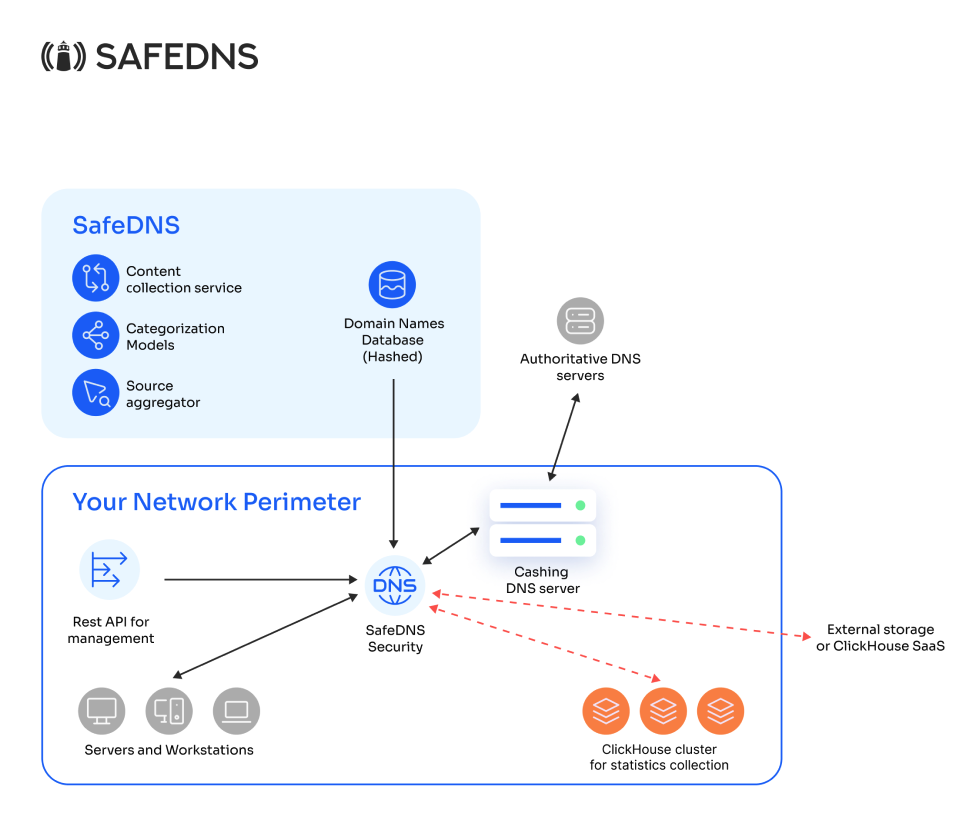
For corporate clients
 or
or
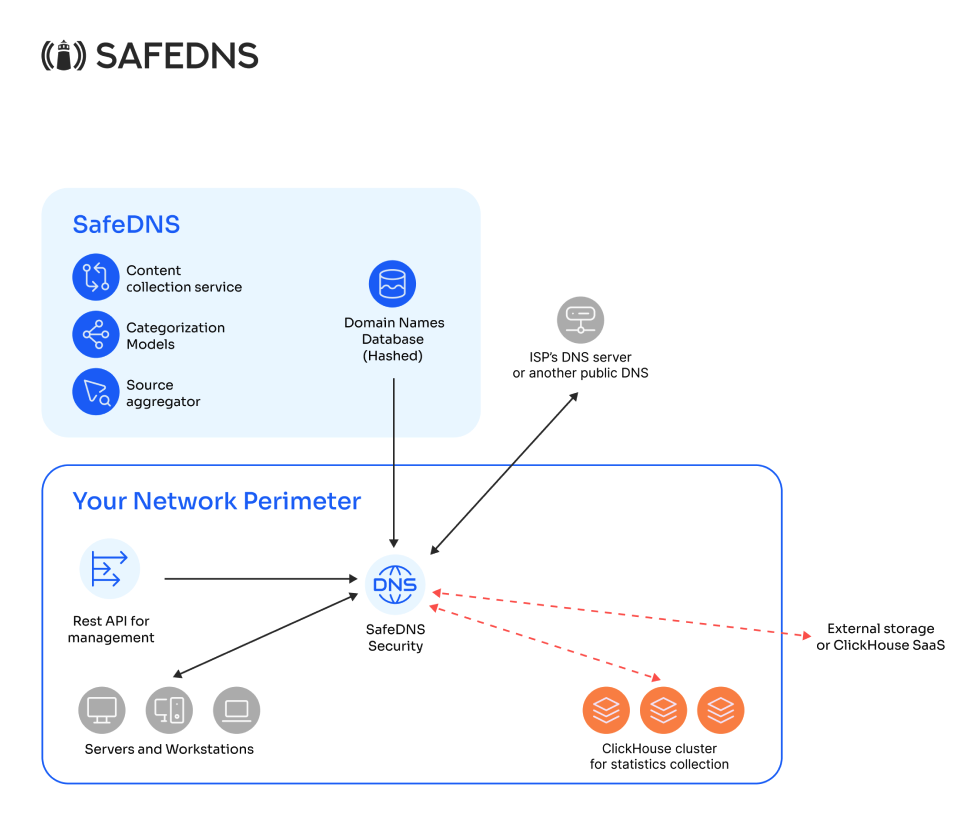
This setup is used in networks where the end user can be identified by their IP address at the deployment location of our solution. Depending on whether the company has its own caching DNS server, requests are either proxied to it or to external infrastructure (ISPs' DNS or any public DNS, such as 1.1.1.1 or 8.8.8.8).
3. User Identification
To apply various filtering policies and to separate statistics by requests, it is necessary to identify the end user. In the on-premises solution, user identification is achieved through one of the following methods:
- IP
- IP/subnet
- IP:port
- IP:[port]-[port]
If each user has a unique IP address (from which DNS requests are made), we identify the client by this IP. Alternatively, if detailed separation is not required, we can identify them by the subnet.
If users are behind NAT (such as CGNAT, NAT44, etc.), and requests from different end users come from the same IP address, we can identify the end user by the combination of IP address and port, or by a range of ports.
4. Components
Our solution consists of the following components:
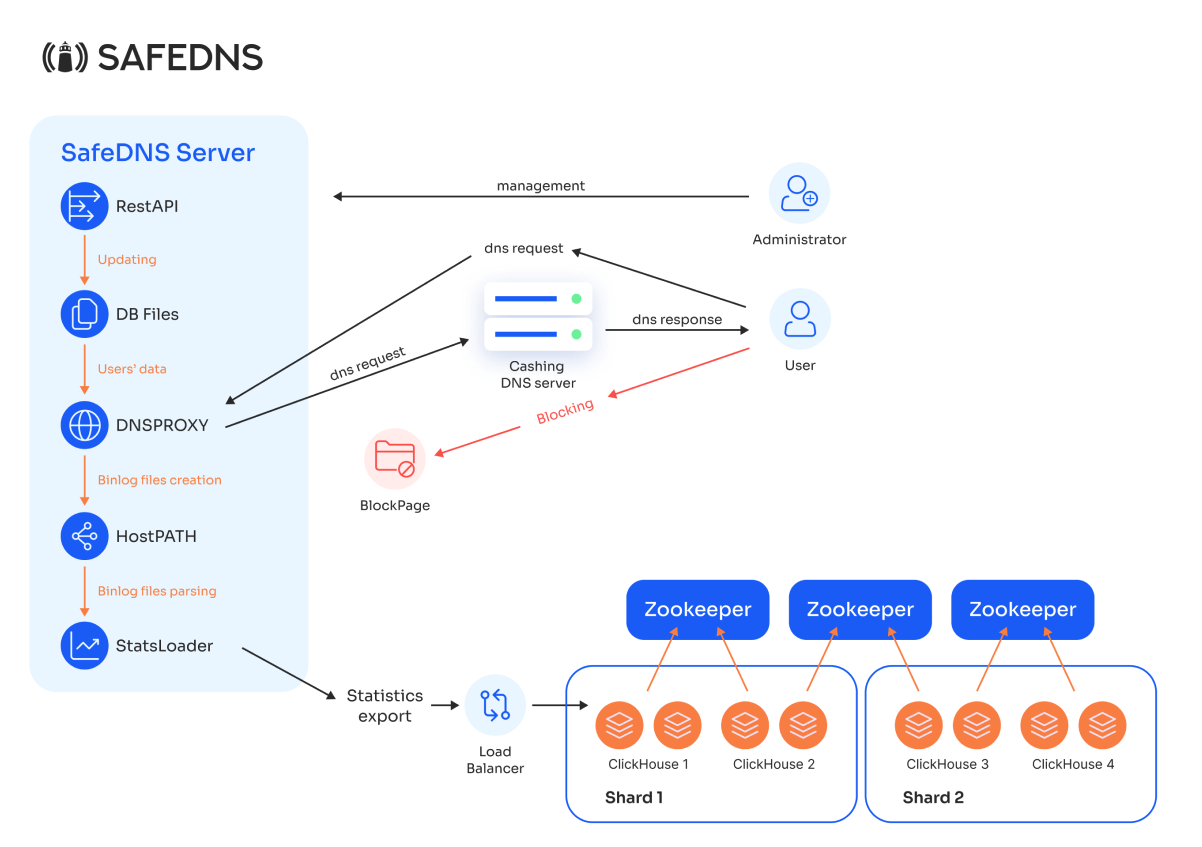
- DNS Proxy Module: Receives DNS requests and returns responses in the form of IP addresses.
- Internal Database: Stores information about all users and filtering policies.
- RestAPI: Used to update the Database with:
- Identifier (subnet/IP/port)
- Filtering profile
- Block page
- Creation/modification of filtering profiles (specifying which categories should be blocked)
- Creation/modification of block pages
- Creation/updating of users or user groups, including:
- Block Pages
- Binary Log Parsing Module for DNS proxy (StatsLoader)
- Statistics Export Module to Clickhouse DBMS.
Explanation of other elements of the setup:
Client: Represents the end user who will use the DNS filtering service. The client sends DNS requests to SafeDNS Shield.
DB Files: This is the database that stores information about clients and filtering rules. RestAPI retrieves information from this database.
DNS Proxy: This is the core component of the DNS filtering process. It receives DNS requests from the client, applies filtering rules based on the data from DB Files, and then forwards the requests to the caching DNS.
Caching DNS Server: This is a cache server deployed on the client’s side. It performs the actual resolution of DNS requests after they have been filtered through the DNS Proxy.
HostPATH: After processing DNS requests, the DNS Proxy generates binlog files (log files containing information about DNS queries). HostPATH is responsible for storing these binlog files.
StatsLoader: Once the binlog files are stored, StatsLoader retrieves and analyzes the binary data from HostPATH, processes the statistics, and sends them to the ClickHouse cluster for storage and analysis.
Load Balancer (LB): StatsLoader sends processed statistics to the load balancer, which distributes them across ClickHouse nodes.
ClickHouse Cluster: This is a distributed database used for storing and analyzing DNS request statistics. The cluster is divided into shards, with each shard containing multiple ClickHouse nodes for fault tolerance (mirroring). Shard 1 and Shard 2 are designed for high performance, as reading and writing are done in parallel.
Zookeeper: These instances manage the configuration and coordination of the ClickHouse cluster, ensuring data consistency and the reliability of the distributed system.
5. Product Setup and Interaction
Custom Local Deployment
All setup, maintenance, and support are handled exclusively by SafeDNS specialists, which clearly defines the areas of responsibility between SafeDNS and the client. The client provides the hardware (a server with x64 architecture) according to the requirements, along with remote access to the server, after which we handle the full setup "turnkey".
Our specialists, in collaboration with the client, carry out the initial configuration of filtering rules and provide training for the client's staff for future adjustments.
If needed, a dedicated support line is made available for clients using On-Prem solutions.
VM deployment via ISO Image
The installation can also be done using an ISO image mounted in a virtual machine (VM).
6. Working with Statistics
Binary logs are stored on the SafeDNS Security server. Our solution includes a module that parses these logs and exports them to an external DBMS for further analysis and report generation. Currently, there is a connector for exporting logs to the ClickHouse DBMS, which provides the best performance for this type of data. However, if needed, logs can be exported to other databases as well. The statistics module is not essential for the core functionality of SafeDNS Security, but without it, it is impossible to assess performance or investigate incidents effectively.
7. System Requirements for the Product
The minimum system requirements for a server running the SafeDNS Security module are as follows:
DNS proxy CPU requirements:
- Intel 12+ Gen, Intel Xeon Silver/Gold, or similar performance AMD Ryzen/Epyc
For handling up to 1,000 queries per second:
- CPU: 4 cores (x64 architecture)
- RAM: 8 GB
- 200 GB NVMe
- OS: Debian 11
For 15,000 queries per second:
- CPU: 12 cores
- RAM: 16 GB
- SSD: 512 Gb in RAID1
- OS: Debian 11
- Network: 1 Gbps connection
For 310,000 queries per second:
- CPU: 64 cores
- RAM: 128 GB
- SSD/NVME: 2 TB in RAID1
- Network: 1 Gbps connection
For 2 million queries per second:
- CPU: 128 cores
- RAM: 2 TB
- SSD/NVME: 16 TB in RAID1
- Network: 25 Gbps connection
The minimum system requirements for a single server for the ClickHouse DBMS cluster:
- CPU: 6 cores (x64 architecture)
- RAM: 16 GB
- 500 GB NVMe (up to 6 TB depending on client traffic volume)
For handling up to 75,000 queries per second and retaining logs for one year:
Clickhouse node (x4):
-
CPU: 6 cores
-
RAM: 16 GB
-
SSD: 6 TB NVMe
Clickhouse keeper (x3):
- CPU: 2 cores
- RAM: 4 GB
- SSD: 60 GB
We recommend a minimum cluster configuration of 4 servers arranged in a 2x2 setup: two shards for parallel read/write operations, with two servers in each shard for redundancy. Optionally, for lower traffic volumes, a standalone ClickHouse server can be deployed, eliminating the need for the Zookeeper module.
8. Rest API
All interaction with SafeDNS Shield is performed via a REST API, which typically responds on port 8080 from the same IP address that handles user requests. By default, the API only responds to requests from whitelisted IP addresses specified during the server deployment.
Use case
To understand how to work with it, let's consider a specific scenario for initial configuration. This requires sending the following request:
- Type: POST
- URL: <domain>/init/
- Data:
{
    "profiles": [
        {
            "profile": {
                "id": 1,
                "page_id": 1
            },
            "cat_ids": [3, 4, 12],
            "app_ids": [1, 12, 93]
        }
    ],
    "blockpages": [
        {
            "id": 1,
            "type": 0
        },
        {
            "id": 2,
            "type": 1
        }
    ],
    "bw_lists": [
       {
            "profile_id": 1,
            "type": "deny",
            "domains": [
                "example1.com",
                "example2.com",
                "example3.com"
            ]
        }
    ],
    "nets": [
        {
            "ip": "100.100.100.100",
            "profile_id": 1,
            "prefix_len": 32
        },
        {
            "ip": "100.110.110.0",
            "profile_id": 1,
            "prefix_len": 24
        },
        {
            "ip": "100.120.0.0",
            "profile_id": 1,
            "prefix_len": 16
        }
    ],
    "nets6": [],
    "napts": []
}
In this init file (in sequence), we configure the SafeDNS On-Prem as follows:
- Create a single filtering profile with id=1 and a blocking page with id=1 [profiles → profile].
- In this profile’s settings, specify three blocked categories (in this example: malware, phishing, and botnets) [profiles → cat_ids].
- Specify three blocked AppBlocker categories (in this example: Slack, AnyDesk, Netflix) [profiles → app_ids].
- Create two blocking pages of different types (type 0 - displays the blocked domain, type 1 - without showing the blocked domain) [blockpages].
- Add three domains to the blacklist for the filtering profile with id=1 [bw_lists].
- Assign IP addresses to the filtering profile with id=1, so requests from these IPs are filtered according to the profile’s policy (in this example: 1 specific IP and 2 subnets with /16 and /24 masks) [nets].
- [nets6] (same as nets but for IPv6) and [napts] (user identification behind NAT via port) are not filled in this example, but must be sent (empty) to initiate the creation of the initial configuration.
Once this request is sent, and a successful response with status code 204 is received, the initial configuration is complete, and all DNS traffic to this server will be processed according to the specified rules.
Modifying Filtering Categories
Let’s now consider typical use cases for changing or updating filtering settings. For instance, if you want to modify the categories being filtered, you’ll need to update the entire list of categories for the relevant profile. Based on the example above, we had a single profile created with two categories. Suppose we want to add three more categories (Cryptojacking, DGA, and Ransomware). To do this, you need to send the following request:
- Type: PATCH
- URL: <domain>/profiles/1/
- Data:
{
  "cat_ids": [3, 4, 12, 66, 70, 71],
  "app_ids": [1, 12, 93],
  "profile": {
    "page_id": 1
  }
}
That is, we specified the profile ID directly in the URL, and in the request body, we provided the updated list of categories (the previous 3 plus the new 3), while keeping the same AppBlocker categories and blockpage as before.
Adding an Address to the Allowlist
Now, let’s consider a scenario where a specific domain from the blocked list needs to be added to the whitelist to bypass category-based blocking. To achieve this, send the following request:
- Type: POST
- URL: <domain>/profile/1/bw_list
- Data:
{
  "type": "allow",
  "domain": "example4.com"
}
Thus, for the filtering profile with id=1, we added the domain to the allowlist, giving it priority over category-based blocking.
Adding Domains to the Denylist
Now, suppose we need to block certain domains that are not part of the filtered categories. To do this, we’ll add them to the denylist using a batch method:
Type: POST
URL: <domain>/profile/1/bw_list/batch
Data:
{
  "type": "deny",
  "domains": ["example5.com", "example6.com", "example7.com", "example8.com", "example9.com"]
}
Adding a New Network (or IP) for Filtering:
Type: POST
URL: <domain>/net/
Data:
{
    "ip": "100.100.100.101",
    "profile_id": 1,
    "prefix_len": 32
}
Thus, we added a new IP to our filtering profile. In this case, we specified a network prefix of /32. If we needed to specify an entire subnet, we could have sent, for example:
{
    "ip": "100.100.101.0",
    "profile_id": 1,
    "prefix_len": 24
}
Removing an IP from the List
Adding a new network (or IP) for filtering:
- Type: DELETE
- URL: <domain>/net/1684300901
- Data: None
This request has no body. The only requirement is to provide the IP address in decimal format within the URL. You must use the exact IP previously submitted (without the mask), e.g., 100.100.100.101 or 100.100.101.0 for the earlier examples. To convert an IP address to decimal format, you can use a converter like [this one].
Modifying the Filtering Profile for a Specific IP
Type: PATCH
URL: <domain>/net/1684301056
Data:
{
    "ip": "100.100.101.0",
    "profile_id": 2,
    "prefix_len": 24
}
In this case, we addressed the record for 100.100.101.0 (in decimal format in the URL) and changed the profile from id=1 to id=2. To modify the prefix, for instance, from /24 to /16, we would need to delete this record and add a new one with the appropriate prefix, replacing 100.100.101.0 with 100.100.0.0.
Creating a New Filtering Profile
In the example above, we changed the filtering profile for a specific IP. However, such a profile hasn’t been created yet. Here’s how you can create it:
- Type: POST
- URL: <domain>/profiles/
- Data:
{
    "profile": {
        "id": 2,
        "page_id": 1
    },
    "cat_ids": [3, 4, 12, 66, 70, 71, 13],
    "app_ids": [1, 12, 93]
}
Thus, we created a filtering profile with id=2, specified the same type of blocking page, and assigned the same categories and AppBlocker settings as in the first profile, adding a new category — "Adult Related".
Complete API Methods Description
User data methods
- Initialize user data database (batch data creation):
- Type: POST
- URL: <domain>/init/
- Data:
{ 'profiles': [ { 'cat_ids': [<cat_id>,], 'app_ids': [<app_id>,], 'profile': { 'page_id': <page_id>, 'id': <id> } }, ... ], 'nets': [{'ip': <ipv4>, 'profile_id': <profile_id>, 'prefix_len': <prefix_len4>}, ...], 'nets6': [{'ip': <ipv6>, 'profile_id': <profile_id>, 'prefix_len': <prefix_len6>}, ...], 'blockpages': [{'id': <page_id>, 'type': <blockpage_type>}, ...], 'napts': [ { 'ip': <ipv4>, "profile_id": <profile_id>, "lower_port_bound": <lower_port_bound>, "upper_port_bound": <upper_port_bound> }, ] } - Result: 204 No body
- Type: POST
Profile methods
- Fetch all profiles:
- Type: GET
- URL: <domain>/profiles
- Result: 200 OK
- Type: GET
- Add a profile:
- Type: POST
- URL: <domain>/profiles
- Data:
{ "profile": { "id": int, "page_id": int }, "cat_ids": [int, ], "app_ids": [int, ], } - Result: 201 Created
- Type: POST
- Fetch a specific profile:
- Type: GET
- URL: <domain>/profiles/<id>
- Result: 200 OK
- Type: GET
- Update a specific profile:
- Type: PATCH
- URL: <domain>/profiles
- Data:
{ "app_ids": [int, ], "cat_ids": [int, ], "profile": { "plan_id": int, "provider_id": int, "white_list_only": bool, "hide_block_reason": bool, "empty_dns_answer": bool, "page_id": int, "tls": bool } } - Result: 200 OK
Blockpage methods
- Get all blockpages:
- Type: GET
- URL: <domain>/blockpage
- Result: 200 OK
- Type: GET
- Create a blockpage:
- Type: POST
- URL: <domain>/blockpage
- Data:
{ "type": int, "id": int } - Result: 200 OK
- Type: POST
- Get a specific blockpage:
- Type: GET
- URL: <domain>/blockpage/<page_id>
- Result: 200 OK
- Type: GET
- Update a blockpage:
- Type: PATCH
- URL: <domain>/blockpage/<page_id>
- Data:
{ "type": int } - Result: 200 OK
- Type: PATCH
- Delete a blockpage:
- Type: GET
- URL: <domain>/blockpage/<page_id>
- Result: 204 No Content, no body
- Type: GET
Lists methods
- Create an allow- or denylist:
- Type: POST
- URL: <domain>/profile/<profile_id>/bw_list
- Data:
{ "type": "string", //"allow" or "deny" only "domain": "string" } - Result: 201 Created
- Create an allow- or denylist with multiple entries:
- Type: POST
- URL: <domain>/profile/<profile_id>/bw_list/batch
- Data:
{ "type": "string", //"allow" or "deny" only "domains": ["string", "string", ] } - Result: 201 Created
- Update a domain in an allow- or denylist:
- Type: PATCH
- URL: <domain>/profile/<profile_id>/bw_list/<domain>
- Data:
{ "type": "string", //"allow" or "deny" only "domain": "string", "profile_id": int } - Result: 200 OK
- Delete a domain from an allow- or denylist:
- Type: DELETE
- URL: <domain>/profile/<profile_id>/bw_list/<domain>
- Result: 204 No Content, no body
IPv4 network methods
- Create an IPv4 address entry:
- Type: POST
- URL: <domain>/net
- Data:
{ "ip": "string", //IPv4 address in canonical form "profile_id": int, "prefix_len": int } - Result: 201 Created
- Type: POST
- Get an IPv4 address entry:
- Type: GET
- URL: <domain>/net/<int_ip>
- Result: 200 OK
- Type: GET
- Update an IPv4 address entry:
- Type: PATCH
- URL: <domain>/net/<int_ip>
- Data:
{ "ip": "string", //IPv4 address in canonical form "profile_id": int, "prefix_len": int } - Result: 200 OK
- Type: PATCH
- Delete an IPv4 address:
- Type: DELETE
- URL: <domain>/net/<int_ip>
- Result: 204 No Content, no body
- Type: DELETE
IPv6 network methods
- Create an IPv6 address entry:
- Type: POST
- URL: <domain>/net6
- Data:
{ "ip": "string", //IPv6 address in canonical form "prefix_len": int, "profile_id": int } - Result: 201 Created
- Type: POST
- Get an IPv6 address entry:
- Type: GET
- URL: <domain>/net6/<ipv6>
- Result: Dictionary with IPv6 and profile_id data
- Type: GET
- Update an IPv6 address entry:
- Type: PATCH
- URL: <domain>/net6/<ipv6>
- Data:
{ "ip": "string", //IPv6 address in canonical form "prefix_len": int, "profile_id": int } - Result: 200 OK
- Type: PATCH
- Delete an IPv6 address:
- Type: DELETE
- URL: <domain>/net6/<ipv6>
- Result: 204 No Content, no body
- Type: DELETE
IPv4 NAT methods
- Create an IPv4 NAT entry:
- Type: POST
- URL: <domain>/napt/
- Data:
{ "ip": "string", //IPv4 address in canonical form "lower_port_bound": int, "upper_port_bound": int, "profile_id": int } - Result: 201 Created
- Type: POST
- Create multiple IPv4 NAT entries:
- Type: POST
- URL: <domain>/napt/batch
- Data:
[ { "ip": "string", //IPv4 address in canonical form "lower_port_bound": int, "upper_port_bound": int, "profile_id": int }, ] - Result: 201 Created
- Type: POST
- Get all IPv4 NAT entries by IP:
- Type: GET
- URL: <domain>/napt/<int_ip>
- Result: 200 OK
- Type: GET
- Get a specific IPv4 NAT entry:
- Type: GET
- URL: <domain>/napt/<int_ip>/<lower_port_bound>/<upper_port_bound>
- Result: 200 OK
- Type: GET
- Update an IPv4 NAT entry:
- Type: PATCH
- URL: <domain>/napt/<int_ip>/<lower_port_bound>/<upper_port_bound>
- Data:
{ "ip": "string", //IPv4 address in canonical form "lower_port_bound": int, "upper_port_bound": int, "profile_id": int } - Result: 200 OK
- Type: PATCH
- Delete an IPv4 NAT entry:
- Type: DELETE
- URL: <domain>/napt/<int_ip>/<lower_port_bound>/<upper_port_bound>
- Result: 204 No Content, no body
- Type: DELETE
- Delete multiple IPv4 NAT entries:
- Type: DELETE
- URL: <domain>/napt/batch
- Data:
[ { "ip": "string", //IPv4 address in canonical form "lower_port_bound": int, "upper_port_bound": int, "profile_id": int }, ] - Result: 204 No Content, no body
- Type: DELETE
AppBlocker methods
- Get a list of all available AppBlocker categories:
- Type: GET
- URL: <domain>/app_aware/application/
- Result: 200 OK
- Type: GET