Setting up Hypervisors
Necessary conditions for SafeUTM work:
1. UEFI support.
2. Legacy download mode must be turned off (it may also be called CSM - Compatibility Support Module).
3. Turn off Secure Boot in UEFI.
SafeUTM supports the following hypervisors:
- VMware (Workstation and ESXi) versions 6.5.0 and higher;
- Microsoft Hyper-V (2nd generation);
- VirtualBox;
- KVM;
- Citrix XenServer.
In order to work on virtual machines, there is no need to install additional drivers or utilities on SafeUTM. Guest add-ons are included in the distribution package.
General Recommendations
- OS type to create a virtual machine: Linux Fedora, 64-bit;
- Minimum hard drive capacity - 64 Gb;
- Hard drive dynamic expansion is not automated but possible upon contacting technical support;
- Minimum memory size - 8 Gb;
- An internal VM clock must be set up for keeping time in the UTC time zone.
If during the installation of SafeUTM an error "At least 8 GB of RAM is required" appears on the screen, and you specified the recommended amount of RAM, then reduce the size of the resources allocated for video memory to the minimum.
Microsoft Hyper-V
Only the 2nd generation VMs for Windows Server 2012 R2 or higher are supported. It is necessary to turn off Secure Boot.
Always use a regular virtual network adapter.
VMware ESXi
Before SafeUTM installation it is necessary to increase video memory for the virtual machine to 16 Mb (the default is 4 Mb).
Vmxnet3 virtual network adapters are recommended for use.
Citrix XenServer
In case XenServer cannot be downloaded from an ISO file, follow these steps:
- Run command
xe vm-list. This command will show the list of virtual machines on XenServer. - Select a virtual machine with UTM and memorize its UUID.
- Run command
xe vm-param-set uuid=<UUID> HVM-boot-policy=BIOS\ order HVM-boot-params:order=dc
These steps should start the installation from the installation medium.
KVM
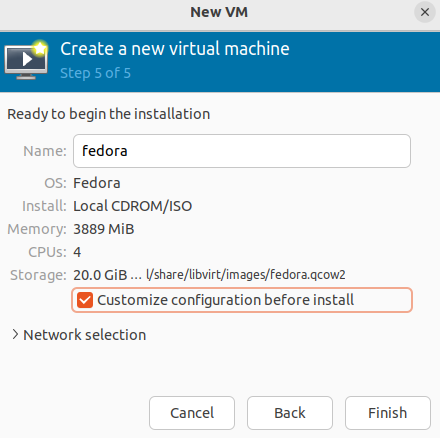
- When installing SafeUTM choose Fedora as the type of operating system.
- At Step 5 (virtm-manager) of installation make sure to tick Customize configuration before installation and click Finish.
- For disks and NICs select/change the network interface to virtio.
- For disks use writeback cache mode if disks are stored in qcow2 or raw files. If it is not the case, please consult your storage admin or our technical support about the cache mode selection.
- In the window, select Overview in the Firmware field and select UEFI x86_64:/usr/share/OVMF/OVMF_CODE.fd. This selection will turn on UEFI and turn off Secure Boot.
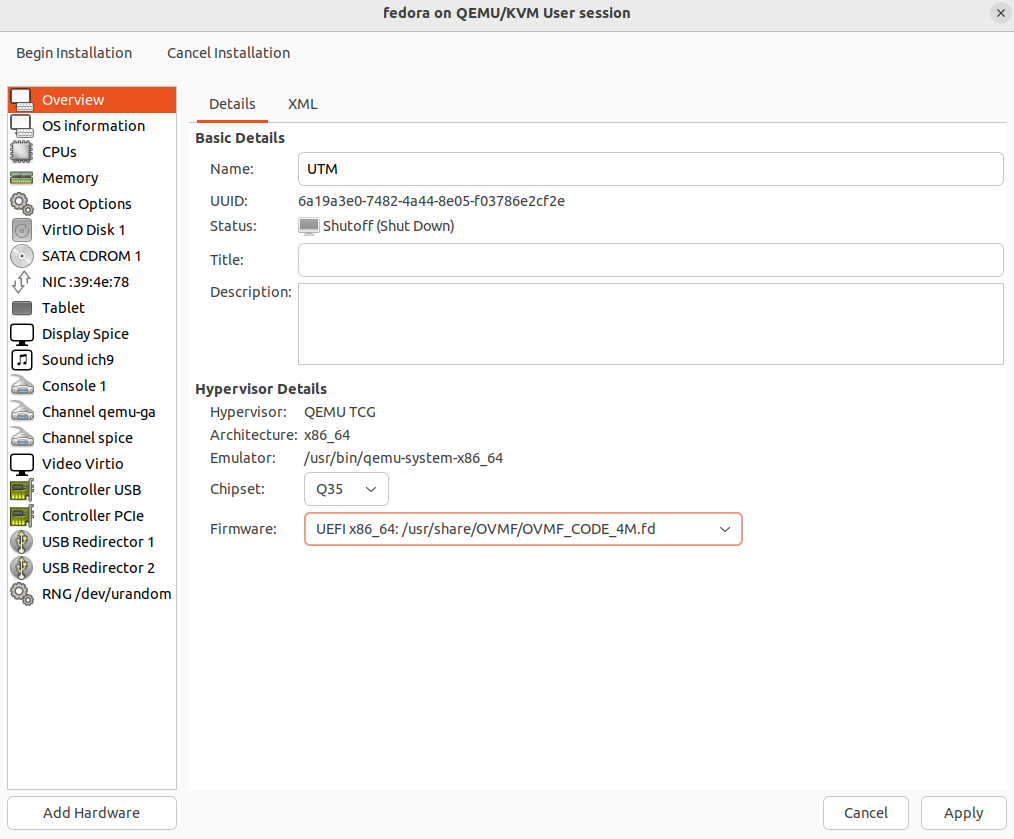


If there is no UEFI x86_64:/usr/share/OVMF/OVMF_CODE.fd on the list, you need to install ovmf package. In Ubuntu, this package is installed with the command sudo apt install ovmf.