Central Console
Central Console
Helps to centrally manage UTM servers.
Safe Center is a central console that will help you administer multiple SafeUTM servers at once. Currently does not require licensing and has no restrictions on use. Automatically propagates security policies to all connected SafeUTMs, even if they were connected after the policies were configured.
Opportunities of Safe Center:
- Creation of security policy rules (firewall, content filter, etc.) and objects that are transferred to connected SafeUTM servers at the same time;
- The transition from Safe Center to the web interface of connected SafeUTMs;
- Management of administrator access rights. However, Safe Center administrators have access to connected UTMs, but connected UTM administrators do not have access to Safe Center.
Learn more about how security policies and objects work in the Policies and Objects articles.
Technical requirements for servers and virtual machines:
- RAM - 8 GB;
- UEFI;
- Disk space - 64 GB;
- Two processor cores;
- One network card;
- Supported hypervisors: KVM, ESXi, hyper-v
You can request the installation file from your Manager or Tech Support. The Safe Center installation process is similar to the SafeUTM installation process.
Connecting Safe UTM to Safe Center
If a cluster is used in the connected SafeUTM, it is enough to connect only the active node, the passive one will automatically accept this setting.
The network connection is made in the direction from SafeUTM to Safe Center, i.e. communication is also possible when SafeUTM is behind NAT.
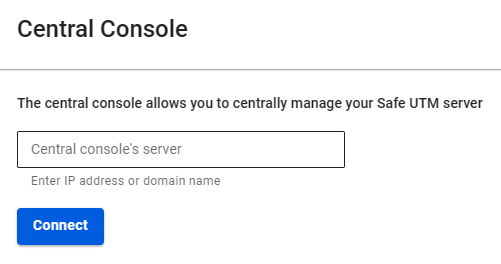
To connect SafeUTM to Safe Center:
- Go to Server Management -> Central Console;
- Enter the IP address or domain name in the Server field and click Connect:
If the Safe Center IP address is listed instead of the domain name, upload the Safe Center root certificate to SafeUTM:
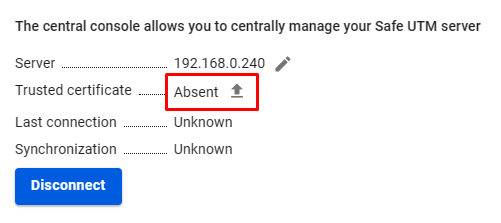
You can download the root certificate in the Safe Center, section Services -> TLS Certificates.
- In the Safe Center interface, go to the Servers section and confirm the connection.

If the Safe Center server is behind NAT, enter the IP address or domain name in Server Management -> Additional settings -> Central Console's Address.
Removing the SafeUTM server from the Safe Center will break the binding in the SafeUTM interface:

Switching from the Safe Center web interface to the SafeUTM web interface
Safe Center provides two ways to switch to SafeUTM:
- Go to the Servers section and click on the eye icon:

The SafeUTM web interface will open in a new tab.
- Click on the dropdown icon in the upper left corner and select the desired UTM:
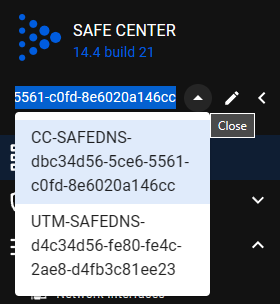
The SafeUTM web interface will open inside Safe Center window.
Policies
The principles of operation of the sections Firewall, Application Control, Content Filter, and Traffic Shaping with connected UTM are identical. Consider it using the Firewall section as an example.
Firewall
The Safe Center firewall contains only FORWARD and INPUT tables.
An example of adding rules in Safe Center: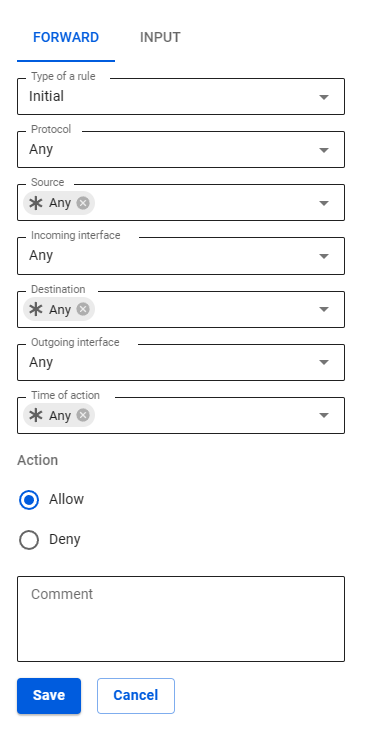
In Safe Center
The Forward rules created in Safe Center are displayed in two tables: Initial and Final. These tables are divided by Local Rules on SafeUTM servers.
An example of an empty table:
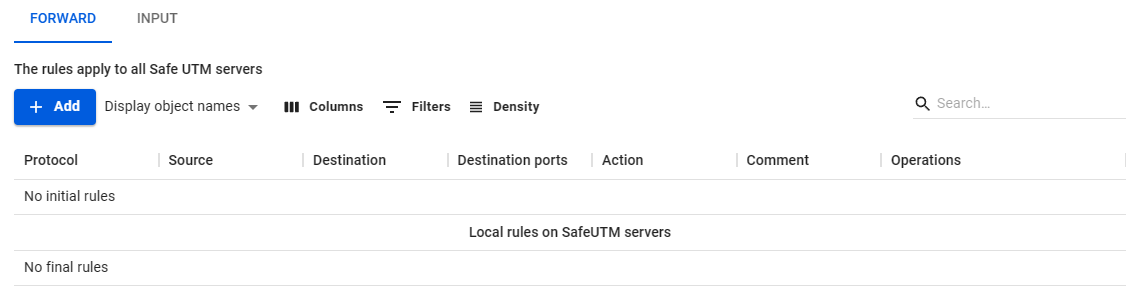
An example of a completed table:

Local rules on SafeUTM servers are not visible in the Safe Center interface. To view, go to the Servers section, click on the eye icon in the line with the required SafeUTM, and go to the Firewall section.
In order for the created rule to be included in the Initial rules table, specify the Initial value in the Rule type line. If you want to place the rule in the Final rules table, select the Final value.
You cannot move rules between the Initial rules and Final rules tables.
In SafeUTM
The table in SafeUTM is visually divided into three parts: top, middle, and bottom.
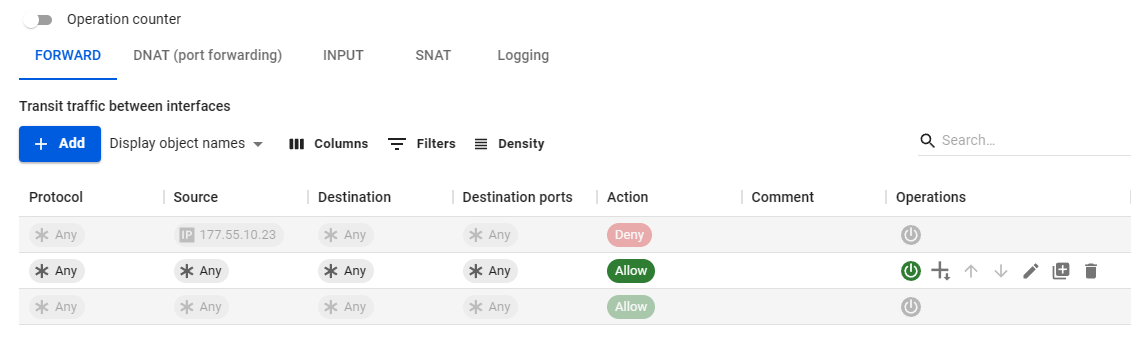
The rules from the connected Safe Center are transferred to the upper and lower parts. These rules cannot be managed in SafeUTM. The top part corresponds to the Initial rules table in the Safe Center. The lower part - the table Final rules.
The middle part is created by the UTM administrator in UTM itself and is not visible in the Safe Center interface.
Objects
Objects created in Safe Center are migrated to connected SafeUTMs. The SafeUTM administrator can use these objects to create rules.
When an object is deleted from Safe Center, the object is also deleted from SafeUTM. If a rule with a deleted object was created in SafeUTM, then this object will be marked with the Deleted icon.
The principle of creating and deleting objects in the Safe Center is consistent with the principles of SafeUTM. Detailed description in the article Objects.
Services
Network interfaces
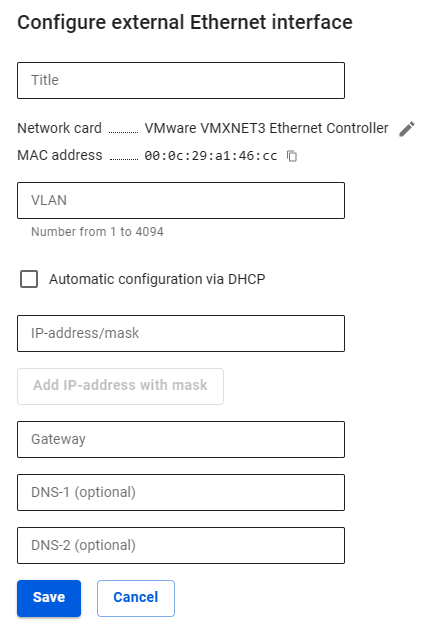
Unlike SafeUTM, only a local Ethernet interface is created in Safe Center. To do this, click Add, select a network card, and fill in the required fields:
- Interface name - Name to identify the interface;
- Network card - Network adapter that will be used to connect to the Internet provider;
- VLAN tag - VLAN ID. Such a network interface is considered a VLAN interface. Filled in if the network card is already in use;
- Automatic configuration via DHCP - Use if your ISP supports automatic configuration of the Ethernet interface via DHCP;
- IP Address/Mask - Assign multiple IP addresses to an interface if required. At least one IP address is required;
- Gateway - IP address of the gateway;
- DNS - Two fields are available to specify the DNS server (optional).
Routing
Routing works similarly to SafeUTM routing. Detailed description at the link.
DNS
The principle of operation of DNS in Safe Center is similar to the principle of operation of External DNS servers in SafeUTM. If the upstream router intercepts Safe Center DNS queries, then add external DNS servers.
Server Management
In the central console (Safe Center), the sections Automatic Update, Backup, and Terminal are similar to these sections in SafeUTM.
Administrators
In Safe Center, you can create several administrators with different roles:
- Administrator - an administrator with this role has access to all Safe Center functionality (more about features);
- Read-only - an administrator with this role cannot manage rules in Safe Center (create, change priority, etc.). But can switch to connected SafeUTMs and manage them.
All administrators (both Administrator and Read-Only) can delete connected SafeUTM from Safe Center.
There are two ways to connect to the SafeUTM web interface from the Safe Center located in the Safe Center:
- From the Servers section (by clicking on the eye icon);
- By clicking on the arrow in the upper left corner, and selecting the desired UTM:
It is not possible to log in to the connected SafeUTM with the Safe Center administrator login and password.
Additional Settings
The following settings are available in the section:
- Central console's address - the field is filled in if the Safe Center server is behind NAT;
- Time zone settings - changes take effect only after restarting the Safe Center;
- Language settings - changes take effect only after restarting Safe Center.