Branches and Head Office
This type of connection allows you to combine the LANs of several SafeUTM servers.
Features of IPsec technology implementation in SafeUTM assume two roles of using SafeUTM:
- Head office – SafeUTM must have a public address on the Internet and accept connections from other SafeUTM (Branches), network equipment, or workstations (Remote Users).
- Branch office – SafeUTM connects to the Head Office and, as a rule, does not have a public address on the Internet. But if the Branch has a public address, then any other device can also be connected to it.
Setting up Connection Between Branch and Head Office
Head offices and Branches are added on the tabs with the same names in the section Services -> IPsec.
- Before creating a connection between the Branch and the Head Office, make sure that the time zone is correctly configured on each of the connected parties. It is impossible to establish a connection without this.
- Before configuring IPsec, it should be taken into account that for it to work, no IP subnets involved in connections, including the networks of the Head Office and all Branches, should overlap and, moreover, coincide.
- Networks of local interfaces of the Head offices and Branches to which you want to give access, must be set statically.
- Before setting up the connection, you need to make sure that one of the servers has a public (white) IP address from the Internet provider. If it turns out that the Head Office does not have a public IP address, and the Branch has such an address, then the server roles for this connection should be reversed.
- When replacing/reissuing the root certificate in the TLS Certificates section, IPsec connections Head Office <-> Branch will stop working and they will need to be recreated.
Step 1. Creating a connection in a Branch
In order to create a connection on SafeUTM, which will act as a Branch, it is necessary to perform the following settings in the web interface of this UTM:
1. Open the section Services -> IPsec -> Branch office and click Add in the upper left corner of the screen.
2. Fill in the following fields:
- Head office name – maximum 42 characters.
- Head office's external address – the domain name or external IP address of the head office issued by the provider. If necessary, you can enter the Head office's additional address.
- Branch office LANs – the IP address of the Branch's subnet that will be available to users in the Head Office, in the IP address/mask format.

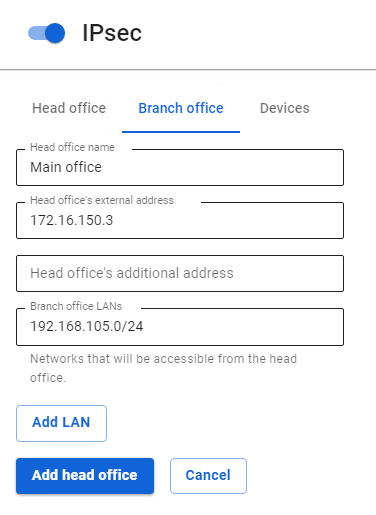
3. After filling in the fields, click Add head Office.
4. Click on the edit icon next to the added Head Office.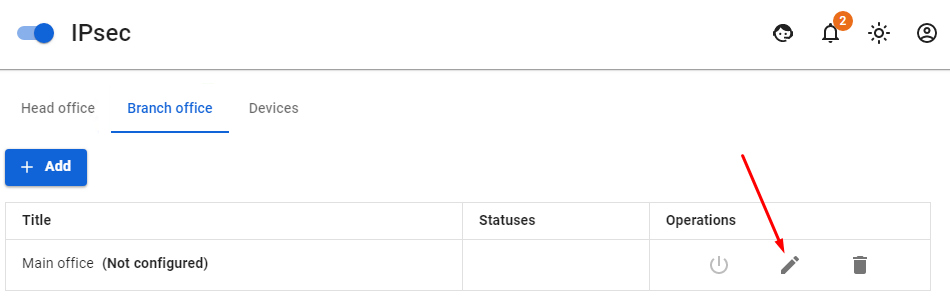
5. Copy the contents of the Branch office settings field. The contents need to be pasted when setting up the Head Office to which the connection is being made (see step 2).
Step 2. Creating a connection in the Head Office
In order to create a connection on SafeUTM which will act as the Head Office it is necessary to perform the following settings in the web interface of this UTM:
1. Open the section Services -> IPsec -> Head Office and click Add.
2. Fill in the following fields:
- Branch office name – maximum 42 characters.
- Branch office settings – paste the settings that you copied from the Branch after completing step 1.

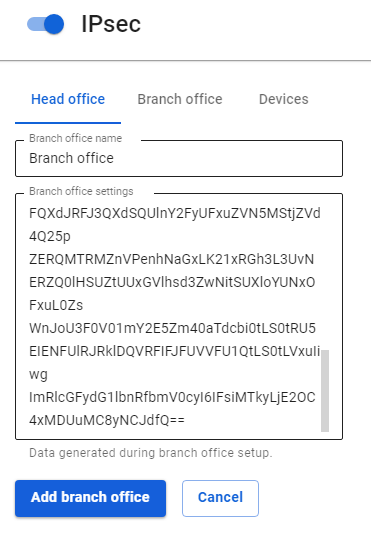
3. Click Add branch office.
4. Click the edit icon next to the added Branch.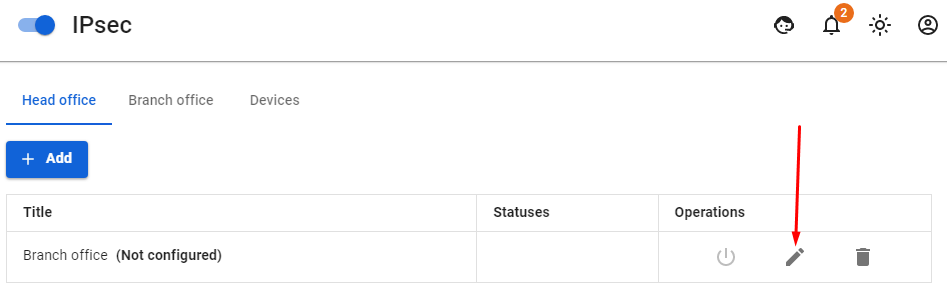
5. Select the LANs of the Head Office and click Save.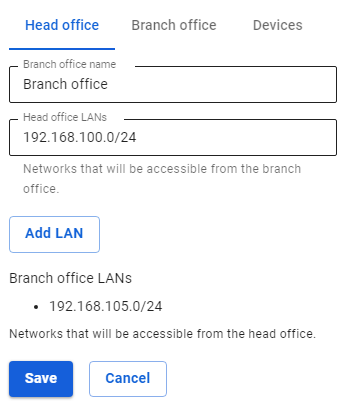
6. Go back to editing the added Branch and copy the contents of the Head office settings field. The contents need to be added to the Branch settings (see step 3).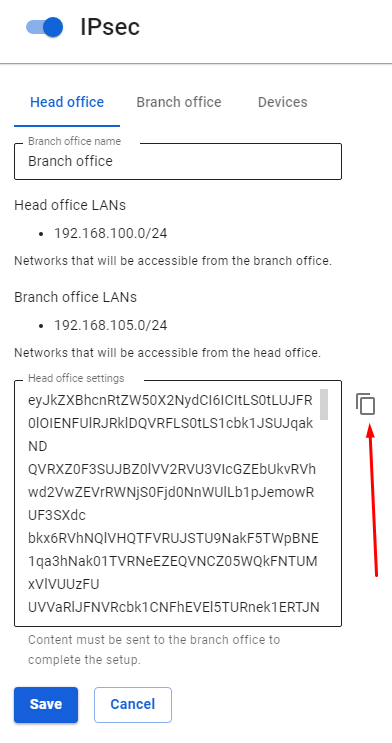
Step 3. Final setup of the Branch
In order to complete the creation of a connection on SafeUTM which will act as a Branch it is necessary to perform the following settings in the web interface of this UTM:
1. Open section Services -> IPsec -> Branch office.
2. Select the desired head office and click Edit.
3. Insert into the Head Office Settings field the settings text received from the Head Office during step 2.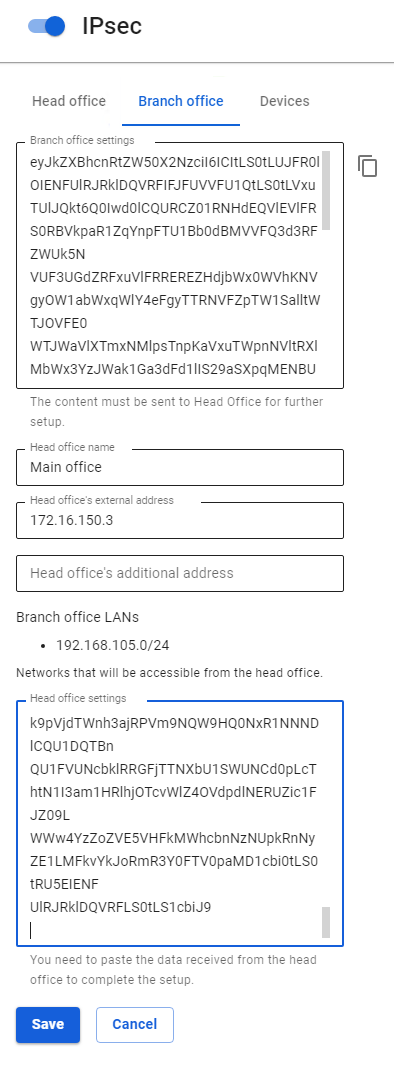
4. Click Save.
5. Open section Services -> IPsec -> Branch office on UTM acting as a Branch and section Services -> IPsec -> Head Office on UTM acting as the Head Office and make sure that the connection to the Head Office is established. The confirmation Established should appear in a green frame.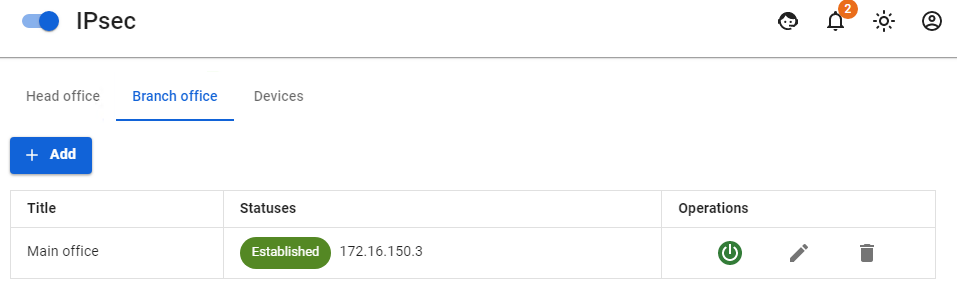
Routing of additional networks located behind the router in the local UTM network through an IPsec tunnel.
In order to configure the routing of networks located behind the router in the local UTM network, it is necessary to create a route to an additional network via the router's IP on SafeUTM (UTM, router and target host will be on the same network).
- If SafeUTM is behind NAT, then in order to work with IPsec you need to forward ports 500 and 4500 UDP.
- When installing an IPsec tunnel between SafeUTM servers (Branch and Head Office), 256-bit AES encryption is always used, as it is common and very reliable.