Incoming Connection of Cisco IOS to SafeUTM via IPsec
Following the steps in this article, you can combine Cisco and SafeUTM networks via IPsec using PSK.
Find below the connection setup according to the scheme shown in the figure: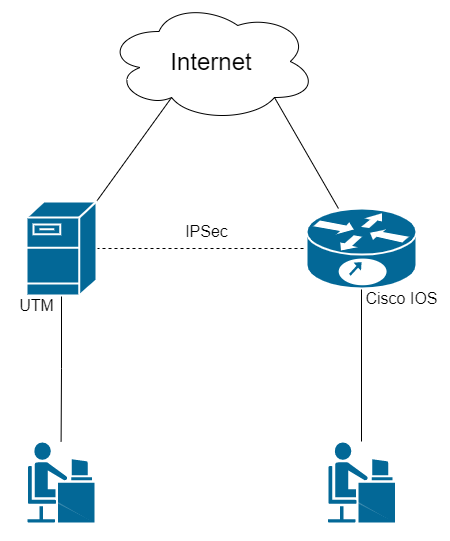
Step 1. Initial Setup of SafeUTM
Configure the local and external interfaces on SafeUTM. Detailed information can be found in the article Initial setup.
Step 2. Initial setup of Cisco IOS EX
Cisco configuration can be done through the device console (the configuration is described below)
1. Setting up the local interface:
enable
conf t
interface GigabitEthernet2
ip address {local IP Cisco} {subnet mask}
no shutdown
ip nat inside
exit
2. Configuring the external interface:
interface GigabitEthernet1
ip address {Cisco external IP} {subnet mask}
no shutdown
ip nat outside
exit
3. Check if there is a connection between the external interfaces of SafeUTM and Cisco. To do this, use the ping {external IP UTM} command in the Cisco console. The result of the command output is the presence of ICMP responses.
4. Creating an access list with local network addressing:
ip access-list extended NAT
permit ip {Cisco local subnet} {reverse subnet mask} any
exit
5. Configuring NAT (for more information on configuring this item, you can read the article on the official Cisco website):
ip nat inside source list NAT interface GigabitEthernet1 overload
exit
6. Saving configuration settings:
write memory7. Having saved the settings, make sure that there is Internet access from the Cisco LAN. To do this, visit any website (for example: https://www.cisco.com) from a device on the Cisco LAN.
Step 3. Configuring IKEv2+IPsec on Cisco
1. Creating a proposal (you can read detailed information on setting up this item in the article on the official Cisco website):
conf t
crypto ikev2 proposal ikev2proposal
encryption aes-cbc-256
integrity sha256
group 19
exit
2. Creating a policy (you can read detailed information on setting up this item in the article on the official Cisco website):
crypto ikev2 policy ikev2policy
match fvrf any
proposal ikev2proposal
exit
3. Creating a peer (key_id is the ID of the remote party, i.e. SafeUTM). Detailed information on setting up this item can be found in the article on the official Cisco website.
crypto ikev2 keyring key
peer strongswan
address {UTM external IP}
identity key-id {key_id}
pre-shared-key local {psk}
pre-shared-key remote {psk}
exit
exit
4. Creating an IKEv2 profile (you can read detailed information on configuring this item in the article on the official Cisco website):
crypto ikev2 profile ikev2profile
match identity remote address {UTM external IP} 255.255.255.255
authentication remote pre-share
authentication local pre-share
keyring local key
exit
5. Setting up encryption in esp:
crypto ipsec transform-set TS esp-gcm 256
mode tunnel
exit
6. Creating ipsec-isakmp:
crypto map cmap 10 ipsec-isakmp
set peer {UTM external IP}
set transform-set TS
set ikev2-profile ikev2profile
match address cryptoacl
exit
7. Configuring the crypto map on the external interface:
interface GigabitEthernet1
crypto map cmap
exit
8. Creating an access list for traffic between Cisco and UTM local networks:
ip access-list extended cryptoacl
permit ip {Cisco local subnet} {reverse subnet mask} {UTM local subnet} {reverse subnet mask}
exit
9. Adding traffic exceptions between Cisco and UTM local networks to the NAT access list (the deny rule should be higher than permit):
ip access-list extended NAT
no permit ip {Cisco local subnet} {reverse subnet mask} any
deny ip {Cisco local subnet} {reverse subnet mask} {local UTM subnet} {reverse subnet mask}
permit ip {Cisco local subnet} {reverse subnet mask} any
exit
end
10. Saving configuration settings:
write memoryStep 4. Creating an incoming IPsec connection on UTM
1. In the SafeUTM web interface, open tab Services -> IPsec -> Devices.
2. Add a new connection:
- Connection name – any.
- Type – incoming.
- Authorization type – PSK.
- PSK – specify the PSK key that you entered in Step 3 item 3.
- Remote side identifier – insert the Cisco ID (Key ID parameter in Step 3 item 3).
- Home local network – specify the SafeUTM local area network.
- Remote local networks – specify the Cisco local network.
3. Save the created connection, then click on Turn on
4. Check that the connection is established (your connection will appear in the list of connections, in column Statuses the word Installed will be highlighted in green).
5. Check for traffic between local networks (TCP and web).
The final configuration of Cisco IOS
The final configuration of IKEv2 IPsec on Cisco IOS should look like this:
crypto ikev2 proposal ikev2proposal
 encryption aes-cbc-256
 integrity sha256
 group 19

crypto ikev2 policy ikev2policy
 match fvrf any
 proposal ikev2proposal

crypto ikev2 keyring key
 peer strongswan
  address 5.5.5.5
  pre-shared-key local QWEqwe1234567890
  pre-shared-key remote QWEqwe1234567890

crypto ikev2 profile ikev2profile
 match identity remote key-id key-id
 authentication remote pre-share
 authentication local pre-share
 keyring local key

crypto ipsec transform-set TS esp-gcm 256
 mode tunnel

crypto map cmap 10 ipsec-isakmp
 set peer 5.5.5.5
 set transform-set TS
 set ikev2-profile ikev2profile
 match address cryptoacl

interface GigabitEthernet1
! external interface
 ip address 1.1.1.1 255.255.255.0
 ip nat outside
 negotiation auto
 no mop enabled
 no mop sysid
 crypto map cmap

interface GigabitEthernet2
! local interface
 ip address 2.2.2.2 255.255.255.0
 ip nat inside
 negotiation auto
 no mop enabled
 no mop sysid

ip nat inside source list NAT interface GigabitEthernet1 overload

ip access-list extended NAT
 deny   ip 2.2.2.0 0.0.0.255 3.3.3.0 0.0.0.255
 permit ip 2.2.2.0 0.0.0.255 any
ip access-list extended cryptoacl
 permit ip 2.2.2.0 0.0.0.255 3.3.3.0 0.0.0.255